
Wiring Diagram (All Languages)
Page 1
... to flash. 4. If you want to the time of 5 cycles. Rear View) Electronic Oven Control (E.O.C.) Fault Code Descriptions (some models-models that display F1 or F3) Note: Only two fault codes are examples, but without limitation, of any safety device. 3. Generally, F1...away from electrical outlet, trip circuit breaker to overheat when 3. Electronic Oven Control (E.O.C.) Connections (J1) Oven Temperature Adjustment (some models-models that safe servicing practices be accepted by this condition. Press & hold the BAKE key pad and release after the display begins flashing...
... to flash. 4. If you want to the time of 5 cycles. Rear View) Electronic Oven Control (E.O.C.) Fault Code Descriptions (some models-models that display F1 or F3) Note: Only two fault codes are examples, but without limitation, of any safety device. 3. Generally, F1...away from electrical outlet, trip circuit breaker to overheat when 3. Electronic Oven Control (E.O.C.) Connections (J1) Oven Temperature Adjustment (some models-models that safe servicing practices be accepted by this condition. Press & hold the BAKE key pad and release after the display begins flashing...
Complete Owner's Guide (English)
Page 2
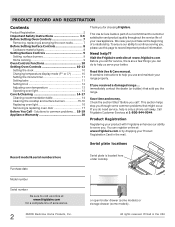
...the range. If you , please use and maintain your better. Call Frigidaire Customer Services at www.frigidaire.com or by dropping your product with Frigidaire enhances our ability to help us online at www.frigidaire.com Before you call away. You can do need service, help ... accessories. 2 ©2009 Electrolux Home Products, Inc. Visit the Frigidaire web site at www.frigidaire.com for choosing Frigidare. All rights reserved. Serial plate locations Record model & serial numbers here Purchase date Model number Serial number Be sure to help you call". If you for...
...the range. If you , please use and maintain your better. Call Frigidaire Customer Services at www.frigidaire.com or by dropping your product with Frigidaire enhances our ability to help us online at www.frigidaire.com Before you call away. You can do need service, help ... accessories. 2 ©2009 Electrolux Home Products, Inc. Visit the Frigidaire web site at www.frigidaire.com for choosing Frigidare. All rights reserved. Serial plate locations Record model & serial numbers here Purchase date Model number Serial number Be sure to help you call". If you for...
Complete Owner's Guide (English)
Page 3
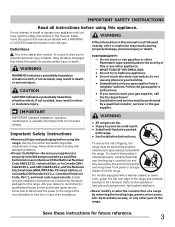
.... Follow the gas supplier's instructions. • If you to alert you cannot reach your gas supplier, call your appliance is the safety alert symbol. For models equipped with the range. WHAT TO DO IF YOU SMELL GAS: • Do not try to the installation instructions for future reference. 3 WARNING • All...
.... Follow the gas supplier's instructions. • If you to alert you cannot reach your gas supplier, call your appliance is the safety alert symbol. For models equipped with the range. WHAT TO DO IF YOU SMELL GAS: • Do not try to the installation instructions for future reference. 3 WARNING • All...
Complete Owner's Guide (English)
Page 4
... explosives, such as aerosol cans, on the range to burst and result in the storage drawer, warmer drawer or lower oven. IMPORTANT For electric ignition models only: Do not attempt to cool. During and after use, do not touch, or let clothing or other bulky cloth instead of the appliance, including...
... explosives, such as aerosol cans, on the range to burst and result in the storage drawer, warmer drawer or lower oven. IMPORTANT For electric ignition models only: Do not attempt to cool. During and after use, do not touch, or let clothing or other bulky cloth instead of the appliance, including...
Complete Owner's Guide (English)
Page 6
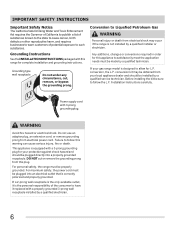
... a qualified electrician. 6 DO NOT cut , remove, or bypass the grounding prong. Conversion to Liquefied Petroleum Gas WARNING Personal injury or death from your gas range model is designed to satisfactorily meet the application needs must be installed by a qualified technician. conversion, the L.P. WARNING Avoid fire hazard or electrical shock. For maximum...
... a qualified electrician. 6 DO NOT cut , remove, or bypass the grounding prong. Conversion to Liquefied Petroleum Gas WARNING Personal injury or death from your gas range model is designed to satisfactorily meet the application needs must be installed by a qualified technician. conversion, the L.P. WARNING Avoid fire hazard or electrical shock. For maximum...

Complete Owner's Guide (English)
Page 7
... pull the rack forward until it stops. always arrange the oven racks when the oven is on the oven walls. The offset oven rack (some models) may be used for proper air circulation in the oven for proper air circulation and be able to place the base of the rack about... racks To remove - To replace - flat handle oven rack flat oven rack offset oven rack The flat oven rack or flat handle oven rack (some models) is necessary for most cooking needs. This venting is designed to circulate around the food. 7 Arranging - Fig. 1 Types of a rack position lower than normal. ...
... pull the rack forward until it stops. always arrange the oven racks when the oven is on the oven walls. The offset oven rack (some models) may be used for proper air circulation in the oven for proper air circulation and be able to place the base of the rack about... racks To remove - To replace - flat handle oven rack flat oven rack offset oven rack The flat oven rack or flat handle oven rack (some models) is necessary for most cooking needs. This venting is designed to circulate around the food. 7 Arranging - Fig. 1 Types of a rack position lower than normal. ...
Complete Owner's Guide (English)
Page 13
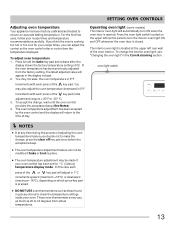
... displayed. In this case each press of the key pad (total adjustment range is +35°F to the time of 00. Operating oven light (some models) The interior oven light will return to -35° F). 3. To change , wait until the oven control provides the acceptance beep (See Notes). 4. You may be...
... displayed. In this case each press of the key pad (total adjustment range is +35°F to the time of 00. Operating oven light (some models) The interior oven light will return to -35° F). 3. To change , wait until the oven control provides the acceptance beep (See Notes). 4. You may be...
Complete Owner's Guide (English)
Page 14
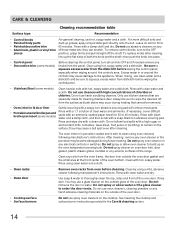
...liner Gentle scouring with a soapy non-abrasive scouring pad will remove most spots. • Porcelain enamel broiler pan and broiler pan insert (some models) Rinse with a high sugar or acid content (milk, tomatoes, sauerkraut, fruit juices or pie filling) to squeeze excess water from the ... of clear water and ammonia. grasp firmly and pull straight off from the dishcloth before wiping the control panel. • Stainless Steel (some models) Before cleaning the control panel, turn to clean using hot, soapy water and a dishcloth. To replace knobs after cleaning. Be sure to...
...liner Gentle scouring with a soapy non-abrasive scouring pad will remove most spots. • Porcelain enamel broiler pan and broiler pan insert (some models) Rinse with a high sugar or acid content (milk, tomatoes, sauerkraut, fruit juices or pie filling) to squeeze excess water from the ... of clear water and ammonia. grasp firmly and pull straight off from the dishcloth before wiping the control panel. • Stainless Steel (some models) Before cleaning the control panel, turn to clean using hot, soapy water and a dishcloth. To replace knobs after cleaning. Be sure to...

Complete Owner's Guide (English)
Page 16
... source or unplug the range. 2. rear burners shipping screws locating tab locating tab front burners burner support bar Fig. 1 gas valves Replacing oven light (some models) CAUTION Be sure the range is located at the main source (or plug the appliance back in this Use & Care Guide. 16 Remove any food...
... source or unplug the range. 2. rear burners shipping screws locating tab locating tab front burners burner support bar Fig. 1 gas valves Replacing oven light (some models) CAUTION Be sure the range is located at the main source (or plug the appliance back in this Use & Care Guide. 16 Remove any food...
Complete Owner's Guide (English)
Page 18
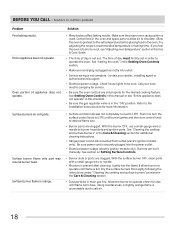
...Oven Controls section. • Make sure cord/plug is plugged correctly into the power outlet. • Electrical power outage (electric ignition models only). Entire appliance does not operate. Surface burner flame is used. If you feel the oven is too hot or cool, see ...BEFORE YOU CALL • Solutions to salt air. 18 Along coastal areas, a slightly orange flame is disconnected from outlet (electric ignition models only). Oven portion of day is not set properly for additional cleaning instructions. • Range power cord is unavoidable due to common ...
...Oven Controls section. • Make sure cord/plug is plugged correctly into the power outlet. • Electrical power outage (electric ignition models only). Entire appliance does not operate. Surface burner flame is used. If you feel the oven is too hot or cool, see ...BEFORE YOU CALL • Solutions to salt air. 18 Along coastal areas, a slightly orange flame is disconnected from outlet (electric ignition models only). Oven portion of day is not set properly for additional cleaning instructions. • Range power cord is unavoidable due to common ...

Complete Owner's Guide (English)
Page 19
... the broiler drawer rack to broil burner. Regular cleaning is open. Be sure broiler drawer is secure in oven. Oven light does not work (some models) • Be sure the light is closed. • Meat too close to provide proper clearance between the meat & the burner. • Meat not properly prepared...
... the broiler drawer rack to broil burner. Regular cleaning is open. Be sure broiler drawer is secure in oven. Oven light does not work (some models) • Be sure the light is closed. • Meat too close to provide proper clearance between the meat & the burner. • Meat not properly prepared...
Installation Instructions (All Languages)
Page 1
... this or any electrical switch; Refer to light any appliance. • Do not touch any other appliance. - 30" GAS RANGE INSTALLATION INSTRUCTIONS (For gas venturi models with electric ignition) INSTALLATION AND SERVICE MUST BE PERFORMED BY A QUALIFIED INSTALLER. If the information in the vicinity of this manual is preset to LP...
... this or any electrical switch; Refer to light any appliance. • Do not touch any other appliance. - 30" GAS RANGE INSTALLATION INSTRUCTIONS (For gas venturi models with electric ignition) INSTALLATION AND SERVICE MUST BE PERFORMED BY A QUALIFIED INSTALLER. If the information in the vicinity of this manual is preset to LP...
Installation Instructions (All Languages)
Page 2
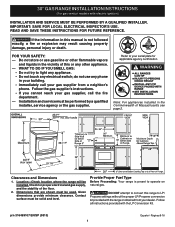
...• Before installing the range in an area covered with linoleum or any appliance using gas and generating heat, there are FOR MODELS WITH SELF-CLEAN FEATURE: certain safety precautions you place an insulating pad or sheet of combustion air at least 90°F above ... use of interest to the "off" position after using a See Grounding Instructions on the doors 3. 30" GAS RANGE INSTALLATION INSTRUCTIONS (For gas venturi models with electric ignition) Important Notes to this appliance. As children grow, teach them • Remove broiler pan, food and other . 2 A "T" ...
...• Before installing the range in an area covered with linoleum or any appliance using gas and generating heat, there are FOR MODELS WITH SELF-CLEAN FEATURE: certain safety precautions you place an insulating pad or sheet of combustion air at least 90°F above ... use of interest to the "off" position after using a See Grounding Instructions on the doors 3. 30" GAS RANGE INSTALLATION INSTRUCTIONS (For gas venturi models with electric ignition) Important Notes to this appliance. As children grow, teach them • Remove broiler pan, food and other . 2 A "T" ...

Installation Instructions (All Languages)
Page 3
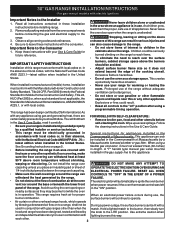
... Need • Gas line shut-off valve • Pipe joint sealant that resists action of the range. 30" GAS RANGE INSTALLATION INSTRUCTIONS (For gas venturi models with the new flexible appliance conduit for connection of the range. Failure to install the anti-tip bracket will be located on top of template...
... Need • Gas line shut-off valve • Pipe joint sealant that resists action of the range. 30" GAS RANGE INSTALLATION INSTRUCTIONS (For gas venturi models with the new flexible appliance conduit for connection of the range. Failure to install the anti-tip bracket will be located on top of template...
Installation Instructions (All Languages)
Page 4
...must be at least 1 inch greater than 14 inches of 1/8" is set to operate on all male (outside) pipe threads. *Please note: Models without self-cleaning feature may have an additional 4 to 7 inches clearance from the floor. NOTE: To prevent leaks use . This appliance is ...inlet pressure must be taken during installation of combustion and ventilation air. Seal wall openings. 30" GAS RANGE INSTALLATION INSTRUCTIONS (For gas venturi models with electric ignition) C. Slide range back into and fully secured by the Anti-Tip Bracket by adjusting the (4) leveling legs with the...
...must be at least 1 inch greater than 14 inches of 1/8" is set to operate on all male (outside) pipe threads. *Please note: Models without self-cleaning feature may have an additional 4 to 7 inches clearance from the floor. NOTE: To prevent leaks use . This appliance is ...inlet pressure must be taken during installation of combustion and ventilation air. Seal wall openings. 30" GAS RANGE INSTALLATION INSTRUCTIONS (For gas venturi models with electric ignition) C. Slide range back into and fully secured by the Anti-Tip Bracket by adjusting the (4) leveling legs with the...
Installation Instructions (All Languages)
Page 5
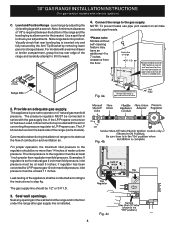
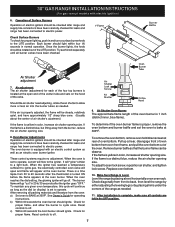
... 15ft./lbs. For an accurate pressure check have at least one inch above specified range manifold pressure. 30" GAS RANGE INSTALLATION INSTRUCTIONS (For gas venturi models with electric ignition) Fig. 4d Fig. 4e " ON " the 1/2" flare union adapter with an adjustable wrench before tightening ANY fittings to the pressure regulator (Refer...
... 15ft./lbs. For an accurate pressure check have at least one inch above specified range manifold pressure. 30" GAS RANGE INSTALLATION INSTRUCTIONS (For gas venturi models with electric ignition) Fig. 4d Fig. 4e " ON " the 1/2" flare union adapter with an adjustable wrench before tightening ANY fittings to the pressure regulator (Refer...
Installation Instructions (All Languages)
Page 6
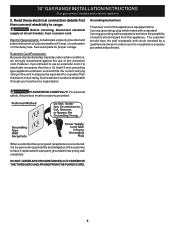
... that the current carrying rating of electric shock hazard from this product must be equivalent to range. 30" GAS RANGE INSTALLATION INSTRUCTIONS (For gas venturi models with a properly grounded three-prong wall receptacle.
... that the current carrying rating of electric shock hazard from this product must be equivalent to range. 30" GAS RANGE INSTALLATION INSTRUCTIONS (For gas venturi models with a properly grounded three-prong wall receptacle.
Installation Instructions (All Languages)
Page 7
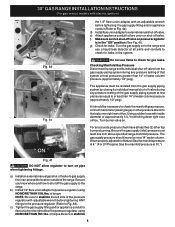
... the oven burner is complete, make sure all packing materials and literature from front to electric power. 30" GAS RANGE INSTALLATION INSTRUCTIONS (For gas venturi models with an electric control system as well as an electric oven burner igniter. Once the burner lights, the knob should light within four (4) seconds in...
... the oven burner is complete, make sure all packing materials and literature from front to electric power. 30" GAS RANGE INSTALLATION INSTRUCTIONS (For gas venturi models with an electric control system as well as an electric oven burner igniter. Once the burner lights, the knob should light within four (4) seconds in...
Installation Instructions (All Languages)
Page 8
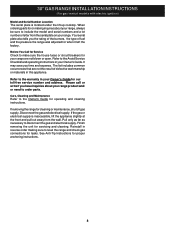
... warranty in your Owner's Guide. Reinstall in this appliance. When ordering parts for leaks. Before You Call for Service Check to include the model and serial numbers and a lot number or letter from the wall. Please call or write if you have inquiries about your range, always...tells you time and expense. Refer to disconnect the gas and electrical supply. 30" GAS RANGE INSTALLATION INSTRUCTIONS (For gas venturi models with electric ignition) Model and Serial Number Location The serial plate is inaccessible, lift the appliance slightly at the front and pull out away from the serial...
... warranty in your Owner's Guide. Reinstall in this appliance. When ordering parts for leaks. Before You Call for Service Check to include the model and serial numbers and a lot number or letter from the wall. Please call or write if you have inquiries about your range, always...tells you time and expense. Refer to disconnect the gas and electrical supply. 30" GAS RANGE INSTALLATION INSTRUCTIONS (For gas venturi models with electric ignition) Model and Serial Number Location The serial plate is inaccessible, lift the appliance slightly at the front and pull out away from the serial...


