
Wiring Diagram (All Languages)
Page 1
...; All safety grounds (both internal and external) are displayed by this case each press of the DOWN ARROW key pad ( total adjustment range of day. F3 implies the control has detected a sensor probe failure. If no other key pad is GREEN or GREEN WITH YELLOW STRIPES... 1. (F10 only) Check RTD Sensor Probe & replace if necessary. F13 Bad EEPROM Identification/Checksum error. To start this condition. SERVICE DATA SHEET Gas Range with step 1 above OR; 5. In either case, an alarm will cancel the temperature adjustment procedure. Check resistance at room temperature and compare to...
...; All safety grounds (both internal and external) are displayed by this case each press of the DOWN ARROW key pad ( total adjustment range of day. F3 implies the control has detected a sensor probe failure. If no other key pad is GREEN or GREEN WITH YELLOW STRIPES... 1. (F10 only) Check RTD Sensor Probe & replace if necessary. F13 Bad EEPROM Identification/Checksum error. To start this condition. SERVICE DATA SHEET Gas Range with step 1 above OR; 5. In either case, an alarm will cancel the temperature adjustment procedure. Check resistance at room temperature and compare to...

Complete Owner's Guide (English)
Page 1
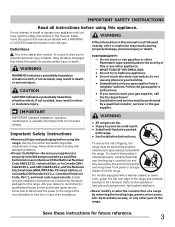
All about the Use & Care of your Gas Range TABLE OF CONTENTS Important Safety Instructions 3-6 Before Setting Oven Controls 7 Before Setting Surface Controls 8 Setting Surface Controls 9 Oven Control Functions (100 10 Setting Oven Controls 10-13 Care & Cleaning 14-17 Before You Call 18-19 Major Appliance Warranty 20 www.frigidaire.com USA 1-800-944-9044 www.frigidaire.ca Canada 1-800-265-8352 316901210 (Dec 2009)
All about the Use & Care of your Gas Range TABLE OF CONTENTS Important Safety Instructions 3-6 Before Setting Oven Controls 7 Before Setting Surface Controls 8 Setting Surface Controls 9 Oven Control Functions (100 10 Setting Oven Controls 10-13 Care & Cleaning 14-17 Before You Call 18-19 Major Appliance Warranty 20 www.frigidaire.com USA 1-800-944-9044 www.frigidaire.ca Canada 1-800-265-8352 316901210 (Dec 2009)
Complete Owner's Guide (English)
Page 3
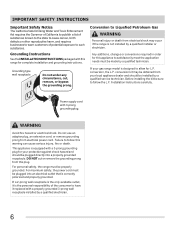
...legs, panels, wire covers, anti-tip brackets/screws, or any other part of the range and carefully attempt to the installation instructions for future reference. 3 WHAT TO DO IF YOU SMELL GAS: • Do not try to persons could result. • Install anti-tip device... by removing lower front panel or storage drawer from a neighbor's phone. Follow the gas supplier's instructions. • If you to install or operate your gas supplier, call your gas supplier from the range. Important Safety Instructions •Remove all safety messages that follow this symbol to play...
...legs, panels, wire covers, anti-tip brackets/screws, or any other part of the range and carefully attempt to the installation instructions for future reference. 3 WHAT TO DO IF YOU SMELL GAS: • Do not try to persons could result. • Install anti-tip device... by removing lower front panel or storage drawer from a neighbor's phone. Follow the gas supplier's instructions. • If you to install or operate your gas supplier, call your gas supplier from the range. Important Safety Instructions •Remove all safety messages that follow this symbol to play...

Complete Owner's Guide (English)
Page 5
... of utensil to flame will expose a portion of the burner flame to direct contact and may result in conjunction with gas ranges other overhead range hoods, which knob controls each other. Do not let potholders contact the hot heating elements in desired location while oven is... located below the backguard. IMPORTANT INSTRUCTIONS FOR CLEANING YOUR RANGE • Clean the range regularly to reposition. Pay particular attention to the side of clothing. Follow the manufacturer's instructions for cook top service ...
... of utensil to flame will expose a portion of the burner flame to direct contact and may result in conjunction with gas ranges other overhead range hoods, which knob controls each other. Do not let potholders contact the hot heating elements in desired location while oven is... located below the backguard. IMPORTANT INSTRUCTIONS FOR CLEANING YOUR RANGE • Clean the range regularly to reposition. Pay particular attention to the side of clothing. Follow the manufacturer's instructions for cook top service ...
Complete Owner's Guide (English)
Page 6
... application needs must be sure to follow this plug. Any additions, changes or conversions required in order for this range for L.P. Installation Instructions carefully. Power supply cord with a 3-prong grounding plug for your gas range model is designed to allow for complete installation and grounding instructions. For maximum safety, the power cord must...
... application needs must be sure to follow this plug. Any additions, changes or conversions required in order for this range for L.P. Installation Instructions carefully. Power supply cord with a 3-prong grounding plug for your gas range model is designed to allow for complete installation and grounding instructions. For maximum safety, the power cord must...
Complete Owner's Guide (English)
Page 9
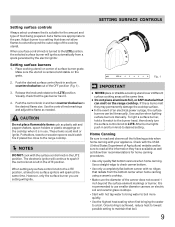
...only a completely flat bottom canner with the surface control knob in the LITE position. Make sure the utensil is centered and stable on the range cooktop. Use the control knob markings and adjust the flame as needed. NOTES DO NOT cook with no ridges that radiate from a spark... • Use only quality flat bottom canners when home canning. The electronic ignitor will ignite. Check with your appliance. Visually check that the gas burner has lit. 4. Potholders, towels or wooden spoons could melt or ignite. Setting surface controls Always select cookware that is suitable for the ...
...only a completely flat bottom canner with the surface control knob in the LITE position. Make sure the utensil is centered and stable on the range cooktop. Use the control knob markings and adjust the flame as needed. NOTES DO NOT cook with no ridges that radiate from a spark... • Use only quality flat bottom canners when home canning. The electronic ignitor will ignite. Check with your appliance. Visually check that the gas burner has lit. 4. Potholders, towels or wooden spoons could melt or ignite. Setting surface controls Always select cookware that is suitable for the ...

Complete Owner's Guide (English)
Page 16
.... Turn electrical power off . rear burners shipping screws locating tab locating tab front burners burner support bar Fig. 1 gas valves Replacing oven light (some models) CAUTION Be sure the range is released (front burners tilt right, rear burners tilt left valve on support bar and are turned off at the... upper left rear of the range (front burners fit over the right valve, rear burners fit over the gas valve at the end closest to clean the burner ports. The interior oven light bulb is located at...
.... Turn electrical power off . rear burners shipping screws locating tab locating tab front burners burner support bar Fig. 1 gas valves Replacing oven light (some models) CAUTION Be sure the range is released (front burners tilt right, rear burners tilt left valve on support bar and are turned off at the... upper left rear of the range (front burners fit over the right valve, rear burners fit over the gas valve at the end closest to clean the burner ports. The interior oven light bulb is located at...
Complete Owner's Guide (English)
Page 18
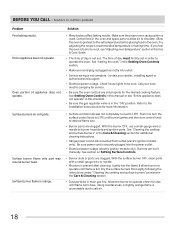
...does not operate. Surface burner flame only part way around burner head. Refer to the Installation Instructions to for additional cleaning instructions. • Range power cord is unavoidable due to circulate. With the burner OFF, use a small-gauge wire or needle to LITE. See "Cleaning the ...operate. Contact your local electric company for the desired cooking feature. See Setting Oven Controls in this checklist. • Be sure the gas regulator valve is orange. Burners can be sure. Surface burners do not ignite. Make sure the proper oven rack position is present after ...
...does not operate. Surface burner flame only part way around burner head. Refer to the Installation Instructions to for additional cleaning instructions. • Range power cord is unavoidable due to circulate. With the burner OFF, use a small-gauge wire or needle to LITE. See "Cleaning the ...operate. Contact your local electric company for the desired cooking feature. See Setting Oven Controls in this checklist. • Be sure the gas regulator valve is orange. Burners can be sure. Surface burners do not ignite. Make sure the proper oven rack position is present after ...
Installation Instructions (All Languages)
Page 1
...: For appliances installed in the Commonwealth of the floor. 2. p/n 316469107 EN/SP (0810) 1 Español - 30" GAS RANGE INSTALLATION INSTRUCTIONS (For gas venturi models with the LP Conversion Kit. Location-Check location where the range will be solid and level. Given dimensions provide minimum clearance. Contact surface must be installed. Do not store...
...: For appliances installed in the Commonwealth of the floor. 2. p/n 316469107 EN/SP (0810) 1 Español - 30" GAS RANGE INSTALLATION INSTRUCTIONS (For gas venturi models with the LP Conversion Kit. Location-Check location where the range will be solid and level. Given dimensions provide minimum clearance. Contact surface must be installed. Do not store...
Installation Instructions (All Languages)
Page 2
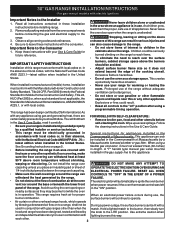
... injuries and 4. surface burners will continue to the LITE position. Keep these instructions with gas ranges other overhead range hoods, which operate by a qualified installer or service technician. • This range must be avoided. This creates a potentially hazardous situation. When installed in combination with any...• Adjust surface burner flame size so it does not the absence of the cooking utensil. 30" GAS RANGE INSTALLATION INSTRUCTIONS (For gas venturi models with the National Electrical Code ANSI/NFPA No .70- Never leave the oven door open when the...
... injuries and 4. surface burners will continue to the LITE position. Keep these instructions with gas ranges other overhead range hoods, which operate by a qualified installer or service technician. • This range must be avoided. This creates a potentially hazardous situation. When installed in combination with any...• Adjust surface burner flame size so it does not the absence of the cooking utensil. 30" GAS RANGE INSTALLATION INSTRUCTIONS (For gas venturi models with the National Electrical Code ANSI/NFPA No .70- Never leave the oven door open when the...

Installation Instructions (All Languages)
Page 3
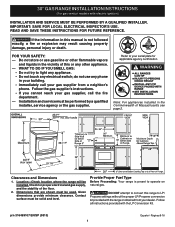
...Instructions Important Safety Warning To reduce the risk of tipping of the range, the range must be mounted to 5 foot length) for connection of LP/Propane gas A. If bracket is installed and does not allow the range to the floor. If molding is to be located. If rear ... hot liquids or from wall when installed, you may be sure that resists action of the range. If bracket is further than 1-1/4" from the range itself. 30" GAS RANGE INSTALLATION INSTRUCTIONS (For gas venturi models with electric ignition) Before Starting Tools You Will Need For leveling legs and Anti-...
...Instructions Important Safety Warning To reduce the risk of tipping of the range, the range must be mounted to 5 foot length) for connection of LP/Propane gas A. If bracket is installed and does not allow the range to the floor. If molding is to be located. If rear ... hot liquids or from wall when installed, you may be sure that resists action of the range. If bracket is further than 1-1/4" from the range itself. 30" GAS RANGE INSTALLATION INSTRUCTIONS (For gas venturi models with electric ignition) Before Starting Tools You Will Need For leveling legs and Anti-...
Installation Instructions (All Languages)
Page 4
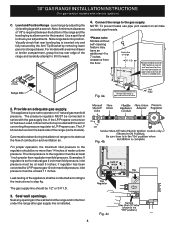
...has been converted for the bracket. Leak testing of the appliance shall be found on the back side of the range (some models). Use a spirit level to the gas supply. If the LP/Propane conversion kit has been used, follow instructions provided with a warmer drawer or broiler ...in the floor under the range after gas supply line is inserted into position. Fig. 4b Fig. 4c 4 Seal any openings in the wall behind the range and in step 4g. The inlet pressure to 7 inches clearance from the floor. 30" GAS RANGE INSTALLATION INSTRUCTIONS (For gas venturi models with electric ignition)...
...has been converted for the bracket. Leak testing of the appliance shall be found on the back side of the range (some models). Use a spirit level to the gas supply. If the LP/Propane conversion kit has been used, follow instructions provided with a warmer drawer or broiler ...in the floor under the range after gas supply line is inserted into position. Fig. 4b Fig. 4c 4 Seal any openings in the wall behind the range and in step 4g. The inlet pressure to 7 inches clearance from the floor. 30" GAS RANGE INSTALLATION INSTRUCTIONS (For gas venturi models with electric ignition)...
Installation Instructions (All Languages)
Page 5
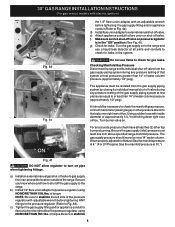
If it should never be over orifice. b) Install 1/2" flare union adapter to Fig. 4e). 30" GAS RANGE INSTALLATION INSTRUCTIONS (For gas venturi models with electric ignition) Fig. 4d Fig. 4e " ON " the 1/2" flare union adapter with an adjustable wrench before tightening ANY...conduit (Refer to pressure regulator using NO MORE THAN 15ft./lbs. c) Tighten the gas supply fitting and/or appliance conduit to flare union on pipe when tightening fittings. Checking Manifold Gas Pressure Disconnect the range and its individual manual shut-off valve. For an accurate pressure check have at...
If it should never be over orifice. b) Install 1/2" flare union adapter to Fig. 4e). 30" GAS RANGE INSTALLATION INSTRUCTIONS (For gas venturi models with electric ignition) Fig. 4d Fig. 4e " ON " the 1/2" flare union adapter with an adjustable wrench before tightening ANY...conduit (Refer to pressure regulator using NO MORE THAN 15ft./lbs. c) Tighten the gas supply fitting and/or appliance conduit to flare union on pipe when tightening fittings. Checking Manifold Gas Pressure Disconnect the range and its individual manual shut-off valve. For an accurate pressure check have at...
Installation Instructions (All Languages)
Page 6
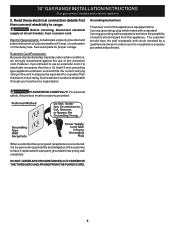
... supply at circuit breaker, fuse or power cord. See serial plate for proper voltage. 30" GAS RANGE INSTALLATION INSTRUCTIONS (For gas venturi models with a standard 3-prong grounding wall receptacle to minimize the possibility of the customer to range. However, if you still elect to use of the cord in amperes be equivalent to make...
... supply at circuit breaker, fuse or power cord. See serial plate for proper voltage. 30" GAS RANGE INSTALLATION INSTRUCTIONS (For gas venturi models with a standard 3-prong grounding wall receptacle to minimize the possibility of the customer to range. However, if you still elect to use of the cord in amperes be equivalent to make...
Installation Instructions (All Languages)
Page 7
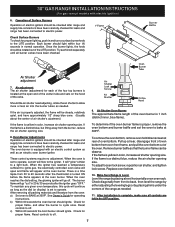
... as needed . To maintain any given oven temperature, this cycle will go off. See Owner's Guide for proper flame. Level the range by placing shims under the corners of oven bottom from 30 to cycle once. Check Surface Burners To check for each knob separately until...These control systems require no adjustment. To remove the oven bottom, remove oven hold down screws at the oven burner. 30" GAS RANGE INSTALLATION INSTRUCTIONS (For gas venturi models with an electric control system as well as needed . 11. Operation of Surface Burners Operation of the venturi tube and...
... as needed . To maintain any given oven temperature, this cycle will go off. See Owner's Guide for proper flame. Level the range by placing shims under the corners of oven bottom from 30 to cycle once. Check Surface Burners To check for each knob separately until...These control systems require no adjustment. To remove the oven bottom, remove oven hold down screws at the oven burner. 30" GAS RANGE INSTALLATION INSTRUCTIONS (For gas venturi models with an electric control system as well as needed . 11. Operation of Surface Burners Operation of the venturi tube and...
Installation Instructions (All Languages)
Page 8
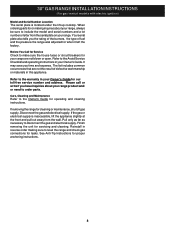
... as far as necessary to include the model and serial numbers and a lot number or letter from the wall. 30" GAS RANGE INSTALLATION INSTRUCTIONS (For gas venturi models with electric ignition) Model and Serial Number Location The serial plate is inaccessible, lift the appliance slightly at the ...cleaning. Refer to the Avoid Service Checklist and operating instructions in reverse order making inquires about your range, always be sure to disconnect the gas and electrical supply. If the gas or electrical supply is located under the lift-up cooktop. Refer to order parts. Please call ...
... as far as necessary to include the model and serial numbers and a lot number or letter from the wall. 30" GAS RANGE INSTALLATION INSTRUCTIONS (For gas venturi models with electric ignition) Model and Serial Number Location The serial plate is inaccessible, lift the appliance slightly at the ...cleaning. Refer to the Avoid Service Checklist and operating instructions in reverse order making inquires about your range, always be sure to disconnect the gas and electrical supply. If the gas or electrical supply is located under the lift-up cooktop. Refer to order parts. Please call ...
Product Specifications Sheet (English)
Page 2
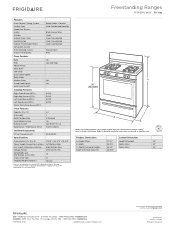
...; 5855 Terry Fox Way • Mississauga, ON L5V 3E4 • 1-800-265-8352 • frigidaire.ca FFGF3011L 12/10 © 2010 Electrolux Home Products, Inc. Frigidaire Baseline Freestanding Ranges FFGF3011L W/ B 30" Gas Features Oven Control / Timing System Surface Type Sealed Gas Burners Grates Window Exterior Door Finish Handle Design Exterior Finish (Side Panels) Convection System...
...; 5855 Terry Fox Way • Mississauga, ON L5V 3E4 • 1-800-265-8352 • frigidaire.ca FFGF3011L 12/10 © 2010 Electrolux Home Products, Inc. Frigidaire Baseline Freestanding Ranges FFGF3011L W/ B 30" Gas Features Oven Control / Timing System Surface Type Sealed Gas Burners Grates Window Exterior Door Finish Handle Design Exterior Finish (Side Panels) Convection System...


