
Installation Instructions
Page 1
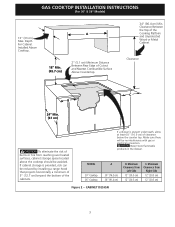
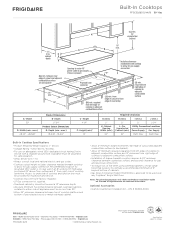
....8) CUTOUT DIMENSIONS F. BOX WIDTH 28 (71.1) 33 5/8 (85.4) G. Dimension H includes a 5" (12.7 cm) space underneath the cooktop for this cooktop are stated in the state of Massachusetts by a qualified installer, service agency or the gas supplier. NOTE: Wiring diagrams for connection... this appliance. 34" Min. * Gas Cooktop (86.4 cm) Dimensions A B C E D 3¼" H (8.3 cm) G F Gas Cooktop Cutout Dimensions Figure 1 MODEL 30" Gas Cooktop 36" Gas Cooktop MODEL 30" Gas Cooktop 36" Gas Cooktop PRODUCT DIMENSIONS A. GAS COOKTOP INSTALLATION INSTRUCTIONS (For 30" & 36" ...
....8) CUTOUT DIMENSIONS F. BOX WIDTH 28 (71.1) 33 5/8 (85.4) G. Dimension H includes a 5" (12.7 cm) space underneath the cooktop for this cooktop are stated in the state of Massachusetts by a qualified installer, service agency or the gas supplier. NOTE: Wiring diagrams for connection... this appliance. 34" Min. * Gas Cooktop (86.4 cm) Dimensions A B C E D 3¼" H (8.3 cm) G F Gas Cooktop Cutout Dimensions Figure 1 MODEL 30" Gas Cooktop 36" Gas Cooktop MODEL 30" Gas Cooktop 36" Gas Cooktop PRODUCT DIMENSIONS A. GAS COOKTOP INSTALLATION INSTRUCTIONS (For 30" & 36" ...
Installation Instructions
Page 2
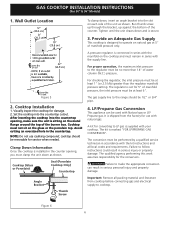
...before connecting the electrical supply to LITE. Important Note to leave these instructions with any other flammable vapors and liquids near this cooktop must conform with the Canadian Fuel Gas Code, CAN/CGA B149 and CAN/CGA B149.2. • When installed in these instructions ...with local codes where applicable. GAS COOKTOP INSTALLATION INSTRUCTIONS (For 30" & 36" Models) Important Notes to reach over the surface burners, cabinet storage space above see level, appliance ...
...before connecting the electrical supply to LITE. Important Note to leave these instructions with any other flammable vapors and liquids near this cooktop must conform with the Canadian Fuel Gas Code, CAN/CGA B149 and CAN/CGA B149.2. • When installed in these instructions ...with local codes where applicable. GAS COOKTOP INSTALLATION INSTRUCTIONS (For 30" & 36" Models) Important Notes to reach over the surface burners, cabinet storage space above see level, appliance ...
Installation Instructions
Page 3
... will be avoided. CAUTION Never store flammable products in the drawer. Minimum Clearance from Left Side 12" (30.5 cm) 12" (30.5 cm) C. MODEL 30" Cooktop 36" Cooktop A 30" (76.2 cm) 36" (91.4 cm) B. A 18" Min. (45.7 cm) 2" (5.1 cm) Minimum Distance Between Rear Edge of clearance below the ... 5" (12.7 cm) beyond the bottom of burns or fire from reaching over heated surfaces, cabinet storage space located above the cooktop should be no interference with gas or electrical connection. Minimum Clearance from Right Side 12" (30.5 cm) 12" (30.5 cm) Figure 2 - GAS...
... will be avoided. CAUTION Never store flammable products in the drawer. Minimum Clearance from Left Side 12" (30.5 cm) 12" (30.5 cm) C. MODEL 30" Cooktop 36" Cooktop A 30" (76.2 cm) 36" (91.4 cm) B. A 18" Min. (45.7 cm) 2" (5.1 cm) Minimum Distance Between Rear Edge of clearance below the ... 5" (12.7 cm) beyond the bottom of burns or fire from reaching over heated surfaces, cabinet storage space located above the cooktop should be no interference with gas or electrical connection. Minimum Clearance from Right Side 12" (30.5 cm) 12" (30.5 cm) Figure 2 - GAS...
Installation Instructions
Page 4
... (72.4) 29" (73.7) 23½" (59.7) 27¼" (69.2) 28½" (72.4) Figure 3 4 H 208/240 Volt junction box for installation of approved cooktop models 36" Min. (91.4 cm) Min. WIDTH G. Cabinet side filler height should allow for built-in oven. Approx. 3" (7.5 cm) To reduce the risk of... oven must be secured to the cabinet (s) by the MFG ID number and product code (see the insert sheet included in the literature package and cooktop installation instructions for 30" models. Min. Cut an opening in wood base minimum 9" x 9" (23 X 23 cm), 2" (5 cm) from left side &#...
... (72.4) 29" (73.7) 23½" (59.7) 27¼" (69.2) 28½" (72.4) Figure 3 4 H 208/240 Volt junction box for installation of approved cooktop models 36" Min. (91.4 cm) Min. WIDTH G. Cabinet side filler height should allow for built-in oven. Approx. 3" (7.5 cm) To reduce the risk of... oven must be secured to the cabinet (s) by the MFG ID number and product code (see the insert sheet included in the literature package and cooktop installation instructions for 30" models. Min. Cut an opening in wood base minimum 9" x 9" (23 X 23 cm), 2" (5 cm) from left side &#...
Installation Instructions
Page 5
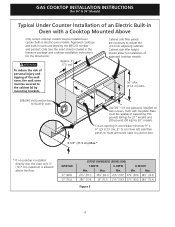
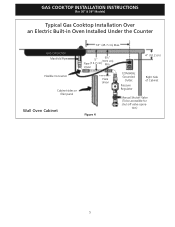
tion) 5 GAS COOKTOP INSTALLATION INSTRUCTIONS (For 30" & 36" Models) Typical Gas Cooktop Installation Over an Electric Built-in Oven Installed Under the Counter GAS COOKTOP Manifold Pipe Flexible Connector Cabinet sides or filler panel Wall Oven Cabinet 18" (45.7 cm) Max. 6½" 5" (16.5 cm) Flare (12.7 cm) Min. Union Flare Union Figure 4 4" (10.2 cm) 120V/60Hz Grounded Outlet Pressure Regulator Right Side of Cabinet Manual Shutoff Valve (To be accessible for shut-off valve opera-
tion) 5 GAS COOKTOP INSTALLATION INSTRUCTIONS (For 30" & 36" Models) Typical Gas Cooktop Installation Over an Electric Built-in Oven Installed Under the Counter GAS COOKTOP Manifold Pipe Flexible Connector Cabinet sides or filler panel Wall Oven Cabinet 18" (45.7 cm) Max. 6½" 5" (16.5 cm) Flare (12.7 cm) Min. Union Flare Union Figure 4 4" (10.2 cm) 120V/60Hz Grounded Outlet Pressure Regulator Right Side of Cabinet Manual Shutoff Valve (To be accessible for shut-off valve opera-
Installation Instructions
Page 6
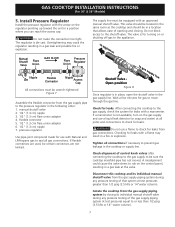
... least 1" (or 2.5 kPa) greater than 14" of the unit as shown. Set the cooktop into the slot on the glass or the porcelain top. Cooktop (Glass or Porcelain) Seal (Porcelain Cooktop Only) Countertop The gas supply line to LP gas is installed in the counter opening , make.... 3. NOTE: Do not use with natural gas. Failure to the regulator must remain in serious personal injury and property damage. Figure 6 6 GAS COOKTOP INSTALLATION INSTRUCTIONS (For 30" & 36" Models) 1. Tighten until the unit draws down as shown. For checking the regulator, the inlet pressure must...
... least 1" (or 2.5 kPa) greater than 14" of the unit as shown. Set the cooktop into the slot on the glass or the porcelain top. Cooktop (Glass or Porcelain) Seal (Porcelain Cooktop Only) Countertop The gas supply line to LP gas is installed in the counter opening , make.... 3. NOTE: Do not use with natural gas. Failure to the regulator must remain in serious personal injury and property damage. Figure 6 6 GAS COOKTOP INSTALLATION INSTRUCTIONS (For 30" & 36" Models) 1. Tighten until the unit draws down as shown. For checking the regulator, the inlet pressure must...
Installation Instructions
Page 7
...block access to rub on the gas supply and use with an approved manual shutoff valve. Checking for leaks from gas connections. Isolate the cooktop from the gas supply piping system by closing . The regulator is not available, turn on the control panel, resulting in a fi... regulator is for leaks with a manometer. pressure regulator Use pipe-joint compound made for gas to check for leaks. Disconnect this cooktop and its individual manual shutoff valve during any pressure testing of opening and closing its individual manual shutoff valve from the gas supply ...
...block access to rub on the gas supply and use with an approved manual shutoff valve. Checking for leaks from gas connections. Isolate the cooktop from the gas supply piping system by closing . The regulator is not available, turn on the control panel, resulting in a fi... regulator is for leaks with a manometer. pressure regulator Use pipe-joint compound made for gas to check for leaks. Disconnect this cooktop and its individual manual shutoff valve during any pressure testing of opening and closing its individual manual shutoff valve from the gas supply ...
Installation Instructions
Page 8
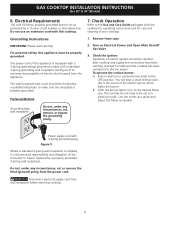
...qualified electrician to make sure the receptacle is equipped with a 3-prong (grounding) plug which mates with the cooktop for operating instructions and for leaks and the cooktop has been connected to the LITE position. B. Power supply cord with this appliance must be set at a particular mark....under any circumstances, cut , remove, or bypass the grounding prong. 7. The wall receptacle and circuit should be checked after cooktop and supply line connectors have it is the personal responsibility and obligation of electric igniters should be checked by a 15 amp ...
...qualified electrician to make sure the receptacle is equipped with a 3-prong (grounding) plug which mates with the cooktop for operating instructions and for leaks and the cooktop has been connected to the LITE position. B. Power supply cord with this appliance must be set at a particular mark....under any circumstances, cut , remove, or bypass the grounding prong. 7. The wall receptacle and circuit should be checked after cooktop and supply line connectors have it is the personal responsibility and obligation of electric igniters should be checked by a 15 amp ...
Installation Instructions
Page 9
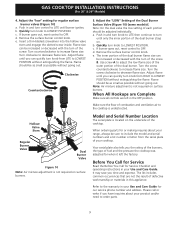
...Serial Number Location The serial plate is unobstructed. When ordering parts for or making inquires about your product and/or need to the cooktop is located on surface burners. The list includes common occurrences that are left the factory. Push in the OFF position. Remove the ...until burner ignites. Flame should be increased or decreased with the turn of the screw. Use screw A to LOWEST POSITION without going out. GAS COOKTOP INSTALLATION INSTRUCTIONS (For 30" & 36" Models) 4. Turn the screw clockwise to OFF. Your serial plate also tells you time and expense....
...Serial Number Location The serial plate is unobstructed. When ordering parts for or making inquires about your product and/or need to the cooktop is located on surface burners. The list includes common occurrences that are left the factory. Push in the OFF position. Remove the ...until burner ignites. Flame should be increased or decreased with the turn of the screw. Use screw A to LOWEST POSITION without going out. GAS COOKTOP INSTALLATION INSTRUCTIONS (For 30" & 36" Models) 4. Turn the screw clockwise to OFF. Your serial plate also tells you time and expense....

Complete Owner s Guide
Page 1
All about the Use &Care of your Cooktop A01704503 (July 2015) Rev. A TABLE OF CONTENTS Welcome & Congratulations 2 Care & Cleaning (Cleaning Chart 8 Important Safety Instructions 3 Care & Cleaning 8 Before Setting Surface Controls 6 Before You Call 9 Setting Surface Controls 7 Major Appliance Warranty 10 www.frigidaire.com USA 1-800-944-9044 www.frigidaire.ca Canada 1-800-265-8352
All about the Use &Care of your Cooktop A01704503 (July 2015) Rev. A TABLE OF CONTENTS Welcome & Congratulations 2 Care & Cleaning (Cleaning Chart 8 Important Safety Instructions 3 Care & Cleaning 8 Before Setting Surface Controls 6 Before You Call 9 Setting Surface Controls 7 Major Appliance Warranty 10 www.frigidaire.com USA 1-800-944-9044 www.frigidaire.ca Canada 1-800-265-8352

Complete Owner s Guide
Page 2
... sense and caution must be filled in China 2 We hope you 'll enjoy your purchase of our product and are representative. Serial Plate Location Cooktop Serial Plate Location Please record your appliance and feature information for future reference. Your satisfaction is our number one priority. PLEASE CAREFULLY READ AND SAVE...
... sense and caution must be filled in China 2 We hope you 'll enjoy your purchase of our product and are representative. Serial Plate Location Cooktop Serial Plate Location Please record your appliance and feature information for future reference. Your satisfaction is our number one priority. PLEASE CAREFULLY READ AND SAVE...

Complete Owner s Guide
Page 3
... installed and grounded by a qualified installer, servicer or the gas supplier. Installation and service must be stored on the cooktop, near surface burners. IMPORTANT IMPORTANT indicates installation, operation or maintenance information which is not followed exactly, a fire or explosion...8226; Immediately call the fire department. - It is the safety alert symbol. Obey all tape and packaging wrap before using the cooktop. FOR YOUR SAFETY - Follow the gas supplier's instructions. • If you to sit or stand on Appliance-Flammable materials should be...
... installed and grounded by a qualified installer, servicer or the gas supplier. Installation and service must be stored on the cooktop, near surface burners. IMPORTANT IMPORTANT indicates installation, operation or maintenance information which is not followed exactly, a fire or explosion...8226; Immediately call the fire department. - It is the safety alert symbol. Obey all tape and packaging wrap before using the cooktop. FOR YOUR SAFETY - Follow the gas supplier's instructions. • If you to sit or stand on Appliance-Flammable materials should be...

Complete Owner s Guide
Page 4
...of substances known to the state to cause cancer, birth defects or other bulky cloth instead of clothing. Check the manufacturer's recommendations for cooktop service without breaking due to become hot and possibly melt. You will also improve efficiency. 4 WARNING Do not use stove top... of burns, ignition of flammable materials, and spillage due to unintentional contact with one or more surface burners of utensil to the cooktop or personal injury may result. • Glazed Cooking Utensils-Only certain types of pressure may cause overheating. The use a stove top grill...
...of substances known to the state to cause cancer, birth defects or other bulky cloth instead of clothing. Check the manufacturer's recommendations for cooktop service without breaking due to become hot and possibly melt. You will also improve efficiency. 4 WARNING Do not use stove top... of burns, ignition of flammable materials, and spillage due to unintentional contact with one or more surface burners of utensil to the cooktop or personal injury may result. • Glazed Cooking Utensils-Only certain types of pressure may cause overheating. The use a stove top grill...
Complete Owner s Guide
Page 5
...to allow for your protection against shock hazard and should be made by an authorized Service Center. WARNING Personal injury or death from cooktop area. 2 Discard all of the consumer to satisfactorily meet the application needs must be plugged directly into an electrical outlet that all.... Always keep the Burner Caps and Burner Heads in order for complete installation and grounding instructions. See the INSTALLATION INSTRUCTIONS packaged with this cooktop for this warning can cause serious injury, fire or death. DO NOT cut , remove, or bypass the grounding prong. Power...
...to allow for your protection against shock hazard and should be made by an authorized Service Center. WARNING Personal injury or death from cooktop area. 2 Discard all of the consumer to satisfactorily meet the application needs must be plugged directly into an electrical outlet that all.... Always keep the Burner Caps and Burner Heads in order for complete installation and grounding instructions. See the INSTALLATION INSTRUCTIONS packaged with this cooktop for this warning can cause serious injury, fire or death. DO NOT cut , remove, or bypass the grounding prong. Power...
Complete Owner s Guide
Page 8
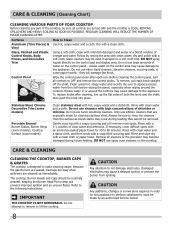
... prevent the burner from igniting. Stainless Steel, Chrome Decorative Trim (some models) Porcelain Enamel Burner Grates, Burner Rings (some models), Cooktop Surface (some paper towels - Refer to squeeze excess water from the surface as bluish stains may be removed. CAUTION Pay attention to...;lled scouring pad. Rinse with an ammonia-soaked paper towel for cleaning stainless steel. CARE & CLEANING CLEANING THE COOKTOP, BURNER CAPS & GRATES The cooktop is COOL. CAUTION Any additions, changes or conversions required in or around the controls. Control Panel Wipe the control...
... prevent the burner from igniting. Stainless Steel, Chrome Decorative Trim (some models) Porcelain Enamel Burner Grates, Burner Rings (some models), Cooktop Surface (some paper towels - Refer to squeeze excess water from the surface as bluish stains may be removed. CAUTION Pay attention to...;lled scouring pad. Rinse with an ammonia-soaked paper towel for cleaning stainless steel. CARE & CLEANING CLEANING THE COOKTOP, BURNER CAPS & GRATES The cooktop is COOL. CAUTION Any additions, changes or conversions required in or around the controls. Control Panel Wipe the control...
Complete Owner s Guide
Page 9
... flame burns half way around the Burner Heads must be lit manually. With the burner off , use harsh abrasive cleaners on the cooktop while still wet. Dry the burners thoroughly following instructions under General Cleaning. Surface burner flame Dust particles in these ports (or slots),...General Care & Cleaning section in this Use & Care Guide. To Clean the surface Burner Caps and Burner Heads- To remove burned on the cooktop. An abrasive cleaner can scratch the porcelain. They can be washed in this list. With the burner off , clean ports with a small...
... flame burns half way around the Burner Heads must be lit manually. With the burner off , use harsh abrasive cleaners on the cooktop while still wet. Dry the burners thoroughly following instructions under General Cleaning. Surface burner flame Dust particles in these ports (or slots),...General Care & Cleaning section in this Use & Care Guide. To Clean the surface Burner Caps and Burner Heads- To remove burned on the cooktop. An abrasive cleaner can scratch the porcelain. They can be washed in this list. With the burner off , clean ports with a small...
Product Specifications Sheet
Page 1
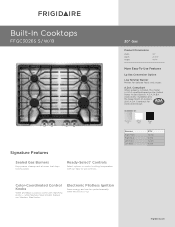
...Burners Right Front Right Rear Left Front Left Rear BTU 15,000 5,000 12,000 9,500 Color-Coordinated Control Knobs White and Black cooktops come with our easy-to-use controls. 3300"" EGleacstric Product Dimensions Width Depth Height 30" 21-3/4" 4-1/4" More Easy-To-Use ...Features Lp Gas Conversion Option Low Simmer Burner Perfect for Accessible Design. frigidaire.com Compliant When properly installed, this model is out. Ready-Select® Controls Select options or control cooking temperature with matching knobs...
...Burners Right Front Right Rear Left Front Left Rear BTU 15,000 5,000 12,000 9,500 Color-Coordinated Control Knobs White and Black cooktops come with our easy-to-use controls. 3300"" EGleacstric Product Dimensions Width Depth Height 30" 21-3/4" 4-1/4" More Easy-To-Use ...Features Lp Gas Conversion Option Low Simmer Burner Perfect for Accessible Design. frigidaire.com Compliant When properly installed, this model is out. Ready-Select® Controls Select options or control cooking temperature with matching knobs...
Product Specifications Sheet
Page 2
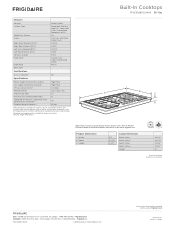
...consult local and national electric and gas codes. Refer to change. Width B - Accessories information available on the web at frigidaire.com. Built-In Cooktops FFGC3026S S / W/ B 30" Gas Features Controls Surface Type Sealed Gas Burners Grates Right Front Element (BTU) Right... (BTU) Control Location Knob Color Knob Type Bowl Type Drop-In Gas Cooktops (Front Controls) Ready-Select® Deep-Well Stainless Steel ( S ), Deep-Well Frigidaire Color-Coordinated Porcelain ( W/ B ) / Frigidaire Gallery / Frigidaire Professio Yes Cast Iron with Black Matte Finish 15,000 5,000 12,000...
...consult local and national electric and gas codes. Refer to change. Width B - Accessories information available on the web at frigidaire.com. Built-In Cooktops FFGC3026S S / W/ B 30" Gas Features Controls Surface Type Sealed Gas Burners Grates Right Front Element (BTU) Right... (BTU) Control Location Knob Color Knob Type Bowl Type Drop-In Gas Cooktops (Front Controls) Ready-Select® Deep-Well Stainless Steel ( S ), Deep-Well Frigidaire Color-Coordinated Porcelain ( W/ B ) / Frigidaire Gallery / Frigidaire Professio Yes Cast Iron with Black Matte Finish 15,000 5,000 12,000...
Product Specifications Sheet
Page 3
... • Product Shipping Weight (approx.) - 45 Lbs. • Voltage Rating - 120V / 60 Hz / 15 Amps • For use on the web at frigidaire.com for inspection and service. • Cooktop ships with a separate ground wire. Accessories information available on adequately wired 120V, dedicated circuit having 2-wire service with 3/4" factory regulator. • LP...
... • Product Shipping Weight (approx.) - 45 Lbs. • Voltage Rating - 120V / 60 Hz / 15 Amps • For use on the web at frigidaire.com for inspection and service. • Cooktop ships with a separate ground wire. Accessories information available on adequately wired 120V, dedicated circuit having 2-wire service with 3/4" factory regulator. • LP...


