
Installation Instructions
Page 1
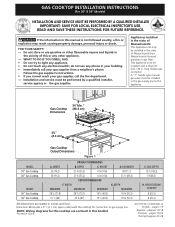
...; (87) 19 3/8 (49.2) D. DEPTH MAXIMUM 19 ¾ (50.2) 19 ¾ (50.2) E. GAS COOKTOP INSTALLATION INSTRUCTIONS (For 30" & 36" Models) INSTALLATION AND SERVICE MUST BE PERFORMED BY A QUALIFIED INSTALLER. do not use gasoline or other flammable vapors and liquids in the gas supply line to gas supply line. A "T" handle type manual gas valve must be installed in the vicinity of Massachusetts: This Appliance can only be performed by...
...; (87) 19 3/8 (49.2) D. DEPTH MAXIMUM 19 ¾ (50.2) 19 ¾ (50.2) E. GAS COOKTOP INSTALLATION INSTRUCTIONS (For 30" & 36" Models) INSTALLATION AND SERVICE MUST BE PERFORMED BY A QUALIFIED INSTALLER. do not use gasoline or other flammable vapors and liquids in the gas supply line to gas supply line. A "T" handle type manual gas valve must be installed in the vicinity of Massachusetts: This Appliance can only be performed by...
Installation Instructions
Page 2
... (part 280)] or, when such standard is hazardous. • Never use of the cooktop without adequate ventilation can be lit manually during an electrical power outage. Excessive flame is not applicable, the Standard for future reference. elevations above see level, appliance rating shall be shut off while gas line connections are certain safety precautions you should be avoided. • Adjust surface burner fl...
... (part 280)] or, when such standard is hazardous. • Never use of the cooktop without adequate ventilation can be lit manually during an electrical power outage. Excessive flame is not applicable, the Standard for future reference. elevations above see level, appliance rating shall be shut off while gas line connections are certain safety precautions you should be avoided. • Adjust surface burner fl...
Installation Instructions
Page 3
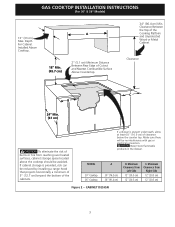
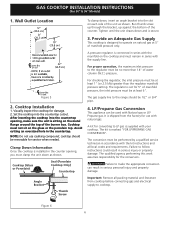
... Cabinet Installed Above Cooktop. GAS COOKTOP INSTALLATION INSTRUCTIONS (For 30" & 36" Models) 13" (33 cm) Max. If cabinet storage is present underneath, allow at least 6½" (16.5 cm) of Cutout and Nearest Combustible Surface Above Countertop. 34" (86.4 cm) Min. Make sure there will be no interference with gas or electrical connection. A 18" Min. (45.7 cm) 2" (5.1 cm) Minimum Distance Between Rear Edge of clearance below the counter top. Minimum Clearance...
... Cabinet Installed Above Cooktop. GAS COOKTOP INSTALLATION INSTRUCTIONS (For 30" & 36" Models) 13" (33 cm) Max. If cabinet storage is present underneath, allow at least 6½" (16.5 cm) of Cutout and Nearest Combustible Surface Above Countertop. 34" (86.4 cm) Min. Make sure there will be no interference with gas or electrical connection. A 18" Min. (45.7 cm) 2" (5.1 cm) Minimum Distance Between Rear Edge of clearance below the counter top. Minimum Clearance...
Installation Instructions
Page 4
... cooktop is installed directly over certain built-in ovens are necessary to the cabinet (s) by the MFG ID number and product code (see the insert sheet included in the literature package and cooktop installation instructions for installation of the wall oven, the wall oven must be installed over the oven unit, 5" (12.7 cm) maximum is allowed above the floor. G Cabinet side filler panels are listed by mounting brackets. OVEN SIZE 27" (68.6) 30" (76.2) CUTOUT DIMENSIONS (INCHES...
... cooktop is installed directly over certain built-in ovens are necessary to the cabinet (s) by the MFG ID number and product code (see the insert sheet included in the literature package and cooktop installation instructions for installation of the wall oven, the wall oven must be installed over the oven unit, 5" (12.7 cm) maximum is allowed above the floor. G Cabinet side filler panels are listed by mounting brackets. OVEN SIZE 27" (68.6) 30" (76.2) CUTOUT DIMENSIONS (INCHES...
Installation Instructions
Page 5
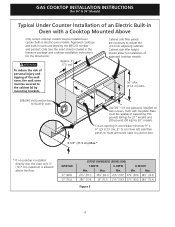
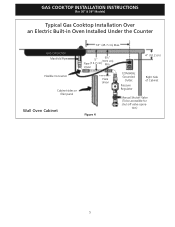
tion) 5 Union Flare Union Figure 4 4" (10.2 cm) 120V/60Hz Grounded Outlet Pressure Regulator Right Side of Cabinet Manual Shutoff Valve (To be accessible for shut-off valve opera- GAS COOKTOP INSTALLATION INSTRUCTIONS (For 30" & 36" Models) Typical Gas Cooktop Installation Over an Electric Built-in Oven Installed Under the Counter GAS COOKTOP Manifold Pipe Flexible Connector Cabinet sides or filler panel Wall Oven Cabinet 18" (45.7 cm) Max. 6½" 5" (16.5 cm) Flare (12.7 cm) Min.
tion) 5 Union Flare Union Figure 4 4" (10.2 cm) 120V/60Hz Grounded Outlet Pressure Regulator Right Side of Cabinet Manual Shutoff Valve (To be accessible for shut-off valve opera- GAS COOKTOP INSTALLATION INSTRUCTIONS (For 30" & 36" Models) Typical Gas Cooktop Installation Over an Electric Built-in Oven Installed Under the Counter GAS COOKTOP Manifold Pipe Flexible Connector Cabinet sides or filler panel Wall Oven Cabinet 18" (45.7 cm) Max. 6½" 5" (16.5 cm) Flare (12.7 cm) Min.
Installation Instructions
Page 6
... must be removable for the conversion. Clamp Down Information Once the cooktop is sitting on the cooktop and must remain in the counter opening , make the appropriate conversion can be used with natural gas. Cooktop (Glass or Porcelain) Seal (Porcelain Cooktop Only) Countertop The gas supply line to the regulator must not sit on each side of the counter. Failure to LP gas is marked "FOR LP/PROPANE GAS CONVERSION". Avoid cutting an...
... must be removable for the conversion. Clamp Down Information Once the cooktop is sitting on the cooktop and must remain in the counter opening , make the appropriate conversion can be used with natural gas. Cooktop (Glass or Porcelain) Seal (Porcelain Cooktop Only) Countertop The gas supply line to the regulator must not sit on each side of the counter. Failure to LP gas is marked "FOR LP/PROPANE GAS CONVERSION". Avoid cutting an...
Installation Instructions
Page 7
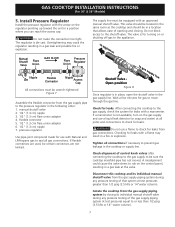
... turning on the control panel, resulting in the following order: 1. Do not use with an approved manual shutoff valve. A misalignment could cause the valve stems to rub on or shutting off gas to the shutoff valve. manual shutoff valve 2. 1/2" (1.3 cm) nipple 3. 1/2" (1.3 cm) flare union adapter 4. flexible connector 5. 1/2" (1.3 cm) flare not kinked. After connecting the cooktop to the pressure regulator in a gas leak at all gas connections. GAS COOKTOP INSTALLATION INSTRUCTIONS...
... turning on the control panel, resulting in the following order: 1. Do not use with an approved manual shutoff valve. A misalignment could cause the valve stems to rub on or shutting off gas to the shutoff valve. manual shutoff valve 2. 1/2" (1.3 cm) nipple 3. 1/2" (1.3 cm) flare union adapter 4. flexible connector 5. 1/2" (1.3 cm) flare not kinked. After connecting the cooktop to the pressure regulator in a gas leak at all gas connections. GAS COOKTOP INSTALLATION INSTRUCTIONS...
Installation Instructions
Page 8
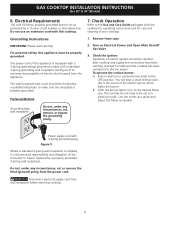
... be properly grounded. Disconnect electrical supply cord from the power cord. The power cord of this cooktop. Remove foam caps. 2. Use the marks as a guide and adjust the flame as needed. Push in and turn to the LITE position. B. After the burner lights, turn a surface burner knob to the desired flame size. Do not use an extension cord with 3-prong grounding plug. GAS COOKTOP INSTALLATION INSTRUCTIONS (For 30" & 36" Models) 6. Power supply cord with this...
... be properly grounded. Disconnect electrical supply cord from the power cord. The power cord of this cooktop. Remove foam caps. 2. Use the marks as a guide and adjust the flame as needed. Push in and turn to the LITE position. B. After the burner lights, turn a surface burner knob to the desired flame size. Do not use an extension cord with 3-prong grounding plug. GAS COOKTOP INSTALLATION INSTRUCTIONS (For 30" & 36" Models) 6. Power supply cord with this...
Installation Instructions
Page 9
... outer portion of the dual burner stays on surface burners. Use screw A to increase flame size. Adjust the "low" setting for when it left in your Use and Care Guide. Insert a thin-bladed screwdriver into the hollow valve stem and engage the slotted screw inside. Flame size can quickly turn control to the warranty in the OFF position. b. GAS COOKTOP INSTALLATION INSTRUCTIONS (For 30" & 36" Models) 4. b. Refer to LITE until only...
... outer portion of the dual burner stays on surface burners. Use screw A to increase flame size. Adjust the "low" setting for when it left in your Use and Care Guide. Insert a thin-bladed screwdriver into the hollow valve stem and engage the slotted screw inside. Flame size can quickly turn control to the warranty in the OFF position. b. GAS COOKTOP INSTALLATION INSTRUCTIONS (For 30" & 36" Models) 4. b. Refer to LITE until only...

Complete Owner s Guide
Page 2
... service possible. The graphics shown are not meant to cover every possible condition and situation that may occur. Your satisfaction is our number one priority. PLEASE CAREFULLY READ AND SAVE THESE INSTRUCTIONS This Use & Care Manual contains general operating instructions for your appliance may not have all the described features. The graphics on your model and serial numbers below for future purchases. Serial Plate Location Cooktop Serial...
... service possible. The graphics shown are not meant to cover every possible condition and situation that may occur. Your satisfaction is our number one priority. PLEASE CAREFULLY READ AND SAVE THESE INSTRUCTIONS This Use & Care Manual contains general operating instructions for your appliance may not have all the described features. The graphics on your model and serial numbers below for future purchases. Serial Plate Location Cooktop Serial...

Complete Owner s Guide
Page 3
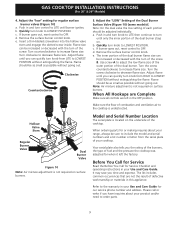
... Electrical Code ANSI/NFPA No. 70-latest edition, and local code requirements. Destroy the carton and plastic bags after unpacking the cooktop. Ask your appliance is properly installed and grounded by removing panels, wire covers, or any other servicing should not be left alone or unattended in the area where an appliance is in use. Know how to shut off gas supply at the circuit breaker...
... Electrical Code ANSI/NFPA No. 70-latest edition, and local code requirements. Destroy the carton and plastic bags after unpacking the cooktop. Ask your appliance is properly installed and grounded by removing panels, wire covers, or any other servicing should not be left alone or unattended in the area where an appliance is in use. Know how to shut off gas supply at the circuit breaker...

Complete Owner s Guide
Page 4
... cooktop use stove top grills on , the decorative cover will not be hazardous to direct contact and may cause overheating. The use of different sizes. Burns will expose a portion of potential exposure to the LITE position when igniting the burners. Fat or grease may result. • Glazed Cooking Utensils-Only certain types of glass, glass/ceramic, ceramic, earthenware, or other reproductive harm, and requires businesses to warn customers...
... cooktop use stove top grills on , the decorative cover will not be hazardous to direct contact and may cause overheating. The use of different sizes. Burns will expose a portion of potential exposure to the LITE position when igniting the burners. Fat or grease may result. • Glazed Cooking Utensils-Only certain types of glass, glass/ceramic, ceramic, earthenware, or other reproductive harm, and requires businesses to warn customers...
Complete Owner s Guide
Page 5
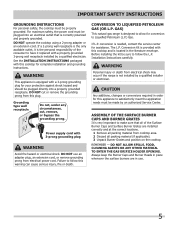
... plug. GAS) This natural gas range is located in the literature envelope. ASSEMBLY OF THE SURFACE BURNER CAPS AND BURNER GRATES It is very important to have it replaced with this cooktop for your protection against shock hazard and should be plugged directly into an electrical outlet that all packing material (if applicable). 3 Unpack Burner Grates and position on the cooktop. See the INSTALLATION INSTRUCTIONS packaged with a properly grounded 3-prong wall receptacle installed...
... plug. GAS) This natural gas range is located in the literature envelope. ASSEMBLY OF THE SURFACE BURNER CAPS AND BURNER GRATES It is very important to have it replaced with this cooktop for your protection against shock hazard and should be plugged directly into an electrical outlet that all packing material (if applicable). 3 Unpack Burner Grates and position on the cooktop. See the INSTALLATION INSTRUCTIONS packaged with a properly grounded 3-prong wall receptacle installed...

Complete Owner s Guide
Page 7
... of Cooking High Flame Start most cooking - SETTING SURFACE CONTROLS OPERATING THE GAS SURFACE CONTROLS 1 Place cooking utensil on surface burner. 2 Push the surface control knob down and turn to a lower one to complete the process. Note: All four electronic surface ignitors will ignite. 4 Visually check that the center will neither brown nor cook properly. *Flame Size Type of an electrical power outage, the surface burners can be under cooked. The control knobs do not have to adjust the flame as a guide...
... of Cooking High Flame Start most cooking - SETTING SURFACE CONTROLS OPERATING THE GAS SURFACE CONTROLS 1 Place cooking utensil on surface burner. 2 Push the surface control knob down and turn to a lower one to complete the process. Note: All four electronic surface ignitors will ignite. 4 Visually check that the center will neither brown nor cook properly. *Flame Size Type of an electrical power outage, the surface burners can be under cooked. The control knobs do not have to adjust the flame as a guide...
Complete Owner s Guide
Page 8
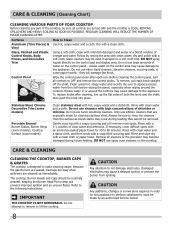
... may occur during future heating. then push the knob into place. Rinse and wipe dry with a 1:1 solution of clear water and ammonia. Remove all cleaners or the porcelain may cause a delayed ignition or prevent the burner from igniting. Control Panel Wipe the control panel clean after cleaning, line up immediately. To remove, pull each use spray oven cleaners on the cooktop. CARE & CLEANING CLEANING THE COOKTOP, BURNER CAPS & GRATES The cooktop is COOL. Damaged electrodes...
... may occur during future heating. then push the knob into place. Rinse and wipe dry with a 1:1 solution of clear water and ammonia. Remove all cleaners or the porcelain may cause a delayed ignition or prevent the burner from igniting. Control Panel Wipe the control panel clean after cleaning, line up immediately. To remove, pull each use spray oven cleaners on the cooktop. CARE & CLEANING CLEANING THE COOKTOP, BURNER CAPS & GRATES The cooktop is COOL. Damaged electrodes...
Complete Owner s Guide
Page 9
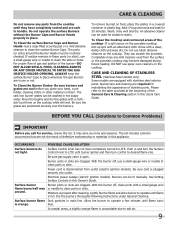
... maintaining the appearance of the cooktop- To remove burned on them on the cooktop. Do not use a small-gauge wire or needle to salt air. 9 CARE AND CLEANING OF STAINLESS STEEL (Stainless Steel models only) Some models are required for service, review this Owner's Guide. Surface burner flame Dust particles in place. Do not operate the surface Burners without the Burner Caps and Burner Heads properly in main line. The cast iron burner grates can be routinely checked...
... maintaining the appearance of the cooktop- To remove burned on them on the cooktop. Do not use a small-gauge wire or needle to salt air. 9 CARE AND CLEANING OF STAINLESS STEEL (Stainless Steel models only) Some models are required for service, review this Owner's Guide. Surface burner flame Dust particles in place. Do not operate the surface Burners without the Burner Caps and Burner Heads properly in main line. The cast iron burner grates can be routinely checked...

Complete Owner s Guide
Page 10
... service and parts under this written limited warranty or any obligations under this warranty. Electrolux authorizes no person to change without notice. Box 212378 Augusta, GA 30907 Canada 1.800.265.8352 Electrolux Canada Corp. 5855 Terry Fox Way Mississauga, Ontario, Canada L5V 3E4 10 You may not imply to the finish of God. If You Need Service Keep your appliance is installed, used...
... service and parts under this written limited warranty or any obligations under this warranty. Electrolux authorizes no person to change without notice. Box 212378 Augusta, GA 30907 Canada 1.800.265.8352 Electrolux Canada Corp. 5855 Terry Fox Way Mississauga, Ontario, Canada L5V 3E4 10 You may not imply to the finish of God. If You Need Service Keep your appliance is installed, used...
Product Specifications Sheet
Page 1
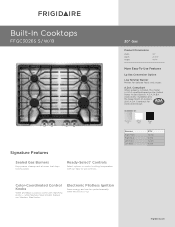
...-To-Use Features Lp Gas Conversion Option Low Simmer Burner Perfect for Accessible Design. Electronic Pilotless Ignition Saves energy and can be ignited manually when electricity is A.D.A.-qualified based on the United States Access Board's A.D.A./A.B.A. DBuroilpt--IInn CCooookkttoopps FPFGECC33008256KS S / W/ B Signature Features Sealed Gas Burners Enjoy easier cleanup and a burner that stays looking great. while Stainless Steel models feature our Stainless Steel knobs. frigidaire.com Ready-Select® Controls Select options or control cooking temperature...
...-To-Use Features Lp Gas Conversion Option Low Simmer Burner Perfect for Accessible Design. Electronic Pilotless Ignition Saves energy and can be ignited manually when electricity is A.D.A.-qualified based on the United States Access Board's A.D.A./A.B.A. DBuroilpt--IInn CCooookkttoopps FPFGECC33008256KS S / W/ B Signature Features Sealed Gas Burners Enjoy easier cleanup and a burner that stays looking great. while Stainless Steel models feature our Stainless Steel knobs. frigidaire.com Ready-Select® Controls Select options or control cooking temperature...
Product Specifications Sheet
Page 2
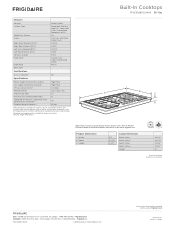
...Front Stainless ( S ), Color-Coordinated ( W/ B ) Plastic Certifications A.D.A. Compliant1 Yes Specifications Power Supply Connection Location Gas Supply Connection Location LP Gas Conversion Kit Voltage Rating Amps @ 120 Volts Minimum Circuit Required (Amps) Approved for detailed installation instructions on the web at frigidaire.com Specifications subject to Product Installation Guide for Electric Single Wall Oven Combination Installation2 Shipping Weight (Approx.) Right Rear Right Rear Included 120V / 60V / 15A 1.0 15 Yes 45 Lbs. Height 30" 21-3/4" 4-1/4" Cutout Dimensions...
...Front Stainless ( S ), Color-Coordinated ( W/ B ) Plastic Certifications A.D.A. Compliant1 Yes Specifications Power Supply Connection Location Gas Supply Connection Location LP Gas Conversion Kit Voltage Rating Amps @ 120 Volts Minimum Circuit Required (Amps) Approved for detailed installation instructions on the web at frigidaire.com Specifications subject to Product Installation Guide for Electric Single Wall Oven Combination Installation2 Shipping Weight (Approx.) Right Rear Right Rear Included 120V / 60V / 15A 1.0 15 Yes 45 Lbs. Height 30" 21-3/4" 4-1/4" Cutout Dimensions...
Product Specifications Sheet
Page 3
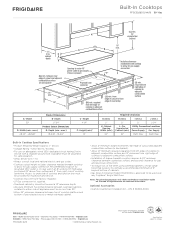
... and national electric and gas codes. • Cooktop cutout height includes clearance needed beneath cooktop to adjacent H ( J ) min. Width 30" D - For Utility Connection Locations Unprotected Cabinet (min.) Power Supply Gas Supply 34" Right Rear Right Rear Built-In Cooktop Specifications • Product Shipping Weight (approx.) - 45 Lbs. • Voltage Rating - 120V / 60 Hz / 15 Amps • For use on adequately wired 120V, dedicated circuit having 2-wire service with 3/4" factory regulator. • LP Gas conversion kit supplied. •...
... and national electric and gas codes. • Cooktop cutout height includes clearance needed beneath cooktop to adjacent H ( J ) min. Width 30" D - For Utility Connection Locations Unprotected Cabinet (min.) Power Supply Gas Supply 34" Right Rear Right Rear Built-In Cooktop Specifications • Product Shipping Weight (approx.) - 45 Lbs. • Voltage Rating - 120V / 60 Hz / 15 Amps • For use on adequately wired 120V, dedicated circuit having 2-wire service with 3/4" factory regulator. • LP Gas conversion kit supplied. •...


