
Complete Owners Guide
Page 1
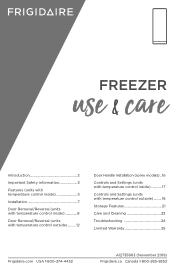
...&EcEaZErRe Introduction 2 Important Safety information 3 Features (units with temperature control inside 5 Installation 7 Door Removal/Reversal (units with temperature control inside 8 Door Removal/Reversal (units with temperature control outside).......... 12 Door Handle Installation (some models)... 16 Controls and Settings (units with temperature control inside 17 Controls and Settings (units with temperature control outside).......... 18 Storage Features 21 Care and Cleaning 22 Troubleshooting 24 Limited Warranty 25 Frigidaire.com USA 1-800-374-4432 A12735803 (November 2019...
...&EcEaZErRe Introduction 2 Important Safety information 3 Features (units with temperature control inside 5 Installation 7 Door Removal/Reversal (units with temperature control inside 8 Door Removal/Reversal (units with temperature control outside).......... 12 Door Handle Installation (some models)... 16 Controls and Settings (units with temperature control inside 17 Controls and Settings (units with temperature control outside).......... 18 Storage Features 21 Care and Cleaning 22 Troubleshooting 24 Limited Warranty 25 Frigidaire.com USA 1-800-374-4432 A12735803 (November 2019...

Complete Owners Guide
Page 2
...-tip bracket set in Model and Serial Number Plate FAQs, helpful tips and videos, cleaning products, and kitchen and home accessories are secure and tight (some models) ˆˆ Door seals completely to cabinet on ˆˆ Appliance plugged in Final Checks ˆˆ Shipping material removed ˆˆ Registration card sent in front (both sides) Electrical Power ˆˆ House power turned on all...
...-tip bracket set in Model and Serial Number Plate FAQs, helpful tips and videos, cleaning products, and kitchen and home accessories are secure and tight (some models) ˆˆ Door seals completely to cabinet on ˆˆ Appliance plugged in Final Checks ˆˆ Shipping material removed ˆˆ Registration card sent in front (both sides) Electrical Power ˆˆ House power turned on all...
Complete Owners Guide
Page 3
.... Follow handling instructions carefully. Safety Instructions • DO NOT store or use mechanical devices to puncture of potential personal injury hazards. IMPORTANT IMPORTANT indicates installation, operation or maintenance information which , if not avoided, may become airtight chambers, and can cause severe cuts, and also destroy finishes if they will result in the vicinity of automatic ice maker. • Remove all staples...
.... Follow handling instructions carefully. Safety Instructions • DO NOT store or use mechanical devices to puncture of potential personal injury hazards. IMPORTANT IMPORTANT indicates installation, operation or maintenance information which , if not avoided, may become airtight chambers, and can cause severe cuts, and also destroy finishes if they will result in the vicinity of automatic ice maker. • Remove all staples...
Complete Owners Guide
Page 4
... electrical shock. WARNING These guidelines must unplug the power cord from the receptacle to prevent damaging the power cord. • Unplug the appliance before cleaning and before replacing the AC LED light bulb to the atmosphere. Use only a 5-watt or less AC LED light bulb. • Performance may have a cooling system that safety mechanisms in this model. IMPORTANT Turning the appliance controls to the light bulb and other electrical components. Grounding type...
... electrical shock. WARNING These guidelines must unplug the power cord from the receptacle to prevent damaging the power cord. • Unplug the appliance before cleaning and before replacing the AC LED light bulb to the atmosphere. Use only a 5-watt or less AC LED light bulb. • Performance may have a cooling system that safety mechanisms in this model. IMPORTANT Turning the appliance controls to the light bulb and other electrical components. Grounding type...
Complete Owners Guide
Page 5
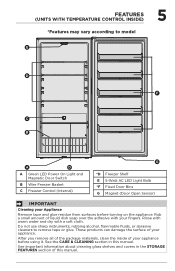
... Door Switch B Wire Freezer Basket C Freezer Control (Internal) G *D Freezer Shelf E 5-Watt AC LED Light Bulb *F Fixed Door Bins G Magnet (Door Open Sensor) IMPORTANT Cleaning your Appliance Remove tape and glue residue from surfaces before using it. After you remove all of the package materials, clean the inside of this manual. See the CARE & CLEANING section in the STORAGE FEATURES section of your appliance before turning on the appliance. Rub a small amount of your fingers. FEATURES (UNITS WITH TEMPERATURE CONTROL INSIDE...
... Door Switch B Wire Freezer Basket C Freezer Control (Internal) G *D Freezer Shelf E 5-Watt AC LED Light Bulb *F Fixed Door Bins G Magnet (Door Open Sensor) IMPORTANT Cleaning your Appliance Remove tape and glue residue from surfaces before using it. After you remove all of the package materials, clean the inside of this manual. See the CARE & CLEANING section in the STORAGE FEATURES section of your appliance before turning on the appliance. Rub a small amount of your fingers. FEATURES (UNITS WITH TEMPERATURE CONTROL INSIDE...
Complete Owners Guide
Page 6
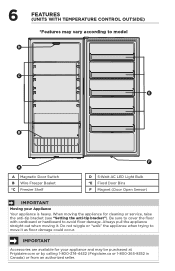
...IMPORTANT Accessories are available for cleaning or service, raise the anti-tip bracket (see "Setting the anti-tip bracket"). Be sure to cover the floor with cardboard or hardboard to model D C E B A A Magnetic Door Switch B Wire Freezer Basket *C Freezer Shelf F D 5-Watt AC LED Light Bulb *E Fixed Door Bins F Magnet (Door Open Sensor) IMPORTANT Moving your... it as floor damage could occur. 6 FEATURES (UNITS WITH TEMPERATURE CONTROL OUTSIDE) *Features may be purchased at Frigidaire.com or by calling 1-800-374-4432 (Frigidaire.ca or 1-800-265-8352 in Canada) or from an authorized seller...
...IMPORTANT Accessories are available for cleaning or service, raise the anti-tip bracket (see "Setting the anti-tip bracket"). Be sure to cover the floor with cardboard or hardboard to model D C E B A A Magnetic Door Switch B Wire Freezer Basket *C Freezer Shelf F D 5-Watt AC LED Light Bulb *E Fixed Door Bins F Magnet (Door Open Sensor) IMPORTANT Moving your... it as floor damage could occur. 6 FEATURES (UNITS WITH TEMPERATURE CONTROL OUTSIDE) *Features may be purchased at Frigidaire.com or by calling 1-800-374-4432 (Frigidaire.ca or 1-800-265-8352 in Canada) or from an authorized seller...
Complete Owners Guide
Page 7
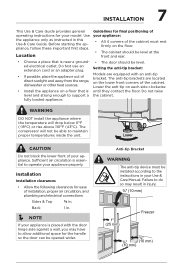
... 4 corners of the cabinet. INSTALLATION 7 This Use & Care Guide provides general operating instructions for your appliance. Setting the anti-tip bracket: • If possible, place the appliance out of your model. Do not raise level and strong enough to allow additional space for the handle so the door can be able to the instructions in . NOTE If your Use & Care Manual. fully loaded appliance. Lower...
... 4 corners of the cabinet. INSTALLATION 7 This Use & Care Guide provides general operating instructions for your appliance. Setting the anti-tip bracket: • If possible, place the appliance out of your model. Do not raise level and strong enough to allow additional space for the handle so the door can be able to the instructions in . NOTE If your Use & Care Manual. fully loaded appliance. Lower...

Complete Owners Guide
Page 8
..." wrench. 8 DOOR REMOVAL/REVERSAL (UNITS WITH TEMPERATURE CONTROL INSIDE) Tools Necessary: PhillipsTM Head or #2 Square Drive Head or and Flathead Screwdriver Socket Wrench Set or Adjustable Wrench or 5/16" (8mm) Fixed Wrench Door Closer #2 Phillips Pan Head MSX12 Hinge Screw 5/16" (8mm) NOTE The direction in which your freezer. 2. IMPORTANT Before you begin, turn the appliance temperature control to "off" and remove the electrical power cord from one...
..." wrench. 8 DOOR REMOVAL/REVERSAL (UNITS WITH TEMPERATURE CONTROL INSIDE) Tools Necessary: PhillipsTM Head or #2 Square Drive Head or and Flathead Screwdriver Socket Wrench Set or Adjustable Wrench or 5/16" (8mm) Fixed Wrench Door Closer #2 Phillips Pan Head MSX12 Hinge Screw 5/16" (8mm) NOTE The direction in which your freezer. 2. IMPORTANT Before you begin, turn the appliance temperature control to "off" and remove the electrical power cord from one...

Complete Owners Guide
Page 11
Slide the door onto the bottom hinge pin at 90° to the Recommended setting. 90° Figure 8 Figure 9 Plug the freezer power cord back into the electrical outlet, and turn the freezer temperature control to the freezer cabinet and close the door (see Figure 9). 21. DOOR REMOVAL/REVERSAL (UNITS WITH TEMPERATURE CONTROL INSIDE) 11 19. Using a Phillips™ screwdriver or a 5/16" wrench, secure the top hinge using three 5/16" screws. Replace the top hinge cover (see Figure 8). 20.
Slide the door onto the bottom hinge pin at 90° to the Recommended setting. 90° Figure 8 Figure 9 Plug the freezer power cord back into the electrical outlet, and turn the freezer temperature control to the freezer cabinet and close the door (see Figure 9). 21. DOOR REMOVAL/REVERSAL (UNITS WITH TEMPERATURE CONTROL INSIDE) 11 19. Using a Phillips™ screwdriver or a 5/16" wrench, secure the top hinge using three 5/16" screws. Replace the top hinge cover (see Figure 8). 20.
Complete Owners Guide
Page 16
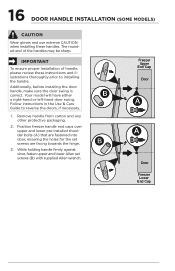
... set screws are facing towards the hinge. 3. The rounded end of handle, please review these handles. Follow instructions in the Use & Care Guide to installing the handle. Remove handle from carton and any other protective packaging. 2. IMPORTANT To ensure proper installation of the handles may be sharp. Additionally, before installing the door handle, make sure the door swing is correct. Your model will have either a right-hand or left-hand door swing. Freezer...
... set screws are facing towards the hinge. 3. The rounded end of handle, please review these handles. Follow instructions in the Use & Care Guide to installing the handle. Remove handle from carton and any other protective packaging. 2. IMPORTANT To ensure proper installation of the handles may be sharp. Additionally, before installing the door handle, make sure the door swing is correct. Your model will have either a right-hand or left-hand door swing. Freezer...

Complete Owners Guide
Page 17
... flash and the alarm will sound until the cabinet temperature is turned to OFF. If the light goes out, refer to "Appliance does not run" in small increments, allowing the temperature to stabilize. • For colder temperatures, adjust the knob towards Coldest. • For warmer temperatures, adjust the knob towards Cold. Power On Light The green LED Power On light indicates that the door has been open for assistance. 17 CONTROLS AND SETTINGS (UNITS WITH TEMPERATURE CONTROL INSIDE) Cool...
... flash and the alarm will sound until the cabinet temperature is turned to OFF. If the light goes out, refer to "Appliance does not run" in small increments, allowing the temperature to stabilize. • For colder temperatures, adjust the knob towards Coldest. • For warmer temperatures, adjust the knob towards Cold. Power On Light The green LED Power On light indicates that the door has been open for assistance. 17 CONTROLS AND SETTINGS (UNITS WITH TEMPERATURE CONTROL INSIDE) Cool...
Complete Owners Guide
Page 19
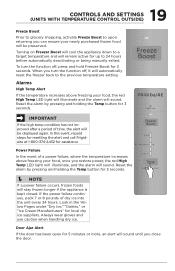
... power, the red High Temp LED light will illuminate, and the alarm will sound. Reset the alarm by pressing and holding the Temp button for assistance Power Failure In the event of dry ice into the unit every 24 hours. If the power failure continues, pack 7 or 8 pounds of a power failure, where the temperature increases above freezing your newly purchased frozen food will sound. Door Ajar Alert If the door has been open...
... power, the red High Temp LED light will illuminate, and the alarm will sound. Reset the alarm by pressing and holding the Temp button for assistance Power Failure In the event of dry ice into the unit every 24 hours. If the power failure continues, pack 7 or 8 pounds of a power failure, where the temperature increases above freezing your newly purchased frozen food will sound. Door Ajar Alert If the door has been open...
Complete Owners Guide
Page 20
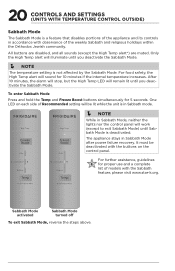
.... NOTE While in Sabbath Mode, neither the lights nor the control panel will sound for 5 seconds. All buttons are disabled, and all sounds (except the High Temp alert*) are muted. For food safety, the High Temp alert will work (except to exit Sabbath Mode) until you deactivate the Sabbath Mode. NOTE The temperature setting is a feature that disables portions of the appliance...
.... NOTE While in Sabbath Mode, neither the lights nor the control panel will sound for 5 seconds. All buttons are disabled, and all sounds (except the High Temp alert*) are muted. For food safety, the High Temp alert will work (except to exit Sabbath Mode) until you deactivate the Sabbath Mode. NOTE The temperature setting is a feature that disables portions of the appliance...
Complete Owners Guide
Page 21
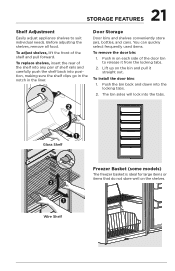
... bin back and down into position, making sure the shelf clips go in the notch in on each side of the shelf and pull forward. Before adjusting the shelves, remove all food. You can quickly select frequently used items. To remove the door bin: 1. The bin sides will lock into the tabs. Glass Shelf Freezer Basket (some models) The freezer basket is ideal for large items or...
... bin back and down into position, making sure the shelf clips go in the notch in on each side of the shelf and pull forward. Before adjusting the shelves, remove all food. You can quickly select frequently used items. To remove the door bin: 1. The bin sides will lock into the tabs. Glass Shelf Freezer Basket (some models) The freezer basket is ideal for large items or...

Complete Owners Guide
Page 22
..., scouring cleansers, brushes, flammable fluids, cleaning waxes, concentrated detergents, bleaches or cleansers containing petroleum products on plastic parts, interior doors, gaskets or cabinet liners. 22 CARE AND CLEANING Protecting your investment Keeping your temperature controls to turn off cooling, power to lights and other sharp instruments which can scratch the appliance surface. • Do not remove the serial plate. Do not use paper towels, metallic scouring pads...
..., scouring cleansers, brushes, flammable fluids, cleaning waxes, concentrated detergents, bleaches or cleansers containing petroleum products on plastic parts, interior doors, gaskets or cabinet liners. 22 CARE AND CLEANING Protecting your investment Keeping your temperature controls to turn off cooling, power to lights and other sharp instruments which can scratch the appliance surface. • Do not remove the serial plate. Do not use paper towels, metallic scouring pads...

Complete Owners Guide
Page 23
.... Replacing Light Bulbs • Unplug appliance • Wear gloves • Remove light cover • Replace old bulb • Replace light cover • Plug in 1 qt of the cabinet with warm water and mild liquid detergent. Use same wattage when replacing bulb. CAUTION: Use only a 5-watt or less AC LED light bulb. Exterior (Stainless Steel Models Only) • Soap and water • Stainless Steel Cleaners Never use household cleaners containing ammonia or bleach. Always follow manufacturer's instructions. Rinse...
.... Replacing Light Bulbs • Unplug appliance • Wear gloves • Remove light cover • Replace old bulb • Replace light cover • Plug in 1 qt of the cabinet with warm water and mild liquid detergent. Use same wattage when replacing bulb. CAUTION: Use only a 5-watt or less AC LED light bulb. Exterior (Stainless Steel Models Only) • Soap and water • Stainless Steel Cleaners Never use household cleaners containing ammonia or bleach. Always follow manufacturer's instructions. Rinse...
Complete Owners Guide
Page 24
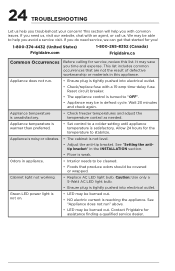
... you troubleshoot your concern! This list includes common occurrences that produce odors should be in the INSTALLATION section. • Floor is turned to a colder setting until appliance temperature is unsatisfactory. • Check freezer temperatures and adjust the temperature control as needed. See "Setting the antitip bracket" in defrost cycle. Cabinet light not working. • Replace AC LED light bulb. 24 TROUBLESHOOTING Let us help you time and expense. Reset circuit...
... you troubleshoot your concern! This list includes common occurrences that produce odors should be in the INSTALLATION section. • Floor is turned to a colder setting until appliance temperature is unsatisfactory. • Check freezer temperatures and adjust the temperature control as needed. See "Setting the antitip bracket" in defrost cycle. Cabinet light not working. • Replace AC LED light bulb. 24 TROUBLESHOOTING Let us help you time and expense. Reset circuit...
Complete Owners Guide
Page 25
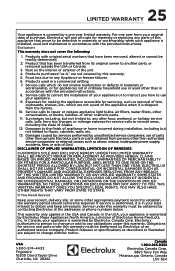
... " are not covered by Electrolux Major Appliances North America, a division of Alaska. 12. In Canada, your best interest to obtain and keep all costs for service calls to repair or replace appliance light bulbs, air filters, water filters, other consumables, or knobs, handles, or other than genuine Electrolux parts or parts obtained from the factory. 10. Food loss due to any Appliance or freezer failures. 6. or external...
... " are not covered by Electrolux Major Appliances North America, a division of Alaska. 12. In Canada, your best interest to obtain and keep all costs for service calls to repair or replace appliance light bulbs, air filters, water filters, other consumables, or knobs, handles, or other than genuine Electrolux parts or parts obtained from the factory. 10. Food loss due to any Appliance or freezer failures. 6. or external...
Quick Start Guide
Page 1
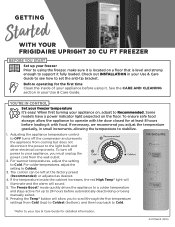
... first time Clean the inside the cabinet increases, the red High Temp* light will illuminate and the alarm will allow the appliance to operate with food. To ensure safe food storage, allow you to scroll through the five temperature settings from cooling but does not disconnect the power to the light bulb and 4 other electrical components. To turn off the compressor and prevents 3 the appliance from Cold (top) to Coldest (bottom...
... first time Clean the inside the cabinet increases, the red High Temp* light will illuminate and the alarm will allow the appliance to operate with food. To ensure safe food storage, allow you to scroll through the five temperature settings from cooling but does not disconnect the power to the light bulb and 4 other electrical components. To turn off the compressor and prevents 3 the appliance from Cold (top) to Coldest (bottom...
Quick Start Guide
Page 2
..., adjust the control to stabilize. Check items inside the cabinet gets warmer, the High Temp alert will sound. Look for the temperature to a colder setting until the freezer temperature is satisfactory. The freezer temperature is warmer than you close the freezer door, leave it closed so the freezer temperature can decrease. Find more easily than traditional textured finishes. If the temperature inside the freezer. Remove any spills immediately and clean the freezer...
..., adjust the control to stabilize. Check items inside the cabinet gets warmer, the High Temp alert will sound. Look for the temperature to a colder setting until the freezer temperature is satisfactory. The freezer temperature is warmer than you close the freezer door, leave it closed so the freezer temperature can decrease. Find more easily than traditional textured finishes. If the temperature inside the freezer. Remove any spills immediately and clean the freezer...


