
Complete Owners Guide
Page 1
useFR&EcEaZErRe Introduction 2 Important Safety information 3 Features 5 Installation 7 Door Removal/Reversal (some models)......8 Door Handle Installation (some models).....11 Controls and Settings 12 Storage Features 13 Care and Cleaning 14 Troubleshooting 16 Warranty 17 Frigidaire.com USA 1-800-374-4432 A12735802 (July 2019) Frigidaire.ca Canada 1-800-265-8352
useFR&EcEaZErRe Introduction 2 Important Safety information 3 Features 5 Installation 7 Door Removal/Reversal (some models)......8 Door Handle Installation (some models).....11 Controls and Settings 12 Storage Features 13 Care and Cleaning 14 Troubleshooting 16 Warranty 17 Frigidaire.com USA 1-800-374-4432 A12735802 (July 2019) Frigidaire.ca Canada 1-800-265-8352

Complete Owners Guide
Page 2
... (some models) ˆˆ Door seals completely to cabinet on all corners ˆˆ Anti-tip bracket set in front (both sides) Electrical Power ˆˆ House power turned on ˆˆ Appliance plugged in Final Checks ˆˆ Shipping material removed ˆˆ Registration card sent in Model and Serial Number Plate We are here for you for the use and care of your...
... (some models) ˆˆ Door seals completely to cabinet on all corners ˆˆ Anti-tip bracket set in front (both sides) Electrical Power ˆˆ House power turned on ˆˆ Appliance plugged in Final Checks ˆˆ Shipping material removed ˆˆ Registration card sent in Model and Serial Number Plate We are here for you for the use and care of your...
Complete Owners Guide
Page 3
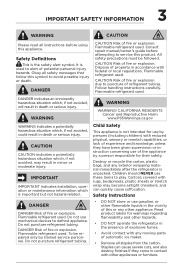
... NEVER use mechanical devices to defrost appliance. IMPORTANT SAFETY INFORMATION 3 WARNING CAUTION Please read all instructions before attempting to service this or any other appliances or furniture. Obey all staples from the carton. Consult repair manual/owner's guide before using this symbol to avoid possible injury or death. Flammable refrigerant used . Follow handling instructions carefully. Flammable refrigerant used to puncture of fire or explosion. CAUTION CAUTION indicates a potentially...
... NEVER use mechanical devices to defrost appliance. IMPORTANT SAFETY INFORMATION 3 WARNING CAUTION Please read all instructions before attempting to service this or any other appliances or furniture. Obey all staples from the carton. Consult repair manual/owner's guide before using this symbol to avoid possible injury or death. Flammable refrigerant used . Follow handling instructions carefully. Flammable refrigerant used to puncture of fire or explosion. CAUTION CAUTION indicates a potentially...
Complete Owners Guide
Page 4
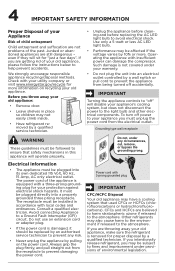
...-prong grounding plug for more . The power cord of environmental legislation. Use only a 5-watt or less AC LED light bulb. • Performance may be plugged directly into its own dedicated 115 Volt, 60 Hz., 15 Amp, AC only electrical outlet. IMPORTANT Turning the appliance controls to "off" will disable your old appliance, please follow the instructions below to prevent any circumstances, cut, remove, or...
...-prong grounding plug for more . The power cord of environmental legislation. Use only a 5-watt or less AC LED light bulb. • Performance may be plugged directly into its own dedicated 115 Volt, 60 Hz., 15 Amp, AC only electrical outlet. IMPORTANT Turning the appliance controls to "off" will disable your old appliance, please follow the instructions below to prevent any circumstances, cut, remove, or...
Complete Owners Guide
Page 5
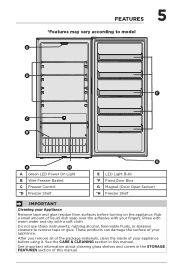
... with warm water and dry with your fingers. FEATURES *Features may vary according to remove tape or glue. Do not use sharp instruments, rubbing alcohol, flammable fluids, or abrasive cleaners to model 5 E D F C B A H A Green LED Power On Light B Wire Freezer Basket C Freezer Control *D Freezer Shelf G E LED Light Bulb *F Fixed Door Bins G Magnet (Door Open Sensor) *H Freezer Shelf IMPORTANT Cleaning your Appliance Remove tape and glue residue from surfaces before using it. See important information about cleaning glass shelves...
... with warm water and dry with your fingers. FEATURES *Features may vary according to remove tape or glue. Do not use sharp instruments, rubbing alcohol, flammable fluids, or abrasive cleaners to model 5 E D F C B A H A Green LED Power On Light B Wire Freezer Basket C Freezer Control *D Freezer Shelf G E LED Light Bulb *F Fixed Door Bins G Magnet (Door Open Sensor) *H Freezer Shelf IMPORTANT Cleaning your Appliance Remove tape and glue residue from surfaces before using it. See important information about cleaning glass shelves...
Complete Owners Guide
Page 6
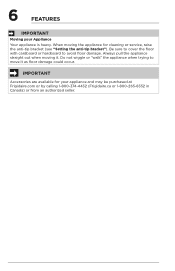
... cardboard or hardboard to move it . IMPORTANT Accessories are available for cleaning or service, raise the anti-tip bracket (see "Setting the anti-tip bracket"). 6 FEATURES IMPORTANT Moving your appliance and may be purchased at Frigidaire.com or by calling 1-800-374-4432 (Frigidaire.ca or 1-800-265-8352 in Canada) or from an authorized...
... cardboard or hardboard to move it . IMPORTANT Accessories are available for cleaning or service, raise the anti-tip bracket (see "Setting the anti-tip bracket"). 6 FEATURES IMPORTANT Moving your appliance and may be purchased at Frigidaire.com or by calling 1-800-374-4432 (Frigidaire.ca or 1-800-265-8352 in Canada) or from an authorized...
Complete Owners Guide
Page 7
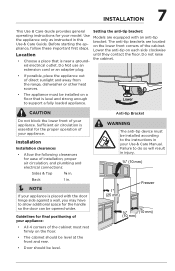
... door hinge side against a wall, you may have to do so will result in your Use & Care Manual. Use the appliance only as instructed in . Do Not use an extension cord or an adapter plug. Setting the anti-tip bracket: Models are located on each side clockwise until they contact the floor. Lower CAUTION Do not block the lower front of your appliance. Installation Installation...
... door hinge side against a wall, you may have to do so will result in your Use & Care Manual. Use the appliance only as instructed in . Do Not use an extension cord or an adapter plug. Setting the anti-tip bracket: Models are located on each side clockwise until they contact the floor. Lower CAUTION Do not block the lower front of your appliance. Installation Installation...
Complete Owners Guide
Page 8
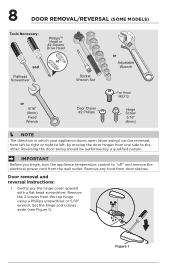
..." and remove the electrical power cord from door shelves. 8 DOOR REMOVAL/REVERSAL (SOME MODELS) Tools Necessary: PhillipsTM Head or #2 Square Drive Head or and Flathead Screwdriver Socket Wrench Set or Adjustable Wrench or 5/16" (8mm) Fixed Wrench Door Closer #2 Phillips Pan Head MSX12 Hinge Screw 5/16" (8mm) NOTE The direction in which your appliance doors open (door swing) can be performed by moving the door hinges from the top hinge using...
..." and remove the electrical power cord from door shelves. 8 DOOR REMOVAL/REVERSAL (SOME MODELS) Tools Necessary: PhillipsTM Head or #2 Square Drive Head or and Flathead Screwdriver Socket Wrench Set or Adjustable Wrench or 5/16" (8mm) Fixed Wrench Door Closer #2 Phillips Pan Head MSX12 Hinge Screw 5/16" (8mm) NOTE The direction in which your appliance doors open (door swing) can be performed by moving the door hinges from the top hinge using...

Complete Owners Guide
Page 9
... of the lower hinge pin. Using a flat head screwdriver, gently pry the door closer off of the door (see Figure 3). 4. Figure 2 Bottom Figure 3 9 Door Stopper Door Stopper Screw Bottom Hinge Pin Figure 4 Reinstall the closer/bearing assembly to avoid damage. 3. Remove the screw from the hinge bearing and the door closer (see Figure 3). 5. DOOR REMOVAL/REVERSAL (SOME MODELS) 2. Gently pry the hinge bearing out...
... of the lower hinge pin. Using a flat head screwdriver, gently pry the door closer off of the door (see Figure 3). 4. Figure 2 Bottom Figure 3 9 Door Stopper Door Stopper Screw Bottom Hinge Pin Figure 4 Reinstall the closer/bearing assembly to avoid damage. 3. Remove the screw from the hinge bearing and the door closer (see Figure 3). 5. DOOR REMOVAL/REVERSAL (SOME MODELS) 2. Gently pry the hinge bearing out...

Complete Owners Guide
Page 10
... opposite hinge. Attach the upper hinge using the three 5/16" screws. Replace the hinge cover. Reinstall the hinge pin into place. 12. Flip door stop over the hinge into the outer hole and tighten with an adjustable wrench. Figure 5 13. Reinstall the screw (see Figure 7). 90° Figure 6 Figure 7 10 DOOR REMOVAL/REVERSAL (SOME MODELS) 10. To reinstall the door, place door on lower hinge pin...
... opposite hinge. Attach the upper hinge using the three 5/16" screws. Replace the hinge cover. Reinstall the hinge pin into place. 12. Flip door stop over the hinge into the outer hole and tighten with an adjustable wrench. Figure 5 13. Reinstall the screw (see Figure 7). 90° Figure 6 Figure 7 10 DOOR REMOVAL/REVERSAL (SOME MODELS) 10. To reinstall the door, place door on lower hinge pin...
Complete Owners Guide
Page 11
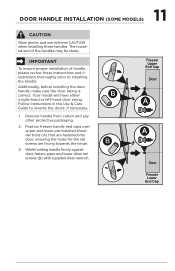
.... Follow instructions in the Use & Care Guide to installing the handle. While holding handle firmly against door, fasten upper and lower Allen set screws are facing towards the hinge. 3. DOOR HANDLE INSTALLATION (SOME MODELS) 11 CAUTION Wear gloves and use extreme CAUTION when installing these instructions and illustrations thoroughly prior to reverse the doors, if necessary. 1. Freezer Upper End Cap Door Door Freezer Lower End Cap Additionally, before installing the door handle, make sure the door swing...
.... Follow instructions in the Use & Care Guide to installing the handle. While holding handle firmly against door, fasten upper and lower Allen set screws are facing towards the hinge. 3. DOOR HANDLE INSTALLATION (SOME MODELS) 11 CAUTION Wear gloves and use extreme CAUTION when installing these instructions and illustrations thoroughly prior to reverse the doors, if necessary. 1. Freezer Upper End Cap Door Door Freezer Lower End Cap Additionally, before installing the door handle, make sure the door swing...

Complete Owners Guide
Page 12
... to alert you must unplug the power cord from cooling, but does not disconnect the power to stabilize. • For colder temperatures, adjust the knob towards Coldest. • For warmer temperatures, adjust the knob towards Cold. Door Ajar Alert This alert will sound to operate with food. The light glows even when the temperature control is closed for 5 minutes or more. Alarms High Temp Alert If the temperature inside the cabinet exceeds 23°F (-5°...
... to alert you must unplug the power cord from cooling, but does not disconnect the power to stabilize. • For colder temperatures, adjust the knob towards Coldest. • For warmer temperatures, adjust the knob towards Cold. Door Ajar Alert This alert will sound to operate with food. The light glows even when the temperature control is closed for 5 minutes or more. Alarms High Temp Alert If the temperature inside the cabinet exceeds 23°F (-5°...

Complete Owners Guide
Page 13
... side of shelf rails and carefully push the shelf back into the tabs. To install the door bins: 1. The bin sides will lock into position, making sure the shelf clips go in the notch in on the bin and pull it straight out. Frequently used items can be quickly selected. Push in the liner. 1. Before adjusting the shelves, remove all food. Wire Shelf Freezer Basket The freezer basket is...
... side of shelf rails and carefully push the shelf back into the tabs. To install the door bins: 1. The bin sides will lock into position, making sure the shelf clips go in the notch in on the bin and pull it straight out. Frequently used items can be quickly selected. Push in the liner. 1. Before adjusting the shelves, remove all food. Wire Shelf Freezer Basket The freezer basket is...
Complete Owners Guide
Page 14
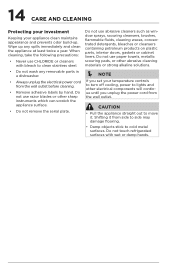
.... 14 CARE AND CLEANING Protecting your investment Keeping your temperature controls to turn off cooling, power to lights and other sharp instruments which can scratch the appliance surface. • Do not remove the serial plate. CAUTION • Pull the appliance straight out to cold metal surfaces. Do not use razor blades or other electrical components will continue until you set your appliance clean maintains appearance...
.... 14 CARE AND CLEANING Protecting your investment Keeping your temperature controls to turn off cooling, power to lights and other sharp instruments which can scratch the appliance surface. • Do not remove the serial plate. CAUTION • Pull the appliance straight out to cold metal surfaces. Do not use razor blades or other electrical components will continue until you set your appliance clean maintains appearance...
Complete Owners Guide
Page 15
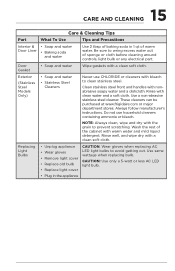
... warm water. 15 CARE AND CLEANING Care & Cleaning Tips Part What To Use Tips and Precautions Interior & • Soap and water Door Liner • Baking soda and water Use 2 tbsp of baking soda in the appliance CAUTION: Wear gloves when replacing AC LED light bulbs to wring excess water out of sponge or cloth before cleaning around controls, light bulb or any electrical part. Be sure to avoid getting cut. Door Gasket • Soap and water...
... warm water. 15 CARE AND CLEANING Care & Cleaning Tips Part What To Use Tips and Precautions Interior & • Soap and water Door Liner • Baking soda and water Use 2 tbsp of baking soda in the appliance CAUTION: Wear gloves when replacing AC LED light bulbs to wring excess water out of sponge or cloth before cleaning around controls, light bulb or any electrical part. Be sure to avoid getting cut. Door Gasket • Soap and water...
Complete Owners Guide
Page 16
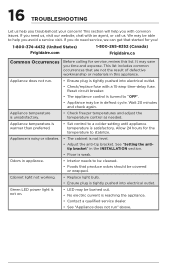
... service, review this appliance. Cabinet light not working. • Replace light bulb. • Ensure plug is tightly pushed into electrical outlet. • Check/replace fuse with a 15-amp time-delay fuse. Odors in defrost cycle. Green LED power light is not on. • LED may be burned out. • No electric current is reaching the appliance. • Contact a qualified service dealer. • See "Appliance does not run . • Ensure plug...
... service, review this appliance. Cabinet light not working. • Replace light bulb. • Ensure plug is tightly pushed into electrical outlet. • Check/replace fuse with a 15-amp time-delay fuse. Odors in defrost cycle. Green LED power light is not on. • LED may be burned out. • No electric current is reaching the appliance. • Contact a qualified service dealer. • See "Appliance does not run . • Ensure plug...
Complete Owners Guide
Page 17
... God. Service calls to repair or replace appliance light bulbs, air filters, water filters, other consumables, or knobs, handles, or other appropriate payment record to establish the warranty period should service be obtained by contacting Electrolux at the addresses or phone numbers below. Damages to the finish of the unit. 4. use of parts other than genuine Electrolux parts or parts obtained from its original owner to another party or removed outside the...
... God. Service calls to repair or replace appliance light bulbs, air filters, water filters, other consumables, or knobs, handles, or other appropriate payment record to establish the warranty period should service be obtained by contacting Electrolux at the addresses or phone numbers below. Damages to the finish of the unit. 4. use of parts other than genuine Electrolux parts or parts obtained from its original owner to another party or removed outside the...

Complete Owners Guide
Page 18
home welcome Our home is your registration card for more information.) Frigidaire.com 1-800-374-4432 Frigidaire.ca 1-800-265-8352 Visit us if you need help with any of these things: owner support accessories service registration (See your home.
home welcome Our home is your registration card for more information.) Frigidaire.com 1-800-374-4432 Frigidaire.ca 1-800-265-8352 Visit us if you need help with any of these things: owner support accessories service registration (See your home.
Wiring Diagram
Page 1
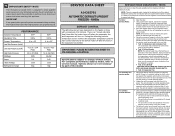
... appliance. PERFORMANCE Ambient Temperature 70ºF Operating Time 100% Freezer Temperature 4 to 56 PSIG 46.6W 0.61 115V 50g SERVICE DATA SHEET A14365701 AUTOMATIC DEFROST UPRIGHT FREEZER - During the defrosting period a temperature sensor monitors the evaporator temperature and the main control board turns the defrost heater off indicating the unit is designed to power. To Enter Service Mode: • Open the door. • Using a permanent magnet, activate the magnetic switch 4 times within...
... appliance. PERFORMANCE Ambient Temperature 70ºF Operating Time 100% Freezer Temperature 4 to 56 PSIG 46.6W 0.61 115V 50g SERVICE DATA SHEET A14365701 AUTOMATIC DEFROST UPRIGHT FREEZER - During the defrosting period a temperature sensor monitors the evaporator temperature and the main control board turns the defrost heater off indicating the unit is designed to power. To Enter Service Mode: • Open the door. • Using a permanent magnet, activate the magnetic switch 4 times within...

Wiring Diagram
Page 2
Wiring Diagram A14353601
Wiring Diagram A14353601


