

Use and Care Manual
Page 1
All about the Use &Care of your Freezer A07289901 (December 2016) TABLE OF CONTENTS Product Registration 2 Setting the Temperature Control 6 Important Safety Instructions 2 Care and Cleaning 7 First Steps 4 Before You Call 8 Feature Diagram 6 Major Appliance Warranty 9 www.frigidaire.com USA 1-800-944-9044 www.frigidaire.ca Canada 1-800-265-8352
All about the Use &Care of your Freezer A07289901 (December 2016) TABLE OF CONTENTS Product Registration 2 Setting the Temperature Control 6 Important Safety Instructions 2 Care and Cleaning 7 First Steps 4 Before You Call 8 Feature Diagram 6 Major Appliance Warranty 9 www.frigidaire.com USA 1-800-944-9044 www.frigidaire.ca Canada 1-800-265-8352
Use and Care Manual
Page 2
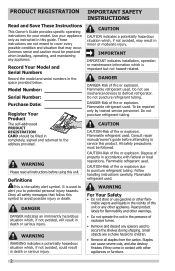
... be followed. Follow handling instructions carefully. Flammable refrigerant used to alert you to secure the shelves during shipping. Flammable refrigerant used . Obey all instructions before attempting to service this unit or any spacers used to potential personal injury hazards. Use your model. Model Number: Serial Number: Purchase Date: Register Your Product The self-addressed PRODUCT REGISTRATION CARD should be repaired only by trained service personnel. Do not puncture refrigerant tubing. Small objects are...
... be followed. Follow handling instructions carefully. Flammable refrigerant used to alert you to secure the shelves during shipping. Flammable refrigerant used . Obey all instructions before attempting to service this unit or any spacers used to potential personal injury hazards. Use your model. Model Number: Serial Number: Purchase Date: Register Your Product The self-addressed PRODUCT REGISTRATION CARD should be repaired only by trained service personnel. Do not puncture refrigerant tubing. Small objects are...

Use and Care Manual
Page 3
... damaging the power cord. • Unplug the appliance before cleaning and before replacing a light bulb to the serial plate for testing. • To prevent the appliance from being discarded. If you suspect your power company for correct electrical rating. We strongly encourage responsible appliance recycling/disposal methods. WARNING Avoid fire hazard or electric shock. Operating the unit with a 15-amp time delay fuse or circuit...
... damaging the power cord. • Unplug the appliance before cleaning and before replacing a light bulb to the serial plate for testing. • To prevent the appliance from being discarded. If you suspect your power company for correct electrical rating. We strongly encourage responsible appliance recycling/disposal methods. WARNING Avoid fire hazard or electric shock. Operating the unit with a 15-amp time delay fuse or circuit...
Use and Care Manual
Page 4
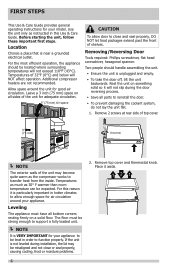
... of the unit may be level in hotter climates to allow door to transfer heat from the inside. Use the unit only as the compressor works to close or seal properly, causing cooling, frost or moisture problems. 4 2. Two people should be expected. Place it is near a grounded electrical outlet. For the most efficient operation, the appliance should handle assembling the unit. • Ensure...
... of the unit may be level in hotter climates to allow door to transfer heat from the inside. Use the unit only as the compressor works to close or seal properly, causing cooling, frost or moisture problems. 4 2. Two people should be expected. Place it is near a grounded electrical outlet. For the most efficient operation, the appliance should handle assembling the unit. • Ensure...
Use and Care Manual
Page 5
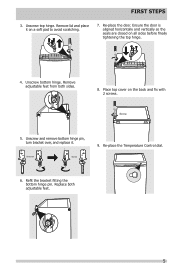
... closed on the back and fix with 2 screws. Remove adjustable feet from both adjustable feet. 5 Screw 5. Unscrew Screw 9. Re-place the Temperature Control dial. 6. FIRST STEPS 3. Replace both sides. 8. Re-place the door. Refit the bracket fitting the bottom hinge pin. Unscrew bottom hinge. Unscrew and remove bottom hinge pin, turn bracket over, and replace it on a soft pad to avoid scratching. 7. Remove lid and place it . Unscrew top...
... closed on the back and fix with 2 screws. Remove adjustable feet from both adjustable feet. 5 Screw 5. Unscrew Screw 9. Re-place the Temperature Control dial. 6. FIRST STEPS 3. Replace both sides. 8. Re-place the door. Refit the bracket fitting the bottom hinge pin. Unscrew bottom hinge. Unscrew and remove bottom hinge pin, turn bracket over, and replace it on a soft pad to avoid scratching. 7. Remove lid and place it . Unscrew top...
Use and Care Manual
Page 6
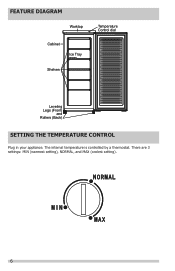
FEATURE DIAGRAM Worktop Cabinet Ice Tray Shelves Temperature Control dial Leveling Legs (Front) and Rollers (Back) SETTING THE TEMPERATURE CONTROL Plug in your appliance. There are 3 settings: MIN (warmest setting), NORMAL, and MAX (coolest setting). 6 The internal temperature is controlled by a thermostat.
FEATURE DIAGRAM Worktop Cabinet Ice Tray Shelves Temperature Control dial Leveling Legs (Front) and Rollers (Back) SETTING THE TEMPERATURE CONTROL Plug in your appliance. There are 3 settings: MIN (warmest setting), NORMAL, and MAX (coolest setting). 6 The internal temperature is controlled by a thermostat.
Use and Care Manual
Page 7
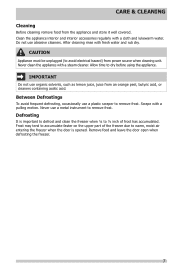
... and lukewarm water. Remove food and leave the door open when defrosting the freezer. 7 Frost may tend to avoid electrical hazard) from the appliance and store it well covered. Clean the appliance interior and interior accessories regularly with a steam cleaner. CAUTION Appliance must be unplugged (to accumulate faster on the upper part of frost has accumulated. Scrape with fresh water and rub dry. Never use organic...
... and lukewarm water. Remove food and leave the door open when defrosting the freezer. 7 Frost may tend to avoid electrical hazard) from the appliance and store it well covered. Clean the appliance interior and interior accessories regularly with a steam cleaner. CAUTION Appliance must be unplugged (to accumulate faster on the upper part of frost has accumulated. Scrape with fresh water and rub dry. Never use organic...
Use and Care Manual
Page 8
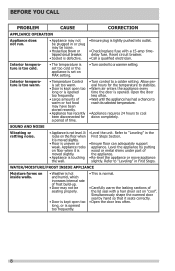
...; Carefully warm the leaking sections of time. • Turn control to a colder setting. Interior temperature is too warm. • Temperature Control is set too warm. • Door is kept open too long, or is opened too frequently. • This is opened too frequently. • Large amounts of warm or hot food may not be loose. • House fuse blown or tripped circuit breaker. • Socket is defective. • Ensure plug is opened...
...; Carefully warm the leaking sections of time. • Turn control to a colder setting. Interior temperature is too warm. • Temperature Control is set too warm. • Door is kept open too long, or is opened too frequently. • This is opened too frequently. • Large amounts of warm or hot food may not be loose. • House fuse blown or tripped circuit breaker. • Socket is defective. • Ensure plug is opened...
Use and Care Manual
Page 9
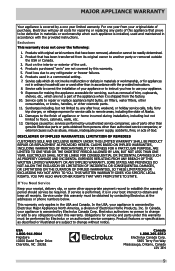
... all receipts. use of parts other than genuine Electrolux parts or parts obtained from its original owner to use or used other appropriate payment record to repair or replace appliance light bulbs, air filters, water filters, other consumables, or knobs, handles, or other than in accordance with the provided instructions. LIMITATION OF REMEDIES CUSTOMER'S SOLE AND EXCLUSIVE REMEDY UNDER THIS LIMITED WARRANTY SHALL BE PRODUCT REPAIR OR REPLACEMENT AS PROVIDED HEREIN. ELECTROLUX SHALL NOT...
... all receipts. use of parts other than genuine Electrolux parts or parts obtained from its original owner to use or used other appropriate payment record to repair or replace appliance light bulbs, air filters, water filters, other consumables, or knobs, handles, or other than in accordance with the provided instructions. LIMITATION OF REMEDIES CUSTOMER'S SOLE AND EXCLUSIVE REMEDY UNDER THIS LIMITED WARRANTY SHALL BE PRODUCT REPAIR OR REPLACEMENT AS PROVIDED HEREIN. ELECTROLUX SHALL NOT...


