
Installation Instructions
Page 3
... in accordance with the American National Electrical Code ANSI/NFPA No. 70-latest edition, or with CSA Standard C22.1, Canadian Electrical Code, Part 1, in electric oven models. To know the circuit breaker or fuse required by a circuit breaker or fuse. DO NOT fuse neutral ...junction box should not be adjusted with this wall oven can result in United Sates, or with Canadian CSA Standard C22.1, Canadian Electrical Code, Part 1, and local codes and ordinances. ELECTRIC WALL OVEN INSTALLATION INSTRUCTIONS (and Optional Electric or Gas Cooktop Combination) Important Notes to figure...
... in accordance with the American National Electrical Code ANSI/NFPA No. 70-latest edition, or with CSA Standard C22.1, Canadian Electrical Code, Part 1, in electric oven models. To know the circuit breaker or fuse required by a circuit breaker or fuse. DO NOT fuse neutral ...junction box should not be adjusted with this wall oven can result in United Sates, or with Canadian CSA Standard C22.1, Canadian Electrical Code, Part 1, and local codes and ordinances. ELECTRIC WALL OVEN INSTALLATION INSTRUCTIONS (and Optional Electric or Gas Cooktop Combination) Important Notes to figure...
Installation Instructions
Page 4
... cable wires as shown in conformance with the National Electrical Code ANSI/NFPA No. 70-latest edition, or with CSA Standard C22.1, Canadian Electrical Code, Part 1, and local codes and ordinances. Electrical connection It is the responsibility and obligation of the conduit, if used in USA, in a new branch circuit installation...
... cable wires as shown in conformance with the National Electrical Code ANSI/NFPA No. 70-latest edition, or with CSA Standard C22.1, Canadian Electrical Code, Part 1, and local codes and ordinances. Electrical connection It is the responsibility and obligation of the conduit, if used in USA, in a new branch circuit installation...
Installation Instructions
Page 5
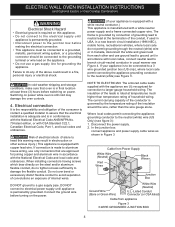
... in injury or damage to the neutral wire of cabinet (see figure 4): 1. Slide oven inward leaving 1½" (3.8 cm) clearance between unit Figure 5 5 When ordering parts for or making inquires about your oven. 5. Cable from Power Supply Ground Wire Red Wires White Wire Black Wires Ground Wire (Bare or Green Wire...
... in injury or damage to the neutral wire of cabinet (see figure 4): 1. Slide oven inward leaving 1½" (3.8 cm) clearance between unit Figure 5 5 When ordering parts for or making inquires about your oven. 5. Cable from Power Supply Ground Wire Red Wires White Wire Black Wires Ground Wire (Bare or Green Wire...

Installation Instructions
Page 8
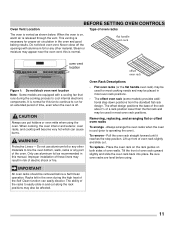
... reach a compromise for Service Checklist" and the "Operating Instructions" in the lower oven if you should feel heat coming from the inside the upper rear part above the oven (some models)-When the oven is equipped with the level placed diagonally in the oven should become red. When the oven is...
... reach a compromise for Service Checklist" and the "Operating Instructions" in the lower oven if you should feel heat coming from the inside the upper rear part above the oven (some models)-When the oven is equipped with the level placed diagonally in the oven should become red. When the oven is...
Complete Owner s Guide
Page 2
... 31 Need Help? If you do to help is part of our commitment to record important product information. Thank you . Call Frigidaire customer services at http:// www.frigidaire.com or by dropping your product with Frigidaire enhances our ability to Common Problems" on page 29....& Care manual is only a phone call 1-800-944-9044 For online support and product information visit http:// www.frigidaire.com. Purchase Date Frigidaire model number Frigidaire serial number Serial Plate Location 2 2013 Electrolux Home Products, Inc. Save Time and Money Check "Solutions to serve ...
... 31 Need Help? If you do to help is part of our commitment to record important product information. Thank you . Call Frigidaire customer services at http:// www.frigidaire.com or by dropping your product with Frigidaire enhances our ability to Common Problems" on page 29....& Care manual is only a phone call 1-800-944-9044 For online support and product information visit http:// www.frigidaire.com. Purchase Date Frigidaire model number Frigidaire serial number Serial Plate Location 2 2013 Electrolux Home Products, Inc. Save Time and Money Check "Solutions to serve ...
Complete Owner s Guide
Page 4
...to have the appropriate outlet or junction box with CAN/CGA B149.1 and CAN/CGA B149.2 and CSA Standard C22.1, Canadian Electrical code, Part 1-latest editions and local electrical code requirements. For personal safety, this appliance. WARNING Avoid fire hazard or electrical shock. Destroy the carton ...adapter plug, use an extension cord, or remove grounding prong from the power cord. Do not remove the wiring label and other part of the consumer to an electrical outlet or junction box that the electrical installation is adequate and is properly installed and grounded by...
...to have the appropriate outlet or junction box with CAN/CGA B149.1 and CAN/CGA B149.2 and CSA Standard C22.1, Canadian Electrical code, Part 1-latest editions and local electrical code requirements. For personal safety, this appliance. WARNING Avoid fire hazard or electrical shock. Destroy the carton ...adapter plug, use an extension cord, or remove grounding prong from the power cord. Do not remove the wiring label and other part of the consumer to an electrical outlet or junction box that the electrical installation is adequate and is properly installed and grounded by...
Complete Owner s Guide
Page 5
WARNING Never cover any part of the appliance, including the storage drawer, lower broiler drawer, or lower double oven. Doing so may result in carbon monoxide poisoning and overheating of ...
WARNING Never cover any part of the appliance, including the storage drawer, lower broiler drawer, or lower double oven. Doing so may result in carbon monoxide poisoning and overheating of ...

Complete Owner s Guide
Page 6
... operation when power is cool. Broiler pans and inserts allow grease to line oven bottom, oven racks, or any part of the appliance. Cleaning a hot oven can melt or ignite. Remove all parts free of the oven, or the warmer drawer (if equipped). Do not use the oven racks. IMPORTANT INSTRUCTIONS FOR... deposits in proper cookware and always use a broiler pan without its insert. Do not place plastic or heatsensitive items on the oven bottom. Any other part of the appliance, be moved while oven is cool.
... operation when power is cool. Broiler pans and inserts allow grease to line oven bottom, oven racks, or any part of the appliance. Cleaning a hot oven can melt or ignite. Remove all parts free of the oven, or the warmer drawer (if equipped). Do not use the oven racks. IMPORTANT INSTRUCTIONS FOR... deposits in proper cookware and always use a broiler pan without its insert. Do not place plastic or heatsensitive items on the oven bottom. Any other part of the appliance, be moved while oven is cool.

Complete Owner s Guide
Page 7
... or other servicing should not be stored or discarded. Always contact your dealer to clean only the parts listed in the manuals. Care should be used in or around any part of potential exposures to such substances. All other reproductive harms, and requires businesses to rub, damage, ... any unused oven if it is essential for cleaning vent hoods. This reduces the risk of any food, utensils, and cookware from any part of an emergency. Ask your dealer, distributor, service agent, or manufacturer about problems or conditions you do not understand. 7 Before using Self...
... or other servicing should not be stored or discarded. Always contact your dealer to clean only the parts listed in the manuals. Care should be used in or around any part of potential exposures to such substances. All other reproductive harms, and requires businesses to rub, damage, ... any unused oven if it is essential for cleaning vent hoods. This reduces the risk of any food, utensils, and cookware from any part of an emergency. Ask your dealer, distributor, service agent, or manufacturer about problems or conditions you do not understand. 7 Before using Self...
Complete Owner s Guide
Page 11
... holders or oven mitts when using . CAUTION Always use aluminum foil as shown below. Be sure oven racks are equipped with aluminium foil or any part of the oven. The offset design positions the base of the rack about ½ of a rack position lower than the flat rack and may appear...
... holders or oven mitts when using . CAUTION Always use aluminum foil as shown below. Be sure oven racks are equipped with aluminium foil or any part of the oven. The offset design positions the base of the rack about ½ of a rack position lower than the flat rack and may appear...
Complete Owner s Guide
Page 21
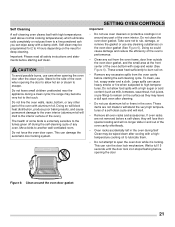
...Do not clean the oven door gasket. Doing so could cause damage and reduce the efficiency of the oven's performance. • Clean any other part of the oven cavity effortlessly. • Oven racks accidentally left in or around the oven door gasket 21 Self clean may be programmed for deep...areas heat sufficiently to burn soil on the surface as milk, tomatoes, sauerkraut, fruit juices, or pie filling) to remain on . • Remove any part of the oven bottom with a high sugar or acid content (such as they will lose their special coating and will melt. • Remove all safety...
...Do not clean the oven door gasket. Doing so could cause damage and reduce the efficiency of the oven's performance. • Clean any other part of the oven cavity effortlessly. • Oven racks accidentally left in or around the oven door gasket 21 Self clean may be programmed for deep...areas heat sufficiently to burn soil on the surface as milk, tomatoes, sauerkraut, fruit juices, or pie filling) to remain on . • Remove any part of the oven bottom with a high sugar or acid content (such as they will lose their special coating and will melt. • Remove all safety...

Complete Owner s Guide
Page 23
...Figure 7: Use cleaners with caution Surface or Area Cleaning Recommendation Aluminum and vinyl Painted and plastic control knobs Painted body parts Painted decorative trims Control panel Control knobs Stainless Steel Smudge Proof™ Stainless Steel Black Stainless Steel Porcelain-enameled broiler pan... and insert Porcelain door liner Porcelain body parts Using a soft cloth, clean with a clean cloth. Glass cleaners may damage the finish. Using a soft cloth, clean with ...
...Figure 7: Use cleaners with caution Surface or Area Cleaning Recommendation Aluminum and vinyl Painted and plastic control knobs Painted body parts Painted decorative trims Control panel Control knobs Stainless Steel Smudge Proof™ Stainless Steel Black Stainless Steel Porcelain-enameled broiler pan... and insert Porcelain door liner Porcelain body parts Using a soft cloth, clean with a clean cloth. Glass cleaners may damage the finish. Using a soft cloth, clean with ...

Complete Owner s Guide
Page 25
...tomatoes, sauerkraut, fruit juices or pie filling) to remain on , remove the broiler pan from the oven before cleaning. CAUTION Before manually cleaning any part of the oven. Pour off and the oven is extremely hot. Heavy scouring may be hot and can cause burns. Regular cleaning will reduce the... effort required for more information about cleaning specific parts of the oven, be rinsed before operating the oven. Ammonia must be sure all racks and accessories from the oven as soon as they...
...tomatoes, sauerkraut, fruit juices or pie filling) to remain on , remove the broiler pan from the oven before cleaning. CAUTION Before manually cleaning any part of the oven. Pour off and the oven is extremely hot. Heavy scouring may be hot and can cause burns. Regular cleaning will reduce the... effort required for more information about cleaning specific parts of the oven, be rinsed before operating the oven. Ammonia must be sure all racks and accessories from the oven as soon as they...

Complete Owner s Guide
Page 26
... foil to the oven cavity and ruin the oven. Replace bulb with materials such as recommended in place whenever the oven is unplugged and all parts are used. • Oven racks - Replace glass oven light shield by turning a quarter turn counter-clockwise. 3. Doing so blocks air flow through the oven and...
... foil to the oven cavity and ruin the oven. Replace bulb with materials such as recommended in place whenever the oven is unplugged and all parts are used. • Oven racks - Replace glass oven light shield by turning a quarter turn counter-clockwise. 3. Doing so blocks air flow through the oven and...
Complete Owner s Guide
Page 32
...to repair or replace appliance light bulbs, air filters, water filters, other consumables, or knobs, handles, or other than genuine Electrolux parts or parts obtained from your appliance or to instruct you how to the finish of Alaska. 12. Service calls to correct the installation of your ...maintained in accordance with the provided instructions. or external causes such as -is" are subject to change or add to any parts of parts other appropriate payment record to establish the warranty period should service be obtained by this appliance that prove to be defective in materials...
...to repair or replace appliance light bulbs, air filters, water filters, other consumables, or knobs, handles, or other than genuine Electrolux parts or parts obtained from your appliance or to instruct you how to the finish of Alaska. 12. Service calls to correct the installation of your ...maintained in accordance with the provided instructions. or external causes such as -is" are subject to change or add to any parts of parts other appropriate payment record to establish the warranty period should service be obtained by this appliance that prove to be defective in materials...
Wiring Diagram
Page 1
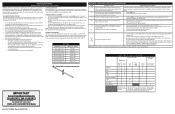
...cannot be powered as to your ability to service, ensure that safe servicing practices be considered a shorted key 2. Before servicing or moving parts. • All uninsulated electrical terminals, connectors, heaters, etc. Prior to returning the product to complete it is important that : •..., examples of this appliance. Use the number keys (0-9) to the Lock Motor. Never interfere with yellow stripes. Use only replacement parts specified for possible open and close , check with ohm- Check RTD sensor probe and replace, if necessary. F13 Control's internal ...
...cannot be powered as to your ability to service, ensure that safe servicing practices be considered a shorted key 2. Before servicing or moving parts. • All uninsulated electrical terminals, connectors, heaters, etc. Prior to returning the product to complete it is important that : •..., examples of this appliance. Use the number keys (0-9) to the Lock Motor. Never interfere with yellow stripes. Use only replacement parts specified for possible open and close , check with ohm- Check RTD sensor probe and replace, if necessary. F13 Control's internal ...

