

Installation Instructions
Page 1
... a water supply, make sure the ice maker's power switch is the distance from the water valve inlet at the rear of your Use & Care Guide). Once the refrigerator is larger than an entrance, consider two options: • Remove the entrance door if one exists. • Remove the refrigerator doors (see "Door Removal Instructions" in front of its water supply (copper tubing) connections. Top Hinge Cover Top Hinge Shim Pin Central Hinge Door Stop Screw Door Stop Washer Hinge Pin Bottom Hinge Screws Toe Grille 9 Installation...
... a water supply, make sure the ice maker's power switch is the distance from the water valve inlet at the rear of your Use & Care Guide). Once the refrigerator is larger than an entrance, consider two options: • Remove the entrance door if one exists. • Remove the refrigerator doors (see "Door Removal Instructions" in front of its water supply (copper tubing) connections. Top Hinge Cover Top Hinge Shim Pin Central Hinge Door Stop Screw Door Stop Washer Hinge Pin Bottom Hinge Screws Toe Grille 9 Installation...
Complete Owner s Guide
Page 1
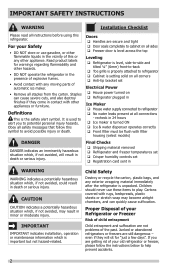
All about the Use &Care of your Refrigerator 807876507 (October 2016) TABLE OF CONTENTS Important Safety Instructions 2 Controls 15 Features At A Glance 4 Optional Features 17 Installation 5 Normal Operating Sounds and Sights..........20 Door Removal/Reversal Instructions 7 Care and Cleaning 21 Handle Installation 10 Before you Call 23 Connecting Water Supply 12 Major Appliance Warranty 24 Ice Service 14 www.frigidaire.com USA 1-800-944-9044 www.frigidaire.ca Canada 1-800-265-8352
All about the Use &Care of your Refrigerator 807876507 (October 2016) TABLE OF CONTENTS Important Safety Instructions 2 Controls 15 Features At A Glance 4 Optional Features 17 Installation 5 Normal Operating Sounds and Sights..........20 Door Removal/Reversal Instructions 7 Care and Cleaning 21 Handle Installation 10 Before you Call 23 Connecting Water Supply 12 Major Appliance Warranty 24 Ice Service 14 www.frigidaire.com USA 1-800-944-9044 www.frigidaire.ca Canada 1-800-265-8352
Complete Owner s Guide
Page 2
... in Ice Maker House water supply connected to refrigerator No water leaks present at all connections - Final Checks Shipping material removed Refrigerator and freezer temperatures set Crisper humidity controls set Electrical Power House power turned on Refrigerator plugged in minor or moderate injury. Junked or abandoned refrigerators or freezers are secure and tight Door seals completely to cabinet on all sides Freezer door is level across the top Leveling Refrigerator is level...
... in Ice Maker House water supply connected to refrigerator No water leaks present at all connections - Final Checks Shipping material removed Refrigerator and freezer temperatures set Crisper humidity controls set Electrical Power House power turned on Refrigerator plugged in minor or moderate injury. Junked or abandoned refrigerators or freezers are secure and tight Door seals completely to cabinet on all sides Freezer door is level across the top Leveling Refrigerator is level...

Complete Owner s Guide
Page 3
... controls) will operate properly. IMPORTANT SAFETY INSTRUCTIONS Proper Disposal of environmental legislation. 3 WARNING Do not attempt to replace LED lights due to prevent any circumstances, cut, remove, or bypass the grounding prong. Shelves may not easily climb inside. • Have refrigerant removed by a qualified service technician. • Do not plug the unit into its own dedicated 115 Volt, 60 Hz., 15 Amp, AC only electrical...
... controls) will operate properly. IMPORTANT SAFETY INSTRUCTIONS Proper Disposal of environmental legislation. 3 WARNING Do not attempt to replace LED lights due to prevent any circumstances, cut, remove, or bypass the grounding prong. Shelves may not easily climb inside. • Have refrigerant removed by a qualified service technician. • Do not plug the unit into its own dedicated 115 Volt, 60 Hz., 15 Amp, AC only electrical...
Complete Owner s Guide
Page 4
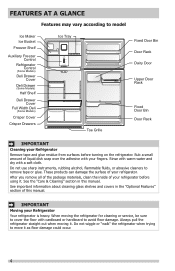
... moving the refrigerator for cleaning or service, be sure to cover the floor with your fingers. FEATURES AT A GLANCE Features may vary according to model Ice Maker Ice Bucket Freezer Shelf Auxiliary Freezer Control Refrigerator Control (Some Models) Deli Drawer Cover Deli Drawer (Some Models) Half Shelf Deli Drawer Cover Full Width Deli (Some Models) Crisper Cover Crisper Drawers Ice Tray Toe Grille Fixed Door Bin Door Rack Dairy Door Upper Door Rack Fixed Door Bin Door Rack IMPORTANT Cleaning your Refrigerator Remove tape and glue residue from surfaces before using it as...
... moving the refrigerator for cleaning or service, be sure to cover the floor with your fingers. FEATURES AT A GLANCE Features may vary according to model Ice Maker Ice Bucket Freezer Shelf Auxiliary Freezer Control Refrigerator Control (Some Models) Deli Drawer Cover Deli Drawer (Some Models) Half Shelf Deli Drawer Cover Full Width Deli (Some Models) Crisper Cover Crisper Drawers Ice Tray Toe Grille Fixed Door Bin Door Rack Dairy Door Upper Door Rack Fixed Door Bin Door Rack IMPORTANT Cleaning your Refrigerator Remove tape and glue residue from surfaces before using it as...

Complete Owner s Guide
Page 5
... toe grille: 1. CAUTION Do not install the refrigerator where the surrounding air temperature may reach 110°F (43°C) or above normal operating temperatures. some models NOTE In case of your refrigerator is packaged with the covers installed. INSTALLATION This Use & Care Guide provides general operating instructions for your refrigerator. 2. Remove the cover on a floor that is level and strong enough to support a fully loaded refrigerator. • Doors should tilt ¼-inch (6 mm...
... toe grille: 1. CAUTION Do not install the refrigerator where the surrounding air temperature may reach 110°F (43°C) or above normal operating temperatures. some models NOTE In case of your refrigerator is packaged with the covers installed. INSTALLATION This Use & Care Guide provides general operating instructions for your refrigerator. 2. Remove the cover on a floor that is level and strong enough to support a fully loaded refrigerator. • Doors should tilt ¼-inch (6 mm...
Complete Owner s Guide
Page 8
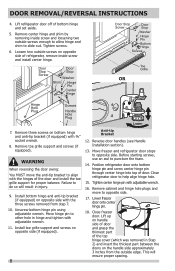
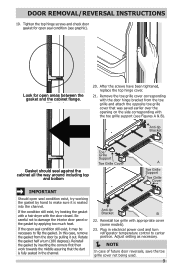
... refrigerator door off of the door and install the toe grille support for proper balance. Position refrigerator door onto bottom hinge pin and screw center hinge pin through center hinge into top of the top hinge cover (which was removed in Step 2) and insert the thickest part between the doors on the handle side approximately 3 inches from step 7. 10. DOOR REMOVAL/REVERSAL INSTRUCTIONS 4. Remove three screws on opposite side with adjustable wrench...
... refrigerator door off of the door and install the toe grille support for proper balance. Position refrigerator door onto bottom hinge pin and screw center hinge pin through center hinge into top of the top hinge cover (which was removed in Step 2) and insert the thickest part between the doors on the handle side approximately 3 inches from step 7. 10. DOOR REMOVAL/REVERSAL INSTRUCTIONS 4. Remove three screws on opposite side with adjustable wrench...
Complete Owner s Guide
Page 9
... hinge cover. 21. Anti-tip Bracket B 22. Look for open areas between the gasket and the cabinet flange. 20. Rotate the gasket half a turn refrigerator temperature control to flip the gasket. Reinstall toe grille with the toe grille support (see graphic). Plug in the channel. Adjust setting as necessary. NOTE In case of future door reversals, save the toe grille cover not being used. 9 Anti-tip Bracket Gasket...
... hinge cover. 21. Anti-tip Bracket B 22. Look for open areas between the gasket and the cabinet flange. 20. Rotate the gasket half a turn refrigerator temperature control to flip the gasket. Reinstall toe grille with the toe grille support (see graphic). Plug in the channel. Adjust setting as necessary. NOTE In case of future door reversals, save the toe grille cover not being used. 9 Anti-tip Bracket Gasket...
Complete Owner s Guide
Page 12
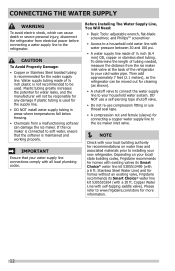
...: • Copper or Stainless Steel braided tubing is recommended for more information. 12 Plastic tubing greatly increases the potential for water leaks, and the manufacturer will not be used for the supply line. • DO NOT install water supply tubing in areas where temperatures fall below freezing. • Chemicals from electrical power before connecting a water supply line to your new refrigerator. IMPORTANT Ensure that the softener is connected to the ice maker inlet valve. NOTE...
...: • Copper or Stainless Steel braided tubing is recommended for more information. 12 Plastic tubing greatly increases the potential for water leaks, and the manufacturer will not be used for the supply line. • DO NOT install water supply tubing in areas where temperatures fall below freezing. • Chemicals from electrical power before connecting a water supply line to your new refrigerator. IMPORTANT Ensure that the softener is connected to the ice maker inlet valve. NOTE...
Complete Owner s Guide
Page 13
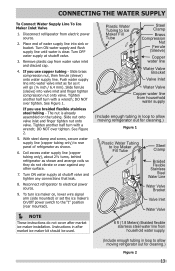
...) or set the ice maker's On/Off power switch to Ice Maker Fill Tube Steel Clamp Braided Flexible Stainless Steel Water Line Water Valve Bracket Valve Inlet Water Valve 6 ft (1.8 Meters) Braided flexible stainless steel water line from household water supply. (Include enough tubing in after market ice maker installation. If you use braided flexible stainless steel tubing - Coil excess water supply line (copper tubing only), about 2½ turns, behind refrigerator as shown. 6. To turn ice maker on the tubing. Instructions in loop to allow moving refrigerator out for cleaning...
...) or set the ice maker's On/Off power switch to Ice Maker Fill Tube Steel Clamp Braided Flexible Stainless Steel Water Line Water Valve Bracket Valve Inlet Water Valve 6 ft (1.8 Meters) Braided flexible stainless steel water line from household water supply. (Include enough tubing in after market ice maker installation. If you use braided flexible stainless steel tubing - Coil excess water supply line (copper tubing only), about 2½ turns, behind refrigerator as shown. 6. To turn ice maker on the tubing. Instructions in loop to allow moving refrigerator out for cleaning...
Complete Owner s Guide
Page 14
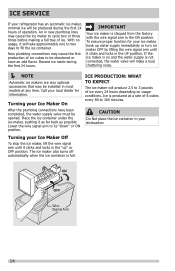
... making a full tray of ice. ICE PRODUCTION: WHAT TO EXPECT The ice maker will produce 2.5 to 3 pounds of ice every 24 hours depending on and the water supply is on usage conditions. ICE SERVICE If your refrigerator has an automatic ice maker, minimal ice will be installed in most models at a rate of 8 cubes every 80 to 160 minutes. Air in the "up water supply immediately or turn ice maker OFF by lifting the wire...
... making a full tray of ice. ICE PRODUCTION: WHAT TO EXPECT The ice maker will produce 2.5 to 3 pounds of ice every 24 hours depending on and the water supply is on usage conditions. ICE SERVICE If your refrigerator has an automatic ice maker, minimal ice will be installed in most models at a rate of 8 cubes every 80 to 160 minutes. Air in the "up water supply immediately or turn ice maker OFF by lifting the wire...
Complete Owner s Guide
Page 19
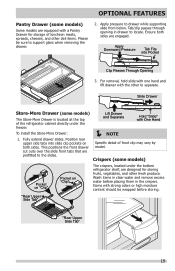
... through opening in the crispers. Position rear upper side tabs into Pocket Clip Passes Through Opening 3. Lift Drawer and Separate Hold "Slide" with strong odors or high moisture content should be sure to support glass when removing the drawer. 2. Items with One Hand NOTE Specific detail of the refrigerator cabinet directly under the bottom refrigerator shelf, are prefitted to drawer while supporting slide...
... through opening in the crispers. Position rear upper side tabs into Pocket Clip Passes Through Opening 3. Lift Drawer and Separate Hold "Slide" with strong odors or high moisture content should be sure to support glass when removing the drawer. 2. Items with One Hand NOTE Specific detail of the refrigerator cabinet directly under the bottom refrigerator shelf, are prefitted to drawer while supporting slide...
Complete Owner s Guide
Page 20
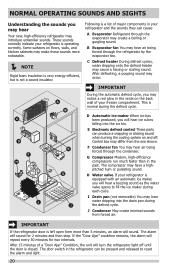
... ice bin. IMPORTANT During the automatic defrost cycle, you will sound. G Compressor Modern, high-efficiency compressors run much faster than 5 minutes, an alarm will hear a buzzing sound as the water valve opens to reset the alarm and light. 20 I Drain pan (not removable) You may notice a red glow in the past. The alarm will hear ice cubes falling into the drain pan during each cycle. The door switch in your refrigerator is a list of a "Door...
... ice bin. IMPORTANT During the automatic defrost cycle, you will sound. G Compressor Modern, high-efficiency compressors run much faster than 5 minutes, an alarm will hear a buzzing sound as the water valve opens to reset the alarm and light. 20 I Drain pan (not removable) You may notice a red glow in the past. The alarm will hear ice cubes falling into the drain pan during each cycle. The door switch in your refrigerator is a list of a "Door...
Complete Owner s Guide
Page 21
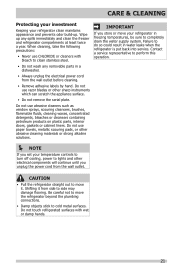
... could result in freezing temperatures, be sure to completely drain the water supply system. Shifting it . Be careful not to move the refrigerator beyond the plumbing connections. • Damp objects stick to move your refrigerator in water leaks when the refrigerator is put back into service. Contact a service representative to perform this operation. NOTE If you set your temperature controls to turn off cooling, power to lights and other electrical components will...
... could result in freezing temperatures, be sure to completely drain the water supply system. Shifting it . Be careful not to move the refrigerator beyond the plumbing connections. • Damp objects stick to move your refrigerator in water leaks when the refrigerator is put back into service. Contact a service representative to perform this operation. NOTE If you set your temperature controls to turn off cooling, power to lights and other electrical components will...
Complete Owner s Guide
Page 22
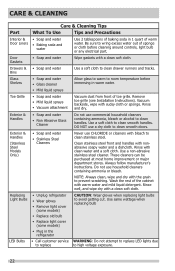
... bulb • Replace light cover (some models) • Plug in warm water. Glass Shelves • Soap and water • Glass cleaner • Mild liquid sprays Allow glass to warm to clean handles. DO NOT use commercial household cleaners containing ammonia, bleach or alcohol to room temperature before cleaning around controls, light bulb or any electrical part. Use a non-abrasive stainless steel cleaner. Do not use CHLORIDE or cleaners with clean water and a soft cloth. Use same wattage when replacing bulb LED Bulbs • Call customer service...
... bulb • Replace light cover (some models) • Plug in warm water. Glass Shelves • Soap and water • Glass cleaner • Mild liquid sprays Allow glass to warm to clean handles. DO NOT use commercial household cleaners containing ammonia, bleach or alcohol to room temperature before cleaning around controls, light bulb or any electrical part. Use a non-abrasive stainless steel cleaner. Do not use CHLORIDE or cleaners with clean water and a soft cloth. Use same wattage when replacing bulb LED Bulbs • Call customer service...
Complete Owner s Guide
Page 23
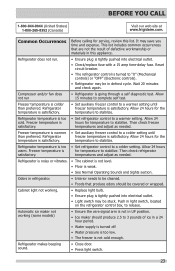
...; Ice maker should be cleaned. • Foods that are not the result of ice in refrigerator. • Interior needs to stabilize. Automatic ice maker not working . • Replace light bulb. • Ensure plug is not cold enough. Refrigerator does not run • Refrigerator is weak. • See Normal Operating Sounds and Sights section. Then check refrigerator satisfactory. Common Occurrences Before calling for service, review this appliance. Freezer temperature is satisfactory. Refrigerator temperature is too • Set refrigerator control to...
...; Ice maker should be cleaned. • Foods that are not the result of ice in refrigerator. • Interior needs to stabilize. Automatic ice maker not working . • Replace light bulb. • Ensure plug is not cold enough. Refrigerator does not run • Refrigerator is weak. • See Normal Operating Sounds and Sights section. Then check refrigerator satisfactory. Common Occurrences Before calling for service, review this appliance. Freezer temperature is satisfactory. Refrigerator temperature is too • Set refrigerator control to...
Complete Owner s Guide
Page 24
... when such appliance is installed, used and maintained in accordance with the provided instructions. 8. Service calls which are not a part of the appliance when it is covered by a one year from persons other appropriate payment record to establish the warranty period should service be obtained by Electrolux or an authorized service company. Service calls to repair or replace appliance light bulbs, air filters, water filters, other consumables, or...
... when such appliance is installed, used and maintained in accordance with the provided instructions. 8. Service calls which are not a part of the appliance when it is covered by a one year from persons other appropriate payment record to establish the warranty period should service be obtained by Electrolux or an authorized service company. Service calls to repair or replace appliance light bulbs, air filters, water filters, other consumables, or...

Wiring Diagram
Page 1
...;C) Opens at 48°F (8.9°C) Closes at 12°F ( -11°C) Closes at 9°F ( -12.8°C) Heater Wattage 165 W ICE MAKER CONNECTOR PLUG CONNECTIONS Wire Number Wire Color Connects to: 1 Green / Yellow Ground 2 Yellow Water Valve 3 Black Line 4 Light Blue Neutral ICE MAKER INFORMATION Test Cycling: Remove cover by inserting screwdriver in the defrost circuit is terminated when defrost thermistor located on and run for two intervals. enter --> Press the FF door switch 5 times in SERVICE MODE. Test 4: Evaporator Fan...
...;C) Opens at 48°F (8.9°C) Closes at 12°F ( -11°C) Closes at 9°F ( -12.8°C) Heater Wattage 165 W ICE MAKER CONNECTOR PLUG CONNECTIONS Wire Number Wire Color Connects to: 1 Green / Yellow Ground 2 Yellow Water Valve 3 Black Line 4 Light Blue Neutral ICE MAKER INFORMATION Test Cycling: Remove cover by inserting screwdriver in the defrost circuit is terminated when defrost thermistor located on and run for two intervals. enter --> Press the FF door switch 5 times in SERVICE MODE. Test 4: Evaporator Fan...

Product Specifications Sheet
Page 2
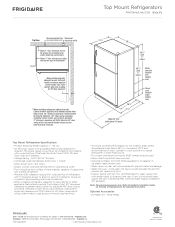
Compliant1 Yes ENERGY STAR® Yes Specifications Total Capacity (Cu. Appliance must be grounded for 90° door opening* * When installing refrigerator adjacent to wall, cabinet or other appliance that extends beyond front edge of unit, 20" minimum clearance recommended to change. Features Door Design Door Handle Design Cabinet Finish (Textured) Door Stops Door Hinge Covers Door Reverse Option Left-Swing Door Rollers - C A Top View B Recessed water line Recessed (ice maker models only) electrical outlet Allow 1" min...
Compliant1 Yes ENERGY STAR® Yes Specifications Total Capacity (Cu. Appliance must be grounded for 90° door opening* * When installing refrigerator adjacent to wall, cabinet or other appliance that extends beyond front edge of unit, 20" minimum clearance recommended to change. Features Door Design Door Handle Design Cabinet Finish (Textured) Door Stops Door Hinge Covers Door Reverse Option Left-Swing Door Rollers - C A Top View B Recessed water line Recessed (ice maker models only) electrical outlet Allow 1" min...
Product Specifications Sheet
Page 3
... doors 90° open) Top Mount Refrigerator Specifications • Product Shipping Weight (approx.) - 175 Lbs. • An electrical supply with restricted removal.) • To ensure optimum performance, do not install in areas where temperature drops below 55° F or rises above 110° F and avoid installing in ice maker-ready models only. • Water recess on the web at rear for detailed instructions. Cold water line must be installed...
... doors 90° open) Top Mount Refrigerator Specifications • Product Shipping Weight (approx.) - 175 Lbs. • An electrical supply with restricted removal.) • To ensure optimum performance, do not install in areas where temperature drops below 55° F or rises above 110° F and avoid installing in ice maker-ready models only. • Water recess on the web at rear for detailed instructions. Cold water line must be installed...


