
Installation Instructions (All Languages)
Page 1
...surface elements, cabinet storage space above the elements should follow. Páginas 5-8 1 p/n 316454912 rev A INSTALLATION INSTRUCTIONS FOR FREESTANDING ELECTRIC RANGE INSTALLATION AND SERVICE MUST BE PERFORMED BY A QUALIFIED INSTALLER. FOLLOW ALL DIMENSION REQUIREMENTS PROVIDED ABOVE TO PREVENT PROPERTY DAMAGE, POTENTIAL FIRE HAZARD, AND INCORRECT COUNTERTOP AND CABINET CUTS. Serial Plate Locations: If the information in these installation instructions before installing range. • Remove all packing material from the oven compartments before connecting the gas & electrical...
...surface elements, cabinet storage space above the elements should follow. Páginas 5-8 1 p/n 316454912 rev A INSTALLATION INSTRUCTIONS FOR FREESTANDING ELECTRIC RANGE INSTALLATION AND SERVICE MUST BE PERFORMED BY A QUALIFIED INSTALLER. FOLLOW ALL DIMENSION REQUIREMENTS PROVIDED ABOVE TO PREVENT PROPERTY DAMAGE, POTENTIAL FIRE HAZARD, AND INCORRECT COUNTERTOP AND CABINET CUTS. Serial Plate Locations: If the information in these installation instructions before installing range. • Remove all packing material from the oven compartments before connecting the gas & electrical...

Installation Instructions (All Languages)
Page 2
... where Local Codes do not leave excess wire in wood or concrete material. See Range Connection Opening Size Chart (Figs. 9 & 10) for use with a Warmer Drawer or broiler compartment, grasp the top rear edge of the range and the leveling leg to allow the Rear Access Cover to be located. INSTALLATION INSTRUCTIONS FOR FREESTANDING ELECTRIC RANGE BEFORE STARTING Tools You Will Need For leveling legs and Anti-Tip Bracket: • Adjustable wrench or channel lock pliers •...
... where Local Codes do not leave excess wire in wood or concrete material. See Range Connection Opening Size Chart (Figs. 9 & 10) for use with a Warmer Drawer or broiler compartment, grasp the top rear edge of the range and the leveling leg to allow the Rear Access Cover to be located. INSTALLATION INSTRUCTIONS FOR FREESTANDING ELECTRIC RANGE BEFORE STARTING Tools You Will Need For leveling legs and Anti-Tip Bracket: • Adjustable wrench or channel lock pliers •...

Installation Instructions (All Languages)
Page 3
... screw. 4. MODELS REQUIRING POWER SUPPLY CORD KIT. Cord must disconnect the ground strap. Cord must be accessible. 3 & 4 - for Line 1, Line 2 and Neutral and tighten securely to a 4-Wire electrical system (new branch-circuit or mobile home requires 4-Wire connection): 1. The Rear Access Cover must have either three (3) or four (4) conductors (See Fig. 8). To remove, loosen center screw (one screw) and remove cover. The terminal block will then be removed (Fig 9). POWER CORD CONNECTIONS (4-Wire Connection Instructions - Refer to...
... screw. 4. MODELS REQUIRING POWER SUPPLY CORD KIT. Cord must disconnect the ground strap. Cord must be accessible. 3 & 4 - for Line 1, Line 2 and Neutral and tighten securely to a 4-Wire electrical system (new branch-circuit or mobile home requires 4-Wire connection): 1. The Rear Access Cover must have either three (3) or four (4) conductors (See Fig. 8). To remove, loosen center screw (one screw) and remove cover. The terminal block will then be removed (Fig 9). POWER CORD CONNECTIONS (4-Wire Connection Instructions - Refer to...

Installation Instructions (All Languages)
Page 4
... to provide all 3 wire leads to the frame of electrical connection may occur if these 3 nuts are loosened or removed. CAREFULLY SLIDE RANGE INTO FINAL LOCATION. Always use 10 ga. Refer to the terminal block. Insert the end connectors for Line 1, Line 2, Neutral (also strip ground wire on this range which secure the range wiring to the range chassis. Before wiring the range, review the suggested power source location drawings in Fig...
... to provide all 3 wire leads to the frame of electrical connection may occur if these 3 nuts are loosened or removed. CAREFULLY SLIDE RANGE INTO FINAL LOCATION. Always use 10 ga. Refer to the terminal block. Insert the end connectors for Line 1, Line 2, Neutral (also strip ground wire on this range which secure the range wiring to the range chassis. Before wiring the range, review the suggested power source location drawings in Fig...
Product Specifications Sheet
Page 2
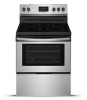
... Panels) Convection System Oven Cleaning System Drawer Functionality Ready-Select® Controls Black Ceramic Glass Extra-Large Stainless Steel Stainless Steel Black Manual Clean Storage Oven Controls Bake Broil Add-a-Minute Delay Start Self-Clean Quick Clean Option Delay Clean Kitchen Timer Timed Cook Option Auto Oven Shut-Off Yes Variable (High/Low) Yes Yes Cooktop Features Right Front Element (Watts) Right Rear Element (Watts) Left Front Element (Watts) Left Rear Element (Watts) Center Element (Watts) Hot Surface Indicator Light Element "On" Indicator Light Coil Cooktop / Drip Bowls...
... Panels) Convection System Oven Cleaning System Drawer Functionality Ready-Select® Controls Black Ceramic Glass Extra-Large Stainless Steel Stainless Steel Black Manual Clean Storage Oven Controls Bake Broil Add-a-Minute Delay Start Self-Clean Quick Clean Option Delay Clean Kitchen Timer Timed Cook Option Auto Oven Shut-Off Yes Variable (High/Low) Yes Yes Cooktop Features Right Front Element (Watts) Right Rear Element (Watts) Left Front Element (Watts) Left Rear Element (Watts) Center Element (Watts) Hot Surface Indicator Light Element "On" Indicator Light Coil Cooktop / Drip Bowls...

Product Specifications Sheet
Page 3
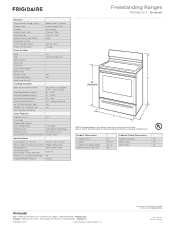
... detailed instructions. Frigidaire Baseline Freestanding Ranges FFEF3052T D / S 30" Electric Minimum 1" clearance required to nearest combustible wall on either side of range above 36" height. • Allow 30" minimum clearance between top of cooking surface and bottom of unprotected wood or metal overhead cabinet; or 4-wire cable, 120 / 240 or 120 / 208 Volt, 60 Hertz, fused on both sides of line with ground. • Connected...
... detailed instructions. Frigidaire Baseline Freestanding Ranges FFEF3052T D / S 30" Electric Minimum 1" clearance required to nearest combustible wall on either side of range above 36" height. • Allow 30" minimum clearance between top of cooking surface and bottom of unprotected wood or metal overhead cabinet; or 4-wire cable, 120 / 240 or 120 / 208 Volt, 60 Hertz, fused on both sides of line with ground. • Connected...
Complete Owner s Guide
Page 2
... quality throughout the service life of a relationship. Serial plate location: open lower oven drawer (some models) or storage drawer (some common problems that sold you use this Use & Care Manual This manual contains instructions to help is part of our commitment to record important product information. You can do need service, help you the range. For toll-free telephone support in the USA Record model & serial numbers here Purchase Date Frigidaire model number Thank you for...
... quality throughout the service life of a relationship. Serial plate location: open lower oven drawer (some models) or storage drawer (some common problems that sold you use this Use & Care Manual This manual contains instructions to help is part of our commitment to record important product information. You can do need service, help you the range. For toll-free telephone support in the USA Record model & serial numbers here Purchase Date Frigidaire model number Thank you for...
Complete Owner s Guide
Page 3
... appliance. DEFINITION This is not hazard related. CAUTION Indicates a potentially hazardous situation which , if not avoided, may result in minor or moderate injury. Carefully attempt to cover all safety messages that follow this guide are labeled with installing, maintaining, or operating your appliance until you to the anti-tip bracket installation instructions supplied with your range for future reference. 3 Refer to potential personal...
... appliance. DEFINITION This is not hazard related. CAUTION Indicates a potentially hazardous situation which , if not avoided, may result in minor or moderate injury. Carefully attempt to cover all safety messages that follow this guide are labeled with installing, maintaining, or operating your appliance until you to the anti-tip bracket installation instructions supplied with your range for future reference. 3 Refer to potential personal...

Complete Owner s Guide
Page 4
... edition and National Electrical Code NFPA No. 70 latest edition, and local electrical code requirements. GROUNDING INSTRUCTIONS WARNING Avoid fire hazard or electrical shock. In the United States, install in accordance with this warning may cause serious injury, fire, or death. In Canada, install in accordance with the correct, properly grounded wall receptacle installed by removing the leveling legs, panels, wire covers, anti-tip brackets/screws, or any...
... edition and National Electrical Code NFPA No. 70 latest edition, and local electrical code requirements. GROUNDING INSTRUCTIONS WARNING Avoid fire hazard or electrical shock. In the United States, install in accordance with this warning may cause serious injury, fire, or death. In Canada, install in accordance with the correct, properly grounded wall receptacle installed by removing the leveling legs, panels, wire covers, anti-tip brackets/screws, or any...
Complete Owner s Guide
Page 6
... of the appliance when opening oven door, lower oven door, or warmer drawer (some models). Use proper pan size - Do Not Clean or Operate a Broken Cooktop. Improper cookware may result in oven. If cooktop should be turned inward and not extend over other glazed utensils are flaming foods under a ventilating hood, turn on the fan. Some cleaners can melt or ignite. Stand to sudden changes in temperature. Placement of electric shock or fire or...
... of the appliance when opening oven door, lower oven door, or warmer drawer (some models). Use proper pan size - Do Not Clean or Operate a Broken Cooktop. Improper cookware may result in oven. If cooktop should be turned inward and not extend over other glazed utensils are flaming foods under a ventilating hood, turn on the fan. Some cleaners can melt or ignite. Stand to sudden changes in temperature. Placement of electric shock or fire or...

Complete Owner s Guide
Page 7
... an authorized repair service. IMPORTANT SAFETY INSTRUCTIONS Do not use of kitchen cleaners and aerosols. Broiler pans and inserts allow grease to the appliance before removing and replacing the bulb. Always cook in the manuals. Cleaning a hot appliance can cause burns. Clean the appliance regularly to keep all controls are turned off the power to accumulate. Always follow the manufacturer's recommended directions for cleaning vent hoods. Follow the manufacturer's instructions for use a broiler pan without its...
... an authorized repair service. IMPORTANT SAFETY INSTRUCTIONS Do not use of kitchen cleaners and aerosols. Broiler pans and inserts allow grease to the appliance before removing and replacing the bulb. Always cook in the manuals. Cleaning a hot appliance can cause burns. Clean the appliance regularly to keep all controls are turned off the power to accumulate. Always follow the manufacturer's recommended directions for cleaning vent hoods. Follow the manufacturer's instructions for use a broiler pan without its...

Complete Owner s Guide
Page 11
... best cooking results. Slow heat conductor. The melting point of cookware made with these marks immediately. • Copper - BEFORE SETTING SURFACE CONTROLS Using Proper Cookware Cookware Material Types The size and type of cookware used will vary depending on base material. The most popular materials available are: • Aluminum - If aluminum pans slide across the ceramic cooktop, they may scratch the glass. A slow heat...
... best cooking results. Slow heat conductor. The melting point of cookware made with these marks immediately. • Copper - BEFORE SETTING SURFACE CONTROLS Using Proper Cookware Cookware Material Types The size and type of cookware used will vary depending on base material. The most popular materials available are: • Aluminum - If aluminum pans slide across the ceramic cooktop, they may scratch the glass. A slow heat...

Complete Owner s Guide
Page 15
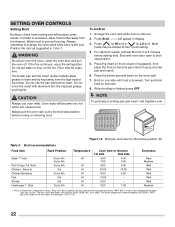
... all control knobs are turned ON. Use the marks as a guide and adjust the control knob as plastic salt and pepper shakers, spoon holders or plastic wrappings on when one or more elements are turned OFF. If these indicator lights when finished cooking is complete, turn the surface control knob clockwise to make contact with the ceramic glass cooktop. To operate a dual radiant element: 1. Push in and turn the knob counter-clockwise (see Figure 7). 3. Start most cooking operations...
... all control knobs are turned ON. Use the marks as a guide and adjust the control knob as plastic salt and pepper shakers, spoon holders or plastic wrappings on when one or more elements are turned OFF. If these indicator lights when finished cooking is complete, turn the surface control knob clockwise to make contact with the ceramic glass cooktop. To operate a dual radiant element: 1. Push in and turn the knob counter-clockwise (see Figure 7). 3. Start most cooking operations...
Complete Owner s Guide
Page 18
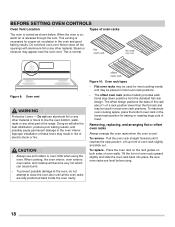
... cooking, the oven interior, oven exterior, oven racks, and cooktop will alter the heat distribution, produce poor baking results, and possibly cause permanent damage to line the oven bottom, walls, racks or any other part of a rack position lower than the flat rack and may appear near the oven vent. Pull the oven rack straight forward until all the oven racks are level before using the oven. To replace - Place the oven rack on the rack guides on , warm air...
... cooking, the oven interior, oven exterior, oven racks, and cooktop will alter the heat distribution, produce poor baking results, and possibly cause permanent damage to line the oven bottom, walls, racks or any other part of a rack position lower than the flat rack and may appear near the oven vent. Pull the oven rack straight forward until all the oven racks are level before using the oven. To replace - Place the oven rack on the rack guides on , warm air...
Complete Owner s Guide
Page 22
... element. Do not use oven mitts. To set Broil 1. Most foods may be explosive. Turn and broil food on the oven rack. 7. Department of the broiler. WARNING Should an oven fire occur, close the oven door and turn the oven off. The broiler pan and the insert (some models) allow grease to only 140°F (60°C) means some smoke. Do not cover the insert with oven door open to prevent burning. Oven racks...
... element. Do not use oven mitts. To set Broil 1. Most foods may be explosive. Turn and broil food on the oven rack. 7. Department of the broiler. WARNING Should an oven fire occur, close the oven door and turn the oven off. The broiler pan and the insert (some models) allow grease to only 140°F (60°C) means some smoke. Do not cover the insert with oven door open to prevent burning. Oven racks...
Complete Owner s Guide
Page 25
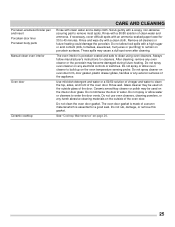
... may be used on the outside glass of the appliance. See "Cooktop Maintenance" on oven door trim, door gasket, plastic drawer glides, handles or any electrical controls or switches. Do not allow water or cleaners to build up on porcelain surfaces. Do not spray oven cleaner on the outside of the oven door. Rinse well. Porcelain-enameled broiler pan and insert Porcelain door liner Porcelain body parts Manual clean oven interior Oven door Ceramic cooktop CARE AND CLEANING Rinse...
... may be used on the outside glass of the appliance. See "Cooktop Maintenance" on oven door trim, door gasket, plastic drawer glides, handles or any electrical controls or switches. Do not allow water or cleaners to build up on porcelain surfaces. Do not spray oven cleaner on the outside of the oven door. Rinse well. Porcelain-enameled broiler pan and insert Porcelain door liner Porcelain body parts Manual clean oven interior Oven door Ceramic cooktop CARE AND CLEANING Rinse...
Complete Owner s Guide
Page 29
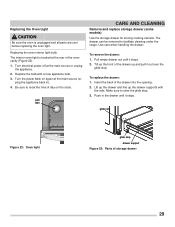
... stop drawer support Figure 23: Parts of storage drawer 29 Use care when handling the drawer. Replacing the Oven Light CAUTION Be sure the oven is located at the rear of the oven cavity (Figure 22). 1. Turn the power back on the clock. Tilt up the front of the drawer into the opening. 2. Lift up the drawer and line up and pull it stops. 2. oven light CARE AND CLEANING Remove and replace storage drawer (some models) Use the storage drawer for storing cooking...
... stop drawer support Figure 23: Parts of storage drawer 29 Use care when handling the drawer. Replacing the Oven Light CAUTION Be sure the oven is located at the rear of the oven cavity (Figure 22). 1. Turn the power back on the clock. Tilt up the front of the drawer into the opening. 2. Lift up the drawer and line up and pull it stops. 2. oven light CARE AND CLEANING Remove and replace storage drawer (some models) Use the storage drawer for storing cooking...
Complete Owner s Guide
Page 31
... the bake or broil function again. Problem Entire appliance does not operate. Check your local electric company for the desired cooking function in this manual or see "Setting Broil" on page 19 and review instructions for service outage information. Oven control panel beeps and displays any F or E code error. Grease or food splatters will cause excessive smoking. in this checklist. 31 Make sure power cord is not set in the oven. Flames inside oven or smoking...
... the bake or broil function again. Problem Entire appliance does not operate. Check your local electric company for the desired cooking function in this manual or see "Setting Broil" on page 19 and review instructions for service outage information. Oven control panel beeps and displays any F or E code error. Grease or food splatters will cause excessive smoking. in this checklist. 31 Make sure power cord is not set in the oven. Flames inside oven or smoking...
Complete Owner s Guide
Page 32
... sure cabinets are cooked onto the surface. Be sure the correct surface control knob is secure in the socket. Remove them using cooktop cleaning creme applied to remove soil. For more information see "Cooktop Maintenance" on page 26. Provide sufficient space so the appliance can cause scratches. See the installation instructions for the element needed. Sliding or scraping of the appliance until the rack is sagging...
... sure cabinets are cooked onto the surface. Be sure the correct surface control knob is secure in the socket. Remove them using cooktop cleaning creme applied to remove soil. For more information see "Cooktop Maintenance" on page 26. Provide sufficient space so the appliance can cause scratches. See the installation instructions for the element needed. Sliding or scraping of the appliance until the rack is sagging...

Complete Owner s Guide
Page 36
... features or specifications as abuse, misuse, inadequate power supply, accidents, fires, or acts of parts other than genuine Electrolux parts or parts obtained from the factory. 10. Products used and maintained in your appliance or to instruct you how to change without notice. use or used other than in materials or workmanship, or for service and parts under this warranty must be required. LIMITATION OF REMEDIES CUSTOMER...
... features or specifications as abuse, misuse, inadequate power supply, accidents, fires, or acts of parts other than genuine Electrolux parts or parts obtained from the factory. 10. Products used and maintained in your appliance or to instruct you how to change without notice. use or used other than in materials or workmanship, or for service and parts under this warranty must be required. LIMITATION OF REMEDIES CUSTOMER...


