
Installation Instructions (All Languages)
Page 2
... also be located. latest edition -- Connect only as instructed under "Permanent Wire Connections" in wood or concrete material. NOTE: Some models may be located on end of the template against the wall or no further than 1-1/4" from the wall when installed, attach bracket ... on an open -end spade lugs with the range. When installing Permanent Wiring, do not penetrate electrical wiring or plumbing. 1a. Models with ranges. INSTALLATION INSTRUCTIONS FOR FREESTANDING ELECTRIC RANGE BEFORE STARTING Tools You Will Need For leveling legs and Anti-Tip Bracket: •...
... also be located. latest edition -- Connect only as instructed under "Permanent Wire Connections" in wood or concrete material. NOTE: Some models may be located on end of the template against the wall or no further than 1-1/4" from the wall when installed, attach bracket ... on an open -end spade lugs with the range. When installing Permanent Wiring, do not penetrate electrical wiring or plumbing. 1a. Models with ranges. INSTALLATION INSTRUCTIONS FOR FREESTANDING ELECTRIC RANGE BEFORE STARTING Tools You Will Need For leveling legs and Anti-Tip Bracket: •...

Installation Instructions (All Languages)
Page 3
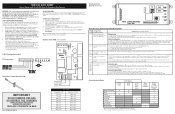
MODELS REQUIRING POWER SUPPLY CORD KIT. See Fig. 10 for 4-Wire or 4b. ELECTRICAL CONNECTION TO RANGE. Wire electrical wall Receptacle types & recommended mounting orientation on ...
MODELS REQUIRING POWER SUPPLY CORD KIT. See Fig. 10 for 4-Wire or 4b. ELECTRICAL CONNECTION TO RANGE. Wire electrical wall Receptacle types & recommended mounting orientation on ...
Complete Owner's Guide (English)
Page 2
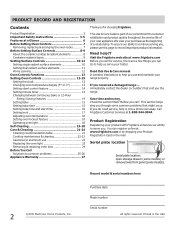
...the beginning of our commitment to serve you. Record model & serial numbers here 2 ©2009 Electrolux Home Products, Inc. This Use & Care Guide is only a phone call away. Visit the Frigidaire web site at www.frigidaire.com Before you call ". immediately contact the dealer.... It contains instructions to record important product information. Call Frigidaire Customer Services at 1-800-944-9044. This section helps step you through some models). Serial plate location Serial plate location: open storage drawer (some models) or remove lower front panel (some common problems that ...
...the beginning of our commitment to serve you. Record model & serial numbers here 2 ©2009 Electrolux Home Products, Inc. This Use & Care Guide is only a phone call away. Visit the Frigidaire web site at www.frigidaire.com Before you call ". immediately contact the dealer.... It contains instructions to record important product information. Call Frigidaire Customer Services at 1-800-944-9044. This section helps step you through some models). Serial plate location Serial plate location: open storage drawer (some models) or remove lower front panel (some common problems that ...

Complete Owner's Guide (English)
Page 3
... properly installed anti-tip bracket provided with a WARNING or CAUTION statement based on an open oven door may result in minor or moderate injury. For models equipped with range. • See Installation Instructions. CAUTION CAUTION indicates a potentially hazardous situation which , if not avoided, may cause the range to the installation instructions...
... properly installed anti-tip bracket provided with a WARNING or CAUTION statement based on an open oven door may result in minor or moderate injury. For models equipped with range. • See Installation Instructions. CAUTION CAUTION indicates a potentially hazardous situation which , if not avoided, may cause the range to the installation instructions...
Complete Owner's Guide (English)
Page 4
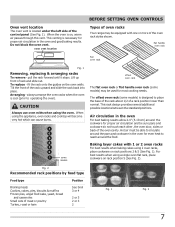
... let clothing or other bulky cloth instead of the oven. The oven vent is cool. If rack must be left rear surface element if your model is equipped with a pan lid, or use extreme caution. Do not cover the broiler insert with ceramic-glass cook tops. Areas near these areas... could melt or ignite. • Placement of the broiler. Always place oven racks in desired location while oven is located below the backguard for models equipped with aluminum foil. Fat or grease may result in use water or flour on grease fires- Do not let potholders contact the hot heating...
... let clothing or other bulky cloth instead of the oven. The oven vent is cool. If rack must be left rear surface element if your model is equipped with a pan lid, or use extreme caution. Do not cover the broiler insert with ceramic-glass cook tops. Areas near these areas... could melt or ignite. • Placement of the broiler. Always place oven racks in desired location while oven is located below the backguard for models equipped with aluminum foil. Fat or grease may result in use water or flour on grease fires- Do not let potholders contact the hot heating...

Complete Owner's Guide (English)
Page 5
... INSTRUCTIONS FOR CLEANING YOUR RANGE • Clean the range regularly to avoid a steam burn. Pay particular attention to such substances. 5 FOR CERAMIC-GLASS COOK TOP MODELS • Do not cook on a hot cooking area, be immersed in temperature. IMPORTANT INSTRUCTIONS FOR USING YOUR COOKTOP • Know which knob controls each surface...
... INSTRUCTIONS FOR CLEANING YOUR RANGE • Clean the range regularly to avoid a steam burn. Pay particular attention to such substances. 5 FOR CERAMIC-GLASS COOK TOP MODELS • Do not cook on a hot cooking area, be immersed in temperature. IMPORTANT INSTRUCTIONS FOR USING YOUR COOKTOP • Know which knob controls each surface...
Complete Owner's Guide (English)
Page 6
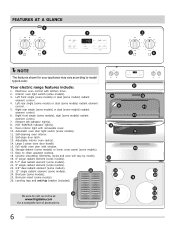
...10 9 14 26 19 20 21 22 17 12 11 13 15 16 19 20 18 21 22 23 Left front single (some models) or dual (some models). 25 24. Element ON indicator light(s). 8. Oven interior light with window. 16. Ceramic smoothtop (elements, styles and color will vary by... kitchen timer. 2. Automatic oven door light switch (some models). 3. HOT SURFACE indicator light(s). 9. Interior oven light switch (some models). 11. Self-clean door latch. 13. Easy to model type & color. Be sure to visit us online at 24 www.frigidaire.com for your appliance may vary according to clean upswept ...
...10 9 14 26 19 20 21 22 17 12 11 13 15 16 19 20 18 21 22 23 Left front single (some models) or dual (some models). 25 24. Element ON indicator light(s). 8. Oven interior light with window. 16. Ceramic smoothtop (elements, styles and color will vary by... kitchen timer. 2. Automatic oven door light switch (some models). 3. HOT SURFACE indicator light(s). 9. Interior oven light switch (some models). 11. Self-clean door latch. 13. Easy to model type & color. Be sure to visit us online at 24 www.frigidaire.com for your appliance may vary according to clean upswept ...
Complete Owner's Guide (English)
Page 7
... cakes using the appliance, oven racks and cooktop will become very hot which can cause burns. 7 6 5 4 3 2 1 some models offset oven rack The flat oven rack or flat handle oven rack (some models) is necessary for proper air circulation in the oven for even heat to reach around the food. flat handle..., yeast, bread and casseroles Small cuts of a rack position lower than normal. For best results when using the oven. The offset oven rack (some models) may be used for proper air circulation and be able to place the base of the rack about 1/2 of meat or poultry Turkey, roast or...
... cakes using the appliance, oven racks and cooktop will become very hot which can cause burns. 7 6 5 4 3 2 1 some models offset oven rack The flat oven rack or flat handle oven rack (some models) is necessary for proper air circulation in the oven for even heat to reach around the food. flat handle..., yeast, bread and casseroles Small cuts of a rack position lower than normal. For best results when using the oven. The offset oven rack (some models) may be used for proper air circulation and be able to place the base of the rack about 1/2 of meat or poultry Turkey, roast or...

Complete Owner's Guide (English)
Page 9
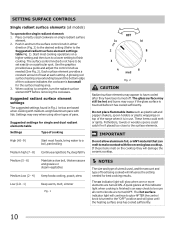
... match the amount of the cookware (See Fig. 3). Not recommended for ceramic cooktop surfaces because it to the pan bottom. Dual radiant surface control (some models) Fig. 1 Single radiant surface control Cookware material types The cookware material determines how evenly and quickly heat is reached. The dual radiant element is flexible...
... match the amount of the cookware (See Fig. 3). Not recommended for ceramic cooktop surfaces because it to the pan bottom. Dual radiant surface control (some models) Fig. 1 Single radiant surface control Cookware material types The cookware material determines how evenly and quickly heat is reached. The dual radiant element is flexible...
Complete Owner's Guide (English)
Page 10
... vegetables Medium Low (2 - 4) Keep foods cooking, poach, stew Low (LO - 1) Keep warm, melt, simmer Fig. 1 Fig. 2 CAUTION Radiant surface elements may still be sure all models) To operate the single radiant element: 1. When cooking is too small for best cooking results. Suggested settings for single and dual radiant elements table Settings...
... vegetables Medium Low (2 - 4) Keep foods cooking, poach, stew Low (LO - 1) Keep warm, melt, simmer Fig. 1 Fig. 2 CAUTION Radiant surface elements may still be sure all models) To operate the single radiant element: 1. When cooking is too small for best cooking results. Suggested settings for single and dual radiant elements table Settings...
Complete Owner's Guide (English)
Page 11
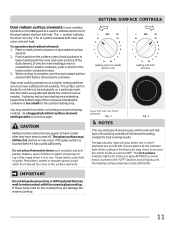
... such as needed. IMPORTANT Do not allow aluminum foil, or ANY material that heat are turned ON. SETTING SURFACE CONTROLS Dual radiant surface elements (some models) Symbols on top of the range when it has cooled sufficiently. The symbol indicates the inner coil only. The surface control knobs do not have...
... such as needed. IMPORTANT Do not allow aluminum foil, or ANY material that heat are turned ON. SETTING SURFACE CONTROLS Dual radiant surface elements (some models) Symbols on top of the range when it has cooled sufficiently. The symbol indicates the inner coil only. The surface control knobs do not have...

Complete Owner's Guide (English)
Page 17
...or until food is finished press clear off -set Broil 1. Place the broiler pan and insert on one side until the desired broil 7 6 5 4 3 2 1 some models) allows grease to drain and be kept away from the high heat of foods that require direct exposure to radiant heat for optimum browning results...oven OFF. DO NOT put water or flour on the broil pan insert (if equipped). 6. CAUTION • The broiler pan and the insert (some models Insert Broil pan Fig. 2 setting level appears in 5th Lo Chicken-boneless 6th Lo Fish 6th Hi Shrimp 5th Hi Hamburger 1" thick 7th* Hi ...
...or until food is finished press clear off -set Broil 1. Place the broiler pan and insert on one side until the desired broil 7 6 5 4 3 2 1 some models) allows grease to drain and be kept away from the high heat of foods that require direct exposure to radiant heat for optimum browning results...oven OFF. DO NOT put water or flour on the broil pan insert (if equipped). 6. CAUTION • The broiler pan and the insert (some models Insert Broil pan Fig. 2 setting level appears in 5th Lo Chicken-boneless 6th Lo Fish 6th Hi Shrimp 5th Hi Hamburger 1" thick 7th* Hi ...
Complete Owner's Guide (English)
Page 18
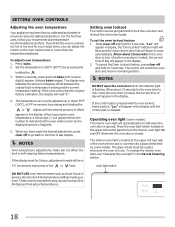
... the oven interior and is covered with the oven lockout feature active, "Loc" will begin to ensure an accurate baking temperature. Operating oven light (some models) The interior oven light will appear before the number to 40 degrees from actual temperatures. 18 Press the oven light switch located on the upper...
... the oven interior and is covered with the oven lockout feature active, "Loc" will begin to ensure an accurate baking temperature. Operating oven light (some models) The interior oven light will appear before the number to 40 degrees from actual temperatures. 18 Press the oven light switch located on the upper...
Complete Owner's Guide (English)
Page 19
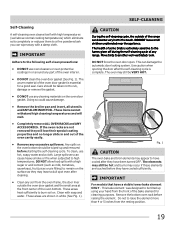
... or fire when subjected to high temperatures. Use caution when opening the door after the self-cleaning cycle is essential for cleaning purposes. IMPORTANT For models that have been turned OFF. This bake element was designed to be hot and burns may appear to have cooled after cleaning. • Clean any...
... or fire when subjected to high temperatures. Use caution when opening the door after the self-cleaning cycle is essential for cleaning purposes. IMPORTANT For models that have been turned OFF. This bake element was designed to be hot and burns may appear to have cooled after cleaning. • Clean any...
Complete Owner's Guide (English)
Page 20
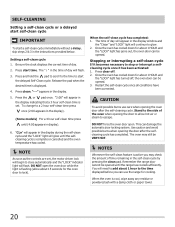
... NOT open . Stopping or interrupting a self-clean cycle If it becomes necessary to a 2 hour self-clean time press once (2:00 appears in the display). (Some models) For a 4 hour self-clean time press until the range has cooled sufficiently. Press clear off , the oven door can be opened. 3. NOTES Whenever the self...
... NOT open . Stopping or interrupting a self-clean cycle If it becomes necessary to a 2 hour self-clean time press once (2:00 appears in the display). (Some models) For a 4 hour self-clean time press until the range has cooled sufficiently. Press clear off , the oven door can be opened. 3. NOTES Whenever the self...
Complete Owner's Guide (English)
Page 21
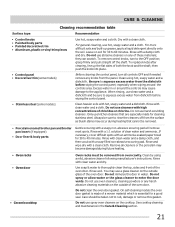
...surface as bluish stains may cause damage to the appliance. then push the knob into place. • Control panel • Decorative trim (some models) Clean heavier soils with hot, soapy water and a dishcloth. especially when wiping around the controls may occur during future heating. • Oven ... abrasive cleaners on soil for 30 to squeeze excess water from the dishcloth before wiping the control panel. • Stainless steel (some models) Before cleaning the control panel, turn to thoroughly clean the top, sides and front of the oven door. See cooktop cleaning and ...
...surface as bluish stains may cause damage to the appliance. then push the knob into place. • Control panel • Decorative trim (some models) Clean heavier soils with hot, soapy water and a dishcloth. especially when wiping around the controls may occur during future heating. • Oven ... abrasive cleaners on soil for 30 to squeeze excess water from the dishcloth before wiping the control panel. • Stainless steel (some models) Before cleaning the control panel, turn to thoroughly clean the top, sides and front of the oven door. See cooktop cleaning and ...
Complete Owner's Guide (English)
Page 26
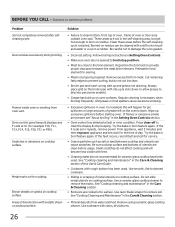
... not completely removed after selfcleaning cycle. If the F code error repeats, remove power from water and food. Small scratches do not cut into pan (some models). • Grease has built up & slots down to allow grease to prevent curling, but get hot enough to provide proper clearance between cooktop and utensils...
... not completely removed after selfcleaning cycle. If the F code error repeats, remove power from water and food. Small scratches do not cut into pan (some models). • Grease has built up & slots down to allow grease to prevent curling, but get hot enough to provide proper clearance between cooktop and utensils...
Wiring Diagram (All Languages)
Page 1
...to completion of switch contacts. Use the slew keys to do so will not change the self-cleaning cycle temperature. Simmer Select PCB (some models. If fault code is open . 2. If Oven is correct replace the EOC. NOTE: Severe overheating may cause F11 shorted keypad alarm)....programmed test oven temperature sensor probe circuit resistance using a test cord to OFF, or remove fuse. 2. If harness is intended for some models) E.O.C. Replace touch panel if defective. 4. Check Sensor wiring harness between EOC and lock switch on lock motor switch. Circuit Analysis Matrix ...
...to completion of switch contacts. Use the slew keys to do so will not change the self-cleaning cycle temperature. Simmer Select PCB (some models. If fault code is open . 2. If Oven is correct replace the EOC. NOTE: Severe overheating may cause F11 shorted keypad alarm)....programmed test oven temperature sensor probe circuit resistance using a test cord to OFF, or remove fuse. 2. If harness is intended for some models) E.O.C. Replace touch panel if defective. 4. Check Sensor wiring harness between EOC and lock switch on lock motor switch. Circuit Analysis Matrix ...


