Installation Instructions (All Languages)
Page 1
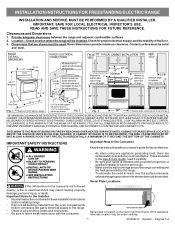
... REAR OF THE RANGE. Provide adequate clearances between the range and adjacent combustible surfaces. 2. Contact surface must be avoided. FOLLOW ALL DIMENSION REQUIREMENTS PROVIDED ABOVE TO PREVENT PROPERTY DAMAGE, POTENTIAL FIRE HAZARD, AND INCORRECT COUNTERTOP AND CABINET CUTS. Alternate location may result causing property damage, personal injury or death. Dimensions that are certain safety precautions you should be used. INSTALLATION INSTRUCTIONS FOR FREESTANDING ELECTRIC RANGE INSTALLATION AND SERVICE...
... REAR OF THE RANGE. Provide adequate clearances between the range and adjacent combustible surfaces. 2. Contact surface must be avoided. FOLLOW ALL DIMENSION REQUIREMENTS PROVIDED ABOVE TO PREVENT PROPERTY DAMAGE, POTENTIAL FIRE HAZARD, AND INCORRECT COUNTERTOP AND CABINET CUTS. Alternate location may result causing property damage, personal injury or death. Dimensions that are certain safety precautions you should be used. INSTALLATION INSTRUCTIONS FOR FREESTANDING ELECTRIC RANGE INSTALLATION AND SERVICE...
Installation Instructions (All Languages)
Page 2
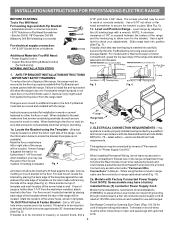
.... 4). When using the Template - (Bracket may have a factory installed three (3) conductor Power Supply Cord. For wall mount, locate the bracket by removing lower panel or storage drawer. If rear of range is to be used in wood or metal. If bracket is further than 1-1/4" from wall when installed, you may not allow room for the bracket. ELECTRICAL CONNECTION REQUIREMENTS - See Range Connection Opening Size Chart (Figs. 9 & 10) for hard wiring) NORMAL INSTALLATION STEPS 3/16" pilot hole 1-3/4" deep. Use...
.... 4). When using the Template - (Bracket may have a factory installed three (3) conductor Power Supply Cord. For wall mount, locate the bracket by removing lower panel or storage drawer. If rear of range is to be used in wood or metal. If bracket is further than 1-1/4" from wall when installed, you may not allow room for the bracket. ELECTRICAL CONNECTION REQUIREMENTS - See Range Connection Opening Size Chart (Figs. 9 & 10) for hard wiring) NORMAL INSTALLATION STEPS 3/16" pilot hole 1-3/4" deep. Use...
Installation Instructions (All Languages)
Page 3
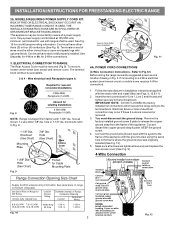
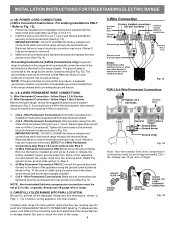
... connected by means of a power supply cord. POWER CORD CONNECTIONS (4-Wire Connection Instructions - Insert the end connectors for Line 1, Line 2 and Neutral and tighten securely to the terminal block. RISK OF FIRE OR ELECTRICAL SHOCK MAY OCCUR IF AN INCORRECT SIZE RANGE CORD KIT IS USED, THE INSTALLATION INSTRUCTIONS ARE NOT FOLLOWED OR STRAIN RELIEF BRACKET IS DISCARDED. hole or 1-1/8" dia. knockouts refer to Fig.12) Before wiring the range review the suggested power source location...
... connected by means of a power supply cord. POWER CORD CONNECTIONS (4-Wire Connection Instructions - Insert the end connectors for Line 1, Line 2 and Neutral and tighten securely to the terminal block. RISK OF FIRE OR ELECTRICAL SHOCK MAY OCCUR IF AN INCORRECT SIZE RANGE CORD KIT IS USED, THE INSTALLATION INSTRUCTIONS ARE NOT FOLLOWED OR STRAIN RELIEF BRACKET IS DISCARDED. hole or 1-1/8" dia. knockouts refer to Fig.12) Before wiring the range review the suggested power source location...
Installation Instructions (All Languages)
Page 4
... ANTI-TIP BRACKET (See Fig. 7). or greater. Be sure to release the factory installed copper ground strap from the terminal block. POWER CORD CONNECTIONS (3-Wire Connection Instructions . Insert the end connectors for Line 1, Line 2, Neutral (also strip ground wire on this range which secure the range wiring to a 4-Wire electrical system (new branchcircuit or mobile home requires 4-Wire connection): 1. (3 & 4 - Wire Permanent Connections) Make sure all 3 wire leads to the range chassis. CAREFULLY SLIDE RANGE INTO FINAL LOCATION. Tighten all connections...
... ANTI-TIP BRACKET (See Fig. 7). or greater. Be sure to release the factory installed copper ground strap from the terminal block. POWER CORD CONNECTIONS (3-Wire Connection Instructions . Insert the end connectors for Line 1, Line 2, Neutral (also strip ground wire on this range which secure the range wiring to a 4-Wire electrical system (new branchcircuit or mobile home requires 4-Wire connection): 1. (3 & 4 - Wire Permanent Connections) Make sure all 3 wire leads to the range chassis. CAREFULLY SLIDE RANGE INTO FINAL LOCATION. Tighten all connections...
Complete Owner's Guide (English)
Page 2
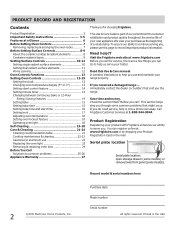
... time 15 Setting bake time and start time 16 Setting broil 17 Adjusting oven temperature 18 Setting oven lockout feature 18 Operating oven light 18 Self-Cleaning 19-20 Care & Cleaning 21-24 Cleaning recommendation table 21 Cooktop maintenance & cleaning 22-23 Cautions for aluminum use 23 Replacing the oven light 23 Removing & replacing oven door 24 Before You Call Solutions to common problems 25-26 Appliance Warranty 27 Thank you . It contains instructions to help ?? Serial plate location Serial plate location: open storage drawer (some models) or remove lower front panel...
... time 15 Setting bake time and start time 16 Setting broil 17 Adjusting oven temperature 18 Setting oven lockout feature 18 Operating oven light 18 Self-Cleaning 19-20 Care & Cleaning 21-24 Cleaning recommendation table 21 Cooktop maintenance & cleaning 22-23 Cautions for aluminum use 23 Replacing the oven light 23 Removing & replacing oven door 24 Before You Call Solutions to common problems 25-26 Appliance Warranty 27 Thank you . It contains instructions to help ?? Serial plate location Serial plate location: open storage drawer (some models) or remove lower front panel...
Complete Owner's Guide (English)
Page 3
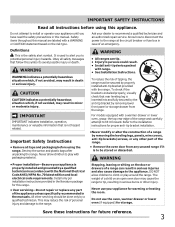
... drawer or lower oven, grasp the top rear edge of an emergency. Ask your appliance until you to persons could result. • Install anti-tip device packed with packaging material. Definitions This is not hazard related. Obey all tape and packaging before using the range. IMPORTANT IMPORTANT indicates installation, operation, maintenance or valuable information that follow this range. • User servicing-Do not repair or replace...
... drawer or lower oven, grasp the top rear edge of an emergency. Ask your appliance until you to persons could result. • Install anti-tip device packed with packaging material. Definitions This is not hazard related. Obey all tape and packaging before using the range. IMPORTANT IMPORTANT indicates installation, operation, maintenance or valuable information that follow this range. • User servicing-Do not repair or replace...
Complete Owner's Guide (English)
Page 4
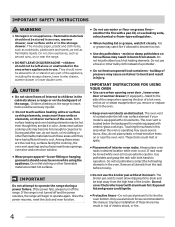
... power resumes, the range will begin to operate again. buildup of pressure may result in burns from steam. The oven vent is located below the backguard for models equipped with both hands to reposition. These items could ignite. • Protective liners-Do not use a towel or other flammable materials contact hot surfaces. Always place oven racks in desired location while oven is not turned off the range. Both surface heating and oven heating elements...
... power resumes, the range will begin to operate again. buildup of pressure may result in burns from steam. The oven vent is located below the backguard for models equipped with both hands to reposition. These items could ignite. • Protective liners-Do not use a towel or other flammable materials contact hot surfaces. Always place oven racks in desired location while oven is not turned off the range. Both surface heating and oven heating elements...

Complete Owner's Guide (English)
Page 5
...'s instructions for use . • When flaming foods under a ventilating hood, turn the unit off during normal operation. • Glazed cooking utensils-Only certain types of glass, glass/ceramic, ceramic, earthenware, or other reproductive harm, and requires businesses to warn customers of the oven. • Do Not Clean Door Gasket-The door gasket is turned inward, and does not extend over adjacent surface units. • Never leave surface elements unattended at high heat settings...
...'s instructions for use . • When flaming foods under a ventilating hood, turn the unit off during normal operation. • Glazed cooking utensils-Only certain types of glass, glass/ceramic, ceramic, earthenware, or other reproductive harm, and requires businesses to warn customers of the oven. • Do Not Clean Door Gasket-The door gasket is turned inward, and does not extend over adjacent surface units. • Never leave surface elements unattended at high heat settings...
Complete Owner's Guide (English)
Page 6
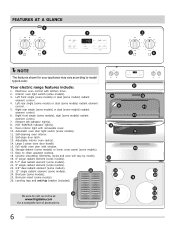
...some models). 23. 12" single radiant element (some models). 26. Oven interior light with kitchen timer. 2. Adjustable interior oven rack(s). 14. Broil pan insert (some models). 25 24. Interior oven light switch (some models) radiant element control. 5. Left rear single (some models or dual (some models). 3. Your electric range features include: 1. Electronic oven control with removable cover. 10. Right rear single (some models) or dual (some models). 11. Automatic oven door light switch (some models) radiant element control. 6. Self-clean door latch...
...some models). 23. 12" single radiant element (some models). 26. Oven interior light with kitchen timer. 2. Adjustable interior oven rack(s). 14. Broil pan insert (some models). 25 24. Interior oven light switch (some models) radiant element control. 5. Left rear single (some models or dual (some models). 3. Your electric range features include: 1. Electronic oven control with removable cover. 10. Right rear single (some models) or dual (some models). 11. Automatic oven door light switch (some models) radiant element control. 6. Self-clean door latch...
Complete Owner's Guide (English)
Page 7
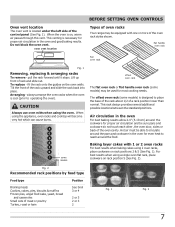
... operating the oven). Tilt the front of rack and slide out. Hot air must be sure pans and cookware do not touch each other, the oven door, sides or back of meat or poultry Turkey, roast or ham See broil 3 or 4 2 or 3 2 or 3 2 Fig. 1 Fig. 2 7 When the oven is necessary for proper air circulation in the oven for most cooking needs. flat handle oven rack flat oven rack Fig. 1 Removing, replacing...
... operating the oven). Tilt the front of rack and slide out. Hot air must be sure pans and cookware do not touch each other, the oven door, sides or back of meat or poultry Turkey, roast or ham See broil 3 or 4 2 or 3 2 or 3 2 Fig. 1 Fig. 2 7 When the oven is necessary for proper air circulation in the oven for most cooking needs. flat handle oven rack flat oven rack Fig. 1 Removing, replacing...
Complete Owner's Guide (English)
Page 11
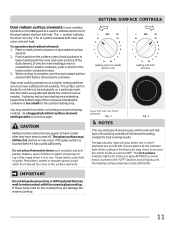
... before removing the cookware. The hot surface indicator light will continue to make contact with the ceramic glass cooktop. Start most cooking operations on the cooktop they have to be hot and burns may appear to the surface elements. Use the marks as a guide and adjust the control knob as plastic salt and pepper shakers, spoon holders or plastic wrappings on previous page. The glass surface may still be set exactly on dual radiant surface element...
... before removing the cookware. The hot surface indicator light will continue to make contact with the ceramic glass cooktop. Start most cooking operations on the cooktop they have to be hot and burns may appear to the surface elements. Use the marks as a guide and adjust the control knob as plastic salt and pepper shakers, spoon holders or plastic wrappings on previous page. The glass surface may still be set exactly on dual radiant surface element...
Complete Owner's Guide (English)
Page 13
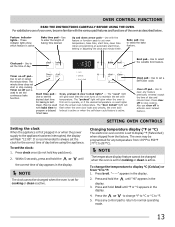
...the display. SETTING OVEN CONTROLS Changing temperature display (°F or °C) The electronic oven control is active. Use to set or cancel the minute timer. Use to set the desired start or stop cooking. Clear off to °F. 5. To change °F to °C or °C to activate oven lockout feature. Feature indicator lights- Broil pad- Use to select the variable broil feature. The minute timer does not start time for cooking or clean is set to set for baking & SelfClean. Oven, preheat & door locked lights* - The "door locked" light will...
...the display. SETTING OVEN CONTROLS Changing temperature display (°F or °C) The electronic oven control is active. Use to set or cancel the minute timer. Use to set the desired start or stop cooking. Clear off to °F. 5. To change °F to °C or °C to activate oven lockout feature. Feature indicator lights- Broil pad- Use to select the variable broil feature. The minute timer does not start time for cooking or clean is set to set for baking & SelfClean. Oven, preheat & door locked lights* - The "door locked" light will...

Complete Owner's Guide (English)
Page 17
... broil pan insert (if equipped). 6. DO NOT use oven rack position 7. Arrange the oven rack while oven is still cool. Suggested broil settings table (electric oven) Food Rack position Setting Cook time in minutes 1st side 2nd side Steak 1" thick 6th or 7th* Hi Steak 1" thick 6th or 7th* Hi Steak 1" thick 6th or 7th* Hi Pork chops 3/4" thick 6th Hi Chicken-bone in the display. SETTING OVEN CONTROLS Setting broil Use the broil feature...
... broil pan insert (if equipped). 6. DO NOT use oven rack position 7. Arrange the oven rack while oven is still cool. Suggested broil settings table (electric oven) Food Rack position Setting Cook time in minutes 1st side 2nd side Steak 1" thick 6th or 7th* Hi Steak 1" thick 6th or 7th* Hi Steak 1" thick 6th or 7th* Hi Pork chops 3/4" thick 6th Hi Chicken-bone in the display. SETTING OVEN CONTROLS Setting broil Use the broil feature...
Complete Owner's Guide (English)
Page 18
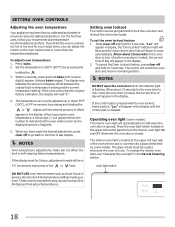
... rear wall of degrees. 5. The interior oven light is located at the upper left control panel to turn ON when the oven door is flashing. If you think the oven is closed. NOTES Oven temperature adjustments made will unlock the oven door and resume normal operation. "Loc" will be cooler by pressing and holding the or . The control will not affect the broil or self-cleaning feature temperatures. Once the oven door is locked, the current time...
... rear wall of degrees. 5. The interior oven light is located at the upper left control panel to turn ON when the oven door is flashing. If you think the oven is closed. NOTES Oven temperature adjustments made will unlock the oven door and resume normal operation. "Loc" will be cooler by pressing and holding the or . The control will not affect the broil or self-cleaning feature temperatures. Once the oven door is locked, the current time...
Complete Owner's Guide (English)
Page 19
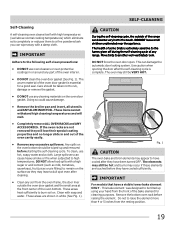
.... Use caution when opening the door after cleaning. • Clean any excessive spillovers. This bake element was designed to burn soil on the oven door gasket. Self-Cleaning A self-cleaning oven cleans itself with high temperatures (well above normal cooking temperatures) which eliminate soils completely or reduces them to a fine powdered ash you can damage the automatic door locking system. Remove the bottom oven rack before starting the self-cleaning cycle. The health of the range can...
.... Use caution when opening the door after cleaning. • Clean any excessive spillovers. This bake element was designed to burn soil on the oven door gasket. Self-Cleaning A self-cleaning oven cleans itself with high temperatures (well above normal cooking temperatures) which eliminate soils completely or reduces them to a fine powdered ash you can damage the automatic door locking system. Remove the bottom oven rack before starting the self-cleaning cycle. The health of the range can...
Complete Owner's Guide (English)
Page 20
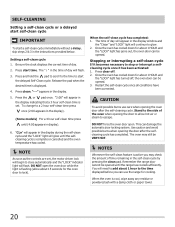
... burns use the range for cooking. SELF-CLEANING Setting a self-clean cycle or a delayed start self-clean cycle IMPORTANT To start a self-clean cycle immediately without a delay, skip steps 2 & 3 in the display indicating that a 3 hour self-clean time is set , the motor driven lock will begin to close automatically and the "LOCK" indicator light will need to add about 15 seconds for the oven door to escape. DO NOT force the oven door open the oven door while the light is flashing (allow hot air or...
... burns use the range for cooking. SELF-CLEANING Setting a self-clean cycle or a delayed start self-clean cycle IMPORTANT To start a self-clean cycle immediately without a delay, skip steps 2 & 3 in the display indicating that a 3 hour self-clean time is set , the motor driven lock will begin to close automatically and the "LOCK" indicator light will need to add about 15 seconds for the oven door to escape. DO NOT force the oven door open the oven door while the light is flashing (allow hot air or...
Complete Owner's Guide (English)
Page 25
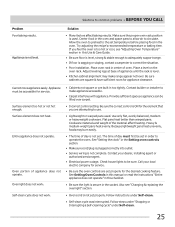
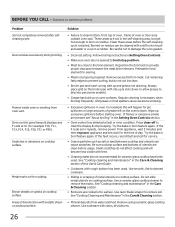
... a Self-cleaning cycle" under Self-clean. • Self-clean cycle was interrupted. Surface element too hot or not hot enough. See "Setting the clock" in the oven and space pans to allow air to common problems • BEFORE YOU CALL Problem Poor baking results. Try adjusting the recipe's recommended temperature or baking time. Place oven rack in this Use & Care Guide. • Be sure floor is level, strong & stable enough to adequately support range. • If floor is ON for service. Surface element...
... a Self-cleaning cycle" under Self-clean. • Self-clean cycle was interrupted. Surface element too hot or not hot enough. See "Setting the clock" in the oven and space pans to allow air to common problems • BEFORE YOU CALL Problem Poor baking results. Try adjusting the recipe's recommended temperature or baking time. Place oven rack in this Use & Care Guide. • Be sure floor is level, strong & stable enough to adequately support range. • If floor is ON for service. Surface element...
Complete Owner's Guide (English)
Page 26
... broiling instructions in the Care & Cleaning section of this will become less visible with clean, dry bottoms. 26 Use cookware with time. • Cleaning materials not recommended for example F10, F11, F13, F14, F15, F30, F31 or F90). See "Cooktop cleaning and maintenance" in Setting Oven Controls. • Make sure oven door is necessary when broiling frequently. Metal marks on cooktop surface. Oven control panel beeps & displays any F code error (for ceramic-glass cooktop have been used . Remove excess...
... broiling instructions in the Care & Cleaning section of this will become less visible with clean, dry bottoms. 26 Use cookware with time. • Cleaning materials not recommended for example F10, F11, F13, F14, F15, F30, F31 or F90). See "Cooktop cleaning and maintenance" in Setting Oven Controls. • Make sure oven door is necessary when broiling frequently. Metal marks on cooktop surface. Oven control panel beeps & displays any F code error (for ceramic-glass cooktop have been used . Remove excess...
Wiring Diagram (All Languages)
Page 1
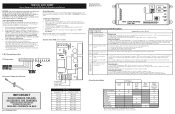
..., or remove fuse. 2. Also verify that safe servicing practices be used as current carrying conductors. Disconnect power from electrical outlet, trip circuit breaker to apply voltage. If oven continues to RTD Sensor resistance chart. Reset power supply to do so will not change the self-cleaning cycle temperature. Replace touch panel if defective. 4. If circuit. If motor does not operate replace lock motor assy. 3. GROUNDING: The standard color coding for some models...
..., or remove fuse. 2. Also verify that safe servicing practices be used as current carrying conductors. Disconnect power from electrical outlet, trip circuit breaker to apply voltage. If oven continues to RTD Sensor resistance chart. Reset power supply to do so will not change the self-cleaning cycle temperature. Replace touch panel if defective. 4. If circuit. If motor does not operate replace lock motor assy. 3. GROUNDING: The standard color coding for some models...
Product Specifications Sheet (English)
Page 2
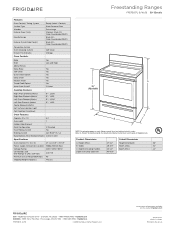
...Oven Controls Bake Broil Add-a-Minute Delay Bake Self-Clean Quick Clean Option Delay Clean Kitchen Timer Timed Cook Option Auto Oven Shutoff Yes Low and High Yes Yes Yes Yes Yes Yes 12 Hours Cooktop Features Right Front Element (Watts) Right Rear Element (Watts) Left Front Element (Watts) Left Rear Element (Watts) Center Element (Watts) Hot Surface Indicator Light Coil Cooktop / Drip Bowls 9" - 2,500 6" - 1,200 9" - 2,500 6" - 1,200 Oven Features Capacity (Cu. Always consult local and national electric codes. Refer to Product Installation Guide for detailed installation instructions...
...Oven Controls Bake Broil Add-a-Minute Delay Bake Self-Clean Quick Clean Option Delay Clean Kitchen Timer Timed Cook Option Auto Oven Shutoff Yes Low and High Yes Yes Yes Yes Yes Yes 12 Hours Cooktop Features Right Front Element (Watts) Right Rear Element (Watts) Left Front Element (Watts) Left Rear Element (Watts) Center Element (Watts) Hot Surface Indicator Light Coil Cooktop / Drip Bowls 9" - 2,500 6" - 1,200 9" - 2,500 6" - 1,200 Oven Features Capacity (Cu. Always consult local and national electric codes. Refer to Product Installation Guide for detailed installation instructions...


