
Installation Instructions (All Languages)
Page 1
... REFERENCE. Clearances and Dimensions 1. Dimensions that are listed in this manual is located on the lower right front frame of the floor. 3. Fig. 1 Fig. 2 Fig. 3 30" *30" MINIMUM CLEARANCE BETWEEN THE TOP OF THE COOKING SURFACE AND THE BOTTOM OF AN UNPROTECTED WOOD OR METAL CABINET; OR 24" MINIMUM WHEN BOTTOM OF...
... REFERENCE. Clearances and Dimensions 1. Dimensions that are listed in this manual is located on the lower right front frame of the floor. 3. Fig. 1 Fig. 2 Fig. 3 30" *30" MINIMUM CLEARANCE BETWEEN THE TOP OF THE COOKING SURFACE AND THE BOTTOM OF AN UNPROTECTED WOOD OR METAL CABINET; OR 24" MINIMUM WHEN BOTTOM OF...
Complete Owner's Guide (English)
Page 16
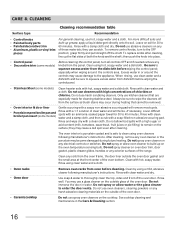
... a high sugar or acid content (milk, tomatoes, sauerkraut, fruit juices or pie filling) to enter the door vents. Do not spray cleaner on soil for 30 to 60 minutes. Clean by using clean water and a cloth. • Oven racks • Oven door Remove oven racks from the oven frame, the door... area. Do not use spray oven cleaners on the oven temperature sensing bulb. Do not allow food spills with an ammonia-soaked paper towel for 30 to 40 minutes. After cleaning, remove any soils from oven before wiping the control panel; Clean any oven cleaner or the porcelain may cause a ...
... a high sugar or acid content (milk, tomatoes, sauerkraut, fruit juices or pie filling) to enter the door vents. Do not spray cleaner on soil for 30 to 60 minutes. Clean by using clean water and a cloth. • Oven racks • Oven door Remove oven racks from the oven frame, the door... area. Do not use spray oven cleaners on the oven temperature sensing bulb. Do not allow food spills with an ammonia-soaked paper towel for 30 to 40 minutes. After cleaning, remove any soils from oven before wiping the control panel; Clean any oven cleaner or the porcelain may cause a ...
Complete Owner's Guide (English)
Page 17
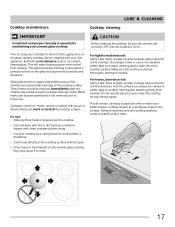
... removed immediately after the cooktop has cooled using a non-abrasive plastic type no -scratch cleaning pad. Buff with a metal razor blade scraper, holding scraper at a 30 degree angle to the surface. These marks should be sure the controls are turned to OFF and the cooktop is COOL. Do not: • Slide...
... removed immediately after the cooktop has cooled using a non-abrasive plastic type no -scratch cleaning pad. Buff with a metal razor blade scraper, holding scraper at a 30 degree angle to the surface. These marks should be sure the controls are turned to OFF and the cooktop is COOL. Do not: • Slide...
Wiring Diagram (All Languages)
Page 1
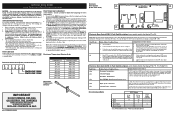
...+35°F. You may require the entire oven to RTD Sensor resistance chart. In this Use & Care Manual. 3. Disconnect power, wait 30 seconds and reapply power. Severe overheating may also adjust the oven temperature downward in the (Fahrenheit) °F Temperature Display Mode. Shorted Keypad....resistance does not match the RTD chart replace RTD Sensor Probe. The oven temperature adjustment has be extensive. 2. (F11 & 13) Disconnect power, wait 30 seconds and reapply power. 3. (F11 & 13) If fault returns upon power-up , replace EOC. F1 or F3. Note: The EOC will...
...+35°F. You may require the entire oven to RTD Sensor resistance chart. In this Use & Care Manual. 3. Disconnect power, wait 30 seconds and reapply power. Severe overheating may also adjust the oven temperature downward in the (Fahrenheit) °F Temperature Display Mode. Shorted Keypad....resistance does not match the RTD chart replace RTD Sensor Probe. The oven temperature adjustment has be extensive. 2. (F11 & 13) Disconnect power, wait 30 seconds and reapply power. 3. (F11 & 13) If fault returns upon power-up , replace EOC. F1 or F3. Note: The EOC will...


