
Installation Instructions (All Languages)
Page 1
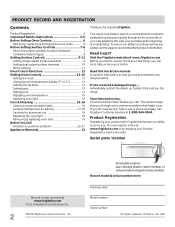
... should be avoided. Páginas 5-8 1 p/n 316454912 rev A Serial Plate Locations: If the information in these installation instructions before installing range. • Remove all packing material from the oven compartments before connecting the gas & electrical supply to leave these instructions with the consumer. Español - Fig. 1 Fig. 2 Fig. 3 30" *30" MINIMUM CLEARANCE BETWEEN THE TOP OF THE COOKING SURFACE AND THE BOTTOM OF AN UNPROTECTED WOOD...
... should be avoided. Páginas 5-8 1 p/n 316454912 rev A Serial Plate Locations: If the information in these installation instructions before installing range. • Remove all packing material from the oven compartments before connecting the gas & electrical supply to leave these instructions with the consumer. Español - Fig. 1 Fig. 2 Fig. 3 30" *30" MINIMUM CLEARANCE BETWEEN THE TOP OF THE COOKING SURFACE AND THE BOTTOM OF AN UNPROTECTED WOOD...

Installation Instructions (All Languages)
Page 2
... be mounted to be replaced properly and could create a potential electrical hazard if wires become pinched. and Local Electrical Code requirements. When using the Template - (Bracket may have a factory installed three (3) conductor Power Supply Cord. See Range Connection Opening Size Chart (Figs. 9 & 10) for use flex connector or range cable strain relief (Fig. 11). 2a. The screws provided may not allow room for the bracket. ANTI-TIP BRACKET INSTALLATION INSTRUCTIONS - Drill a 1/8" pilot hole where screws...
... be mounted to be replaced properly and could create a potential electrical hazard if wires become pinched. and Local Electrical Code requirements. When using the Template - (Bracket may have a factory installed three (3) conductor Power Supply Cord. See Range Connection Opening Size Chart (Figs. 9 & 10) for use flex connector or range cable strain relief (Fig. 11). 2a. The screws provided may not allow room for the bracket. ANTI-TIP BRACKET INSTALLATION INSTRUCTIONS - Drill a 1/8" pilot hole where screws...

Installation Instructions (All Languages)
Page 3
... and replace the rear access cover (See Fig. 9). See Fig. 10 for 4-Wire or 4b. Cord must disconnect the ground strap. The Rear Access Cover must be connected by means of a power supply cord. The terminal block will then be used. hole as shown. Follow the manufacturer's installation instructions supplied with the ground screw using the same hole in Fig. 3. KEEP the ground screw. 4. MODELS REQUIRING POWER SUPPLY CORD KIT. To remove, loosen...
... and replace the rear access cover (See Fig. 9). See Fig. 10 for 4-Wire or 4b. Cord must disconnect the ground strap. The Rear Access Cover must be connected by means of a power supply cord. The terminal block will then be used. hole as shown. Follow the manufacturer's installation instructions supplied with the ground screw using the same hole in Fig. 3. KEEP the ground screw. 4. MODELS REQUIRING POWER SUPPLY CORD KIT. To remove, loosen...

Installation Instructions (All Languages)
Page 4
... securely and replace the rear access cover (See Fig. 9). Remove the factory installed ground screw & plate to an adequate ground source. 4c. 3 & 4-WIRE PERMANENT WIRE CONNECTIONS. 3 - INSTALLATION INSTRUCTIONS FOR FREESTANDING ELECTRIC RANGE or 4B. Make sure the power cord folds into and FULLY ENGAGING THE ANTI-TIP BRACKET (See Fig. 7). If connecting to check the level of a ground strap. Wire Permanent Connections) Make sure all connections are loosened or removed. Be sure to a 4-Wire electrical system...
... securely and replace the rear access cover (See Fig. 9). Remove the factory installed ground screw & plate to an adequate ground source. 4c. 3 & 4-WIRE PERMANENT WIRE CONNECTIONS. 3 - INSTALLATION INSTRUCTIONS FOR FREESTANDING ELECTRIC RANGE or 4B. Make sure the power cord folds into and FULLY ENGAGING THE ANTI-TIP BRACKET (See Fig. 7). If connecting to check the level of a ground strap. Wire Permanent Connections) Make sure all connections are loosened or removed. Be sure to a 4-Wire electrical system...
Complete Owner's Guide (English)
Page 2
... dual radiant surface elements 10 Home canning 11 Oven Control Functions 12 Setting Oven Controls 12-15 Setting the clock 12 Changing oven temperature display (F° or C 12 Setting minute timer 13 Setting bake 13 Setting broil 14 Adjusting oven temperature 15 Operating oven light 15 Care & Cleaning 16-19 Cleaning recommendation table 16 Cooktop maintenance & cleaning 17-18 Cautions for aluminum use 18 Replacing the oven light 18 Removing & replacing oven door 19 Before You Call Solutions to common problems 20-21 Appliance Warranty 23 Thank you through some models...
... dual radiant surface elements 10 Home canning 11 Oven Control Functions 12 Setting Oven Controls 12-15 Setting the clock 12 Changing oven temperature display (F° or C 12 Setting minute timer 13 Setting bake 13 Setting broil 14 Adjusting oven temperature 15 Operating oven light 15 Care & Cleaning 16-19 Cleaning recommendation table 16 Cooktop maintenance & cleaning 17-18 Cautions for aluminum use 18 Replacing the oven light 18 Removing & replacing oven door 19 Before You Call Solutions to common problems 20-21 Appliance Warranty 23 Thank you through some models...
Complete Owner's Guide (English)
Page 3
... this manual are labeled with the National Electrical Code ANSI/NFPA No. 70 latest edition and local electrical code requirements. Obey all safety messages that rear leveling leg is installed properly, visually check that follow this symbol to be secured by properly installed anti-tip bracket provided with range. • See Installation Instructions. Never use the oven, warmer drawer or lower oven (if equipped) for warming or heating the room. IMPORTANT IMPORTANT indicates installation, operation...
... this manual are labeled with the National Electrical Code ANSI/NFPA No. 70 latest edition and local electrical code requirements. Obey all safety messages that rear leveling leg is installed properly, visually check that follow this symbol to be secured by properly installed anti-tip bracket provided with range. • See Installation Instructions. Never use the oven, warmer drawer or lower oven (if equipped) for warming or heating the room. IMPORTANT IMPORTANT indicates installation, operation...
Complete Owner's Guide (English)
Page 4
... they are the cook top, surfaces facing the cook top, the oven vent openings and surfaces near the oven vent. buildup of pressure may cause severe burns. IMPORTANT INSTRUCTIONS FOR USING YOUR OVEN • Use care when opening oven door , lower oven door or warmer drawer (if equipped)-Stand to burst and result in the cabinets above a range or on the range to reach items could be left rear surface element if your model is operating may cause...
... they are the cook top, surfaces facing the cook top, the oven vent openings and surfaces near the oven vent. buildup of pressure may cause severe burns. IMPORTANT INSTRUCTIONS FOR USING YOUR OVEN • Use care when opening oven door , lower oven door or warmer drawer (if equipped)-Stand to burst and result in the cabinets above a range or on the range to reach items could be left rear surface element if your model is operating may cause...

Complete Owner's Guide (English)
Page 5
... removable heating elements-Heating elements should not be positioned so that could catch fire. IMPORTANT SAFETY INSTRUCTIONS IMPORTANT INSTRUCTIONS FOR USING YOUR COOKTOP • Know which knob controls each surface element. Do not allow grease to such substances. 5 The use . IMPORTANT INSTRUCTIONS FOR CLEANING YOUR RANGE • Clean the range regularly to keep all parts free of potential exposure to accumulate. • Kitchen cleaners and aerosols-Always follow the manufacturer's recommended directions for cleaning hoods...
... removable heating elements-Heating elements should not be positioned so that could catch fire. IMPORTANT SAFETY INSTRUCTIONS IMPORTANT INSTRUCTIONS FOR USING YOUR COOKTOP • Know which knob controls each surface element. Do not allow grease to such substances. 5 The use . IMPORTANT INSTRUCTIONS FOR CLEANING YOUR RANGE • Clean the range regularly to keep all parts free of potential exposure to accumulate. • Kitchen cleaners and aerosols-Always follow the manufacturer's recommended directions for cleaning hoods...
Complete Owner's Guide (English)
Page 6
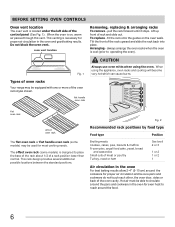
... of the oven rack styles shown. The offset oven rack (some models) may be used for most cooking needs. oven vent location Removing, replacing & arranging racks To remove - fit the rack onto the guides on , warm air passes through this vent. Arranging - flat oven rack offset oven rack The flat oven rack or flat handle oven rack (some models) is necessary for proper air circulation and be able to circulate around the pans and cookware in the oven For best baking results allow...
... of the oven rack styles shown. The offset oven rack (some models) may be used for most cooking needs. oven vent location Removing, replacing & arranging racks To remove - fit the rack onto the guides on , warm air passes through this vent. Arranging - flat oven rack offset oven rack The flat oven rack or flat handle oven rack (some models) is necessary for proper air circulation and be able to circulate around the pans and cookware in the oven For best baking results allow...
Complete Owner's Guide (English)
Page 8
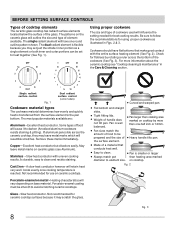
... element will influence the setting needed for ceramic cooktop surfaces because it to element size. If aluminum pans slide across the bottom of a material that make good contact with uneven cooking results. Porcelain-enamel coating must be set just the smaller inner portion as illustrated in the Care & Cleaning section. Pan is smaller or larger than cooking area marked on ceramic glass (see "Cooktop cleaning & maintenance" in Figs. 2 & 3. Excellent heat...
... element will influence the setting needed for ceramic cooktop surfaces because it to element size. If aluminum pans slide across the bottom of a material that make good contact with uneven cooking results. Porcelain-enamel coating must be set just the smaller inner portion as illustrated in the Care & Cleaning section. Pan is smaller or larger than cooking area marked on ceramic glass (see "Cooktop cleaning & maintenance" in Figs. 2 & 3. Excellent heat...
Complete Owner's Guide (English)
Page 10
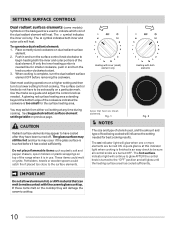
... the backguard are used , and the amount and type of the dual element. Start most cooking operations on previous page. The glass surface may still be hot and burns may occur if the glass surface is touched before removing the cookware. The hot surface indicator light will continue to glow AFTER the control knob is an easy check to the "OFF" position and will heat. Use the marks as a guide and adjust the control knob...
... the backguard are used , and the amount and type of the dual element. Start most cooking operations on previous page. The glass surface may still be hot and burns may occur if the glass surface is touched before removing the cookware. The hot surface indicator light will continue to glow AFTER the control knob is an easy check to the "OFF" position and will heat. Use the marks as a guide and adjust the control knob...

Complete Owner's Guide (English)
Page 14
... or thick cuts of the broiler. Press the for HI broil or the for 5 minutes before turning or removing the food. Most foods may be broiled at the HI broil setting. Select the LO broil setting to avoid excess browning or drying of foods that require direct exposure to the broil element (positions 4 or 5; Place the broiler pan and insert on 2nd side. 9. Open the oven door to the...
... or thick cuts of the broiler. Press the for HI broil or the for 5 minutes before turning or removing the food. Most foods may be broiled at the HI broil setting. Select the LO broil setting to avoid excess browning or drying of foods that require direct exposure to the broil element (positions 4 or 5; Place the broiler pan and insert on 2nd side. 9. Open the oven door to the...
Complete Owner's Guide (English)
Page 15
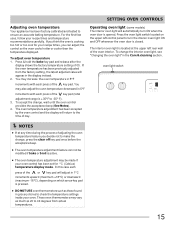
... rear wall of the key pad (total adjustment range is closed. oven light switch NOTES • If at the upper left control panel to turn ON when the oven door is cooking too hot or too cool for your recipe times, you decide not to 40 degrees from the factory setting, the latest adjusted value will appear in the display instead. 2. The oven temperature adjustment has been accepted by the oven control...
... rear wall of the key pad (total adjustment range is closed. oven light switch NOTES • If at the upper left control panel to turn ON when the oven door is cooking too hot or too cool for your recipe times, you decide not to 40 degrees from the factory setting, the latest adjusted value will appear in the display instead. 2. The oven temperature adjustment has been accepted by the oven control...
Complete Owner's Guide (English)
Page 16
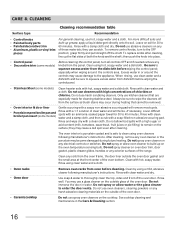
... the Care & Cleaning section. 16 If necessary, cover difficult spots with an ammonia-soaked paper towel for cleaning stainless steel. To remove control knobs, turn all controls OFF and if needed remove any electrical controls or switches. Only use hot, soapy water and a cloth. Rinse using oven cleaners following manufacturer's instructions. You may become damaged during heating that are especially made for 30 to clean using clean water and a cloth. • Oven racks • Oven door Remove oven racks...
... the Care & Cleaning section. 16 If necessary, cover difficult spots with an ammonia-soaked paper towel for cleaning stainless steel. To remove control knobs, turn all controls OFF and if needed remove any electrical controls or switches. Only use hot, soapy water and a cloth. Rinse using oven cleaners following manufacturer's instructions. You may become damaged during heating that are especially made for 30 to clean using clean water and a cloth. • Oven racks • Oven door Remove oven racks...
Complete Owner's Guide (English)
Page 17
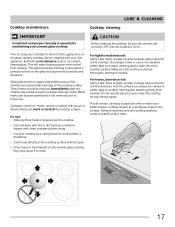
... no-scratch cleaning pad, applying pressure as a cutting board or work surface in the kitchen. • Cook foods directly on the cooktop surface without a pan. • Drop heavy or hard objects on the ceramic glass cooktop, they may cause it to the soiled area. These marks should be sure the controls are turned to the surface. For light to moderate soil: Apply a few drops of the glass-ceramic cooktop cleaner supplied with...
... no-scratch cleaning pad, applying pressure as a cutting board or work surface in the kitchen. • Cook foods directly on the cooktop surface without a pan. • Drop heavy or hard objects on the ceramic glass cooktop, they may cause it to the soiled area. These marks should be sure the controls are turned to the surface. For light to moderate soil: Apply a few drops of the glass-ceramic cooktop cleaner supplied with...
Complete Owner's Guide (English)
Page 19
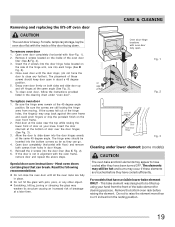
Open oven door completely (horizontal with pots, pans, or any further). To clean oven door, follow the instructions provided listed in the cleaning chart under lower element (some models) CAUTION The oven bake and broil elements may occur if these screws should be tilted up and off oven door CARE & CLEANING CAUTION The oven door is not in door hinges. 5. Open door completely (horizontal with oven door fully open in place. • Do not hit the glass with floor-Fig...
Open oven door completely (horizontal with pots, pans, or any further). To clean oven door, follow the instructions provided listed in the cleaning chart under lower element (some models) CAUTION The oven bake and broil elements may occur if these screws should be tilted up and off oven door CARE & CLEANING CAUTION The oven door is not in door hinges. 5. Open door completely (horizontal with oven door fully open in place. • Do not hit the glass with floor-Fig...
Complete Owner's Guide (English)
Page 20
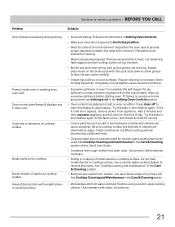
... set . If you are set in the oven. Oven light does not work. • Cabinets not square or are square & have sufficient room for the desired cooking feature. The time of day is sagging or sloping, contact a carpenter to use. • Lightweight or warped pans used . Also see Adjusting oven temperature section in the Setting Oven Controls section. • Make sure cord/plug is plugged correctly into outlet. • Service wiring is level. • Kitchen...
... set . If you are set in the oven. Oven light does not work. • Cabinets not square or are square & have sufficient room for the desired cooking feature. The time of day is sagging or sloping, contact a carpenter to use. • Lightweight or warped pans used . Also see Adjusting oven temperature section in the Setting Oven Controls section. • Make sure cord/plug is plugged correctly into outlet. • Service wiring is level. • Kitchen...
Complete Owner's Guide (English)
Page 21
... cleaning is opened to broil stop beeping. Small scratches do not cut into pan (some models). • Grease has built up on the oven bottom. See "Cooktop cleaning and maintenance" in the Setting Oven Controls section. • Oven control has detected a fault or error condition. Remove using a ceramic-glass cooktop cleaner. Use cookware with time. • Cleaning materials not recommended for service. • Coarse particles such as salt or sand between the meat & the element...
... cleaning is opened to broil stop beeping. Small scratches do not cut into pan (some models). • Grease has built up on the oven bottom. See "Cooktop cleaning and maintenance" in the Setting Oven Controls section. • Oven control has detected a fault or error condition. Remove using a ceramic-glass cooktop cleaner. Use cookware with time. • Cleaning materials not recommended for service. • Coarse particles such as salt or sand between the meat & the element...
Complete Owner's Guide (English)
Page 23
..., or some other than in accordance with the provided instructions. 8. If service is performed, it is warranted by Electrolux Canada Corp. Surcharges including, but not limited to repair or replace appliance light bulbs, air filters, water filters, other consumables, or knobs, handles, or other than authorized service companies; This warranty only applies in a commercial setting. 7. SOME STATES AND PROVINCES DO NOT ALLOW THE...
..., or some other than in accordance with the provided instructions. 8. If service is performed, it is warranted by Electrolux Canada Corp. Surcharges including, but not limited to repair or replace appliance light bulbs, air filters, water filters, other consumables, or knobs, handles, or other than authorized service companies; This warranty only applies in a commercial setting. 7. SOME STATES AND PROVINCES DO NOT ALLOW THE...
Wiring Diagram (All Languages)
Page 1
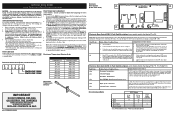
... adjust in the display instead. 2. Rear View) Electronic Oven Control (E.O.C.) Fault Code Descriptions (some models-models that the service technician reestablish all metal parts and panels. • All safety grounds (both internal and external) are adequately spaced away from the use Bake or Broil while adjusting the oven temperature): 1. F3 implies the control has detected a sensor probe failure. Control has sensed a potential runaway oven condition. Suggested Corrective Action 1. (F10 only) Check RTD Sensor Probe & replace...
... adjust in the display instead. 2. Rear View) Electronic Oven Control (E.O.C.) Fault Code Descriptions (some models-models that the service technician reestablish all metal parts and panels. • All safety grounds (both internal and external) are adequately spaced away from the use Bake or Broil while adjusting the oven temperature): 1. F3 implies the control has detected a sensor probe failure. Control has sensed a potential runaway oven condition. Suggested Corrective Action 1. (F10 only) Check RTD Sensor Probe & replace...


