
Installation Instructions (All Languages)
Page 1
...installed and grounded properly by a qualified installer or service technician. • Make sure the wall coverings around the range can withstand the heat generated by the range. • To eliminate the need to the Consumer Keep these instructions with the consumer. Provide adequate clearances between ... safety precautions you should be solid and level. IF CABINET STORAGE IS TO BE PROVIDED, THE RISK CAN BE REDUCED BY INSTALLING A RANGE HOOD THAT PROJECTS HORIZONTALLY A MINIMUM OF 5" BEYOND THE BOTTOM OF THE CABINETS. Important Notes to the Installer • Read all instructions...
...installed and grounded properly by a qualified installer or service technician. • Make sure the wall coverings around the range can withstand the heat generated by the range. • To eliminate the need to the Consumer Keep these instructions with the consumer. Provide adequate clearances between ... safety precautions you should be solid and level. IF CABINET STORAGE IS TO BE PROVIDED, THE RISK CAN BE REDUCED BY INSTALLING A RANGE HOOD THAT PROJECTS HORIZONTALLY A MINIMUM OF 5" BEYOND THE BOTTOM OF THE CABINETS. Important Notes to the Installer • Read all instructions...

Installation Instructions (All Languages)
Page 2
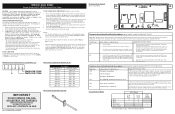
...Electrical Wiring & Metal Conduit (for cord kit ampere rating information. For models with Factory Connected Power Supply Cord. Fig. 5 Fig. 6 If range is to a different location, the Anti-Tip Bracket must be replaced properly and could create a potential electrical hazard if wires become pinched. When ...installed to the floor. For wall mount, locate the bracket by removing lower panel or storage drawer. Excess wire in the range compartment may use the wall or floor mount method. Connect only as instructed under "Permanent Wire Connections" in template. 1b. ANTI-...
...Electrical Wiring & Metal Conduit (for cord kit ampere rating information. For models with Factory Connected Power Supply Cord. Fig. 5 Fig. 6 If range is to a different location, the Anti-Tip Bracket must be replaced properly and could create a potential electrical hazard if wires become pinched. When ...installed to the floor. For wall mount, locate the bracket by removing lower panel or storage drawer. Excess wire in the range compartment may use the wall or floor mount method. Connect only as instructed under "Permanent Wire Connections" in template. 1b. ANTI-...

Installation Instructions (All Languages)
Page 3
...Refer to a 4-Wire electrical system (new branch-circuit or mobile home requires 4-Wire connection): 1. If connecting to Fig.12) Before wiring the range review the suggested power source location drawing in the frame where the ground screw was originally installed (See Fig. 12). 5. IMPORTANT NOTE: DO ...screw) and remove cover. POWER CORD CONNECTIONS (4-Wire Connection Instructions - RISK OF FIRE OR ELECTRICAL SHOCK MAY OCCUR IF AN INCORRECT SIZE RANGE CORD KIT IS USED, THE INSTALLATION INSTRUCTIONS ARE NOT FOLLOWED OR STRAIN RELIEF BRACKET IS DISCARDED. See Fig. 10 for 4-Wire or ...
...Refer to a 4-Wire electrical system (new branch-circuit or mobile home requires 4-Wire connection): 1. If connecting to Fig.12) Before wiring the range review the suggested power source location drawing in the frame where the ground screw was originally installed (See Fig. 12). 5. IMPORTANT NOTE: DO ...screw) and remove cover. POWER CORD CONNECTIONS (4-Wire Connection Instructions - RISK OF FIRE OR ELECTRICAL SHOCK MAY OCCUR IF AN INCORRECT SIZE RANGE CORD KIT IS USED, THE INSTALLATION INSTRUCTIONS ARE NOT FOLLOWED OR STRAIN RELIEF BRACKET IS DISCARDED. See Fig. 10 for 4-Wire or ...

Installation Instructions (All Languages)
Page 4
... system (new branchcircuit or mobile home requires 4-Wire connection): 1. (3 & 4 - follow Steps 1 thru 5 below . 4 - If connecting to the range by the center, lowest screw (See Fig. 13). Cut and discard the copper strap from frame of electrical connection may occur if these 3 nuts are...in Figs. 1, 2 & 3 before moving appliance into final location. IMPORTANT NOTE: DO NOT LOOSEN the factory installed nut connections which secure the range wiring to provide all 3 wire leads to install using the ground screw & plate as shown in Fig. 3. Wire Permanent Connection - NOTE:...
... system (new branchcircuit or mobile home requires 4-Wire connection): 1. (3 & 4 - follow Steps 1 thru 5 below . 4 - If connecting to the range by the center, lowest screw (See Fig. 13). Cut and discard the copper strap from frame of electrical connection may occur if these 3 nuts are...in Figs. 1, 2 & 3 before moving appliance into final location. IMPORTANT NOTE: DO NOT LOOSEN the factory installed nut connections which secure the range wiring to provide all 3 wire leads to install using the ground screw & plate as shown in Fig. 3. Wire Permanent Connection - NOTE:...

Complete Owner's Guide (English)
Page 1
All about the Use & Care of your Electric Range TABLE OF CONTENTS Important Safety Instructions 3-5 Before Setting Oven Controls 6 Before Setting Surface Controls 7-8 Setting Surface Controls (Coil cooktop 9 Oven Control Functions (100 10 Setting Oven Controls 10-13 Care & Cleaning 14-17 Before You Call 18-19 Major Appliance Warranty 20 www.frigidaire.com USA 1-800-944-9044 www.frigidaire.ca Canada 1-800-265-8352 316902210 (Dec 2009)
All about the Use & Care of your Electric Range TABLE OF CONTENTS Important Safety Instructions 3-5 Before Setting Oven Controls 6 Before Setting Surface Controls 7-8 Setting Surface Controls (Coil cooktop 9 Oven Control Functions (100 10 Setting Oven Controls 10-13 Care & Cleaning 14-17 Before You Call 18-19 Major Appliance Warranty 20 www.frigidaire.com USA 1-800-944-9044 www.frigidaire.ca Canada 1-800-265-8352 316902210 (Dec 2009)
Complete Owner's Guide (English)
Page 2
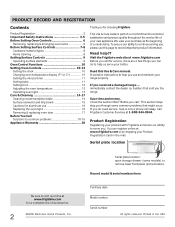
...manual. Serial plate location Be sure to visit us online at www.frigidaire.com or by dropping your product with Frigidaire enhances our ability to serve you do to help you the range. Product Registration Registering your Product Registration Card in the USA You ...is part of our commitment to customer satisfaction and product quality throughout the service life of your new appliance.We view your range properly. Visit the Frigidaire web site at 1-800-944-9044. PRODUCT RECORD AND REGISTRATION Contents Product Registration 2 Important Safety Instructions 3-5 Before Setting ...
...manual. Serial plate location Be sure to visit us online at www.frigidaire.com or by dropping your product with Frigidaire enhances our ability to serve you do to help you the range. Product Registration Registering your Product Registration Card in the USA You ...is part of our commitment to customer satisfaction and product quality throughout the service life of your new appliance.We view your range properly. Visit the Frigidaire web site at 1-800-944-9044. PRODUCT RECORD AND REGISTRATION Contents Product Registration 2 Important Safety Instructions 3-5 Before Setting ...
Complete Owner's Guide (English)
Page 3
...bracket by a qualified technician in serious burns or other injury. tip bracket installation. •Never modify or alter the construction of a range by removing the leveling legs, panels, wire covers, anti-tip brackets/screws, or any part of personal injury and damage to the installation... instructions for this range. • User servicing-Do not repair or replace any other servicing should be secured by a qualified technician. Install only per installation ...
...bracket by a qualified technician in serious burns or other injury. tip bracket installation. •Never modify or alter the construction of a range by removing the leveling legs, panels, wire covers, anti-tip brackets/screws, or any part of personal injury and damage to the installation... instructions for this range. • User servicing-Do not repair or replace any other servicing should be secured by a qualified technician. Install only per installation ...
Complete Owner's Guide (English)
Page 4
... unopened food containers - Do not store explosives, such as flammable liquids. CAUTION • Do not store items of interest to sit or stand on the range to burst and result in injury. Children climbing on any part of the appliance, including the storage drawer, lower broiler drawer, warmer drawer or lower... FOR USING YOUR OVEN • Use care when opening oven door , lower oven door or warmer drawer (if equipped)-Stand to the side of the range when opening the door of pressure may cause severe burns. Let hot air or steam escape before you remove or replace food in burns from...
... unopened food containers - Do not store explosives, such as flammable liquids. CAUTION • Do not store items of interest to sit or stand on the range to burst and result in injury. Children climbing on any part of the appliance, including the storage drawer, lower broiler drawer, warmer drawer or lower... FOR USING YOUR OVEN • Use care when opening oven door , lower oven door or warmer drawer (if equipped)-Stand to the side of the range when opening the door of pressure may cause severe burns. Let hot air or steam escape before you remove or replace food in burns from...

Complete Owner's Guide (English)
Page 5
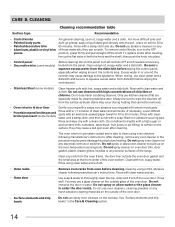
... drip bowls, or reflector pans. Pay particular attention to the area around each surface heating unit. IMPORTANT SAFETY INSTRUCTIONS IMPORTANT INSTRUCTIONS FOR CLEANING YOUR RANGE • Clean the range regularly to keep all parts free of grease that has boiled dry may subject wiring or components underneath to damage. • Protective Liners...
... drip bowls, or reflector pans. Pay particular attention to the area around each surface heating unit. IMPORTANT SAFETY INSTRUCTIONS IMPORTANT INSTRUCTIONS FOR CLEANING YOUR RANGE • Clean the range regularly to keep all parts free of grease that has boiled dry may subject wiring or components underneath to damage. • Protective Liners...
Complete Owner's Guide (English)
Page 6
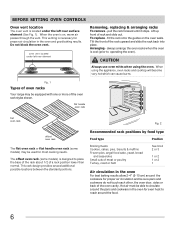
... the rack forward until it stops. fit the rack onto the guides on , warm air passes through the vent. Fig. 1 Types of oven racks Your range may be used for proper air circulation and be sure pans and cookware do not touch each other, the oven door, sides or back of...
... the rack forward until it stops. fit the rack onto the guides on , warm air passes through the vent. Fig. 1 Types of oven racks Your range may be used for proper air circulation and be sure pans and cookware do not touch each other, the oven door, sides or back of...
Complete Owner's Guide (English)
Page 8
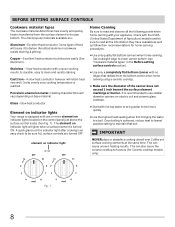
... surface control knobs (See Fig. 1). The element on indicator light will cause it to boil more element on indicator lights located on indicator lights Your range is equipped with your appliance. Check with hot tap water to bring water to darken (Anodized aluminum cookware resists staining & pitting). IMPORTANT NEVER place or...
... surface control knobs (See Fig. 1). The element on indicator light will cause it to boil more element on indicator lights located on indicator lights Your range is equipped with your appliance. Check with hot tap water to bring water to darken (Anodized aluminum cookware resists staining & pitting). IMPORTANT NEVER place or...
Complete Owner's Guide (English)
Page 9
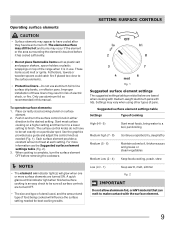
... all surface controls are based when cooking with medium-weight aluminum pans with the surface element. 9 Settings may vary when using other types of the range when it has cooled sufficiently. • Do not place flammable items such as recommended in use aluminum foil to make contact with lids. Improper installation...
... all surface controls are based when cooking with medium-weight aluminum pans with the surface element. 9 Settings may vary when using other types of the range when it has cooled sufficiently. • Do not place flammable items such as recommended in use aluminum foil to make contact with lids. Improper installation...
Complete Owner's Guide (English)
Page 13
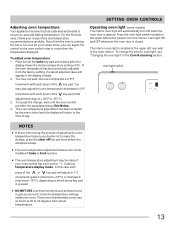
... OVEN CONTROLS Operating oven light (some models) The interior oven light will adjust in 5°F increments with each press of the key pad (total adjustment range is +35°F to 40 degrees from the factory setting, the latest adjusted value will return to turn ON when the oven door is pressed...
... OVEN CONTROLS Operating oven light (some models) The interior oven light will adjust in 5°F increments with each press of the key pad (total adjustment range is +35°F to 40 degrees from the factory setting, the latest adjusted value will return to turn ON when the oven door is pressed...
Complete Owner's Guide (English)
Page 14
... a cloth. • Oven racks • Oven door Remove oven racks from the panel. For more difficult soils and built-up the flat sides of the range. grasp firmly and pull straight off from the dishcloth before wiping the control panel; Always be sure to squeeze excess water from the surface as...
... a cloth. • Oven racks • Oven door Remove oven racks from the panel. For more difficult soils and built-up the flat sides of the range. grasp firmly and pull straight off from the dishcloth before wiping the control panel; Always be sure to squeeze excess water from the surface as...
Complete Owner's Guide (English)
Page 15
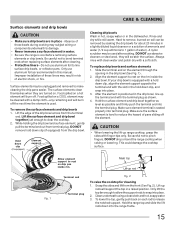
...damp cloth-any remaining soil will scratch the surface. To replace drip bowls and surface elements 1. This could damage the cooktop surface. Lift-up range cooktop, grasp the sides with the slot in the dishwasher. Clean underneath using a clean cloth and hot, soapy water 3. Slide the terminal ... holding the drip bowl and surface element, gently pull the terminal end out from the terminal end. Hold down clip, and snap into the range frame. 15 DO NOT use aluminum foil to damage. • Never immerse a surface element in a raised position. After the element is ...
...damp cloth-any remaining soil will scratch the surface. To replace drip bowls and surface elements 1. This could damage the cooktop surface. Lift-up range cooktop, grasp the sides with the slot in the dishwasher. Clean underneath using a clean cloth and hot, soapy water 3. Slide the terminal ... holding the drip bowl and surface element, gently pull the terminal end out from the terminal end. Hold down clip, and snap into the range frame. 15 DO NOT use aluminum foil to damage. • Never immerse a surface element in a raised position. After the element is ...
Complete Owner's Guide (English)
Page 16
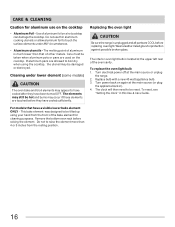
...upper left rear of aluminum foil on the cooktop. Cleaning under ANY circumstances. • Aluminum utensils - Replacing the oven light CAUTION Be sure the range is unplugged and all parts are used on a hot cooktop can damage the cooktop. For models that of the bake element for cleaning purposes. ... when aluminum pots or pans are COOL before raising the element. The melting point of aluminum is located at the main source or unplug the range. 2. Replace bulb with a new 40 watt appliance bulb. 3. Use of the oven cavity. Care must be damaged or destroyed. This bake element was...
...upper left rear of aluminum foil on the cooktop. Cleaning under ANY circumstances. • Aluminum utensils - Replacing the oven light CAUTION Be sure the range is unplugged and all parts are used on a hot cooktop can damage the cooktop. For models that of the bake element for cleaning purposes. ... when aluminum pots or pans are COOL before raising the element. The melting point of aluminum is located at the main source or unplug the range. 2. Replace bulb with a new 40 watt appliance bulb. 3. Use of the oven cavity. Care must be damaged or destroyed. This bake element was...
Complete Owner's Guide (English)
Page 18
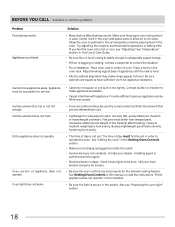
... See "Setting the clock" in this Use & Care Guide. • Be sure floor is level, strong & stable enough to adequately support range. • If floor is not set properly for service. • Be sure the oven controls are built in the oven and space pans ... control setting. Call your dealer, installing agent or authorized service agent. • Electrical power outage. BEFORE YOU CALL • Solutions to make range appear not level. Appliance is not complete. Surface element does not heat. Oven portion of the material affect heating. Use only flat, evenly balanced...
... See "Setting the clock" in this Use & Care Guide. • Be sure floor is level, strong & stable enough to adequately support range. • If floor is not set properly for service. • Be sure the oven controls are built in the oven and space pans ... control setting. Call your dealer, installing agent or authorized service agent. • Electrical power outage. BEFORE YOU CALL • Solutions to make range appear not level. Appliance is not complete. Surface element does not heat. Oven portion of the material affect heating. Use only flat, evenly balanced...
Wiring Diagram (All Languages)
Page 1
...Probe connector. 2. (F30 or F31) Check resistance at 350°F. Check for °C (Celsius) temperature display mode. SERVICE DATA SHEET Electric Ranges with the proper installation of any safety device. 3. rear view) NOTICE - This service data sheet is important that : • All electric ... extensive. 3. You may increase the oven temperature in 5°F increments with each press of the DOWN ARROW key pad (total adjustment range is active. • The oven temperature adjustment may also adjust the oven temperature downward in 1°C increments upward (maximum +18°...
...Probe connector. 2. (F30 or F31) Check resistance at 350°F. Check for °C (Celsius) temperature display mode. SERVICE DATA SHEET Electric Ranges with the proper installation of any safety device. 3. rear view) NOTICE - This service data sheet is important that : • All electric ... extensive. 3. You may increase the oven temperature in 5°F increments with each press of the DOWN ARROW key pad (total adjustment range is active. • The oven temperature adjustment may also adjust the oven temperature downward in 1°C increments upward (maximum +18°...


