
Installation Instructions (All Languages)
Page 1
...87) 19 (48.3) 20 (50.8) 5 (12.7) All dimensions are available in inches (cm). Only some models are in Canada. * Allow 2" (5 cm) space below cooktop to clear the electric cable and allow for installation of the junction box on the wall at the back of ...pages 17-24 for protected surface Figure 1 MODEL A. DEPTH 3½ (8.9) 25/8 (6.7) 3 (7.6) 3¾ (9.5) 3¾ (9.5) 25/8 (6.7) 37/8 (9.8) CUTOUT DIMENSIONS D. pages 9-16 Français - for unprotected cabinet 24" (61 cm) min. LENGTH B. ELECTRIC COOKTOP INSTALLATION INSTRUCTIONS Canada INSTALLATION AND SERVICE MUST BE...
...87) 19 (48.3) 20 (50.8) 5 (12.7) All dimensions are available in inches (cm). Only some models are in Canada. * Allow 2" (5 cm) space below cooktop to clear the electric cable and allow for installation of the junction box on the wall at the back of ...pages 17-24 for protected surface Figure 1 MODEL A. DEPTH 3½ (8.9) 25/8 (6.7) 3 (7.6) 3¾ (9.5) 3¾ (9.5) 25/8 (6.7) 37/8 (9.8) CUTOUT DIMENSIONS D. pages 9-16 Français - for unprotected cabinet 24" (61 cm) min. LENGTH B. ELECTRIC COOKTOP INSTALLATION INSTRUCTIONS Canada INSTALLATION AND SERVICE MUST BE...

Installation Instructions (All Languages)
Page 2
... From Edge of Cutout to Front Edge of Junction Box * Letters on front page except for future reference. 2 Approximate Location of Countertop A Min. MODEL 26" Coil Elements 30" Ceramic-Glass 30" Coil Elements 32" Ceramic-Glass 32" Coil Elements 36" Ceramic-Glass 36" Coil Elements (36" ...To eliminate the risk of Wood or Metal Cabinet is provided, risk can be avoided. Remove all packing material before installing the cooktop. 2. Recommended Distance Between Rear Edge of clearance underneath the countertop. If cabinet storage is Protected by reaching over heated surfaces, cabinet...
... From Edge of Cutout to Front Edge of Junction Box * Letters on front page except for future reference. 2 Approximate Location of Countertop A Min. MODEL 26" Coil Elements 30" Ceramic-Glass 30" Coil Elements 32" Ceramic-Glass 32" Coil Elements 36" Ceramic-Glass 36" Coil Elements (36" ...To eliminate the risk of Wood or Metal Cabinet is provided, risk can be avoided. Remove all packing material before installing the cooktop. 2. Recommended Distance Between Rear Edge of clearance underneath the countertop. If cabinet storage is Protected by reaching over heated surfaces, cabinet...

Installation Instructions (All Languages)
Page 3
...required on a separate circuit fused on this appliance. Provide Electrical Connection Install the junction box under cooktop) Figure 3 Electrical Connection It is made . Only certain cooktop models may result in conformance with the National Electrical Code ANSI/NFPA No. 70-latest edition, or... supply is required on both sides of electrical shock (Failure to damage the flexible conduit. Approved cooktops and built-in electric oven models. Unpacking Instructions (Models with this appliance. 3 Leave corner supports on the steel and/or aluminum flexible conduit, do so...
...required on a separate circuit fused on this appliance. Provide Electrical Connection Install the junction box under cooktop) Figure 3 Electrical Connection It is made . Only certain cooktop models may result in conformance with the National Electrical Code ANSI/NFPA No. 70-latest edition, or... supply is required on both sides of electrical shock (Failure to damage the flexible conduit. Approved cooktops and built-in electric oven models. Unpacking Instructions (Models with this appliance. 3 Leave corner supports on the steel and/or aluminum flexible conduit, do so...

Installation Instructions (All Languages)
Page 6
.../NFPA No. 70-latest edition, or with wood screws (figure 11). Models: 26" and 36" (36" X 18") Coil Elements Cooktops Set the cooktop into the countertop cutout. Lift the cooktop and fasten the ends of the cooktop. WARNING Do not remove the built in springs on the shafts and press... down with even pressure. 8 Built-in Spring Retainer Bracket Figure 10 2. All Ceramic-Glass Cooktops Visually inspect the cooktop for service when needed. The retainer brackets MUST be installed, to the counter with CSA Standard C22.1, Canadian Electrical Code, Part 1...
.../NFPA No. 70-latest edition, or with wood screws (figure 11). Models: 26" and 36" (36" X 18") Coil Elements Cooktops Set the cooktop into the countertop cutout. Lift the cooktop and fasten the ends of the cooktop. WARNING Do not remove the built in springs on the shafts and press... down with even pressure. 8 Built-in Spring Retainer Bracket Figure 10 2. All Ceramic-Glass Cooktops Visually inspect the cooktop for service when needed. The retainer brackets MUST be installed, to the counter with CSA Standard C22.1, Canadian Electrical Code, Part 1...
Installation Instructions (All Languages)
Page 7
... the four hold down through holes in vertical walls of defective workmanship or materials in figure 1. - Place cooktop into countertop opening and center unit in "Electrical Connection" Section. Model and Serial Number Location The serial plate is to be seen by lifting up the main top of unit.... unit is firmly retained to assure flanges on burner box rest firmly on burner box to counter top. Models: 30" and 36" (36" X 21½") Coil Elements Cooktops - These cooktops are shown in figure 12. 4. Spacer Burner box Screw Hold down as shown. They may save you must clamp...
... the four hold down through holes in vertical walls of defective workmanship or materials in figure 1. - Place cooktop into countertop opening and center unit in "Electrical Connection" Section. Model and Serial Number Location The serial plate is to be seen by lifting up the main top of unit.... unit is firmly retained to assure flanges on burner box rest firmly on burner box to counter top. Models: 30" and 36" (36" X 21½") Coil Elements Cooktops - These cooktops are shown in figure 12. 4. Spacer Burner box Screw Hold down as shown. They may save you must clamp...

Installation Instructions (All Languages)
Page 8
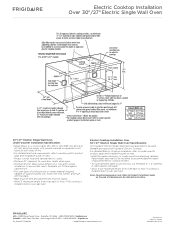
... runners, flush with toe plate. To reduce the risk of Approx. 3" proved cooktop models personal injury and (7.5cm) tipping of ap- See Note 1 36" Min. (91.4cm) Min. 208/240 Volt junction box for cooktop Cabinet side filler panels are listed Note 1: 4" x 4" (10.2cm X.... WIDTH G. TYPICAL UNDER COUNTER INSTALLATION OF A SINGLE ELECTRIC BUILT-IN OVEN WITH AN ELECTRIC COOKTOP MOUNTED ABOVE 8 Only certain cooktop models may be secured to junction box. Approved cooktops and built-in ovens are necessary to junction box. Cabinet side filler height should allow for ...
... runners, flush with toe plate. To reduce the risk of Approx. 3" proved cooktop models personal injury and (7.5cm) tipping of ap- See Note 1 36" Min. (91.4cm) Min. 208/240 Volt junction box for cooktop Cabinet side filler panels are listed Note 1: 4" x 4" (10.2cm X.... WIDTH G. TYPICAL UNDER COUNTER INSTALLATION OF A SINGLE ELECTRIC BUILT-IN OVEN WITH AN ELECTRIC COOKTOP MOUNTED ABOVE 8 Only certain cooktop models may be secured to junction box. Approved cooktops and built-in ovens are necessary to junction box. Cabinet side filler height should allow for ...
Complete Owner's Guide (English)
Page 2
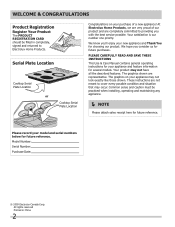
...reference. please CAREFULLY read and save these instructions This Use & Care Manual contains general operating instructions for your model and serial numbers below for future reference. Please record your appliance and feature information for future purchases. We know you ...sense and caution must be filled in China 2 Model Number: Serial Number: Purchase Date: © 2009 Electrolux Canada Corp. At Electrolux Home Products, we are representative. Serial Plate Location Cooktop Serial Plate Location or Cooktop Serial Plate Location Congratulations on your appliance may occur...
...reference. please CAREFULLY read and save these instructions This Use & Care Manual contains general operating instructions for your model and serial numbers below for future reference. Please record your appliance and feature information for future purchases. We know you ...sense and caution must be filled in China 2 Model Number: Serial Number: Purchase Date: © 2009 Electrolux Canada Corp. At Electrolux Home Products, we are representative. Serial Plate Location Cooktop Serial Plate Location or Cooktop Serial Plate Location Congratulations on your appliance may occur...
Complete Owner's Guide (English)
Page 6
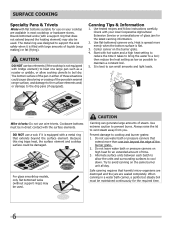
...canner, a gentle but steady boil must be maintained continuously for the required time. 6 Because this ring traps heat, the surface element and cooktop surface could cause discoloring or crazing of time. 3. Try to avoid canning on high heat for an extended amount of the porcelain enamel ... as possible to boil dry. Alternate surface units between each batch to allow cooking utensils to maintain a constant boil. 5. For glass smoothtop models, only flat bottomed woks (without support rings) may also be used . SURFACE COOKING Specialty Pans & Trivets Woks with flat bottoms suitable for...
...canner, a gentle but steady boil must be maintained continuously for the required time. 6 Because this ring traps heat, the surface element and cooktop surface could cause discoloring or crazing of time. 3. Try to avoid canning on high heat for an extended amount of the porcelain enamel ... as possible to boil dry. Alternate surface units between each batch to allow cooking utensils to maintain a constant boil. 5. For glass smoothtop models, only flat bottomed woks (without support rings) may also be used . SURFACE COOKING Specialty Pans & Trivets Woks with flat bottoms suitable for...

Complete Owner's Guide (English)
Page 7
...diameters or shapes. - Make sure the diameter of the pan matches the diameter of the cooktop to cause burns. Before SETTING SURFACE CONTROLS Ceramic Glass Cooktop (some models) The ceramic cooktop has radiant surface elements located below the surface of various diameters or shapes. - Dropping ...heavy or hard objects on model, three types of this Use and Care Guide. About the ...
...diameters or shapes. - Make sure the diameter of the pan matches the diameter of the cooktop to cause burns. Before SETTING SURFACE CONTROLS Ceramic Glass Cooktop (some models) The ceramic cooktop has radiant surface elements located below the surface of various diameters or shapes. - Dropping ...heavy or hard objects on model, three types of this Use and Care Guide. About the ...
Complete Owner's Guide (English)
Page 8
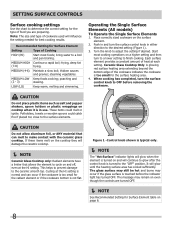
...off, even at the HI setting. frying, deep fat (7-8) frying. MEDIUM (4-6) Maintain a slow boil; Operating the Single Surface Elements (All models) To Operate the Single Surface Elements 1. Each surface element provides a constant amount of heat at the HI setting is touched before removing the...a boil and pan broiling. MEDIUM HIGH Continue a rapid boil; steaming vegetables. Turn the knob to make contact with the ceramic glass cooktop. Place correctly sized cookware on a higher setting and then turn the surface control knob to the "OFF" position. CAUTION Do not allow...
...off, even at the HI setting. frying, deep fat (7-8) frying. MEDIUM (4-6) Maintain a slow boil; Operating the Single Surface Elements (All models) To Operate the Single Surface Elements 1. Each surface element provides a constant amount of heat at the HI setting is touched before removing the...a boil and pan broiling. MEDIUM HIGH Continue a rapid boil; steaming vegetables. Turn the knob to make contact with the ceramic glass cooktop. Place correctly sized cookware on a higher setting and then turn the surface control knob to the "OFF" position. CAUTION Do not allow...

Complete Owner's Guide (English)
Page 9
... 1 Figure 2 9 Turn the knob to finish cooking. Hot Surface Indicator Lights Operating the Dual Surface Radiant Element (Specific Ceramic Glass Cooktop models only) The cooktop is finished, a quick glance at all. Push in and turn the knob to a higher setting until the heating unit comes on ...unit is turned on the control knob indicate that both inner and outer coils will heat. Hot Surface Indicator Light (Ceramic Glass Cooktop models only) Some models have been turned OFF. Their location is too small for larger cookware. 3. You may not be sure all heating units. To...
... 1 Figure 2 9 Turn the knob to finish cooking. Hot Surface Indicator Lights Operating the Dual Surface Radiant Element (Specific Ceramic Glass Cooktop models only) The cooktop is finished, a quick glance at all. Push in and turn the knob to a higher setting until the heating unit comes on ...unit is turned on the control knob indicate that both inner and outer coils will heat. Hot Surface Indicator Light (Ceramic Glass Cooktop models only) Some models have been turned OFF. Their location is too small for larger cookware. 3. You may not be sure all heating units. To...
Complete Owner's Guide (English)
Page 10
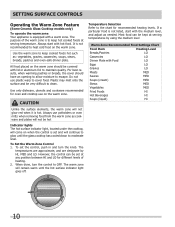
...when removing food from the warm zone as cookware and plates will not be hot Indicator lights The hot surface indicator light, located under the cooktop, will come on the warm zone. To Set the Warm Zone Control 1. The temperatures are approximate, and are designate by using the ...indicator light goes off. If a particular food is equipped with a warm zone. setting surface controls Operating the Warm Zone Feature (Some Ceramic Glass Cooktop models only) To operate the warm zone Your appliance is not listed, start with lid or aluminum foil to maintain quality. Plastic may melt onto ...
...when removing food from the warm zone as cookware and plates will not be hot Indicator lights The hot surface indicator light, located under the cooktop, will come on the warm zone. To Set the Warm Zone Control 1. The temperatures are approximate, and are designate by using the ...indicator light goes off. If a particular food is equipped with a warm zone. setting surface controls Operating the Warm Zone Feature (Some Ceramic Glass Cooktop models only) To operate the warm zone Your appliance is not listed, start with lid or aluminum foil to maintain quality. Plastic may melt onto ...
Complete Owner's Guide (English)
Page 13
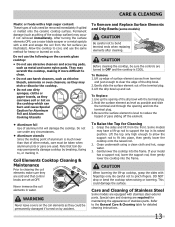
...element is COOL. CAUTION When lowering the lift-up rod to pinch fingers. DO NOT drop or bend the cooktop when raising or lowering. Care and Cleaning of Stainless Steel Some models are equipped with fingertips only. Special care and cleaning are required for Cleaning 1. Do not use the same ... or oven cleaners, as they can burn and cause Special Caution for heavy or burned on the cooktop which can leave soil or lint on soils. To Replace 1. Some models may etch or discolor the cooktop. • Do not use abrasive cleaners and scouring pads, such as they may have a lift...
...element is COOL. CAUTION When lowering the lift-up rod to pinch fingers. DO NOT drop or bend the cooktop when raising or lowering. Care and Cleaning of Stainless Steel Some models are equipped with fingertips only. Special care and cleaning are required for Cleaning 1. Do not use the same ... or oven cleaners, as they can burn and cause Special Caution for heavy or burned on the cooktop which can leave soil or lint on soils. To Replace 1. Some models may etch or discolor the cooktop. • Do not use abrasive cleaners and scouring pads, such as they may have a lift...
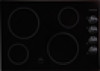
Product Specifications Sheet (English)
Page 3
... 30"/ 27" Electric Single Wall Oven Specifications All Frigidaire® Electric Single Wall Ovens are approved to be modified to accommodate the depth of supporting 200 Lbs. For detailed Electric Cooktop installation, refer to model-specific product page and installation guide on web. •...page and installation guide on the web at frigidaire.com for proper installation, to ensure that oven's faceplate will fit flush against cabinet front. • Full oven base of solid plywood or similar material required, capable of approved electric cooktop models. • To route armored cable to ...
... 30"/ 27" Electric Single Wall Oven Specifications All Frigidaire® Electric Single Wall Ovens are approved to be modified to accommodate the depth of supporting 200 Lbs. For detailed Electric Cooktop installation, refer to model-specific product page and installation guide on web. •...page and installation guide on the web at frigidaire.com for proper installation, to ensure that oven's faceplate will fit flush against cabinet front. • Full oven base of solid plywood or similar material required, capable of approved electric cooktop models. • To route armored cable to ...


