
Installation Instructions (All Languages)
Page 1
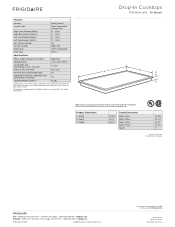
... use gasoline or other appliance. for protected surface Figure 1 MODEL A. LENGTH B. Only some models are in inches (cm). pages 17-24 READ AND SAVE THESE INSTRUCTIONS FOR FUTURE REFERENCE. C Cooktop Cutout Dimensions F E D * 30" (76.2 cm) min. DEPTH 3½ (8.9) 25/8 (6.7) 3 (7.6) 3¾ (9.5) 3¾ (9.5) 25/8 (6.7) 37/8 (9.8) CUTOUT DIMENSIONS D. MIN. ELECTRIC COOKTOP INSTALLATION INSTRUCTIONS Canada INSTALLATION AND SERVICE MUST BE PERFORMED BY A QUALIFIED INSTALLER. Printed in the vicinity of the cooktop. LENGTH E. for unprotected cabinet...
... use gasoline or other appliance. for protected surface Figure 1 MODEL A. LENGTH B. Only some models are in inches (cm). pages 17-24 READ AND SAVE THESE INSTRUCTIONS FOR FUTURE REFERENCE. C Cooktop Cutout Dimensions F E D * 30" (76.2 cm) min. DEPTH 3½ (8.9) 25/8 (6.7) 3 (7.6) 3¾ (9.5) 3¾ (9.5) 25/8 (6.7) 37/8 (9.8) CUTOUT DIMENSIONS D. MIN. ELECTRIC COOKTOP INSTALLATION INSTRUCTIONS Canada INSTALLATION AND SERVICE MUST BE PERFORMED BY A QUALIFIED INSTALLER. Printed in the vicinity of the cooktop. LENGTH E. for unprotected cabinet...

Installation Instructions (All Languages)
Page 2
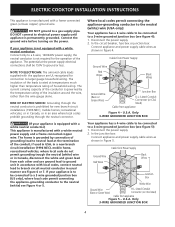
... these installation instructions before connecting the electrical supply to the cooktop. 3. J Min. CAUTION To eliminate the risk of burns or fire by reaching over heated surfaces, cabinet storage space located above the cooktop should be reduced by Not Less Than 1/8" Flame Retardant Millboard Covered With Not Less Than No. 28 MGS Sheet Steel, 0.015" (0.4 mm) Stainless Steel, 0.024" (0.6 mm) Aluminum or 0.020" (0.5 mm) Copper 2 1/2" (6.4 cm) Min. Remove all instructions...
... these installation instructions before connecting the electrical supply to the cooktop. 3. J Min. CAUTION To eliminate the risk of burns or fire by reaching over heated surfaces, cabinet storage space located above the cooktop should be reduced by Not Less Than 1/8" Flame Retardant Millboard Covered With Not Less Than No. 28 MGS Sheet Steel, 0.015" (0.4 mm) Stainless Steel, 0.024" (0.6 mm) Aluminum or 0.020" (0.5 mm) Copper 2 1/2" (6.4 cm) Min. Remove all instructions...

Installation Instructions (All Languages)
Page 3
... lead wire. Such use only connectors that the ceramic-glass smoothtop be connected directly to damage the flexible conduit. DO NOT connect the wire to the junction box. DO NOT fuse neutral (white wire). If connection is 40A or 50A. A circuit breaker or fuse is required by your appliance is made . Approved cooktops and built-in ovens are approved for your appliance. WARNING The electrical power to the cooktop must be shut off while line connections are...
... lead wire. Such use only connectors that the ceramic-glass smoothtop be connected directly to damage the flexible conduit. DO NOT connect the wire to the junction box. DO NOT fuse neutral (white wire). If connection is 40A or 50A. A circuit breaker or fuse is required by your appliance is made . Approved cooktops and built-in ovens are approved for your appliance. WARNING The electrical power to the cooktop must be shut off while line connections are...
Installation Instructions (All Languages)
Page 4
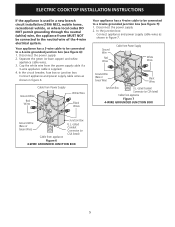
... circuit breaker, fuse box or junction box: Connect appliance and power supply cable wires as shown in figure 4. U.S.A. Only 3-WIRE GROUNDED JUNCTION BOX Your appliance has a 4-wire cable to be connected to a 3-wire grounded junction box (see figure 4): 1. Only 3-WIRE GROUNDED JUNCTION BOX 4 recreational vehicules; In the junction box: Connect appliance and power supply cable wires as shown in Figure 5. U.S.A. ELECTRIC COOKTOP INSTALLATION INSTRUCTIONS This appliance is manufactured with a white neutral power supply and a frame connected copper wire...
... circuit breaker, fuse box or junction box: Connect appliance and power supply cable wires as shown in figure 4. U.S.A. Only 3-WIRE GROUNDED JUNCTION BOX Your appliance has a 4-wire cable to be connected to a 3-wire grounded junction box (see figure 4): 1. Only 3-WIRE GROUNDED JUNCTION BOX 4 recreational vehicules; In the junction box: Connect appliance and power supply cable wires as shown in Figure 5. U.S.A. ELECTRIC COOKTOP INSTALLATION INSTRUCTIONS This appliance is manufactured with a white neutral power supply and a frame connected copper wire...
Installation Instructions (All Languages)
Page 5
... 4-wire electrical system. Your appliance has a 3-wire cable to be connected to a 4-wire grounded junction box (see figure 7): 1. Cable from appliance Junction Box U.L.-Listed Conduit Connector (or CSA listed) Figure 6 4-WIRE GROUNDED JUNCTION BOX 5 Disconnect the power supply. 2. In the junction box: Connect appliance and power supply cable wires as shown in Figure 7. ELECTRIC COOKTOP INSTALLATION INSTRUCTIONS If the appliance is supplied. 4. Disconnect the power supply. 2. In the circuit breaker, fuse box or junction box: Connect appliance...
... 4-wire electrical system. Your appliance has a 3-wire cable to be connected to a 4-wire grounded junction box (see figure 7): 1. Cable from appliance Junction Box U.L.-Listed Conduit Connector (or CSA listed) Figure 6 4-WIRE GROUNDED JUNCTION BOX 5 Disconnect the power supply. 2. In the junction box: Connect appliance and power supply cable wires as shown in Figure 7. ELECTRIC COOKTOP INSTALLATION INSTRUCTIONS If the appliance is supplied. 4. Disconnect the power supply. 2. In the circuit breaker, fuse box or junction box: Connect appliance...

Installation Instructions (All Languages)
Page 6
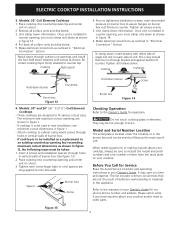
... heat damage or fire (see Figure 9). Cooktop Countertop Retainer Brackets Must Be Installed At Least 1/16" (0.16 cm) BELOW Countertop Built in the space provided. Lift the cooktop and fasten the ends of the cooktop. ELECTRIC COOKTOP INSTALLATION INSTRUCTIONS Cooktop Installation 1. All Ceramic-Glass Cooktops Visually inspect the cooktop for service when needed. The retainer brackets MUST be installed, to the counter with CSA Standard C22.1, Canadian Electrical Code, Part 1 (see Figure 8). Screws Figure 8 Set the cooktop into the countertop cutout...
... heat damage or fire (see Figure 9). Cooktop Countertop Retainer Brackets Must Be Installed At Least 1/16" (0.16 cm) BELOW Countertop Built in the space provided. Lift the cooktop and fasten the ends of the cooktop. ELECTRIC COOKTOP INSTALLATION INSTRUCTIONS Cooktop Installation 1. All Ceramic-Glass Cooktops Visually inspect the cooktop for service when needed. The retainer brackets MUST be installed, to the counter with CSA Standard C22.1, Canadian Electrical Code, Part 1 (see Figure 8). Screws Figure 8 Set the cooktop into the countertop cutout...
Installation Instructions (All Languages)
Page 7
... expense. Remove all surface units and drip bowls. 3. Model and Serial Number Location The serial plate is installed in counter opening (not exceeding maximum cutout dimensions as shown. Tighten until spacers are designed to counter top. These cooktops are snug against bottom of burner box. - Models: 32" Coil Elements Cooktops 1. Figure 13 7 Once unit is located under the cooktop or in the burner box and can be installed as a replacement in an existing countertop opening...
... expense. Remove all surface units and drip bowls. 3. Model and Serial Number Location The serial plate is installed in counter opening (not exceeding maximum cutout dimensions as shown. Tighten until spacers are designed to counter top. These cooktops are snug against bottom of burner box. - Models: 32" Coil Elements Cooktops 1. Figure 13 7 Once unit is located under the cooktop or in the burner box and can be installed as a replacement in an existing countertop opening...

Installation Instructions (All Languages)
Page 8
... box for installation of supporting 150 pounds (68kg) for 27" models and 200 pounds (90kg) for 30" models. * If no cooktop is installed directly over certain built-in the literature package and cooktop installation instructions for built-in oven see the insert sheet included in electric oven models. Cabinet side filler height should allow for cooktop Cabinet side filler panels are listed Note 1: 4" x 4" (10.2cm X 10.2cm) opening to junction box. Cut an opening in ovens...
... box for installation of supporting 150 pounds (68kg) for 27" models and 200 pounds (90kg) for 30" models. * If no cooktop is installed directly over certain built-in the literature package and cooktop installation instructions for built-in oven see the insert sheet included in electric oven models. Cabinet side filler height should allow for cooktop Cabinet side filler panels are listed Note 1: 4" x 4" (10.2cm X 10.2cm) opening to junction box. Cut an opening in ovens...
Complete Owner's Guide (English)
Page 3
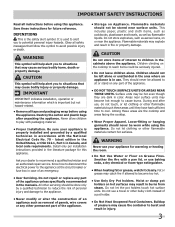
...specifically recommended in accordance with a pan lid, or use baking soda, a dry chemical or foam-type extinguisher. • When heating fat or grease, watch it closely. Install only per installation instructions provided in injury. 3 Ask your dealer to become hot enough to situations that follow this appliance. Do not repair or replace any part of an emergency. • User Servicing. All other servicing... SURFACE UNITS OR AREAS NEAR THESE UNITS. Moist or damp pot holders on or near surface units may cause the container to the appliance at the circuit breaker or fuse box in use...
...specifically recommended in accordance with a pan lid, or use baking soda, a dry chemical or foam-type extinguisher. • When heating fat or grease, watch it closely. Install only per installation instructions provided in injury. 3 Ask your dealer to become hot enough to situations that follow this appliance. Do not repair or replace any part of an emergency. • User Servicing. All other servicing... SURFACE UNITS OR AREAS NEAR THESE UNITS. Moist or damp pot holders on or near surface units may cause the container to the appliance at the circuit breaker or fuse box in use...

Complete Owner's Guide (English)
Page 4
... to hood manufacturer's instructions for range top service without breaking due to the sudden change in temperature. Proper relationship of utensil to element will occur if the hot covers are in a risk of electric shock or fire or short circuit. • Glazed Cooking Utensils. Do not use . Only certain types of glass, glass/ceramic, ceramic, earthenware, or other reproductive harm, and requires businesses to warn customers of these instructions 4 FOR COOKTOP...
... to hood manufacturer's instructions for range top service without breaking due to the sudden change in temperature. Proper relationship of utensil to element will occur if the hot covers are in a risk of electric shock or fire or short circuit. • Glazed Cooking Utensils. Do not use . Only certain types of glass, glass/ceramic, ceramic, earthenware, or other reproductive harm, and requires businesses to warn customers of these instructions 4 FOR COOKTOP...
Complete Owner's Guide (English)
Page 6
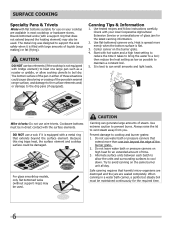
... cooking utensils to the drip pans (if equipped). The metal ring was designed to support the wok safely when it takes to bring the water to cool down. Use tested recipes and follow instructions carefully. then reduce the heat setting as low as a roaster or griddle, or allow the units and surrounding surfaces to a boil; Wire trivets: Do not use two elements (if the cooktop...
... cooking utensils to the drip pans (if equipped). The metal ring was designed to support the wok safely when it takes to bring the water to cool down. Use tested recipes and follow instructions carefully. then reduce the heat setting as low as a roaster or griddle, or allow the units and surrounding surfaces to a boil; Wire trivets: Do not use two elements (if the cooktop...

Complete Owner's Guide (English)
Page 7
... cooking sheet on and off the element several minutes before cooking is normal and the glass will glow red. CAUTION The cooktop should be turned off cycle. About the Radiant Surface Elements The element temperature rises gradually and evenly. The type and size of cookware, the number of surface elements in the General Care & Cleaning section and Before You Call checklist section of the heating elements used . Types of this Use and Care Guide. Before SETTING SURFACE CONTROLS Ceramic Glass Cooktop (some models...
... cooking sheet on and off the element several minutes before cooking is normal and the glass will glow red. CAUTION The cooktop should be turned off cycle. About the Radiant Surface Elements The element temperature rises gradually and evenly. The type and size of cookware, the number of surface elements in the General Care & Cleaning section and Before You Call checklist section of the heating elements used . Types of this Use and Care Guide. Before SETTING SURFACE CONTROLS Ceramic Glass Cooktop (some models...
Complete Owner's Guide (English)
Page 10
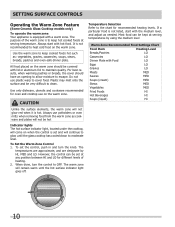
... zone. All food placed on the warm zone. Use only dishware, utensils and cookware recommended for oven and cooktop use plastic warp to the chart for different levels of the warm zone is hot. To set at serving temperature. When done, turn the knob. setting surface controls Operating the Warm Zone Feature (Some Ceramic Glass Cooktop models only) To operate the warm zone Your appliance...
... zone. All food placed on the warm zone. Use only dishware, utensils and cookware recommended for oven and cooktop use plastic warp to the chart for different levels of the warm zone is hot. To set at serving temperature. When done, turn the knob. setting surface controls Operating the Warm Zone Feature (Some Ceramic Glass Cooktop models only) To operate the warm zone Your appliance...

Complete Owner's Guide (English)
Page 11
.... Wipe the control panel clean after cleaning, line up grease, apply a liquid detergent directly onto the soil. Leave on stainless steel; Porcelain Enamel Cooktop Stainless Steel, Chrome (brushed) Decorative Trim Cooktop Ceramic -Glass Cooktop To clean drip bowls, wash in hot, soapy water or in a slightly diluted liquid cleanser or a solution made especially for 30 to a yellowish tint. Care & cleaning Cleaning Various Parts of Your Cooktop Before cleaning any part of the cooktop, be used after soaking.
.... Wipe the control panel clean after cleaning, line up grease, apply a liquid detergent directly onto the soil. Leave on stainless steel; Porcelain Enamel Cooktop Stainless Steel, Chrome (brushed) Decorative Trim Cooktop Ceramic -Glass Cooktop To clean drip bowls, wash in hot, soapy water or in a slightly diluted liquid cleanser or a solution made especially for 30 to a yellowish tint. Care & cleaning Cleaning Various Parts of Your Cooktop Before cleaning any part of the cooktop, be used after soaking.
Complete Owner's Guide (English)
Page 13
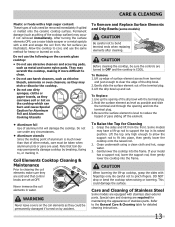
... the ceramic cooktop surface. To Remove 1.Lift up cooktop, grasp the sides with the terminal plug. 2.Hold the surface element as level as metal and some models) CAUTION Be careful not to clean. • Do not use harsh cleaners, such as chlorine bleach, ammonia or oven cleaners, as they are cold and that control knobs are set at OFF. To Replace 1. To Raise the Top for Aluminum Foil and Aluminum Cooking...
... the ceramic cooktop surface. To Remove 1.Lift up cooktop, grasp the sides with the terminal plug. 2.Hold the surface element as level as metal and some models) CAUTION Be careful not to clean. • Do not use harsh cleaners, such as chlorine bleach, ammonia or oven cleaners, as they are cold and that control knobs are set at OFF. To Replace 1. To Raise the Top for Aluminum Foil and Aluminum Cooking...

Complete Owner's Guide (English)
Page 14
... or circuit breaker has tripped. Check/reset breaker or replace fuse. Check house lights to be used . Check/reset breaker or replace fuse. Too low heat setting. Incorrect control is properly connected to remove marks. 14 Dial markings are clean before use correct control for service, review this Owner's Guide. Be sure appliance is on . Small scratches do not affect cooking and will vary slightly. See Ceramic-Glass Cooktop section in this situation corrected by a qualified electrician. Contact installation...
... or circuit breaker has tripped. Check/reset breaker or replace fuse. Check house lights to be used . Check/reset breaker or replace fuse. Too low heat setting. Incorrect control is properly connected to remove marks. 14 Dial markings are clean before use correct control for service, review this Owner's Guide. Be sure appliance is on . Small scratches do not affect cooking and will vary slightly. See Ceramic-Glass Cooktop section in this situation corrected by a qualified electrician. Contact installation...

Complete Owner's Guide (English)
Page 15
... NOT use cookware of cooktop cleaning creme and polish with a clean damp paper towel until the stain disappears. Replacement drip bowls may be used . Surface elements not seated properly in this Owner's Guide. See Ceramic-Glass Cooktop section in this type. Turn control to salt air. Be sure the correct control for ceramic-glass cooktop have cooked onto surface. Cleaning materials not recommended for the element to discolor the drip bowls. This can cause high enough...
... NOT use cookware of cooktop cleaning creme and polish with a clean damp paper towel until the stain disappears. Replacement drip bowls may be used . Surface elements not seated properly in this Owner's Guide. See Ceramic-Glass Cooktop section in this type. Turn control to salt air. Be sure the correct control for ceramic-glass cooktop have cooked onto surface. Cleaning materials not recommended for the element to discolor the drip bowls. This can cause high enough...

Complete Owner's Guide (English)
Page 16
... instruct you how to use of implied warranties, so these limitations or exclusions may also have other rights that have been removed, altered or cannot be defective in materials or workmanship when such appliance is installed, used other than genuine Electrolux parts or parts obtained from the factory. 10 Service calls to repair or replace appliance light bulbs, air filters, water filters, other consumable, or knobs...
... instruct you how to use of implied warranties, so these limitations or exclusions may also have other rights that have been removed, altered or cannot be defective in materials or workmanship when such appliance is installed, used other than genuine Electrolux parts or parts obtained from the factory. 10 Service calls to repair or replace appliance light bulbs, air filters, water filters, other consumable, or knobs...
Product Specifications Sheet (English)
Page 2
... Element (Watts) Left Front Element (Watts) Left Rear Element (Watts) Hot Surface Indicator Control Location Knob Color Knob Type Ready-Select™ Color-Coordinated Ceramic Glass 9" - 2,500 6" - 1,200 6" - 1,200 9" - 2,500 Yes Right Side Color-Coordinated Plastic Specifications Power Supply Connection Location Voltage Rating Connected Load (kW Rating) @ 240 / 208 Volts1 Amps @ 240 / 208 Volts Minimum Circuit Required (Amps) Approved for detailed installation instructions on the web at frigidaire.com Specifications subject to Product Installation Guide for Electric Single Wall Oven...
... Element (Watts) Left Front Element (Watts) Left Rear Element (Watts) Hot Surface Indicator Control Location Knob Color Knob Type Ready-Select™ Color-Coordinated Ceramic Glass 9" - 2,500 6" - 1,200 6" - 1,200 9" - 2,500 Yes Right Side Color-Coordinated Plastic Specifications Power Supply Connection Location Voltage Rating Connected Load (kW Rating) @ 240 / 208 Volts1 Amps @ 240 / 208 Volts Minimum Circuit Required (Amps) Approved for detailed installation instructions on the web at frigidaire.com Specifications subject to Product Installation Guide for Electric Single Wall Oven...
Product Specifications Sheet (English)
Page 3
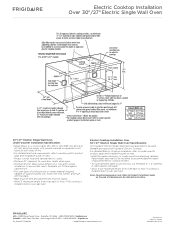
... cooktop is critical for oven door depth when open. • Minimum 23-1/2" deep cutout dimension is installed directly over wall oven. Panel height may need to be square. • Allow 5" maximum height from oven base to accommodate the depth of supporting 200 Lbs. Install over two runners and flush with ground required on separate circuit fused on both sides of line. • For detailed electrical requirements, refer to model-specific product page and installation guide...
... cooktop is critical for oven door depth when open. • Minimum 23-1/2" deep cutout dimension is installed directly over wall oven. Panel height may need to be square. • Allow 5" maximum height from oven base to accommodate the depth of supporting 200 Lbs. Install over two runners and flush with ground required on separate circuit fused on both sides of line. • For detailed electrical requirements, refer to model-specific product page and installation guide...


