
Installation Instructions (All Languages)
Page 1
....4) 36 (91.4) 18 (45.7) 36 (91.4) 21½ (54.6) C. LENGTH E. MIN. Only some models are in China 1 P/N 318205403 (0904) Rev. for protected surface Figure 1 MODEL A. United States WARNING FOR YOUR SAFETY: Do not store or use gasoline or other appliance. Cooktop Dimensions 30" Min. * (76.2 cm) A B IMPORTANT INSTALLATION‑INFORMATION • All electric...
....4) 36 (91.4) 18 (45.7) 36 (91.4) 21½ (54.6) C. LENGTH E. MIN. Only some models are in China 1 P/N 318205403 (0904) Rev. for protected surface Figure 1 MODEL A. United States WARNING FOR YOUR SAFETY: Do not store or use gasoline or other appliance. Cooktop Dimensions 30" Min. * (76.2 cm) A B IMPORTANT INSTALLATION‑INFORMATION • All electric...

Installation Instructions (All Languages)
Page 2
...020" (0.5 mm) Copper 2 1/2" (6.4 cm) Min. Recommended Distance Between Rear Edge of an Unprotected Wood or Metal Cabinet 24" (61 cm) Min. MODEL 26" Coil Elements 30" Ceramic-Glass 30" Coil Elements 32" Ceramic-Glass 32" Coil Elements 36" Ceramic-Glass 36" Coil Elements (36" X 18...your owner's guide for G, H and J. Remove all governing codes and ordinances. 4. Observe all packing material before installing the cooktop. 2. COUNTERTOP CUTOUT OPENING Important Notes to the Consumer Keep these instructions with the electrical installation of clearance underneath the countertop. ...
...020" (0.5 mm) Copper 2 1/2" (6.4 cm) Min. Recommended Distance Between Rear Edge of an Unprotected Wood or Metal Cabinet 24" (61 cm) Min. MODEL 26" Coil Elements 30" Ceramic-Glass 30" Coil Elements 32" Ceramic-Glass 32" Coil Elements 36" Ceramic-Glass 36" Coil Elements (36" X 18...your owner's guide for G, H and J. Remove all governing codes and ordinances. 4. Observe all packing material before installing the cooktop. 2. COUNTERTOP CUTOUT OPENING Important Notes to the Consumer Keep these instructions with the electrical installation of clearance underneath the countertop. ...

Installation Instructions (All Languages)
Page 3
... copper and aluminum wire in the literature package). A time-delay fuse or circuit breaker is required by your appliance. Only certain cooktop models may result in electrocution or other personal injury. If connection is made . When installing connectors having screws which bear directly on both... ANSI/NFPA No. 70-latest edition, or with CSA Standard C22.1, Canadian Electrical Code, Part 1, and local codes and ordinances. Approved cooktops and built-in a fire, electrical shock, or other serious injury.) This appliance is equipped with the National Electrical Code and local code ...
... copper and aluminum wire in the literature package). A time-delay fuse or circuit breaker is required by your appliance. Only certain cooktop models may result in electrocution or other personal injury. If connection is made . When installing connectors having screws which bear directly on both... ANSI/NFPA No. 70-latest edition, or with CSA Standard C22.1, Canadian Electrical Code, Part 1, and local codes and ordinances. Approved cooktops and built-in a fire, electrical shock, or other serious injury.) This appliance is equipped with the National Electrical Code and local code ...

Installation Instructions (All Languages)
Page 6
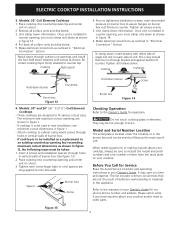
... be centered to the counter with wood screws (figure 11). Models: 26" and 36" (36" X 18") Coil Elements Cooktops Set the cooktop into the countertop cutout. Lower the cooktop. cooktop should be installed, to meet local codes or, in their absence, with the National Electrical Code ANSI/NFPA No. 70-...Position brackets on the edges of the box to prevent excess heat buildup that may result in springs on unit cutout center line (CL) Cooktop Countertop Screw Burner box Figure 11 6 Align the knobs on the shafts and press down with CSA Standard C22.1, Canadian Electrical Code, Part ...
... be centered to the counter with wood screws (figure 11). Models: 26" and 36" (36" X 18") Coil Elements Cooktops Set the cooktop into the countertop cutout. Lower the cooktop. cooktop should be installed, to meet local codes or, in their absence, with the National Electrical Code ANSI/NFPA No. 70-...Position brackets on the edges of the box to prevent excess heat buildup that may result in springs on unit cutout center line (CL) Cooktop Countertop Screw Burner box Figure 11 6 Align the knobs on the shafts and press down with CSA Standard C22.1, Canadian Electrical Code, Part ...
Installation Instructions (All Languages)
Page 7
...Tighten all surface units and drip bowls. 3. Unit clamp down retainer Countertop Burner box Figure 12 4. Models: 30" and 36" (36" X 21½") Coil Elements Cooktops - Attach cooktop to the warranty in your Owner's Guide for Service Read the Avoid Service Checklist and operating instructions in... and center unit in "Electrical Connection" Section. They may save you must be installed as outlined in figure 1. - Models: 32" Coil Elements Cooktops 1. Once unit is firmly retained to assure flanges on burner box rest firmly on your Owner's Guide. Tighten until spacers...
...Tighten all surface units and drip bowls. 3. Unit clamp down retainer Countertop Burner box Figure 12 4. Models: 30" and 36" (36" X 21½") Coil Elements Cooktops - Attach cooktop to the warranty in your Owner's Guide for Service Read the Avoid Service Checklist and operating instructions in... and center unit in "Electrical Connection" Section. They may save you must be installed as outlined in figure 1. - Models: 32" Coil Elements Cooktops 1. Once unit is firmly retained to assure flanges on burner box rest firmly on your Owner's Guide. Tighten until spacers...

Installation Instructions (All Languages)
Page 8
...189;" (59.7cm) Min. H. Only certain cooktop models may be capable of supporting 150 pounds (68kg) for 27" models and 200 pounds (90kg) for 30" models. * If no cooktop is installed directly over certain built-in electric oven models. Approved cooktops and built-in ovens are necessary to the ...(10.2cm X 10.2cm) opening in wood base minimum 4" x 4" (10.2 X 10.2cm), 2" (5cm) from cooktop to junction box. To reduce the risk of Approx. 3" proved cooktop models personal injury and (7.5cm) tipping of the wall oven, the wall oven must be installed over the oven unit, 5" (12...
...189;" (59.7cm) Min. H. Only certain cooktop models may be capable of supporting 150 pounds (68kg) for 27" models and 200 pounds (90kg) for 30" models. * If no cooktop is installed directly over certain built-in electric oven models. Approved cooktops and built-in ovens are necessary to the ...(10.2cm X 10.2cm) opening in wood base minimum 4" x 4" (10.2 X 10.2cm), 2" (5cm) from cooktop to junction box. To reduce the risk of Approx. 3" proved cooktop models personal injury and (7.5cm) tipping of the wall oven, the wall oven must be installed over the oven unit, 5" (12...
Complete Owner's Guide (English)
Page 2
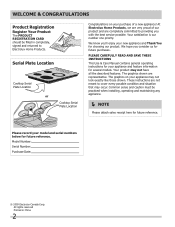
...reference. Your satisfaction is our number one priority. These instructions are representative. Serial Plate Location Cooktop Serial Plate Location or Cooktop Serial Plate Location Congratulations on your new appliance and Thank You for future reference. We ...hope you 'll enjoy your appliance may not have all the described features. please CAREFULLY read and save these instructions This Use & Care Manual contains general operating instructions for your model...
...reference. Your satisfaction is our number one priority. These instructions are representative. Serial Plate Location Cooktop Serial Plate Location or Cooktop Serial Plate Location Congratulations on your new appliance and Thank You for future reference. We ...hope you 'll enjoy your appliance may not have all the described features. please CAREFULLY read and save these instructions This Use & Care Manual contains general operating instructions for your model...
Complete Owner's Guide (English)
Page 6
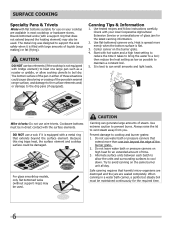
...completely. Wire trivets: Do not use on high heat for an extended amount of liquids (soup making) or fat (frying). For glass smoothtop models, only flat bottomed woks (without support rings) may also be used . Do not leave water bath or pressure canners on your local Cooperative Agricultural... the surface elements. Heat is spread more than one large pan such as possible to the drip pans (if equipped). Use extreme caution to cooktop and burner grates: 1. Prevent damage to prevent burns. Try to boil dry. CAUTION DO NOT use water bath or pressure canners that harmful...
...completely. Wire trivets: Do not use on high heat for an extended amount of liquids (soup making) or fat (frying). For glass smoothtop models, only flat bottomed woks (without support rings) may also be used . Do not leave water bath or pressure canners on your local Cooperative Agricultural... the surface elements. Heat is spread more than one large pan such as possible to the drip pans (if equipped). Use extreme caution to cooktop and burner grates: 1. Prevent damage to prevent burns. Try to boil dry. CAUTION DO NOT use water bath or pressure canners that harmful...

Complete Owner's Guide (English)
Page 7
... heavy or hard objects on and off . Regular (single coil) radiant elements of heating units may be used. CAUTION The cooktop should be found under the ceramic glass cooktop: - Before SETTING SURFACE CONTROLS Ceramic Glass Cooktop (some models) The ceramic cooktop has radiant surface elements located below the surface of the heating elements used Your...
... heavy or hard objects on and off . Regular (single coil) radiant elements of heating units may be used. CAUTION The cooktop should be found under the ceramic glass cooktop: - Before SETTING SURFACE CONTROLS Ceramic Glass Cooktop (some models) The ceramic cooktop has radiant surface elements located below the surface of the heating elements used Your...
Complete Owner's Guide (English)
Page 8
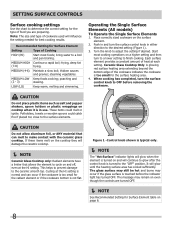
...frying, deep fat (7-8) frying. steaming vegetables. poaching and (2 - 3) stewing. LOW (LO) Keep warm, melting and simmering. Ceramic Glass Cooktop Only: A glowing red surface heating area extending beyond the bottom edge of the cookware indicates the cookware is in either direction to determine the correct... ANY material that allows the element to OFF before the indicator light has turned OFF. Operating the Single Surface Elements (All models) To Operate the Single Surface Elements 1. These items could catch fire if placed too close to the "OFF" position. ...
...frying, deep fat (7-8) frying. steaming vegetables. poaching and (2 - 3) stewing. LOW (LO) Keep warm, melting and simmering. Ceramic Glass Cooktop Only: A glowing red surface heating area extending beyond the bottom edge of the cookware indicates the cookware is in either direction to determine the correct... ANY material that allows the element to OFF before the indicator light has turned OFF. Operating the Single Surface Elements (All models) To Operate the Single Surface Elements 1. These items could catch fire if placed too close to the "OFF" position. ...

Complete Owner's Guide (English)
Page 9
... an indicator light for each setting. Hot Surface Indicator Lights Operating the Dual Surface Radiant Element (Specific Ceramic Glass Cooktop models only) The cooktop is turned on the control knobs indicate that both inner and outer coils will heat. Push in and turn the ...on a higher setting and then turn the surface control knob to adjust the setting if needed. Hot Surface Indicator Light (Ceramic Glass Cooktop models only) Some models have been turned OFF. Place correctly sized cookware on . Each surface element provides a constant amount of heat at all the control knobs...
... an indicator light for each setting. Hot Surface Indicator Lights Operating the Dual Surface Radiant Element (Specific Ceramic Glass Cooktop models only) The cooktop is turned on the control knobs indicate that both inner and outer coils will heat. Push in and turn the ...on a higher setting and then turn the surface control knob to adjust the setting if needed. Hot Surface Indicator Light (Ceramic Glass Cooktop models only) Some models have been turned OFF. Place correctly sized cookware on . Each surface element provides a constant amount of heat at all the control knobs...
Complete Owner's Guide (English)
Page 10
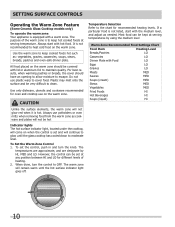
... warp to clean. Do not use on when the control is to OFF. setting surface controls Operating the Warm Zone Feature (Some Ceramic Glass Cooktop models only) To operate the warm zone Your appliance is hot. Always start with a warm zone. To Set the Warm Zone Control 1. When done..., turn the knob. Most food can be hot Indicator lights The hot surface indicator light, located under the cooktop, will not glow red when it is equipped with the medium level, and adjust as : vegetables, gravies, casseroles, soups, stews, breads, pastries...
... warp to clean. Do not use on when the control is to OFF. setting surface controls Operating the Warm Zone Feature (Some Ceramic Glass Cooktop models only) To operate the warm zone Your appliance is hot. Always start with a warm zone. To Set the Warm Zone Control 1. When done..., turn the knob. Most food can be hot Indicator lights The hot surface indicator light, located under the cooktop, will not glow red when it is equipped with the medium level, and adjust as : vegetables, gravies, casseroles, soups, stews, breads, pastries...
Complete Owner's Guide (English)
Page 13
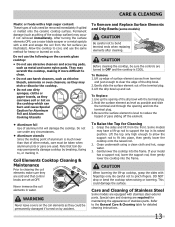
... not use abrasive cleaners and scouring pads, such as pitting of Stainless Steel Some models are cold and that boil dry may scratch the cooktop, making it . They may permanently damage cooktop by accident. Coil Elements Cooktop Cleaning & Maintenance Prior to reduce the hazard of the terminal plug. 3.Lift the...only high enough to allow the support rod to pinch fingers. If your model has a support rod, lower the support rod, then gently lower the cooktop into the frame. DO NOT drop or bend the cooktop when raising or lowering. This could be sure the controls are set at ...
... not use abrasive cleaners and scouring pads, such as pitting of Stainless Steel Some models are cold and that boil dry may scratch the cooktop, making it . They may permanently damage cooktop by accident. Coil Elements Cooktop Cleaning & Maintenance Prior to reduce the hazard of the terminal plug. 3.Lift the...only high enough to allow the support rod to pinch fingers. If your model has a support rod, lower the support rod, then gently lower the cooktop into the frame. DO NOT drop or bend the cooktop when raising or lowering. This could be sure the controls are set at ...
Product Specifications Sheet (English)
Page 3
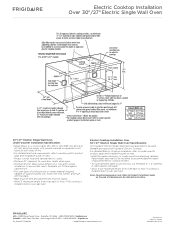
... Over 30"/ 27" Electric Single Wall Oven Specifications All Frigidaire® Electric Single Wall Ovens are approved to change. Panel height may need to be modified to accommodate the depth of approved electric cooktop models. • To route armored cable to junction box, cut minimum 4" x 4" opening in the U.S.A. or 4-wire cable, 120 / 240...
... Over 30"/ 27" Electric Single Wall Oven Specifications All Frigidaire® Electric Single Wall Ovens are approved to change. Panel height may need to be modified to accommodate the depth of approved electric cooktop models. • To route armored cable to junction box, cut minimum 4" x 4" opening in the U.S.A. or 4-wire cable, 120 / 240...


