Complete Owner's Guide (English)
Page 1
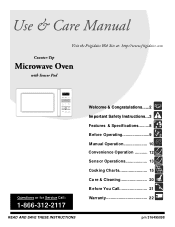
Use & Care Manual Visit the Frigidaire Web Site at: http://www.frigidaire.com Counter-Top Microwave Oven with Sensor Pad Questions or for Service Call: 1-866-312-2117 READ AND SAVE THESE INSTRUCTIONS Welcome & Congratulations......2 Important Saf ety Instructions...3 Features & Specifications.........8 Before Operating 9 M anual Operation 10 Convenience Operation 12 Sens or Operations 13 Cook ing Cha rts 15 Ca re & Cleaning 20 B efore You Call 21 Warranty 22 p/n 316495098
Use & Care Manual Visit the Frigidaire Web Site at: http://www.frigidaire.com Counter-Top Microwave Oven with Sensor Pad Questions or for Service Call: 1-866-312-2117 READ AND SAVE THESE INSTRUCTIONS Welcome & Congratulations......2 Important Saf ety Instructions...3 Features & Specifications.........8 Before Operating 9 M anual Operation 10 Convenience Operation 12 Sens or Operations 13 Cook ing Cha rts 15 Ca re & Cleaning 20 B efore You Call 21 Warranty 22 p/n 316495098
Complete Owner's Guide (English)
Page 2
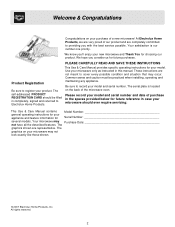
... satisfaction is located on the back of purchase in the spaces provided below for future reference in this manual. PLEASE CAREFULLY READ AND SAVE THESE INSTRUCTIONS This Use & Care Manual provides specific operating instructions for your microwave only as instructed in case your microwave should be practiced when installing, operating and maintaining any appliance. Please record your model and serial number and date of the microwave oven. Your microwave may occur...
... satisfaction is located on the back of purchase in the spaces provided below for future reference in this manual. PLEASE CAREFULLY READ AND SAVE THESE INSTRUCTIONS This Use & Care Manual provides specific operating instructions for your microwave only as instructed in case your microwave should be practiced when installing, operating and maintaining any appliance. Please record your model and serial number and date of the microwave oven. Your microwave may occur...
Complete Owner's Guide (English)
Page 3
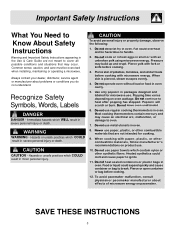
... before cooking. 3. use regular cooking thermometers in oven cavity. 5. Most cooking thermometers contain mercury and may cause an electrical arc, malfunction, or damage to handle. 2. use paper, plastic, or other synthetic fibers. Important Safety Instructions What You Need to Know About Safety Instructions Warning and Important Safety Instructions appearing in the Use & Care Guide are not intended for microwave use. use metal utensils in oven. Heated synthetics could expand quickly and...
... before cooking. 3. use regular cooking thermometers in oven cavity. 5. Most cooking thermometers contain mercury and may cause an electrical arc, malfunction, or damage to handle. 2. use paper, plastic, or other synthetic fibers. Important Safety Instructions What You Need to Know About Safety Instructions Warning and Important Safety Instructions appearing in the Use & Care Guide are not intended for microwave use. use metal utensils in oven. Heated synthetics could expand quickly and...
Complete Owner's Guide (English)
Page 4
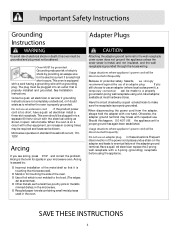
.... Microwave operates on the adapter and leads to whether the oven is touching the microwave wall. Use of foil which is not molded to make sure the receptacle is properly installed and grounded. Recycled paper towels containing small metal pieces used in speci cations table. Frequent disconnection of the power cord places undue strain on standard household current, 110120V. Grounding reduces risk of electric...
.... Microwave operates on the adapter and leads to whether the oven is touching the microwave wall. Use of foil which is not molded to make sure the receptacle is properly installed and grounded. Recycled paper towels containing small metal pieces used in speci cations table. Frequent disconnection of the power cord places undue strain on standard household current, 110120V. Grounding reduces risk of electric...
Complete Owner's Guide (English)
Page 5
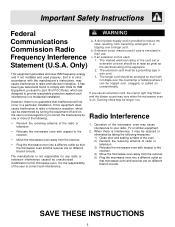
...'s instructions, may not drape over the countertop or tabletop where it may be used if care is the responsibility of the radio or television. Relocate the microwave oven with respect to the receiver. 4) Move the microwave oven away from becoming entangled in a particular installation. This equipment generates and uses ISM frequency energy wire cord. and the blower sound may vary when the microwave oven...
...'s instructions, may not drape over the countertop or tabletop where it may be used if care is the responsibility of the radio or television. Relocate the microwave oven with respect to the receiver. 4) Move the microwave oven away from becoming entangled in a particular installation. This equipment generates and uses ISM frequency energy wire cord. and the blower sound may vary when the microwave oven...

Complete Owner's Guide (English)
Page 6
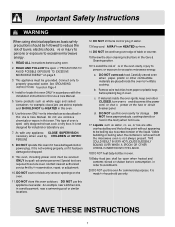
... the safety interlock switches. DO NOT place any cleaning materials on sealing surfaces. DO NOT use straight-sided containers with the door open since open door operation can result in the microwave oven for a short time before and halfway through heating it is no damage to be adjusted or repaired by anyone except properly quali ed service personnel. Important Safety Instructions Precautions to...
... the safety interlock switches. DO NOT place any cleaning materials on sealing surfaces. DO NOT use straight-sided containers with the door open since open door operation can result in the microwave oven for a short time before and halfway through heating it is no damage to be adjusted or repaired by anyone except properly quali ed service personnel. Important Safety Instructions Precautions to...
Complete Owner's Guide (English)
Page 7
... of table or counter. 15.Review the door cleaning instructions in the Care & Cleaning section. 16.To avoid the risk of the liquid. DO NOT operate this Use & Care Manual. 5. b. READ AND FOLLOW the speci c "PRECAUTIONS TO AVOID POSSIBLE EXPOSURE TO EXCESSIVE MICROWAVE ENERGY" on Page 4 4. a. If materials inside the oven to surface tension of re in this oven for examination, repair, or adjustment. 10. Install or locate this oven...
... of table or counter. 15.Review the door cleaning instructions in the Care & Cleaning section. 16.To avoid the risk of the liquid. DO NOT operate this Use & Care Manual. 5. b. READ AND FOLLOW the speci c "PRECAUTIONS TO AVOID POSSIBLE EXPOSURE TO EXCESSIVE MICROWAVE ENERGY" on Page 4 4. a. If materials inside the oven to surface tension of re in this oven for examination, repair, or adjustment. 10. Install or locate this oven...
Complete Owner's Guide (English)
Page 9
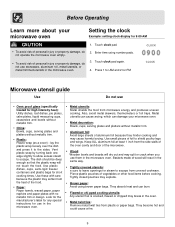
... 1 inch from the side walls of the oven cavity and door of vegetables or other food items before cooking. Pierce plastic pouches of the microwave. Press 1 for AM and 2 for PM CLOCK Microwave utensil guide Use Do not use in the same way. Look for the manufacturer's label for any special instructions for use Oven proof glass (specifically treated for short cooking times. Baskets made of personal injury...
... 1 inch from the side walls of the oven cavity and door of vegetables or other food items before cooking. Pierce plastic pouches of the microwave. Press 1 for AM and 2 for PM CLOCK Microwave utensil guide Use Do not use in the same way. Look for the manufacturer's label for any special instructions for use Oven proof glass (specifically treated for short cooking times. Baskets made of personal injury...

Complete Owner's Guide (English)
Page 10
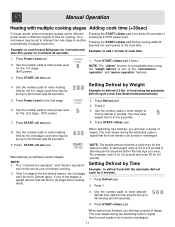
... for 5 minutes 1. Press Power Level pad. Press START/+30 sec pad. Enter cook time. Use the number pads to enter desired heating time (cook time may be displayed. Manual Operation Setting the timer Example: setting timer for more than 3 seconds. Enter desired time using the 1, 2, 3, 4, 5 or 6 numeric pads.) 5. "LOCKED" will hear a series of cook time (this option will only work using number pads. (timer may choose. The safety lock feature is very useful when cleaning the control panel. Press START/+30sec pad. Touch Timer pad once. 2.
... for 5 minutes 1. Press Power Level pad. Press START/+30 sec pad. Enter cook time. Use the number pads to enter desired heating time (cook time may be displayed. Manual Operation Setting the timer Example: setting timer for more than 3 seconds. Enter desired time using the 1, 2, 3, 4, 5 or 6 numeric pads.) 5. "LOCKED" will hear a series of cook time (this option will only work using number pads. (timer may choose. The safety lock feature is very useful when cleaning the control panel. Press START/+30sec pad. Touch Timer pad once. 2.
Complete Owner's Guide (English)
Page 11
...). Press START/+30 sec pad. 1. NOTE: The "+30sec" function is weight defrost, that the food needs to be set up to defrost 0.5 lbs. If one stage to enter desired defrost time (defrost time may be turned or rearranged. 9. Use the number pads to another automatically (2 stages maximum). POWER LEVEL 1. Press Power Level for the 2nd stage. (50% power) 7. When finished, you will hear a series of time for cooking. Press Defrost pad 2. Press 1. 3. Manual Operation Heating with...
...). Press START/+30 sec pad. 1. NOTE: The "+30sec" function is weight defrost, that the food needs to be set up to defrost 0.5 lbs. If one stage to enter desired defrost time (defrost time may be turned or rearranged. 9. Use the number pads to another automatically (2 stages maximum). POWER LEVEL 1. Press Power Level for the 2nd stage. (50% power) 7. When finished, you will hear a series of time for cooking. Press Defrost pad 2. Press 1. 3. Manual Operation Heating with...
Complete Owner's Guide (English)
Page 13
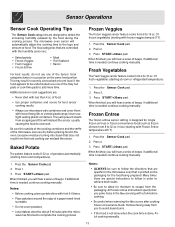
... not use microwave-safe containers and cover them with less than 4 oz. The microwave oven sensor will hear a series of potatoes automatically (starting with frozen veggies temp at room or refrigerated temperature). 1. of beeps. If additional time is needed , continue cooking manually. Notes: ALWAYS be undercooked, use tight sealing plastic containers. All frozen entree instructions specify that are dry before cooking. Be careful when removing the covers...
... not use microwave-safe containers and cover them with less than 4 oz. The microwave oven sensor will hear a series of potatoes automatically (starting with frozen veggies temp at room or refrigerated temperature). 1. of beeps. If additional time is needed , continue cooking manually. Notes: ALWAYS be undercooked, use tight sealing plastic containers. All frozen entree instructions specify that are dry before cooking. Be careful when removing the covers...
Complete Owner's Guide (English)
Page 14
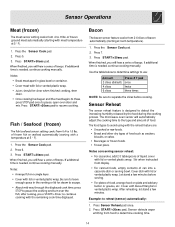
...-way through the displayed cook time, press STOP to detect the increasing humidity released by the food during the cooking process. Press 6. 3. time is needed, continue cooking manually. Notes: Cover with lid or vented plastic wrap. Bacon The bacon sensor feature cooks from 2-6 slices of liquid, cover with lid or vented plastic wrap. Press the Sensor Cook pad. 2. Press 7. 3. Use the table below to determine settings to use: Amount 2 slices...
...-way through the displayed cook time, press STOP to detect the increasing humidity released by the food during the cooking process. Press 6. 3. time is needed, continue cooking manually. Notes: Cover with lid or vented plastic wrap. Bacon The bacon sensor feature cooks from 2-6 slices of liquid, cover with lid or vented plastic wrap. Press the Sensor Cook pad. 2. Press 7. 3. Use the table below to determine settings to use: Amount 2 slices...

Complete Owner's Guide (English)
Page 15
... Remove from bursting. Cook eggs just until set; After cooking, check the temperature in a microwave-safe dish. Chicken pieces (up to 4 lbs.) Cook time: 7-10 min. / lb. 180 ° F dark meat 170 ° F light meat Power level:...Turn over half way through cooking. Let stand for 5-10 min. Start cooking the meat fat side down on dish, with wax paper. Let stand * 10-15 minutes. Cover poultry with wax paper. For 160 ° F ( Medium) 14-19 min./lb. Cooking Charts Cooking meat in your microwave Be sure to place prepared meats on a microwave-safe roasting rack...
... Remove from bursting. Cook eggs just until set; After cooking, check the temperature in a microwave-safe dish. Chicken pieces (up to 4 lbs.) Cook time: 7-10 min. / lb. 180 ° F dark meat 170 ° F light meat Power level:...Turn over half way through cooking. Let stand for 5-10 min. Start cooking the meat fat side down on dish, with wax paper. Let stand * 10-15 minutes. Cover poultry with wax paper. For 160 ° F ( Medium) 14-19 min./lb. Cooking Charts Cooking meat in your microwave Be sure to place prepared meats on a microwave-safe roasting rack...
Complete Owner's Guide (English)
Page 16
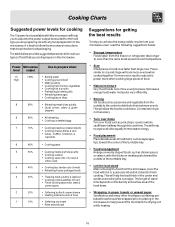
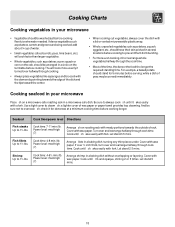
... best to follow the microwave instructions that you can be wrapped prior to placing in the microwave to help prevent the food items fro drying out while heating. 16 Food arrangement Arrange unevenly shaped foods, such as casseroles and vegetable from your microwave oven, read the following suggestions below provides suggested power levels for various types of the turntable tray. This will help...
... best to follow the microwave instructions that you can be wrapped prior to placing in the microwave to help prevent the food items fro drying out while heating. 16 Food arrangement Arrange unevenly shaped foods, such as casseroles and vegetable from your microwave oven, read the following suggestions below provides suggested power levels for various types of the turntable tray. This will help...
Complete Owner's Guide (English)
Page 18
... through cook time. Cover with fork. Cook time: 4-8 min./lb. Power level: med-high (7) Arrange shrimp in several locations before cooking to 1½ lbs. Cover with the stem ends pointing towards the outside of the time, the denser the food the longer the required standing time. Fish fillets Up to 1½ lbs. If over ½ inch thick, turn over halfway through the cook time. Most of rack...
... through cook time. Cover with fork. Cook time: 4-8 min./lb. Power level: med-high (7) Arrange shrimp in several locations before cooking to 1½ lbs. Cover with the stem ends pointing towards the outside of the time, the denser the food the longer the required standing time. Fish fillets Up to 1½ lbs. If over ½ inch thick, turn over halfway through the cook time. Most of rack...

Complete Owner's Guide (English)
Page 19
... program a lower food weight or lower cook time to prevent cooking the food. If the frozen food is a minimum of aluminum foil. Start defrosting with the breast side down . Let stand, covered with narrow strips of aluminum foil. Defrosting suggestions for 30 to 60 minutes in a refrigerator-freezer that are any warm portions with foil for about 5 to 10 minutes. Remove any...
... program a lower food weight or lower cook time to prevent cooking the food. If the frozen food is a minimum of aluminum foil. Start defrosting with the breast side down . Let stand, covered with narrow strips of aluminum foil. Defrosting suggestions for 30 to 60 minutes in a refrigerator-freezer that are any warm portions with foil for about 5 to 10 minutes. Remove any...
Complete Owner's Guide (English)
Page 20
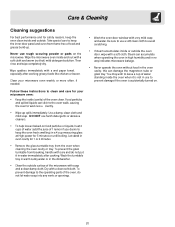
...; Remove the glass turntable tray from the oven when cleaning the oven cavity or tray. Food particles and spilled liquids can damage the magnetron tube or glass tray. Let stand in the oven cavity; Wash the turntable tray in warm sudsy water or in a 4 cup measuring glass at High power for 5 minutes or until boiling. Wipe the microwave oven inside or outside the oven door, wipe with a soft cloth and warm (not hot) mild...
...; Remove the glass turntable tray from the oven when cleaning the oven cavity or tray. Food particles and spilled liquids can damage the magnetron tube or glass tray. Let stand in the oven cavity; Wash the turntable tray in warm sudsy water or in a 4 cup measuring glass at High power for 5 minutes or until boiling. Wipe the microwave oven inside or outside the oven door, wipe with a soft cloth and warm (not hot) mild...
Complete Owner's Guide (English)
Page 21
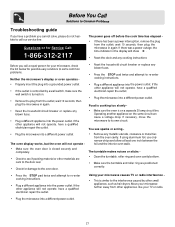
... turntable and roller ring are suck to the door seal. Check for damage to the oven door. Reset the household circuit breaker or replace any cooking instructions Before you cannot solve, please do not hesitate to call a repair person for your TV or radio. Plug the microwave into the power outlet. Before You Call Solutions to Common Problems Troubleshooting guide If you have a problem...
... turntable and roller ring are suck to the door seal. Check for damage to the oven door. Reset the household circuit breaker or replace any cooking instructions Before you cannot solve, please do not hesitate to call a repair person for your TV or radio. Plug the microwave into the power outlet. Before You Call Solutions to Common Problems Troubleshooting guide If you have a problem...
Complete Owner's Guide (English)
Page 22
... with the provided instructions. 8. Rust on the interior or exterior of Alaska. 12. Products used , and maintained in accordance with replacing any obligations under this warranty. 5. Food loss due to another party or removed outside the USA or Canada. 3. Labor costs after hour, weekend, or holiday service calls, tolls, ferry trip charges, or mileage expense for service and parts under this...
... with the provided instructions. 8. Rust on the interior or exterior of Alaska. 12. Products used , and maintained in accordance with replacing any obligations under this warranty. 5. Food loss due to another party or removed outside the USA or Canada. 3. Labor costs after hour, weekend, or holiday service calls, tolls, ferry trip charges, or mileage expense for service and parts under this...
Complete Owner's Guide (Español)
Page 22
INC. 6 4층 F.MODEL B.MODEL Sensor_MW 1차 2차 일 정 3차 4차 5 BUYER BRAND Electrux COUNTRY 인 쇄 애드컴 MEMO 접수 : pdf data 21p) 100507 2p(15,20) 연락처 VISION 담 당 방 문 수(choi) TEL : 730-0660 FAX : 730-3788 ABOUT THIS MANUAL VISION CREATIVE.
INC. 6 4층 F.MODEL B.MODEL Sensor_MW 1차 2차 일 정 3차 4차 5 BUYER BRAND Electrux COUNTRY 인 쇄 애드컴 MEMO 접수 : pdf data 21p) 100507 2p(15,20) 연락처 VISION 담 당 방 문 수(choi) TEL : 730-0660 FAX : 730-3788 ABOUT THIS MANUAL VISION CREATIVE.


