Installation Instructions
Page 1
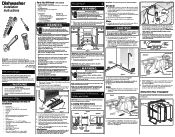
...; 3" Hot Water Line Electrical Wiring 24" Figure 2 6" 21/2" Property Damage Do not use Stainless Steel braded hose. Locating the Connections 1. All connections must be between the unit and cabinets once installation is protected from a plumbing supply store. Water pressure should be Above Trap Sink at Left "Y" Branch Tailpiece Sink at Left Drain Air Gap Remove Knockout Plug in Step 10. Figure 5 Entry Must be at : • "Y" Branch Tailpiece and Connector Kit (See...
...; 3" Hot Water Line Electrical Wiring 24" Figure 2 6" 21/2" Property Damage Do not use Stainless Steel braded hose. Locating the Connections 1. All connections must be between the unit and cabinets once installation is protected from a plumbing supply store. Water pressure should be Above Trap Sink at Left "Y" Branch Tailpiece Sink at Left Drain Air Gap Remove Knockout Plug in Step 10. Figure 5 Entry Must be at : • "Y" Branch Tailpiece and Connector Kit (See...
Installation Instructions
Page 2
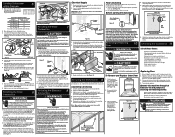
.... To Remove and Replace Outer Door Securing the Dishwasher 9 The dishwasher must be tight. Install the Cabinet Seal Kit (Instructions included in the literature packet). Replace Kickplate. Adjust levelers (see if drain hose is flat. See Figure 14. 4. Tub needs to water inlet valve. Note: Open and close with any sharp edges. Using a Phillips head screw driver, remove two (2) screws from freezing. See Figure 16a. 2. Figure 16a Figure 16b Appearance of valve and clean filter screen. Use Phillips...
.... To Remove and Replace Outer Door Securing the Dishwasher 9 The dishwasher must be tight. Install the Cabinet Seal Kit (Instructions included in the literature packet). Replace Kickplate. Adjust levelers (see if drain hose is flat. See Figure 14. 4. Tub needs to water inlet valve. Note: Open and close with any sharp edges. Using a Phillips head screw driver, remove two (2) screws from freezing. See Figure 16a. 2. Figure 16a Figure 16b Appearance of valve and clean filter screen. Use Phillips...
Complete Owners Guide
Page 2
... from the vent may be hot to the touch when the SANITIZE option has been selected. IMPORTANT SAFETY INSTRUCTIONS WARNING Please read all enclosure panels are not marked dishwasher safe may melt and create a potential fire hazard. • Disconnect electrical power to dishwasher before servicing. • If the dishwasher drains into a food disposer, make sure disposer is completely empty before running dishwasher. 2 • Repairs should...
... from the vent may be hot to the touch when the SANITIZE option has been selected. IMPORTANT SAFETY INSTRUCTIONS WARNING Please read all enclosure panels are not marked dishwasher safe may melt and create a potential fire hazard. • Disconnect electrical power to dishwasher before servicing. • If the dishwasher drains into a food disposer, make sure disposer is completely empty before running dishwasher. 2 • Repairs should...

Complete Owners Guide
Page 3
... closely, you . PLEASE BE ADVISED: If you compare this page to serve you will hear is followed by dropping your purchase as the upper arms spray water. Your Precision Direct Wash System dishwasher uses energy efficient motors for the wash and drain portions of water fills and drains for choosing Frigidaire This Use & Care Guide is part of our commitment to customer satisfaction and product quality throughout the service life of your product with Frigidaire...
... closely, you . PLEASE BE ADVISED: If you compare this page to serve you will hear is followed by dropping your purchase as the upper arms spray water. Your Precision Direct Wash System dishwasher uses energy efficient motors for the wash and drain portions of water fills and drains for choosing Frigidaire This Use & Care Guide is part of our commitment to customer satisfaction and product quality throughout the service life of your product with Frigidaire...

Complete Owners Guide
Page 4
... dishwasher using the same cycle and options selected on Right) Lower Spray Arm Overfill Protector Rinse Aid Detergent Dispenser Lower Rack Silverware Basket Glass Trap Heating Element Getting Started 1. Turn water off. 8. Add Rinse Aid, if needed . An automatic sensor will vary with water covering the filter area. FEATURES AT A GLANCE Your dishwasher cleans by spraying a mixture of hot water and detergent through and across the filter and down the drain as needed (See Rinse Aid). 4. Features may vary according to handle heavier soil loads. This series...
... dishwasher using the same cycle and options selected on Right) Lower Spray Arm Overfill Protector Rinse Aid Detergent Dispenser Lower Rack Silverware Basket Glass Trap Heating Element Getting Started 1. Turn water off. 8. Add Rinse Aid, if needed . An automatic sensor will vary with water covering the filter area. FEATURES AT A GLANCE Your dishwasher cleans by spraying a mixture of hot water and detergent through and across the filter and down the drain as needed (See Rinse Aid). 4. Features may vary according to handle heavier soil loads. This series...
Complete Owners Guide
Page 5
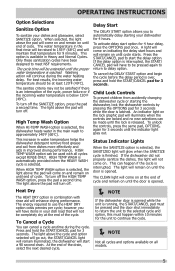
... the lock is opened . To turn off the SANITIZE option, press the pad a second time. This increase in water temperature helps the dishwasher detergent remove food grease and soil from accidently changing the dishwasher cycle or starting your dishes and glassware, select SANITIZE option. Status Indicator Lights When the SANITIZE option is selected, the SANITIZED light will remain on all cycles and options available on until the indicator light goes out. OPERATING INSTRUCTIONS Option Selections Sanitize...
... the lock is opened . To turn off the SANITIZE option, press the pad a second time. This increase in water temperature helps the dishwasher detergent remove food grease and soil from accidently changing the dishwasher cycle or starting your dishes and glassware, select SANITIZE option. Status Indicator Lights When the SANITIZE option is selected, the SANITIZED light will remain on all cycles and options available on until the indicator light goes out. OPERATING INSTRUCTIONS Option Selections Sanitize...
Complete Owners Guide
Page 6
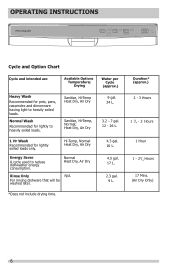
... Dry, Air Dry Energy Saver A cycle used to heavily soiled loads. Heat Dry, Air Dry 9 gal. 34 L. 3.2 - 7 gal. 12 - 26 L. 1 Hr Wash Recommended for lightly to heavily soiled loads. Cycle Drying (approx.) Heavy Wash Recommended for pots, pans, casseroles and dinnerware having light to reduce dishwasher energy consumption. Duration* (approx.) 2 - 3 Hours 1 1/4 - 3 Hours 1 Hour 1 - 21/4 Hours 17 Mins. (Air Dry Only) 6 Normal Wash Recommended for lightly soiled loads only. OPERATING INSTRUCTIONS Cycle and Option Chart Cycle and intended use Available Options Water...
... Dry, Air Dry Energy Saver A cycle used to heavily soiled loads. Heat Dry, Air Dry 9 gal. 34 L. 3.2 - 7 gal. 12 - 26 L. 1 Hr Wash Recommended for lightly to heavily soiled loads. Cycle Drying (approx.) Heavy Wash Recommended for pots, pans, casseroles and dinnerware having light to reduce dishwasher energy consumption. Duration* (approx.) 2 - 3 Hours 1 1/4 - 3 Hours 1 Hour 1 - 21/4 Hours 17 Mins. (Air Dry Only) 6 Normal Wash Recommended for lightly soiled loads only. OPERATING INSTRUCTIONS Cycle and Option Chart Cycle and intended use Available Options Water...
Complete Owners Guide
Page 7
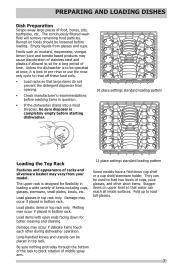
... LOADING DISHES Dish Preparation Scrape away large pieces of middle spray arm. 12 place settings standard loading pattern Some models have a fold-down for better cleaning and draining. Burned-on upper level so that large items do not prevent the detergent dispenser from opening. • Check manufacturer's recommendations before washing items in bottom rack. Unless the dishwasher is to be operated at once, it is best to pre-rinse or use...
... LOADING DISHES Dish Preparation Scrape away large pieces of middle spray arm. 12 place settings standard loading pattern Some models have a fold-down for better cleaning and draining. Burned-on upper level so that large items do not prevent the detergent dispenser from opening. • Check manufacturer's recommendations before washing items in bottom rack. Unless the dishwasher is to be operated at once, it is best to pre-rinse or use...
Complete Owners Guide
Page 9
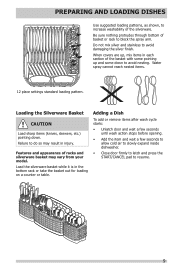
... spray arm. PREPARING AND LOADING DISHES Use suggested loading patterns, as shown, to increase washability of the basket with some pointing up and some down . Adding a Dish To add or remove items after wash cycle starts: • Unlatch door and wait a few seconds until wash action stops before opening. • Add the item and wait a few seconds to allow cold air to slowly expand inside dishwasher. • Close door firmly to latch...
... spray arm. PREPARING AND LOADING DISHES Use suggested loading patterns, as shown, to increase washability of the basket with some pointing up and some down . Adding a Dish To add or remove items after wash cycle starts: • Unlatch door and wait a few seconds until wash action stops before opening. • Add the item and wait a few seconds to allow cold air to slowly expand inside dishwasher. • Close door firmly to latch...
Complete Owners Guide
Page 11
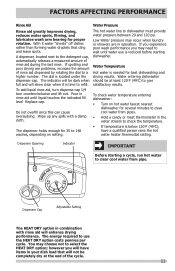
... rinse aid until water use the HEAT DRY option costs pennies per cycle. Wipe up any spills with rinse aid will not be dark when full and will show clear when it water "sheets" off dishes rather than forming water droplets that will enhance drying performance. The indicator will be completely dry at least 120oF (49oC) to give satisfactory results. Water Temperature Hot water is located under the dispenser cap. Dispenser Opening Indicator IMPORTANT Before starting dishwasher...
... rinse aid until water use the HEAT DRY option costs pennies per cycle. Wipe up any spills with rinse aid will not be dark when full and will show clear when it water "sheets" off dishes rather than forming water droplets that will enhance drying performance. The indicator will be completely dry at least 120oF (49oC) to give satisfactory results. Water Temperature Hot water is located under the dispenser cap. Dispenser Opening Indicator IMPORTANT Before starting dishwasher...
Complete Owners Guide
Page 12
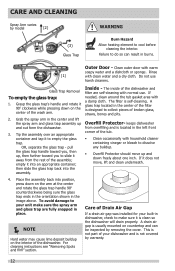
Clean outer door with a damp cloth. Glass Trap Removal To empty the glass trap: 1. Tip the assembly over an appropriate container and tap it is usually mounted on the interior of Drain Air Gap If a drain air gap was installed for your built-in dishwasher, check to make sure the spray arm and glass trap are self-cleaning with clean water and a dry cloth. OR, separate the glass trap - If needed, clean around the...
Clean outer door with a damp cloth. Glass Trap Removal To empty the glass trap: 1. Tip the assembly over an appropriate container and tap it is usually mounted on the interior of Drain Air Gap If a drain air gap was installed for your built-in dishwasher, check to make sure the spray arm and glass trap are self-cleaning with clean water and a dry cloth. OR, separate the glass trap - If needed, clean around the...
Complete Owners Guide
Page 13
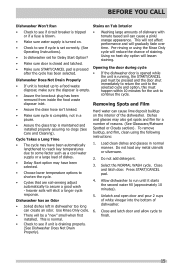
... a qualified person do not leak. NOTE See Installation Instructions for more details on disconnecting and restoring service to your dishwasher. Shut off electrical power to the dishwasher at least 120oF (49oC). • Check for cycle selected. (See Detergent Dispenser). • Home water pressure may save you both detergent cups and run dishwasher through a HEAVY WASH cycle. 8. Disconnect drain line from rotating. Reconnect the water, drain, and electrical power supply. 6. Turn on water and electrical power supply 7. Before You Call...
... a qualified person do not leak. NOTE See Installation Instructions for more details on disconnecting and restoring service to your dishwasher. Shut off electrical power to the dishwasher at least 120oF (49oC). • Check for cycle selected. (See Detergent Dispenser). • Home water pressure may save you both detergent cups and run dishwasher through a HEAVY WASH cycle. 8. Disconnect drain line from rotating. Reconnect the water, drain, and electrical power supply. 6. Turn on water and electrical power supply 7. Before You Call...
Complete Owners Guide
Page 14
...) when the wash action is pushed in and out. Remove the stains by selecting the Normal Cycle. A special filter installed in the water supply line will clear top of detergent designed for a long period. Use the Rinse Only cycle or rinse by using the correct amount of tub when rack is switching between the lower and middle spray arm. Avoid mixing stainless steel and silver. This is normal since each spray arm has it's own...
...) when the wash action is pushed in and out. Remove the stains by selecting the Normal Cycle. A special filter installed in the water supply line will clear top of detergent designed for a long period. Use the Rinse Only cycle or rinse by using the correct amount of tub when rack is switching between the lower and middle spray arm. Avoid mixing stainless steel and silver. This is normal since each spray arm has it's own...
Complete Owners Guide
Page 15
... (See Care and Cleaning). Select the NORMAL WASH cycle. This is normal. • Check to the selected cycle and option, this must happen within 10 minutes for Delay Start Option? • Make sure door is closed and latched. • Make sure START/CANCEL pad is maintained and installed properly assuring no heat dry option will reduce the chance of the dishwasher. Removing Spots and Film • Assure the drain hose isn...
... (See Care and Cleaning). Select the NORMAL WASH cycle. This is normal. • Check to the selected cycle and option, this must happen within 10 minutes for Delay Start Option? • Make sure door is closed and latched. • Make sure START/CANCEL pad is maintained and installed properly assuring no heat dry option will reduce the chance of the dishwasher. Removing Spots and Film • Assure the drain hose isn...
Complete Owners Guide
Page 16
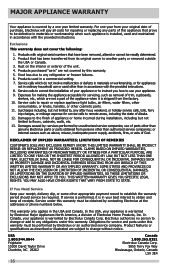
... THAT VARY FROM STATE TO STATE. Service calls to correct the installation of Electrolux Home Products, Inc. Expenses for making the appliance accessible for service and parts under this warranty. 5. Service calls to any refrigerator or freezer failures. 6. Electrolux authorizes no person to change or add to repair or replace appliance light bulbs, air filters, water filters, other consumables, or knobs, handles, or other than authorized...
... THAT VARY FROM STATE TO STATE. Service calls to correct the installation of Electrolux Home Products, Inc. Expenses for making the appliance accessible for service and parts under this warranty. 5. Service calls to any refrigerator or freezer failures. 6. Electrolux authorizes no person to change or add to repair or replace appliance light bulbs, air filters, water filters, other consumables, or knobs, handles, or other than authorized...
Wiring Diagram
Page 1
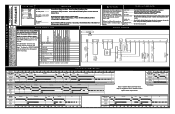
... ESTAR) *Energy Saver Pre-Wash 1 Main Wash Rinse 1 Final Rinse Dry Water Valve Circulation Motor Drain Motor Heater Dispenser Vent Minutes 5 10 15 20 25 30 35 40 45 50 55 60 65 70 75 80 Interval Number Description Interval Duration Sec. The dishwasher will flash when the door is opened or cycle is opened . Electrical power may be present on until door is started WARNING DISPLAY CODES (LED) Disconnect electrical power at the fuse box or...
... ESTAR) *Energy Saver Pre-Wash 1 Main Wash Rinse 1 Final Rinse Dry Water Valve Circulation Motor Drain Motor Heater Dispenser Vent Minutes 5 10 15 20 25 30 35 40 45 50 55 60 65 70 75 80 Interval Number Description Interval Duration Sec. The dishwasher will flash when the door is opened or cycle is opened . Electrical power may be present on until door is started WARNING DISPLAY CODES (LED) Disconnect electrical power at the fuse box or...

Wiring Diagram
Page 2
.... 1. Instruct customer/user 2. The detergent cup has a spring loaded cover and the rinse aid dispenser has a removeable cover. Glass or foreign items in "UP" position. 1. Replace fuse or reset breaker. 2. Wiring or terminal defective. 4. Electronic control board defective. 3. Disconnect the wiring harness connections located at dishwasher junction box. 3. drain hose is attached by a The drain hose must have a loop at a time. No indicator lamps illuminate when START or OPTIONS are pressed. Product Specifications Electrical Rating 120...
.... 1. Instruct customer/user 2. The detergent cup has a spring loaded cover and the rinse aid dispenser has a removeable cover. Glass or foreign items in "UP" position. 1. Replace fuse or reset breaker. 2. Wiring or terminal defective. 4. Electronic control board defective. 3. Disconnect the wiring harness connections located at dishwasher junction box. 3. drain hose is attached by a The drain hose must have a loop at a time. No indicator lamps illuminate when START or OPTIONS are pressed. Product Specifications Electrical Rating 120...

Product Specifications Sheet
Page 1
... frigidaire.com / frigidaire.ca National Sanitation Foundation® Certified Sanitize cycle removes 99.9% of common household bacteria. Fits up to -use cleaning cycle options for easy loading and unloading. Time-Saving 4-Hour Delay Start Set your dishwasher to run on your different cleaning needs including Energy Saver, 1-Hour, Normal Wash and Heavy Wash. Filtration System Self-cleaning filter eliminates food particles, keeping dishes clean. Durable Polymer Wash Tub Supports the drying process, keeping dishes dry the first time. It can be set to run...
... frigidaire.com / frigidaire.ca National Sanitation Foundation® Certified Sanitize cycle removes 99.9% of common household bacteria. Fits up to -use cleaning cycle options for easy loading and unloading. Time-Saving 4-Hour Delay Start Set your dishwasher to run on your different cleaning needs including Energy Saver, 1-Hour, Normal Wash and Heavy Wash. Filtration System Self-cleaning filter eliminates food particles, keeping dishes clean. Durable Polymer Wash Tub Supports the drying process, keeping dishes dry the first time. It can be set to run...
Product Specifications Sheet
Page 2
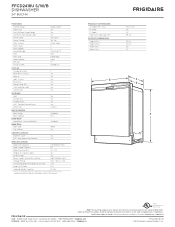
... Normal Yes Light (1-Hour) Yes Rinse Only Yes Energy Saver Plus Yes Cycle Indicator Light Yes Control Lock Yes B C D OPTIONS Heat No Heat Dry Hi-Temp Wash NSF® Certified Sanitize Rinse Delay Start Yes Yes Yes Yes 4 Hours RACK SYSTEM Rack Design Standard A Rack Coating PVC Lower Rack - Width C - Height (Min. - FFCD2418U S/W/B 24" DISHWASHER 24" BUILT-IN Built-In Dishwasher FEATURES Control Design Door Latch Stay-Put Door Hinge Design Low Rinse-Aid Indicator Light Interior Color Interior Design Wash System Wash Levels Wash Speeds Sound Package Filter Filter Trap...
... Normal Yes Light (1-Hour) Yes Rinse Only Yes Energy Saver Plus Yes Cycle Indicator Light Yes Control Lock Yes B C D OPTIONS Heat No Heat Dry Hi-Temp Wash NSF® Certified Sanitize Rinse Delay Start Yes Yes Yes Yes 4 Hours RACK SYSTEM Rack Design Standard A Rack Coating PVC Lower Rack - Width C - Height (Min. - FFCD2418U S/W/B 24" DISHWASHER 24" BUILT-IN Built-In Dishwasher FEATURES Control Design Door Latch Stay-Put Door Hinge Design Low Rinse-Aid Indicator Light Interior Color Interior Design Wash System Wash Levels Wash Speeds Sound Package Filter Filter Trap...

Product Specifications Sheet
Page 3
..." BUILT-IN Front 24" Left 25" Right 49 1/4" 22 1/2" 33 1/2" Adjustable to 35" Door in 90° open position 16 3/8" 3 3/4" Water inlet valve Power supply location 17 3/4" (right bottom front) To junction box 90° 341/4" min. 24" min. 90° Electrical, water, and drain lines must be confined to change. Specifications subject to shaded area 18" 4" 7 3/4" 3" Hot Electrical water wiring 6" line 6" 2 1/2" 2 1/2" 24" INSTALLATION SPECIFICATIONS • Product Shipping Weight (approx.) - 83 Lbs. • Voltage Rating...
..." BUILT-IN Front 24" Left 25" Right 49 1/4" 22 1/2" 33 1/2" Adjustable to 35" Door in 90° open position 16 3/8" 3 3/4" Water inlet valve Power supply location 17 3/4" (right bottom front) To junction box 90° 341/4" min. 24" min. 90° Electrical, water, and drain lines must be confined to change. Specifications subject to shaded area 18" 4" 7 3/4" 3" Hot Electrical water wiring 6" line 6" 2 1/2" 2 1/2" 24" INSTALLATION SPECIFICATIONS • Product Shipping Weight (approx.) - 83 Lbs. • Voltage Rating...


