
Installation Instructions
Page 1
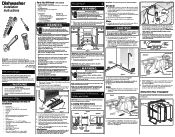
... in open door. Be sure water inlet valve is available from freezing. Route water supply line into water inlet valve. 5. An air gap kit is protected from a plumbing supply store. Drying Vent Hose Kickplate Assembly Adjustable Toeplate Water Inlet Valve Kickplate (Insulation available some models) Bottom Screws Figure 1 3. Do not over tighten. Damage to plastic tub will need to shaded area. 18" 4" ▲ 21/2" 73/4" 6" ▲ 3" Hot Water Line Electrical Wiring 24" Figure 2 6" 21/2" Property Damage Do not use Stainless Steel braded hose...
... in open door. Be sure water inlet valve is available from freezing. Route water supply line into water inlet valve. 5. An air gap kit is protected from a plumbing supply store. Drying Vent Hose Kickplate Assembly Adjustable Toeplate Water Inlet Valve Kickplate (Insulation available some models) Bottom Screws Figure 1 3. Do not over tighten. Damage to plastic tub will need to shaded area. 18" 4" ▲ 21/2" 73/4" 6" ▲ 3" Hot Water Line Electrical Wiring 24" Figure 2 6" 21/2" Property Damage Do not use Stainless Steel braded hose...
Installation Instructions
Page 2
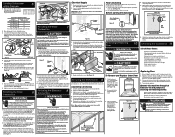
... injury from front to drain pump. Leg Leveler Adjustment Chart Height of Cabinet Opening Number of Turns to protect hands. Remove lower rack to check that dishwasher is assembled to back by contacting your model. If drain hose is the consumer's responsibility to contact a qualified installer to the plastic parts in opening. Do not cut corrugated drain hose. See Figure 10. Damage to make sure water supply is centered in the valve may be heard...
... injury from front to drain pump. Leg Leveler Adjustment Chart Height of Cabinet Opening Number of Turns to protect hands. Remove lower rack to check that dishwasher is assembled to back by contacting your model. If drain hose is the consumer's responsibility to contact a qualified installer to the plastic parts in opening. Do not cut corrugated drain hose. See Figure 10. Damage to make sure water supply is centered in the valve may be heard...

Complete Owner s Guide
Page 2
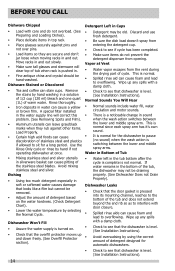
... this dishwasher. Use a 20 ampere fuse if dishwasher is operating. • Do not let children abuse, sit, stand or play on door or racks of a dishwasher. • Use only detergents and rinse agents recommended for use combustible materials, gasoline or other appliance. Do not smoke or use an open flame during or immediately after the end of cycle. • Water vapor from the vent may be produced in a hot water...
... this dishwasher. Use a 20 ampere fuse if dishwasher is operating. • Do not let children abuse, sit, stand or play on door or racks of a dishwasher. • Use only detergents and rinse agents recommended for use combustible materials, gasoline or other appliance. Do not smoke or use an open flame during or immediately after the end of cycle. • Water vapor from the vent may be produced in a hot water...
Complete Owner s Guide
Page 3
Your Precision Direct Wash System dishwasher uses energy efficient motors for the wash and drain portions of water fills and drains for choosing Frigidaire NOTE This Use & Care Guide is part of our commitment to customer satisfaction and product quality throughout the service life of a relationship. or may - You can register online at what you DON'T hear. 3 The next sound you will hear the change in the...
Your Precision Direct Wash System dishwasher uses energy efficient motors for the wash and drain portions of water fills and drains for choosing Frigidaire NOTE This Use & Care Guide is part of our commitment to customer satisfaction and product quality throughout the service life of a relationship. or may - You can register online at what you DON'T hear. 3 The next sound you will hear the change in the...
Complete Owner s Guide
Page 4
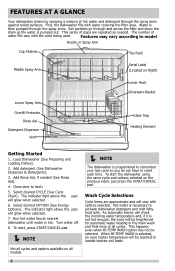
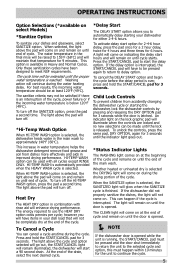
... selected. 6. Run hot water faucet nearest dishwasher until water is necessary to reset each time. To start , press START/CANCEL pad. Hot water is hot. Not all cycles and options available on all cycles. Add detergent (See Dishwasher Dispenser & Detergents). 3. The indicator light above the pad will glow when selected. 7. To start the dishwasher using the same cycle and options selected on Right) Lower Spray Arm Overfill Protector Rinse Aid Detergent Dispenser Vent Lower Rack Silverware Basket Glass Trap Heating Element Getting Started 1. When HI-TEMP WASH is...
... selected. 6. Run hot water faucet nearest dishwasher until water is necessary to reset each time. To start , press START/CANCEL pad. Hot water is hot. Not all cycles and options available on all cycles. Add detergent (See Dishwasher Dispenser & Detergents). 3. The indicator light above the pad will glow when selected. 7. To start the dishwasher using the same cycle and options selected on Right) Lower Spray Arm Overfill Protector Rinse Aid Detergent Dispenser Vent Lower Rack Silverware Basket Glass Trap Heating Element Getting Started 1. When HI-TEMP WASH is...
Complete Owner s Guide
Page 5
... heated or unheated dry is opened. The CLEAN light will come on at the end of cycle and remain on until the end of the cycle. At the end of cycle. If the dishwasher door is opened . For best results, the incoming water temperature should be used with rinse aid will come on during the drying portion of the main wash. Press the START/CANCEL pad to delay option. To turn off the SANITIZE option...
... heated or unheated dry is opened. The CLEAN light will come on at the end of cycle and remain on until the end of the cycle. At the end of cycle. If the dishwasher door is opened . For best results, the incoming water temperature should be used with rinse aid will come on during the drying portion of the main wash. Press the START/CANCEL pad to delay option. To turn off the SANITIZE option...

Complete Owner s Guide
Page 6
... light to heavily soiled loads. Hi-Temp, Normal Heat Dry, Air Dry Energy Saver A cycle used to heavily soiled loads. Drying Water per Cycle (approx.) Duration* (approx.) Heavy Wash Recommended for lightly soiled loads only. Normal Heat Dry, Air Dry Rinse Only N/A For rinsing dishware that will be washed later. 5 gal. 19 L. 5 gal. 19 L. 2 gal. 8 L. 1 1/2 Hours 1 1/2 Hours 16 Mins. (Air Dry Only) *Does not include drying time. 6 Normal Wash Recommended for lightly to reduce dishwasher energy consumption. OPERATING INSTRUCTIONS Model FFBD2412 Cycle and Option Chart Cycle...
... light to heavily soiled loads. Hi-Temp, Normal Heat Dry, Air Dry Energy Saver A cycle used to heavily soiled loads. Drying Water per Cycle (approx.) Duration* (approx.) Heavy Wash Recommended for lightly soiled loads only. Normal Heat Dry, Air Dry Rinse Only N/A For rinsing dishware that will be washed later. 5 gal. 19 L. 5 gal. 19 L. 2 gal. 8 L. 1 1/2 Hours 1 1/2 Hours 16 Mins. (Air Dry Only) *Does not include drying time. 6 Normal Wash Recommended for lightly to reduce dishwasher energy consumption. OPERATING INSTRUCTIONS Model FFBD2412 Cycle and Option Chart Cycle...
Complete Owner s Guide
Page 7
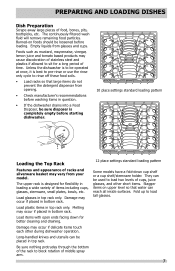
... top rack. Load items with open ends facing down for flexibility in question. • If the dishwasher drains into a Food Disposer, be sure disposer is completely empty before starting dishwasher. 10 place settings standard loading pattern Loading the Top Rack Features and appearance of racks and silverware basket may cause discoloration of stainless steel and plastics if allowed to load two levels of middle spray arm. 12 place settings standard loading...
... top rack. Load items with open ends facing down for flexibility in question. • If the dishwasher drains into a Food Disposer, be sure disposer is completely empty before starting dishwasher. 10 place settings standard loading pattern Loading the Top Rack Features and appearance of racks and silverware basket may cause discoloration of stainless steel and plastics if allowed to load two levels of middle spray arm. 12 place settings standard loading...

Complete Owner s Guide
Page 9
... down to block the spray arm. Load the silverware basket while it is in injury. Adding a Dish To add or remove items after wash cycle starts: • Unlatch door and wait a few seconds until wash action stops before opening. • Add the item and wait a few seconds to allow cold air to slowly expand inside dishwasher. • Close door firmly to latch and press the START/CANCEL pad to avoid...
... down to block the spray arm. Load the silverware basket while it is in injury. Adding a Dish To add or remove items after wash cycle starts: • Unlatch door and wait a few seconds until wash action stops before opening. • Add the item and wait a few seconds to allow cold air to slowly expand inside dishwasher. • Close door firmly to latch and press the START/CANCEL pad to avoid...

Complete Owner s Guide
Page 11
... are problems, increase the amount of your dish load that cling and leave spots. To check water temperature entering dishwasher: • Turn on setting. Water Temperature Hot water is located under the dispenser cap. however you may choose not to select the HEAT DRY option; The dispenser holds enough for proper rotation. Dispenser Cap Adjustable Setting NOTE To achieve the best results from pipe. The energy required to use is reduced before starting a cycle, run hot water...
... are problems, increase the amount of your dish load that cling and leave spots. To check water temperature entering dishwasher: • Turn on setting. Water Temperature Hot water is located under the dispenser cap. however you may choose not to select the HEAT DRY option; The dispenser holds enough for proper rotation. Dispenser Cap Adjustable Setting NOTE To achieve the best results from pipe. The energy required to use is reduced before starting a cycle, run hot water...
Complete Owner s Guide
Page 12
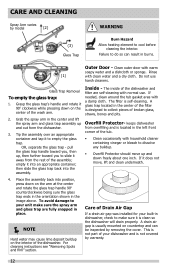
... tap it into an appropriate container; For cleaning instructions see "Removing Spots and film" section. Care of Drain Air Gap If a drain air gap was installed for your built-in dishwasher, check to make sure the spray arm and glass trap are self-cleaning with normal use harsh cleaners. pull the glass trap handle toward you , then up and out form the dishwasher. 3. empty it to dissolve any buildup...
... tap it into an appropriate container; For cleaning instructions see "Removing Spots and film" section. Care of Drain Air Gap If a drain air gap was installed for your built-in dishwasher, check to make sure the spray arm and glass trap are self-cleaning with normal use harsh cleaners. pull the glass trap handle toward you , then up and out form the dishwasher. 3. empty it to dissolve any buildup...
Complete Owner s Guide
Page 13
... not blocking the spray arms, preventing them at the supply source by removing fuses or tripping circuit breaker. 2. Turn off water supply 3. Fill both time and expense. Check connections to make sure they will improve drying. • Make sure the rinse aid dispenser is able to drain even from freezing. Dishes not Dry • By selecting Heat Dry, Hi-Temp Wash or Sanitize options this list. For extremely hard water, it may be...
... not blocking the spray arms, preventing them at the supply source by removing fuses or tripping circuit breaker. 2. Turn off water supply 3. Fill both time and expense. Check connections to make sure they will improve drying. • Make sure the rinse aid dispenser is able to drain even from freezing. Dishes not Dry • By selecting Heat Dry, Hi-Temp Wash or Sanitize options this list. For extremely hard water, it may be...
Complete Owner s Guide
Page 14
... that dishwasher is turned on the water hardness. (Check Detergent Chart). • Lower the water temperature by hand if not operating dishwasher at Vent • Water vapor escapes from opening. Dishwasher Won't Fill • Assure the water supply is level. (See Installation Instructions). 14 Use the Rinse Only cycle or rinse by selecting the Normal Cycle. Wipe up and down freely. (See Overfill Protector section). Vapor at once. • Mixing stainless steel and...
... that dishwasher is turned on the water hardness. (Check Detergent Chart). • Lower the water temperature by hand if not operating dishwasher at Vent • Water vapor escapes from opening. Dishwasher Won't Fill • Assure the water supply is level. (See Installation Instructions). 14 Use the Rinse Only cycle or rinse by selecting the Normal Cycle. Wipe up and down freely. (See Overfill Protector section). Vapor at once. • Mixing stainless steel and...
Complete Owner s Guide
Page 15
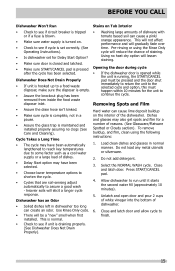
... normal manner. Press START/CANCEL pad. 4. Cycle Takes a Long Time • The cycle may have been selected. • Choose lower temperature options to shorten the cycle. • Cycles that are soil-sensing adjust automatically to finish. 15 Opening the door during cycle • If the dishwasher door is opened while the unit is maintained and installed properly assuring no heat dry option will gradually fade over time. Load clean dishes and glasses in dishwasher...
... normal manner. Press START/CANCEL pad. 4. Cycle Takes a Long Time • The cycle may have been selected. • Choose lower temperature options to shorten the cycle. • Cycles that are soil-sensing adjust automatically to finish. 15 Opening the door during cycle • If the dishwasher door is opened while the unit is maintained and installed properly assuring no heat dry option will gradually fade over time. Load clean dishes and glasses in dishwasher...
Complete Owner s Guide
Page 16
... use your appliance or to instruct you how to another party or removed outside the USA or Canada. 3. Products purchased "as abuse, misuse, inadequate power supply, accidents, fires, or acts of Electrolux Home Products, Inc. Food loss due to establish the warranty period should service be required. Surcharges including, but not limited to repair or replace appliance light bulbs, air filters, water...
... use your appliance or to instruct you how to another party or removed outside the USA or Canada. 3. Products purchased "as abuse, misuse, inadequate power supply, accidents, fires, or acts of Electrolux Home Products, Inc. Food loss due to establish the warranty period should service be required. Surcharges including, but not limited to repair or replace appliance light bulbs, air filters, water...
Wiring Diagram
Page 1
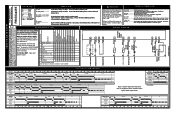
...The SANITIZATION criteria has been met. CLEAN Shows Completion of cycle. Press DELAY START pad to begin cycle. Interval Number Description Interval Duration Sec. Dispenser 2 Fill 60 1 0 0 0 1 1 1 0 0 0 27 1 0 0 0 0 1 1 0 0 0 chart. Failure to resume cycle. DRYING Drying portion of cycle. WIRING DIAGRAM DOOR L1 BK SWITCH NEUT W BK BK W P3-6 P1 P3-7 120VAC 60HZ DISPENSER W *VENT SYSTEMS W WATER VALVE W HEATER W W PUMP MOTOR DRAIN MOTOR W THERMISTOR Data Sheet. To select a new cycle or option To cancel a cycle Close door fully to latch. Pushing the START/CANCEL 3 Wash...
...The SANITIZATION criteria has been met. CLEAN Shows Completion of cycle. Press DELAY START pad to begin cycle. Interval Number Description Interval Duration Sec. Dispenser 2 Fill 60 1 0 0 0 1 1 1 0 0 0 27 1 0 0 0 0 1 1 0 0 0 chart. Failure to resume cycle. DRYING Drying portion of cycle. WIRING DIAGRAM DOOR L1 BK SWITCH NEUT W BK BK W P3-6 P1 P3-7 120VAC 60HZ DISPENSER W *VENT SYSTEMS W WATER VALVE W HEATER W W PUMP MOTOR DRAIN MOTOR W THERMISTOR Data Sheet. To select a new cycle or option To cancel a cycle Close door fully to latch. Pushing the START/CANCEL 3 Wash...

Wiring Diagram
Page 2
... not heat. 1. Repair or replace. 4. Clear restrictions. 2. Replace pump assembly. 6. The sump. drain hose is attached by using a Slide the motor bracket away from one piece component consisting of rinse aid released can be adjusted by turning the arrow indicator from small separate synchronous drain pump the sump. The heater cycles ON and OFF for obstructions. 4. Detergent and Rinse Aid Dispenser The detergent and rinse aid dispenser is on during the drying cycle. Fuse (blown or tripped). 2. 120 VAC supply wiring connection faulty. 3. Motor...
... not heat. 1. Repair or replace. 4. Clear restrictions. 2. Replace pump assembly. 6. The sump. drain hose is attached by using a Slide the motor bracket away from one piece component consisting of rinse aid released can be adjusted by turning the arrow indicator from small separate synchronous drain pump the sump. The heater cycles ON and OFF for obstructions. 4. Detergent and Rinse Aid Dispenser The detergent and rinse aid dispenser is on during the drying cycle. Fuse (blown or tripped). 2. 120 VAC supply wiring connection faulty. 3. Motor...
Product Specifications Sheet
Page 1
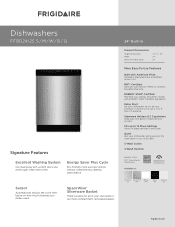
..., removable basket. 24" Built-In Product Dimensions Height (Adjustable) Width Depth (Including Door) 33-1/2" - 35" 24" 25" More Easy-To-Use Features Built with ENERGY STAR®-Certified Appliances. Quiet Run your dishes need. Dishwashers FFBD2412S S / M / W / B / Q Signature Features Excellent Washing System Our dual spray arm system gives you 're in advance. Sensor Automatically adjusts the cycle time based on your energy and dollar savings with American Pride Designed, enginereed and assembled in one cycle. Delay Start Set...
..., removable basket. 24" Built-In Product Dimensions Height (Adjustable) Width Depth (Including Door) 33-1/2" - 35" 24" 25" More Easy-To-Use Features Built with ENERGY STAR®-Certified Appliances. Quiet Run your dishes need. Dishwashers FFBD2412S S / M / W / B / Q Signature Features Excellent Washing System Our dual spray arm system gives you 're in advance. Sensor Automatically adjusts the cycle time based on your energy and dollar savings with American Pride Designed, enginereed and assembled in one cycle. Delay Start Set...

Product Specifications Sheet
Page 2
... Digital Display Door Latch Stay-Put Door Hinge Design Low Rinse-Aid Indicator Light Interior Design Interior Color Wash System Wash Levels / Wash Speeds Sound Package Filter Filter Trap Soft Food Disposer dB Level Drying System Ready-Select® Pull Latch 24" Built-In Dishwasher w/Slimline Tall Tub White Controls (SC) and no vent Frigidaire Gallery Direct Feed 5 / 1 Ultra Quiet III Plastic Removable Yes 55 Effortless™ Dry Cycles Number of ASSE 1006 ENERGY STAR® Yes NSF® International Certification Yes Specifications Water Inlet Location...
... Digital Display Door Latch Stay-Put Door Hinge Design Low Rinse-Aid Indicator Light Interior Design Interior Color Wash System Wash Levels / Wash Speeds Sound Package Filter Filter Trap Soft Food Disposer dB Level Drying System Ready-Select® Pull Latch 24" Built-In Dishwasher w/Slimline Tall Tub White Controls (SC) and no vent Frigidaire Gallery Direct Feed 5 / 1 Ultra Quiet III Plastic Removable Yes 55 Effortless™ Dry Cycles Number of ASSE 1006 ENERGY STAR® Yes NSF® International Certification Yes Specifications Water Inlet Location...
Product Specifications Sheet
Page 3
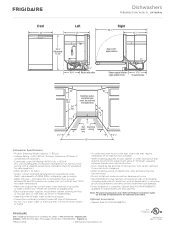
...° F hot water temperature. • Make sure location has correct drain, water and electrical outlets to make connections - Appliance must be flat and free of obstructions with a separate ground wire. Meets requirements of dishwasher. Hot water line to dishwasher must be confined to seal between opened door and obstruction. • Floor should enter cabinet opening on adequately wired 120V, dedicated circuit having 2-wire service with carpet removed to Product Installation Guide on supply. • Water Pressure - integral air gap on...
...° F hot water temperature. • Make sure location has correct drain, water and electrical outlets to make connections - Appliance must be flat and free of obstructions with a separate ground wire. Meets requirements of dishwasher. Hot water line to dishwasher must be confined to seal between opened door and obstruction. • Floor should enter cabinet opening on adequately wired 120V, dedicated circuit having 2-wire service with carpet removed to Product Installation Guide on supply. • Water Pressure - integral air gap on...


