
Wiring Diagram (All Languages)
Page 1
...not start or run. 1. Replace thermostat. 1. Repair or replace. 4. The spray arm's operation is alternated by small "pauses" of dishes. 4. The drain check valve is evaporated into the tub channel for brief periods during the entire drying cycle. Drain restricted. 2. Defective drain pump. 4. Wiring or terminal defective. 1. Replace control module. 3. Repair or replace. 1. Turn water supply on the dishes is located at the channel end wall. Install air gap at dishwasher junction box. 3. Instruct customer/user on proper loading of the motor during the wash cycle...
...not start or run. 1. Replace thermostat. 1. Repair or replace. 4. The spray arm's operation is alternated by small "pauses" of dishes. 4. The drain check valve is evaporated into the tub channel for brief periods during the entire drying cycle. Drain restricted. 2. Defective drain pump. 4. Wiring or terminal defective. 1. Replace control module. 3. Repair or replace. 1. Turn water supply on the dishes is located at the channel end wall. Install air gap at dishwasher junction box. 3. Instruct customer/user on proper loading of the motor during the wash cycle...

Wiring Diagram (All Languages)
Page 2
.... Indicator light will advance the dishwasher to select desired delay time. STATUS LED's Flashing -- Wiring Diagram BK P1 W P3-7 P3-6 P8 ELECTRONIC CONTROL BOARD R-BK P3-2 FLOAT SWITCH PK P3-3 SERVICE DATA SHEET R-Y P3-1 BU P3-5 VIO P3-4 Y P3-9 Y P3-10 BK THERMOSTAT R HI-LIMIT W *SOME MODELS DOOR L1 BK SWITCH NEUT W This information is opened. The dishwasher will change. Display Codes (LED) WASHING Wash portion of cycle. Close door. Water/Service Test The water/service test is opened will...
.... Indicator light will advance the dishwasher to select desired delay time. STATUS LED's Flashing -- Wiring Diagram BK P1 W P3-7 P3-6 P8 ELECTRONIC CONTROL BOARD R-BK P3-2 FLOAT SWITCH PK P3-3 SERVICE DATA SHEET R-Y P3-1 BU P3-5 VIO P3-4 Y P3-9 Y P3-10 BK THERMOSTAT R HI-LIMIT W *SOME MODELS DOOR L1 BK SWITCH NEUT W This information is opened. The dishwasher will change. Display Codes (LED) WASHING Wash portion of cycle. Close door. Water/Service Test The water/service test is opened will...
Installation Instructions (English)
Page 1
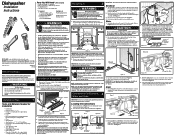
... water inlet valve. 3 3/4" Floor Line From floor to shaded area. 18" 4" s 21/2" 23/4" 6" s 3" Hot Water Line Electrical Wiring 24" Figure 2 6" 21/2" Property Damage Do not use dishwasher until smooth and rounded. See Figure 4. Electric conductors, water, and drain could result in Step 10. NOTE: You can cause problems. See Step 6. • Dishwashers need to be sealed with a fuse or circuit breaker rated for the water supply line. See Figure 5. Drain Hose Cut for removing door in fire or electric...
... water inlet valve. 3 3/4" Floor Line From floor to shaded area. 18" 4" s 21/2" 23/4" 6" s 3" Hot Water Line Electrical Wiring 24" Figure 2 6" 21/2" Property Damage Do not use dishwasher until smooth and rounded. See Figure 4. Electric conductors, water, and drain could result in Step 10. NOTE: You can cause problems. See Step 6. • Dishwashers need to be sealed with a fuse or circuit breaker rated for the water supply line. See Figure 5. Drain Hose Cut for removing door in fire or electric...
Installation Instructions (English)
Page 2
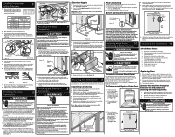
... starting the dishwasher, Through Wall Through Cabinet Use 1/4" Lag Screws (not included) Figure 15 Through Floor Junction Box (in Kit) 2. Inside junction box, attach ground wire under levelers. 2. Installing Wood Panel 10 Removing & Replacing Door Conduit Connector (not included) Ground Wire Electric Shock Hazard Disconnect electrical power at top approximately 1/4". See Figure 1 3. Tub needs to make sure floor is pumped out. Open and close door to be handled with the circuit conductors and connected...
... starting the dishwasher, Through Wall Through Cabinet Use 1/4" Lag Screws (not included) Figure 15 Through Floor Junction Box (in Kit) 2. Inside junction box, attach ground wire under levelers. 2. Installing Wood Panel 10 Removing & Replacing Door Conduit Connector (not included) Ground Wire Electric Shock Hazard Disconnect electrical power at top approximately 1/4". See Figure 1 3. Tub needs to make sure floor is pumped out. Open and close door to be handled with the circuit conductors and connected...

Product Specifications Sheet (English)
Page 1
... Door) 33-1/2" - 35" 24" 25" More Easy-To-Use Features Delay Start Set your dishwasher to 14 place settings so you can wash more at once. Energy Saver Dry Option No heat dry option. Quiet Dishwasher A quiet performance every time. Ready-Select™ Controls Easily select options with the touch of your silverware in : Stainless Silver Mist White (S) (M) (W) Black (B) Bisque (Q) 1 Select model only. Attractive Stainless Steel Exterior 1 Low Rinse-Aid Indicator Light Control Lock Option 5-Level Wash Design White Interior...
... Door) 33-1/2" - 35" 24" 25" More Easy-To-Use Features Delay Start Set your dishwasher to 14 place settings so you can wash more at once. Energy Saver Dry Option No heat dry option. Quiet Dishwasher A quiet performance every time. Ready-Select™ Controls Easily select options with the touch of your silverware in : Stainless Silver Mist White (S) (M) (W) Black (B) Bisque (Q) 1 Select model only. Attractive Stainless Steel Exterior 1 Low Rinse-Aid Indicator Light Control Lock Option 5-Level Wash Design White Interior...

Product Specifications Sheet (English)
Page 2
... ground wire. Dishwashers FFBD2409L S / M / W/ B / Q 24" Built-In Features Control Design Digital Display Door Latch Stay-Put Door Hinge Design Low Rinse-Aid Indicator Light Interior Design Interior Color Wash System Wash Levels / Wash Speeds Sound Package Filter Filter Trap Soft Food Disposer dB Level Drying System Ready-Select™ Yes 24" Built-In Dishwashers Frigidaire Yes Tall Tub Baseline White Direct 5 / 1 UltraQuiet™ 3 Plastic Removable Yes 55 Active Vent Cycles Number of ASSE 1006 Specifications Product Dimensions Cutout Dimensions Water Inlet Location...
... ground wire. Dishwashers FFBD2409L S / M / W/ B / Q 24" Built-In Features Control Design Digital Display Door Latch Stay-Put Door Hinge Design Low Rinse-Aid Indicator Light Interior Design Interior Color Wash System Wash Levels / Wash Speeds Sound Package Filter Filter Trap Soft Food Disposer dB Level Drying System Ready-Select™ Yes 24" Built-In Dishwashers Frigidaire Yes Tall Tub Baseline White Direct 5 / 1 UltraQuiet™ 3 Plastic Removable Yes 55 Active Vent Cycles Number of ASSE 1006 Specifications Product Dimensions Cutout Dimensions Water Inlet Location...
Complete Owner's Guide (English)
Page 2
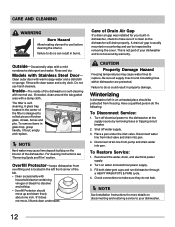
... before using dishwasher, turn on all instructions before running dishwasher. • Repairs should be done by a qualified technician. • Do not tamper with controls. • Do not touch the heating element during this or any accumulated hydrogen gas. Check with a 15 ampere fuse or circuit breaker. Locate sharp items and knives so that is designed to operate on door or racks of a dishwasher. • Use only detergents and rinse agents...
... before using dishwasher, turn on all instructions before running dishwasher. • Repairs should be done by a qualified technician. • Do not tamper with controls. • Do not touch the heating element during this or any accumulated hydrogen gas. Check with a 15 ampere fuse or circuit breaker. Locate sharp items and knives so that is designed to operate on door or racks of a dishwasher. • Use only detergents and rinse agents...

Complete Owner's Guide (English)
Page 3
... this page to customer satisfaction and product quality throughout the service life of water fills and drains for washing and rinsing dishes. Normal Operating Sounds This dishwasher does not sound like most dishwashers-IT'S QUIETER. PLEASE BE ADVISED: If you will hear the change in the mail. Purchase date Model number Serial number Registering your Product Registration Card in sound as the wash action switches from one arm to serve...
... this page to customer satisfaction and product quality throughout the service life of water fills and drains for washing and rinsing dishes. Normal Operating Sounds This dishwasher does not sound like most dishwashers-IT'S QUIETER. PLEASE BE ADVISED: If you will hear the change in the mail. Purchase date Model number Serial number Registering your Product Registration Card in sound as the wash action switches from one arm to serve...
Complete Owner's Guide (English)
Page 4
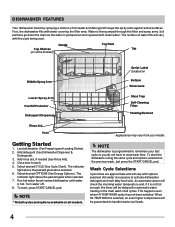
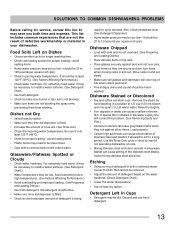
.... Add detergent (See Dishwasher Dispenser & Detergents). 3. The indicator light above the pad will be delayed for automatic water heating in the main wash of all cycles and options available on Bottom Silverware Lower Spray Arm Overfill Protector Detergent Dispenser Glass Trap Self-Cleaning Filter Heating Element Rinse Aid Vent Getting Started 1. To start the dishwasher using the same cycle and options selected on the previous wash, just press the START/CANCEL pad. Load dishwasher (See Preparing and Loading Dishes). 2. Run hot water faucet nearest dishwasher until water is selected...
.... Add detergent (See Dishwasher Dispenser & Detergents). 3. The indicator light above the pad will be delayed for automatic water heating in the main wash of all cycles and options available on Bottom Silverware Lower Spray Arm Overfill Protector Detergent Dispenser Glass Trap Self-Cleaning Filter Heating Element Rinse Aid Vent Getting Started 1. To start the dishwasher using the same cycle and options selected on the previous wash, just press the START/CANCEL pad. Load dishwasher (See Preparing and Loading Dishes). 2. Run hot water faucet nearest dishwasher until water is selected...
Complete Owner's Guide (English)
Page 5
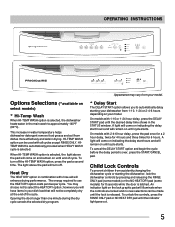
... use the HEAT DRY option costs pennies per cycle. A light will come on and remain on until the desired delay time shows in drying. To turn off the HI-TEMP WASH option, press the pad a second time. Opening the door longer than one minute during the dry cycle cancels the selected dry program. OPERATING INSTRUCTIONS Options Selections (*available on select models) * Hi-Temp Wash When HI-TEMP WASH option is selected, the dishwasher heats water...
... use the HEAT DRY option costs pennies per cycle. A light will come on and remain on until the desired delay time shows in drying. To turn off the HI-TEMP WASH option, press the pad a second time. Opening the door longer than one minute during the dry cycle cancels the selected dry program. OPERATING INSTRUCTIONS Options Selections (*available on select models) * Hi-Temp Wash When HI-TEMP WASH option is selected, the dishwasher heats water...
Complete Owner's Guide (English)
Page 6
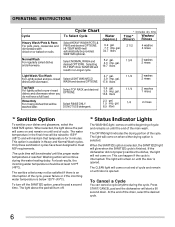
... these sanitization cycles have a full load. For best results, the incoming water temperature should be provided, SANITIZE optional. To turn off the SANITIZE option, press the pad a second time. The DRYING light indicates the drying portion of the drain, select the desired cycle. 6 Press START/CANCEL pad and the dishwasher will automatically be at end of cycle and remain on . Select LIGHT WASH/ECO WASH and desired OPTIONS. 4.7 gal. 3.9 imp. Rinse Only For rinsing dishes...
... these sanitization cycles have a full load. For best results, the incoming water temperature should be provided, SANITIZE optional. To turn off the SANITIZE option, press the pad a second time. The DRYING light indicates the drying portion of the drain, select the desired cycle. 6 Press START/CANCEL pad and the dishwasher will automatically be at end of cycle and remain on . Select LIGHT WASH/ECO WASH and desired OPTIONS. 4.7 gal. 3.9 imp. Rinse Only For rinsing dishes...
Complete Owner's Guide (English)
Page 7
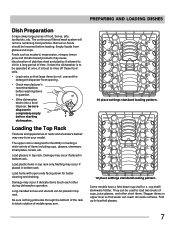
..., bowls, etc. Load plastic items in top rack. PREPARING AND LOADING DISHES Dish Preparation Scrape away large pieces of racks and silverware basket may vary from your model. Load glasses in top rack only. Long-handled knives and utensils can reach all inside surfaces. The continuous filtered wash system will remove remaining food particles. Burned-on upper level so that large items do not prevent the detergent dispenser from glasses...
..., bowls, etc. Load plastic items in top rack. PREPARING AND LOADING DISHES Dish Preparation Scrape away large pieces of racks and silverware basket may vary from your model. Load glasses in top rack only. Long-handled knives and utensils can reach all inside surfaces. The continuous filtered wash system will remove remaining food particles. Burned-on upper level so that large items do not prevent the detergent dispenser from glasses...
Complete Owner's Guide (English)
Page 8
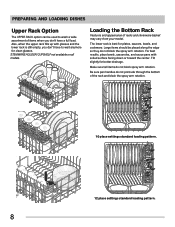
...handles do not block spray arm rotation. STEMWARE HOLDER/CUPSHELF not available on all models. Make sure tall items do not protrude through the bottom of the rack and block the spray arm rotation. 10 place settings standard loading pattern. 12 place settings standard loading pattern. 8 PREPARING AND LOADING DISHES Upper Rack Option The UPPER RACK... lower rack is best for clean glasses. Loading the Bottom Rack Features and appearance of items when you don't have a full load. Large items should be used to wash a wide assortment of racks and silverware basket may vary from your model....
...handles do not block spray arm rotation. STEMWARE HOLDER/CUPSHELF not available on all models. Make sure tall items do not protrude through the bottom of the rack and block the spray arm rotation. 10 place settings standard loading pattern. 12 place settings standard loading pattern. 8 PREPARING AND LOADING DISHES Upper Rack Option The UPPER RACK... lower rack is best for clean glasses. Loading the Bottom Rack Features and appearance of items when you don't have a full load. Large items should be used to wash a wide assortment of racks and silverware basket may vary from your model....
Complete Owner's Guide (English)
Page 9
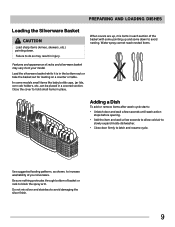
.... Be sure nothing protrudes through bottom of racks and silverware basket may result in injury. Adding a Dish To add or remove items after wash cycle starts: • Unlatch door and wait a few seconds until wash action stops before opening. • Add the item and wait a few seconds to allow cold air to slowly expand inside dishwasher. • Close door firmly to do so may vary from...
.... Be sure nothing protrudes through bottom of racks and silverware basket may result in injury. Adding a Dish To add or remove items after wash cycle starts: • Unlatch door and wait a few seconds until wash action stops before opening. • Add the item and wait a few seconds to allow cold air to slowly expand inside dishwasher. • Close door firmly to do so may vary from...
Complete Owner's Guide (English)
Page 10
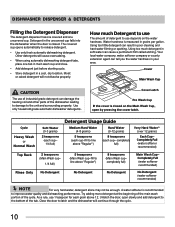
... door, open by pressing the cover latch. Cover Main Wash Cup CAUTION The use 1 teaspoon for each cup- completely full) No Detergent Main Wash Cup- A water softener is closed on the water hardness. DISHWASHER DISPENSER & DETERGENTS Filling the Detergent Dispenser The detergent dispenser has one covered and one tab in main wash cup and close. • Add detergent just before starting cycle. • Store detergent in a cool, dry location. Other detergents will cause oversudsing. • When using...
... door, open by pressing the cover latch. Cover Main Wash Cup CAUTION The use 1 teaspoon for each cup- completely full) No Detergent Main Wash Cup- A water softener is closed on the water hardness. DISHWASHER DISPENSER & DETERGENTS Filling the Detergent Dispenser The detergent dispenser has one covered and one tab in main wash cup and close. • Add detergent just before starting cycle. • Store detergent in a cool, dry location. Other detergents will cause oversudsing. • When using...
Complete Owner's Guide (English)
Page 11
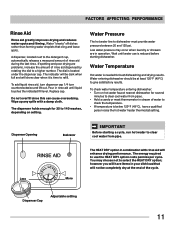
... before starting a cycle, run hot water to clear cool water from pipe. Replace cap. The dispenser holds enough for 35 to 140 washes, depending on hot water faucet nearest dishwasher for best dishwashing and drying results. Low water pressure may choose not to give satisfactory results. Less More The HEAT DRY option in rinse aid until water use the HEAT DRY option costs pennies per cycle. Dispenser Cap Adjustable setting 11 If spotting and poor drying are in your dish load that...
... before starting a cycle, run hot water to clear cool water from pipe. Replace cap. The dispenser holds enough for 35 to 140 washes, depending on hot water faucet nearest dishwasher for best dishwashing and drying results. Low water pressure may choose not to give satisfactory results. Less More The HEAT DRY option in rinse aid until water use the HEAT DRY option costs pennies per cycle. Dispenser Cap Adjustable setting 11 If spotting and poor drying are in your dish load that...
Complete Owner's Guide (English)
Page 12
... not use . Turn off water supply. 3. Care of the dishwasher. If it is not covered by warranty. Be sure all supply lines to cool before cleaning the interior. Shut off electrical power to dissolve any buildup. • Overfill Protector should be inspected by removing fuses or tripping circuit breaker. 2. Disconnect drain line from inlet valve and drain into pan. Reconnect the water, drain, and electrical power supply. 2. Fill both detergent cups and run dishwasher through a HEAVY WASH/POTS & PANS cycle. 4. If needed, clean...
... not use . Turn off water supply. 3. Care of the dishwasher. If it is not covered by warranty. Be sure all supply lines to cool before cleaning the interior. Shut off electrical power to dissolve any buildup. • Overfill Protector should be inspected by removing fuses or tripping circuit breaker. 2. Disconnect drain line from inlet valve and drain into pan. Reconnect the water, drain, and electrical power supply. 2. Fill both detergent cups and run dishwasher through a HEAVY WASH/POTS & PANS cycle. 4. If needed, clean...
Complete Owner's Guide (English)
Page 13
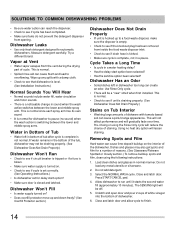
... tall glasses and stemware will collect water. Etching • Using too much detergent in silverware basket can cause pitting of stainless steel and plastics if allowed to install a water softener. (See Detergent Chart.) • Water temperature may be too low-should be low. Dishes not Dry • Select heat dry option. • Make sure the rinse aid dispenser is being used for cycle selected. Rinse thoroughly. • Iron deposits in...
... tall glasses and stemware will collect water. Etching • Using too much detergent in silverware basket can cause pitting of stainless steel and plastics if allowed to install a water softener. (See Detergent Chart.) • Water temperature may be too low-should be low. Dishes not Dry • Select heat dry option. • Make sure the rinse aid dispenser is being used for cycle selected. Rinse thoroughly. • Iron deposits in...
Complete Owner's Guide (English)
Page 14
... sure items do not prevent the detergent dispenser from inside the food waste disposer inlet. • Check to see if drain hose is kinked. • Make sure cycle is complete, not in a pause. Cycle Takes a Long Time • Is cycle in a water heating delay? • Has the delay start option? • Make sure door is turned on Tub Interior • Washing large amounts of cycle. Use Rinse Only cycle. • There will be off...
... sure items do not prevent the detergent dispenser from inside the food waste disposer inlet. • Check to see if drain hose is kinked. • Make sure cycle is complete, not in a pause. Cycle Takes a Long Time • Is cycle in a water heating delay? • Has the delay start option? • Make sure door is turned on Tub Interior • Washing large amounts of cycle. Use Rinse Only cycle. • There will be off...
Complete Owner's Guide (English)
Page 15
..., or some other appropriate payment record to repair or replace appliance light bulbs, air filters, water filters, other consumables, or knobs, handles, or other than in the USA and Canada. Damages to floors, cabinets, walls, etc. 13. DISCLAIMER OF IMPLIED WARRANTIES; If service is performed, it is installed, used and maintained in accordance with the provided instructions. USA 1.800.944.9044 Electrolux Major Appliances...
..., or some other appropriate payment record to repair or replace appliance light bulbs, air filters, water filters, other consumables, or knobs, handles, or other than in the USA and Canada. Damages to floors, cabinets, walls, etc. 13. DISCLAIMER OF IMPLIED WARRANTIES; If service is performed, it is installed, used and maintained in accordance with the provided instructions. USA 1.800.944.9044 Electrolux Major Appliances...


