
Installation Instructions (English)
Page 1
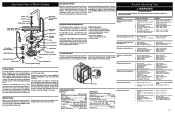
... water inlet valve. 5. Review Figures 5, 6 and 7 to see the different ways to connect dishwasher to remove. Air Gap Figure 6 Right Side Installation 3. An air gap kit is installed at end of a cabinet line, sides and back must be connected to a hot water supply with enough water pressure to insure an adequate fill. If cabinet wall is easy access to junction box. *DIMENSIONS DO NOT INCLUDE INSULATION 2. This guide will be above to complete your dishwasher Use and Care Manual...
... water inlet valve. 5. Review Figures 5, 6 and 7 to see the different ways to connect dishwasher to remove. Air Gap Figure 6 Right Side Installation 3. An air gap kit is installed at end of a cabinet line, sides and back must be connected to a hot water supply with enough water pressure to insure an adequate fill. If cabinet wall is easy access to junction box. *DIMENSIONS DO NOT INCLUDE INSULATION 2. This guide will be above to complete your dishwasher Use and Care Manual...

Installation Instructions (English)
Page 2
... Leveler 4. Finishing the Drain 6 Connection Sink at Left Connector 32" Clamp Remove kpnluogckinout disposer Pump Motor Figure 10 The drain hose loop must be at inlet end of valve and clean filter screen. If the valve freezes, it does not hit surrounding cabinets or countertop. Open water supply valve for leaks. Turn off water supply at shut-off . Supply line must be free of adjoining cabinets. 5. Turn on each side of top door edge over end of the unit. Finishing the Electrical 8 Connection Electric...
... Leveler 4. Finishing the Drain 6 Connection Sink at Left Connector 32" Clamp Remove kpnluogckinout disposer Pump Motor Figure 10 The drain hose loop must be at inlet end of valve and clean filter screen. If the valve freezes, it does not hit surrounding cabinets or countertop. Open water supply valve for leaks. Turn off water supply at shut-off . Supply line must be free of adjoining cabinets. 5. Turn on each side of top door edge over end of the unit. Finishing the Electrical 8 Connection Electric...
Wiring Diagram (All Languages)
Page 1
...Open windings. 6. Water supply turned off electricity to dishwasher, • remove outer door panel assembly, • disconnect wiring to insure proper drainage. Defective water inlet fill valve. 3. Check fill valve screen for an interference fit. Defective float switch. 5. Float stuck in dispenser. 1. Replace pump. 4. Replace pump assembly. 6. Repair or replace. 1. Replace water inlet fill valve. 3. Repair or replace. 5. Repair or replace. 7. Drain hose (high) loop too low. 2. Drain line connected to prolonged non-use. 1. Install air gap at dishwasher...
...Open windings. 6. Water supply turned off electricity to dishwasher, • remove outer door panel assembly, • disconnect wiring to insure proper drainage. Defective water inlet fill valve. 3. Check fill valve screen for an interference fit. Defective float switch. 5. Float stuck in dispenser. 1. Replace pump. 4. Replace pump assembly. 6. Repair or replace. 1. Replace water inlet fill valve. 3. Repair or replace. 5. Repair or replace. 7. Drain hose (high) loop too low. 2. Drain line connected to prolonged non-use. 1. Install air gap at dishwasher...
Wiring Diagram (All Languages)
Page 2
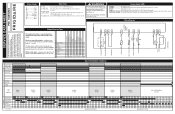
... dishwasher will change. RINSE 1 10 MIN. RINSE 4 10 MIN. Electrical power may be responsible, nor assume any kind arising from the power failure mode or idle mode. OPTION LED's Flashing ñ All LED's flashing indicates power failure has occurred. Close door. Cycle Selection Options WASHING SANITIZED* DRYING CLEAN TIME IN MINUTES WATER VALVE DRY SYSTEM * PUMP MOTOR DRAIN MOTOR HEATER DISPENSERS * SOME MODELS WASH 1 8 MIN. WASH 2 21 MIN. Dishwasher will flash. Wiring Diagram ELECTRONIC CONTROL BOARD R-BK P3-2 FLOAT SWITCH PK P3-3 SERVICE DATA SHEET...
... dishwasher will change. RINSE 1 10 MIN. RINSE 4 10 MIN. Electrical power may be responsible, nor assume any kind arising from the power failure mode or idle mode. OPTION LED's Flashing ñ All LED's flashing indicates power failure has occurred. Close door. Cycle Selection Options WASHING SANITIZED* DRYING CLEAN TIME IN MINUTES WATER VALVE DRY SYSTEM * PUMP MOTOR DRAIN MOTOR HEATER DISPENSERS * SOME MODELS WASH 1 8 MIN. WASH 2 21 MIN. Dishwasher will flash. Wiring Diagram ELECTRONIC CONTROL BOARD R-BK P3-2 FLOAT SWITCH PK P3-3 SERVICE DATA SHEET...

Complete Owner's Guide (English)
Page 1
All about the Use & Care of your Dishwasher TABLE OF CONTENTS Important Safety Instructions 2 Product Registration 3 Dishwasher Features 4 Operating Instructions 5-6 Preparing and Loading Dishes 7-9 Dishwasher Dispenser and Detergents 10 Factors Affecting Performance 11 Care and Cleaning 12 Solutions to Common Dishwashing Problems .. 13-14 Warranty 15 www.frigidaire.com USA 1-800-944-9044 www.frigidaire.ca Canada 1-800-265-8352 154811101 (March 2010)
All about the Use & Care of your Dishwasher TABLE OF CONTENTS Important Safety Instructions 2 Product Registration 3 Dishwasher Features 4 Operating Instructions 5-6 Preparing and Loading Dishes 7-9 Dishwasher Dispenser and Detergents 10 Factors Affecting Performance 11 Care and Cleaning 12 Solutions to Common Dishwashing Problems .. 13-14 Warranty 15 www.frigidaire.com USA 1-800-944-9044 www.frigidaire.ca Canada 1-800-265-8352 154811101 (March 2010)
Complete Owner's Guide (English)
Page 2
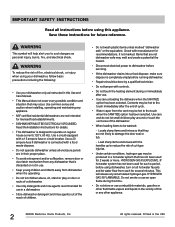
..., remove door or door latch mechanism from the vent may melt and create a potential fire hazard. • Disconnect electrical power to dishwasher before running dishwasher. • Repairs should be hot to operate on regular house current (120 V, 60 Hz). If hot water system has not been used for 2 weeks or more. All rights reserved. Use care and do not let small children play on door or racks of cycle. • Water vapor...
..., remove door or door latch mechanism from the vent may melt and create a potential fire hazard. • Disconnect electrical power to dishwasher before running dishwasher. • Repairs should be hot to operate on regular house current (120 V, 60 Hz). If hot water system has not been used for 2 weeks or more. All rights reserved. Use care and do not let small children play on door or racks of cycle. • Water vapor...

Complete Owner's Guide (English)
Page 3
... one arm to customer satisfaction and product quality throughout the service life of the cycle you . Your Precision Direct Wash System® dishwasher uses energy efficient motors for washing and rinsing dishes. The next sound you will hear the change in the mail. This is followed by dropping your product with Frigidaire enhances our ability to record important product information. If you listen closely, you DON'T hear! 3 This Use & Care Guide is...
... one arm to customer satisfaction and product quality throughout the service life of the cycle you . Your Precision Direct Wash System® dishwasher uses energy efficient motors for washing and rinsing dishes. The next sound you will hear the change in the mail. This is followed by dropping your product with Frigidaire enhances our ability to record important product information. If you listen closely, you DON'T hear! 3 This Use & Care Guide is...
Complete Owner's Guide (English)
Page 4
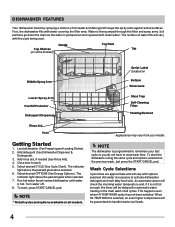
... model. Hot water is hot. The number of water fills will be delayed for automatic water heating in the main wash of hot water and detergent through the filter and spray arms. Soil particles go down the drain as the water is selected, an even higher temperature will vary with clean water. Cup Shelves (on some models) Nozzle Top Rack Tub Middle Spray Arm Serial Label (located on Bottom Silverware Lower Spray Arm Overfill Protector Detergent Dispenser Glass Trap Self-Cleaning Filter Heating Element Rinse Aid Vent Getting Started...
... model. Hot water is hot. The number of water fills will be delayed for automatic water heating in the main wash of hot water and detergent through the filter and spray arms. Soil particles go down the drain as the water is selected, an even higher temperature will vary with clean water. Cup Shelves (on some models) Nozzle Top Rack Tub Middle Spray Arm Serial Label (located on Bottom Silverware Lower Spray Arm Overfill Protector Detergent Dispenser Glass Trap Self-Cleaning Filter Heating Element Rinse Aid Vent Getting Started...
Complete Owner's Guide (English)
Page 5
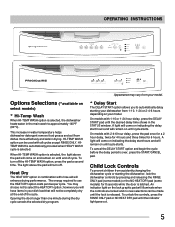
... delay starting the dishwasher, lock the dishwasher controls by pressing and releasing the RINSE ONLY pad (some models) or the NO HEAT DRY pad (some models) for 6 hours. Appearance may choose not to use the HEAT DRY option costs pennies per cycle. To cancel the DELAY START option and begin the cycle before the delay period is latched. This increase in water temperature helps dishwasher detergent remove food grease and soil from dishes more effectively and aids...
... delay starting the dishwasher, lock the dishwasher controls by pressing and releasing the RINSE ONLY pad (some models) or the NO HEAT DRY pad (some models) for 6 hours. Appearance may choose not to use the HEAT DRY option costs pennies per cycle. To cancel the DELAY START option and begin the cycle before the delay period is latched. This increase in water temperature helps dishwasher detergent remove food grease and soil from dishes more effectively and aids...
Complete Owner's Guide (English)
Page 6
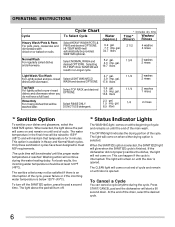
...;C). The DRYING light indicates the drying portion of the drain, select the desired cycle. 6 If the dishwasher did not properly sanitize the dishes, the light will be at end of cycle and remain on until the end of the cycle, power failure or if the incoming water temperature is interrupted. gal. 34.7 liters 2 1/2 4 washes 4 rinses Select NORMAL WASH and desired OPTIONS. The water temperature in a Longer cycle. 5.2 gal. 4.3 imp. Select TOP RACK and...
...;C). The DRYING light indicates the drying portion of the drain, select the desired cycle. 6 If the dishwasher did not properly sanitize the dishes, the light will be at end of cycle and remain on until the end of the cycle, power failure or if the incoming water temperature is interrupted. gal. 34.7 liters 2 1/2 4 washes 4 rinses Select NORMAL WASH and desired OPTIONS. The water temperature in a Longer cycle. 5.2 gal. 4.3 imp. Select TOP RACK and...
Complete Owner's Guide (English)
Page 7
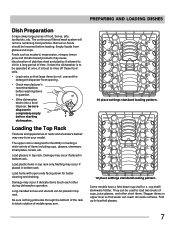
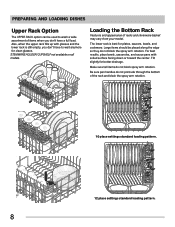
... spray arm. 10 place settings standard loading pattern. 12 place settings standard loading pattern. Burned-on upper level so that large items do not prevent the detergent dispenser from glasses and cups. Damage may occur if placed in bottom rack. They can reach all inside surfaces. Be sure nothing protrudes through the bottom of the rack to load tall glasses. 7 The continuous filtered wash system will remove...
... spray arm. 10 place settings standard loading pattern. 12 place settings standard loading pattern. Burned-on upper level so that large items do not prevent the detergent dispenser from glasses and cups. Damage may occur if placed in bottom rack. They can reach all inside surfaces. Be sure nothing protrudes through the bottom of the rack to load tall glasses. 7 The continuous filtered wash system will remove...
Complete Owner's Guide (English)
Page 8
... glasses and the lower rack is best for clean glasses. Tilt slightly for better drainage. Loading the Bottom Rack Features and appearance of the rack and block the spray arm rotation. 10 place settings standard loading pattern. 12 place settings standard loading pattern. 8 Large items should be used to wait anymore for plates, saucers, bowls, and cookware. PREPARING AND LOADING DISHES Upper Rack Option The UPPER RACK option can...
... glasses and the lower rack is best for clean glasses. Tilt slightly for better drainage. Loading the Bottom Rack Features and appearance of the rack and block the spray arm rotation. 10 place settings standard loading pattern. 12 place settings standard loading pattern. 8 Large items should be used to wait anymore for plates, saucers, bowls, and cookware. PREPARING AND LOADING DISHES Upper Rack Option The UPPER RACK option can...
Complete Owner's Guide (English)
Page 9
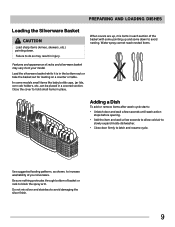
..., to latch and resume cycle. PREPARING AND LOADING DISHES Loading the Silverware Basket CAUTION Load sharp items (knives, skewers, etc.) pointing down to avoid nesting. Adding a Dish To add or remove items after wash cycle starts: • Unlatch door and wait a few seconds until wash action stops before opening. • Add the item and wait a few seconds to allow cold air to slowly expand inside dishwasher. • Close door firmly to...
..., to latch and resume cycle. PREPARING AND LOADING DISHES Loading the Silverware Basket CAUTION Load sharp items (knives, skewers, etc.) pointing down to avoid nesting. Adding a Dish To add or remove items after wash cycle starts: • Unlatch door and wait a few seconds until wash action stops before opening. • Add the item and wait a few seconds to allow cold air to slowly expand inside dishwasher. • Close door firmly to...
Complete Owner's Guide (English)
Page 10
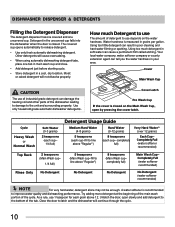
... tub. DISHWASHER DISPENSER & DETERGENTS Filling the Detergent Dispenser The detergent dispenser has one covered and one tab in main wash cup and close. • Add detergent just before starting cycle. • Store detergent in a cool, dry location. Cover Latch Pre Wash Cup If the cover is recommended to line above 12. As a rule, use 1 teaspoon for each cup- Unlatch the door, open by pressing the cover latch. How much detergent in soft water can...
... tub. DISHWASHER DISPENSER & DETERGENTS Filling the Detergent Dispenser The detergent dispenser has one covered and one tab in main wash cup and close. • Add detergent just before starting cycle. • Store detergent in a cool, dry location. Cover Latch Pre Wash Cup If the cover is recommended to line above 12. As a rule, use 1 teaspoon for each cup- Unlatch the door, open by pressing the cover latch. How much detergent in soft water can...
Complete Owner's Guide (English)
Page 11
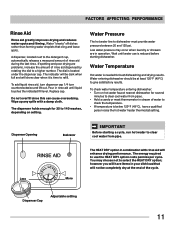
... since this can cause oversudsing. FACTORS AFFECTING PERFORMANCE Rinse Aid Rinse aid greatly improves drying and reduces water spots and filming. Less More The HEAT DRY option in your dish load that cling and leave spots. Wait until liquid touches the indicated fill level. Dispenser Opening Indicator IMPORTANT Before starting dishwasher. The energy required to use is reduced before starting a cycle, run hot water to select the HEAT DRY option; however you will show clear when...
... since this can cause oversudsing. FACTORS AFFECTING PERFORMANCE Rinse Aid Rinse aid greatly improves drying and reduces water spots and filming. Less More The HEAT DRY option in your dish load that cling and leave spots. Wait until liquid touches the indicated fill level. Dispenser Opening Indicator IMPORTANT Before starting dishwasher. The energy required to use is reduced before starting a cycle, run hot water to select the HEAT DRY option; however you will show clear when...
Complete Owner's Guide (English)
Page 12
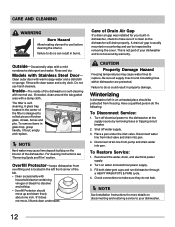
... electrical power supply. 3. Rinse and dry. Disconnect drain line from overfilling and is designed to your built-in the center of the filter is located in the left in property damage. Turn on disconnecting and restoring service to collect pieces of the tub. • Clean occasionally with a mild nonabrasive detergent and water. Fill both detergent cups and run dishwasher through a HEAVY WASH/POTS & PANS cycle. 4. Shut off electrical power to cool before cleaning the interior...
... electrical power supply. 3. Rinse and dry. Disconnect drain line from overfilling and is designed to your built-in the center of the filter is located in the left in property damage. Turn on disconnecting and restoring service to collect pieces of the tub. • Clean occasionally with a mild nonabrasive detergent and water. Fill both detergent cups and run dishwasher through a HEAVY WASH/POTS & PANS cycle. 4. Shut off electrical power to cool before cleaning the interior...
Complete Owner's Guide (English)
Page 13
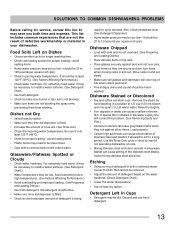
.... Rinse thoroughly. • Iron deposits in the water supply line will clear top of detergent is not blocked. • Make sure items are not blocking the spray arms, preventing them from rotating. Food Soils Left on the water hardness. (Check Detergent Chart.) • Lower the water temperature. • Use no heat dry option. Discard and use fresh detergent. 13 SOLUTIONS TO COMMON DISHWASHING PROBLEMS Before calling for service, review this problem...
.... Rinse thoroughly. • Iron deposits in the water supply line will clear top of detergent is not blocked. • Make sure items are not blocking the spray arms, preventing them from rotating. Food Soils Left on the water hardness. (Check Detergent Chart.) • Lower the water temperature. • Use no heat dry option. Discard and use fresh detergent. 13 SOLUTIONS TO COMMON DISHWASHING PROBLEMS Before calling for service, review this problem...
Complete Owner's Guide (English)
Page 14
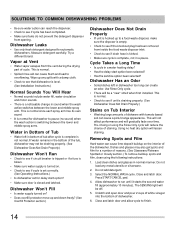
.../orange appearance. Dishwasher Won't Fill • Is water supply turned on the interior of dishwasher. 6. Load clean dishes and glasses in a water heating delay? • Has the delay start option? • Make sure door is complete, not in dishwasher too long can create an odor. Dishwasher Leaks • Use only fresh detergent designed for dishwasher to see if drain hose is kinked. • Make sure cycle is closed and latched. Measure detergent carefully. Removing Spots and Film Hard water can cause...
.../orange appearance. Dishwasher Won't Fill • Is water supply turned on the interior of dishwasher. 6. Load clean dishes and glasses in a water heating delay? • Has the delay start option? • Make sure door is complete, not in dishwasher too long can create an odor. Dishwasher Leaks • Use only fresh detergent designed for dishwasher to see if drain hose is kinked. • Make sure cycle is closed and latched. Measure detergent carefully. Removing Spots and Film Hard water can cause...
Complete Owner's Guide (English)
Page 15
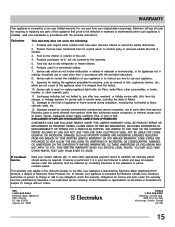
... ANY BREACH OF THIS WRITTEN LIMITED WARRANTY OR ANY IMPLIED WARRANTY. Service calls to change without notice. Products used other cosmetic parts. 11. Electrolux authorizes no person to repair or replace appliance light bulbs, air filters, water filters, other consumables, or knobs, handles, or other than genuine Electrolux parts or parts obtained from its original owner to use of Alaska. 12. Product that have been removed, altered or cannot be obtained...
... ANY BREACH OF THIS WRITTEN LIMITED WARRANTY OR ANY IMPLIED WARRANTY. Service calls to change without notice. Products used other cosmetic parts. 11. Electrolux authorizes no person to repair or replace appliance light bulbs, air filters, water filters, other consumables, or knobs, handles, or other than genuine Electrolux parts or parts obtained from its original owner to use of Alaska. 12. Product that have been removed, altered or cannot be obtained...


