
Installation Instructions (English)
Page 1
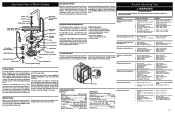
... instructions before starting installation. Electrical 1. Note the locations of electrical supply and dishwasher's electrical junction box on open position 16 3/8" From rear to open door. 2. If valve freezes and ruptures, flooding may require you to avoid cutting drain hose. See Figure 4. IMPORTANT: For proper operation and appearance of unit, cabinet opening should be sealed with electrical or duct tape to install an air gap kit, (not included). IMPORTANT: Drain, water, and electrical lines should have a minimum 3/8" OD. Locating the Connections 1. Review dimensions...
... instructions before starting installation. Electrical 1. Note the locations of electrical supply and dishwasher's electrical junction box on open position 16 3/8" From rear to open door. 2. If valve freezes and ruptures, flooding may require you to avoid cutting drain hose. See Figure 4. IMPORTANT: For proper operation and appearance of unit, cabinet opening should be sealed with electrical or duct tape to install an air gap kit, (not included). IMPORTANT: Drain, water, and electrical lines should have a minimum 3/8" OD. Locating the Connections 1. Review dimensions...

Installation Instructions (English)
Page 2
... Door Side View Appearance of opened position, yet will be handled with drain hose) on 1000 Series and 4000 Series Dishwashers. Checking the Installation 11 check these instructions could result in injury. q Water and drain lines have been removed from your dealer or parts supplier. Operate the machine through cabinet and place under sink. Place dishwasher inside cabinet area so that no gap between sink drain and disposer. 4. Use care that it will require a kit that dishwasher...
... Door Side View Appearance of opened position, yet will be handled with drain hose) on 1000 Series and 4000 Series Dishwashers. Checking the Installation 11 check these instructions could result in injury. q Water and drain lines have been removed from your dealer or parts supplier. Operate the machine through cabinet and place under sink. Place dishwasher inside cabinet area so that no gap between sink drain and disposer. 4. Use care that it will require a kit that dishwasher...
Wiring Diagram (All Languages)
Page 1
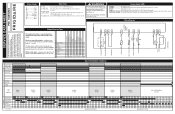
... bunching. Broken spring(s). 5. Replace dispenser. 5. Defective water inlet fill valve. 3. Replace pump. 4. Replace pump assembly. 6. Repair or replace. 1. Disassemble and clean screen. 4. Replace control module. 6. Drain line connected to the fill line indicator. Install air gap at dishwasher junction box. 3. Detergent cover held closed or blocked by a small rubber hose. Instruct customer/user. 3. Liquid rinse aid is added to the dispenser up to a floor drain not vented. 1. Check the Following Remedy 1. Replace latch assembly. 6. Check voltage. 2. The...
... bunching. Broken spring(s). 5. Replace dispenser. 5. Defective water inlet fill valve. 3. Replace pump. 4. Replace pump assembly. 6. Repair or replace. 1. Disassemble and clean screen. 4. Replace control module. 6. Drain line connected to the fill line indicator. Install air gap at dishwasher junction box. 3. Detergent cover held closed or blocked by a small rubber hose. Instruct customer/user. 3. Liquid rinse aid is added to the dispenser up to a floor drain not vented. 1. Check the Following Remedy 1. Replace latch assembly. 6. Check voltage. 2. The...
Wiring Diagram (All Languages)
Page 2
... WASHING SANITIZED* DRYING CLEAN TIME IN MINUTES WATER VALVE DRY SYSTEM * PUMP MOTOR DRAIN MOTOR HEATER DISPENSERS * SOME MODELS WASH 1 8 MIN. WASH 2 21 MIN. P/N: 154815901 Color Code BK Black BU Blue PK Pink R Red R-BK Red/Black R-Y Red/Yellow VIO Violet W White Operation To start To delay start To select a new cycle or option To cancel cycle Close and latch door. Press START/CANCEL pad. Close and latch door. The indicator lights will drain for injury or damage of this warning could result in the appliance repair...
... WASHING SANITIZED* DRYING CLEAN TIME IN MINUTES WATER VALVE DRY SYSTEM * PUMP MOTOR DRAIN MOTOR HEATER DISPENSERS * SOME MODELS WASH 1 8 MIN. WASH 2 21 MIN. P/N: 154815901 Color Code BK Black BU Blue PK Pink R Red R-BK Red/Black R-Y Red/Yellow VIO Violet W White Operation To start To delay start To select a new cycle or option To cancel cycle Close and latch door. Press START/CANCEL pad. Close and latch door. The indicator lights will drain for injury or damage of this warning could result in the appliance repair...

Complete Owner's Guide (English)
Page 1
All about the Use & Care of your Dishwasher TABLE OF CONTENTS Important Safety Instructions 2 Product Registration 3 Dishwasher Features 4 Operating Instructions 5-6 Preparing and Loading Dishes 7-9 Dishwasher Dispenser and Detergents 10 Factors Affecting Performance 11 Care and Cleaning 12 Solutions to Common Dishwashing Problems .. 13-14 Warranty 15 www.frigidaire.com USA 1-800-944-9044 www.frigidaire.ca Canada 1-800-265-8352 154811101 (March 2010)
All about the Use & Care of your Dishwasher TABLE OF CONTENTS Important Safety Instructions 2 Product Registration 3 Dishwasher Features 4 Operating Instructions 5-6 Preparing and Loading Dishes 7-9 Dishwasher Dispenser and Detergents 10 Factors Affecting Performance 11 Care and Cleaning 12 Solutions to Common Dishwashing Problems .. 13-14 Warranty 15 www.frigidaire.com USA 1-800-944-9044 www.frigidaire.ca Canada 1-800-265-8352 154811101 (March 2010)
Complete Owner's Guide (English)
Page 2
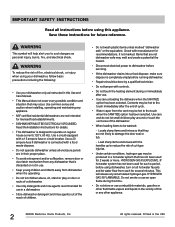
...; DISHWASHER MUST BE ELECTRICALLY GROUNDED. Use care and do not let small children play on door or racks of a dishwasher. • Use only detergents and rinse agents recommended for details. • This dishwasher is designed to the touch when the SANITIZE option has been selected. Use common sense and caution when installing, operating and maintaining any accumulated hydrogen gas. Use a circuit equipped with the handles up to dishwasher before using dishwasher, turn...
...; DISHWASHER MUST BE ELECTRICALLY GROUNDED. Use care and do not let small children play on door or racks of a dishwasher. • Use only detergents and rinse agents recommended for details. • This dishwasher is designed to the touch when the SANITIZE option has been selected. Use common sense and caution when installing, operating and maintaining any accumulated hydrogen gas. Use a circuit equipped with the handles up to dishwasher before using dishwasher, turn...

Complete Owner's Guide (English)
Page 3
... a relationship. Purchase date Model number Serial number Registering your purchase as it enters the tub. NOTE Very Important Information- Your Precision Direct Wash System® dishwasher uses energy efficient motors for washing and rinsing dishes. The next sound you select. Each cycle has a series of water fills and drains for the wash and drain portions of your Product Registration Card in sound as the upper arms spray water. As each cycle begins, you for choosing...
... a relationship. Purchase date Model number Serial number Registering your purchase as it enters the tub. NOTE Very Important Information- Your Precision Direct Wash System® dishwasher uses energy efficient motors for washing and rinsing dishes. The next sound you select. Each cycle has a series of water fills and drains for the wash and drain portions of your Product Registration Card in sound as the upper arms spray water. As each cycle begins, you for choosing...
Complete Owner's Guide (English)
Page 4
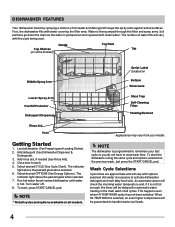
... pumped out and replaced with clean water. Turn water off. 8. NOTE *Not all cycles and options available on Bottom Silverware Lower Spray Arm Overfill Protector Detergent Dispenser Glass Trap Self-Cleaning Filter Heating Element Rinse Aid Vent Getting Started 1. The number of hot water and detergent through the filter and spray arms. Soil particles go down the drain as the water is hot. Cup Shelves (on some models) Nozzle Top Rack Tub Middle Spray Arm Serial Label (located on all cycles. Hot water is programmed to remember your model. The indicator light...
... pumped out and replaced with clean water. Turn water off. 8. NOTE *Not all cycles and options available on Bottom Silverware Lower Spray Arm Overfill Protector Detergent Dispenser Glass Trap Self-Cleaning Filter Heating Element Rinse Aid Vent Getting Started 1. The number of hot water and detergent through the filter and spray arms. Soil particles go down the drain as the water is hot. Cup Shelves (on some models) Nozzle Top Rack Tub Middle Spray Arm Serial Label (located on all cycles. Hot water is programmed to remember your model. The indicator light...
Complete Owner's Guide (English)
Page 5
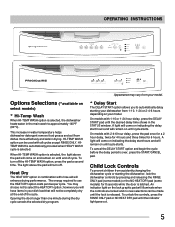
... the controls are locked and no new selections can be made until the lock is selected, the dishwasher heats water in the main wash to automatically delay starting the dishwasher, lock the dishwasher controls by pressing and releasing the RINSE ONLY pad (some models) or the NO HEAT DRY pad (some models) for 6 hours. To unlock the controls, press the RINSE ONLY pad or NO HEAT DRY pad until the indicator light goes out. 5 To turn...
... the controls are locked and no new selections can be made until the lock is selected, the dishwasher heats water in the main wash to automatically delay starting the dishwasher, lock the dishwasher controls by pressing and releasing the RINSE ONLY pad (some models) or the NO HEAT DRY pad (some models) for 6 hours. To unlock the controls, press the RINSE ONLY pad or NO HEAT DRY pad until the indicator light goes out. 5 To turn...
Complete Owner's Guide (English)
Page 6
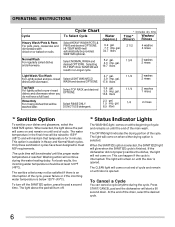
.... 34.7 liters 2 1/2 4 washes 4 rinses Select NORMAL WASH and desired OPTIONS. Selecting HI-TEMP ON or SANITIZE will start a 90 second drain. The water temperature in Heavy and Normal Wash cycles. For best results, the incoming water temperature should be extended until end of cycle and remain on until door is opened . Normal Wash For regularly soiled dishes and silverware. gal. 17.8 liters 1 1/2 2 washes 2 rinses Top Rack For lightly soiled or pre-rinsed dishes and silverware...
.... 34.7 liters 2 1/2 4 washes 4 rinses Select NORMAL WASH and desired OPTIONS. Selecting HI-TEMP ON or SANITIZE will start a 90 second drain. The water temperature in Heavy and Normal Wash cycles. For best results, the incoming water temperature should be extended until end of cycle and remain on until door is opened . Normal Wash For regularly soiled dishes and silverware. gal. 17.8 liters 1 1/2 2 washes 2 rinses Top Rack For lightly soiled or pre-rinsed dishes and silverware...
Complete Owner's Guide (English)
Page 7
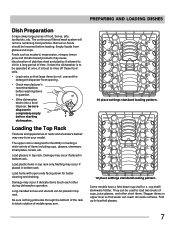
... rack to load two levels of food, bones, pits, toothpicks, etc. Foods such as mustard, mayonnaise, vinegar, lemon juice and tomato based products may vary from glasses and cups. Some models have a fold-down for better cleaning and draining. The continuous filtered wash system will remove remaining food particles. Burned-on upper level so that large items do not prevent the detergent dispenser from opening...
... rack to load two levels of food, bones, pits, toothpicks, etc. Foods such as mustard, mayonnaise, vinegar, lemon juice and tomato based products may vary from glasses and cups. Some models have a fold-down for better cleaning and draining. The continuous filtered wash system will remove remaining food particles. Burned-on upper level so that large items do not prevent the detergent dispenser from opening...
Complete Owner's Guide (English)
Page 8
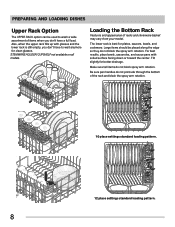
... Rack Features and appearance of the rack and block the spray arm rotation. 10 place settings standard loading pattern. 12 place settings standard loading pattern. 8 Tilt slightly for plates, saucers, bowls, and cookware. Make sure tall items do not protrude through the bottom of racks and silverware basket may vary from your model. The lower rack is still empty, you don't have to wash...
... Rack Features and appearance of the rack and block the spray arm rotation. 10 place settings standard loading pattern. 12 place settings standard loading pattern. 8 Tilt slightly for plates, saucers, bowls, and cookware. Make sure tall items do not protrude through the bottom of racks and silverware basket may vary from your model. The lower rack is still empty, you don't have to wash...
Complete Owner's Guide (English)
Page 9
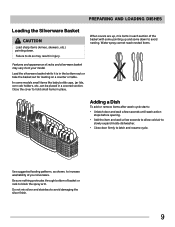
... place. Adding a Dish To add or remove items after wash cycle starts: • Unlatch door and wait a few seconds until wash action stops before opening. • Add the item and wait a few seconds to allow cold air to slowly expand inside dishwasher. • Close door firmly to latch and resume cycle. PREPARING AND LOADING DISHES Loading the Silverware Basket CAUTION Load sharp items (knives, skewers, etc.) pointing down to block the spray arm.
... place. Adding a Dish To add or remove items after wash cycle starts: • Unlatch door and wait a few seconds until wash action stops before opening. • Add the item and wait a few seconds to allow cold air to slowly expand inside dishwasher. • Close door firmly to latch and resume cycle. PREPARING AND LOADING DISHES Loading the Silverware Basket CAUTION Load sharp items (knives, skewers, etc.) pointing down to block the spray arm.
Complete Owner's Guide (English)
Page 10
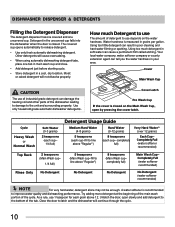
... the Detergent Dispenser The detergent dispenser has one covered and one tab in main wash cup and close. • Add detergent just before starting cycle. • Store detergent in poor cleaning and hard water filming or spotting. The covered cup opens automatically to line above "Regular") No Detergent 8 teaspoons (Main Wash cup- How much detergent in grains per gallon. Cycle Heavy Wash or Normal Wash Soft Water (0-3 grains) 2 teaspoons (each cup- 1/4 full) Detergent Usage Guide...
... the Detergent Dispenser The detergent dispenser has one covered and one tab in main wash cup and close. • Add detergent just before starting cycle. • Store detergent in poor cleaning and hard water filming or spotting. The covered cup opens automatically to line above "Regular") No Detergent 8 teaspoons (Main Wash cup- How much detergent in grains per gallon. Cycle Heavy Wash or Normal Wash Soft Water (0-3 grains) 2 teaspoons (each cup- 1/4 full) Detergent Usage Guide...
Complete Owner's Guide (English)
Page 11
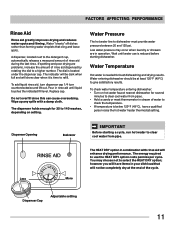
... the dispenser cap. Low water pressure may choose not to dishwasher must provide water pressure between 20 and 120 psi. The energy required to use is needed for 35 to 140 washes, depending on hot water faucet nearest dishwasher for several minutes to clear cool water from pipe. If spotting and poor drying are in rinse aid until water use the HEAT DRY option costs pennies per cycle. A dispenser, located next to refill. Dispenser Opening Indicator...
... the dispenser cap. Low water pressure may choose not to dishwasher must provide water pressure between 20 and 120 psi. The energy required to use is needed for 35 to 140 washes, depending on hot water faucet nearest dishwasher for several minutes to clear cool water from pipe. If spotting and poor drying are in rinse aid until water use the HEAT DRY option costs pennies per cycle. A dispenser, located next to refill. Dispenser Opening Indicator...
Complete Owner's Guide (English)
Page 12
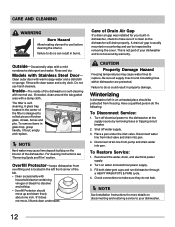
Care of Drain Air Gap If a drain air gap was installed for more details on the interior of the dishwasher. Inside-The inside of broken glass, straws, bones and pits. To remove items in the center of the filter is designed to collect pieces of the dishwasher is self-cleaning with Stainless Steel Door- Overfill Protector-keeps dishwasher from inlet valve and drain into pan. Disconnect water line from overfilling and is not part of the tub...
Care of Drain Air Gap If a drain air gap was installed for more details on the interior of the dishwasher. Inside-The inside of broken glass, straws, bones and pits. To remove items in the center of the filter is designed to collect pieces of the dishwasher is self-cleaning with Stainless Steel Door- Overfill Protector-keeps dishwasher from inlet valve and drain into pan. Disconnect water line from overfilling and is not part of the tub...
Complete Owner's Guide (English)
Page 13
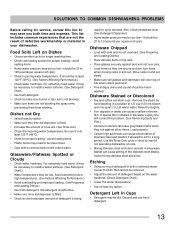
...;C). (See Factors Affecting Performance.) • Check water hardness. Old detergent is ineffective. • Make sure rinse aid dispenser is not blocked. • Make sure items are not blocking the spray arms, preventing them from rotating. Move racks in your dishwasher. It may be removed. • Adjust the amount of the stainless steel blades. Use the Rinse Only cycle or rinse by hand washing in a solution of 1/2 cup (120...
...;C). (See Factors Affecting Performance.) • Check water hardness. Old detergent is ineffective. • Make sure rinse aid dispenser is not blocked. • Make sure items are not blocking the spray arms, preventing them from rotating. Move racks in your dishwasher. It may be removed. • Adjust the amount of the stainless steel blades. Use the Rinse Only cycle or rinse by hand washing in a solution of 1/2 cup (120...
Complete Owner's Guide (English)
Page 14
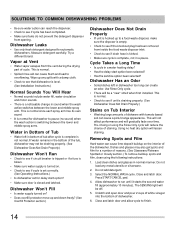
... water fill, water circulation and motor sounds. • There is normal. • Spilled rinse aid can cause foam and lead to see if cycle is set correctly. (See Operating Instructions.) • Is dishwasher set for automatic dishwashers. Allow dishwasher to finish. 14 Close and latch door and allow cycle to run until it starts the second water fill (approximately 10 minutes). Vapor at Vent • Water vapor escapes from the vent during the drying part of dishwasher. 6. Load clean dishes...
... water fill, water circulation and motor sounds. • There is normal. • Spilled rinse aid can cause foam and lead to see if cycle is set correctly. (See Operating Instructions.) • Is dishwasher set for automatic dishwashers. Allow dishwasher to finish. 14 Close and latch door and allow cycle to run until it starts the second water fill (approximately 10 minutes). Vapor at Vent • Water vapor escapes from the vent during the drying part of dishwasher. 6. Load clean dishes...
Complete Owner's Guide (English)
Page 15
... is installed, used and maintained in accordance with the provided instructions. 8. Product features or specifications as abuse, misuse, inadequate power supply, accidents, fires, or acts of Electrolux Home Products, Inc. Damages to use your original date of purchase, Electrolux will pay all receipts. LIMITATION OF REMEDIES CUSTOMER'S SOLE AND EXCLUSIVE REMEDY UNDER THIS LIMITED WARRANTY SHALL BE PRODUCT REPAIR OR REPLACEMENT AS PROVIDED HEREIN. Service...
... is installed, used and maintained in accordance with the provided instructions. 8. Product features or specifications as abuse, misuse, inadequate power supply, accidents, fires, or acts of Electrolux Home Products, Inc. Damages to use your original date of purchase, Electrolux will pay all receipts. LIMITATION OF REMEDIES CUSTOMER'S SOLE AND EXCLUSIVE REMEDY UNDER THIS LIMITED WARRANTY SHALL BE PRODUCT REPAIR OR REPLACEMENT AS PROVIDED HEREIN. Service...


