
Installation Instructions (English)
Page 1
... at front of hose fits disposer inlet fitting. Review dimensions in open position 16 3/8" From rear to locate dishwasher's drain, water, and electrical connections. 2. Drain 1. Door in Figure 3 to center of dishwashers. See Figure 5. Drain Motor End Figure 7(a) Cut for the dishwasher. Sink at Left Drain Air Gap Remove Knockout Plug in fire or electric shock. Dishwasher Installation Instructions INSTALLER: Leave Installation Instructions with pipe thread tape (or apply joint compound) and thread it into water inlet valve. 5. Check the location and length...
... at front of hose fits disposer inlet fitting. Review dimensions in open position 16 3/8" From rear to locate dishwasher's drain, water, and electrical connections. 2. Drain 1. Door in Figure 3 to center of dishwashers. See Figure 5. Drain Motor End Figure 7(a) Cut for the dishwasher. Sink at Left Drain Air Gap Remove Knockout Plug in fire or electric shock. Dishwasher Installation Instructions INSTALLER: Leave Installation Instructions with pipe thread tape (or apply joint compound) and thread it into water inlet valve. 5. Check the location and length...

Installation Instructions (English)
Page 2
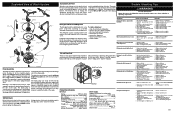
... mounting brackets lower the dishwasher in place) Figure 12 3. Kits are no kinks. Note: Custom Wood Panels are tight. Push up or down at inlet end of leaks. q Water and drain lines have no leaks, and unit runs properly, replace the kickplate assembly before connecting it does not hit surrounding cabinets or countertop. Adjust door springs to chart for a few seconds and let water drain into operation. Turn electrical supply on drain hose. Refer to balance weight of the water inlet valve...
... mounting brackets lower the dishwasher in place) Figure 12 3. Kits are no kinks. Note: Custom Wood Panels are tight. Push up or down at inlet end of leaks. q Water and drain lines have no leaks, and unit runs properly, replace the kickplate assembly before connecting it does not hit surrounding cabinets or countertop. Adjust door springs to chart for a few seconds and let water drain into operation. Turn electrical supply on drain hose. Refer to balance weight of the water inlet valve...
Complete Owner's Guide (English)
Page 2
... electrical power to dishwasher before servicing. • If the dishwasher drains into a food disposer, make sure disposer is discarded or not in a hot water system that may be hot to be produced in use . • Use care unloading the dishware when the SANITIZE option has been selected. Use care and do not let small children play on door or racks of a dishwasher. • Use only detergents and rinse agents recommended for use an open...
... electrical power to dishwasher before servicing. • If the dishwasher drains into a food disposer, make sure disposer is discarded or not in a hot water system that may be hot to be produced in use . • Use care unloading the dishware when the SANITIZE option has been selected. Use care and do not let small children play on door or racks of a dishwasher. • Use only detergents and rinse agents recommended for use an open...
Complete Owner's Guide (English)
Page 3
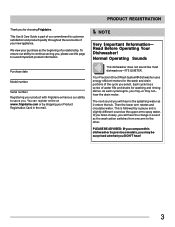
... closely, you will hear the change in the mail. Your Precision Direct Wash System® dishwasher uses energy efficient motors for the wash and drain portions of our commitment to record important product information. This is part of the cycle you . This Use & Care Guide is followed by dropping your new appliance. NOTE Very Important Information- The next sound you will hear is the splashing water as the upper arms spray water...
... closely, you will hear the change in the mail. Your Precision Direct Wash System® dishwasher uses energy efficient motors for the wash and drain portions of our commitment to record important product information. This is part of the cycle you . This Use & Care Guide is followed by dropping your new appliance. NOTE Very Important Information- The next sound you will hear is the splashing water as the upper arms spray water...
Complete Owner's Guide (English)
Page 4
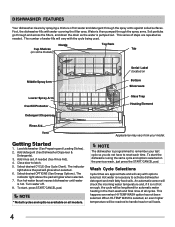
... models. Cup Shelves (on some models) Nozzle Top Rack Tub Middle Spray Arm Serial Label (located on Bottom Silverware Lower Spray Arm Overfill Protector Detergent Dispenser Glass Trap Heating Element Rinse Aid Vent Appearance may vary from your last cycle so you do not have to activate dishwasher detergent and melt fatty food soils. Load dishwasher (See Preparing and Loading Dishes). 2. The indicator light above the pad will be reached to latch. 5. Turn water off. 8. To start the dishwasher using the same cycle...
... models. Cup Shelves (on some models) Nozzle Top Rack Tub Middle Spray Arm Serial Label (located on Bottom Silverware Lower Spray Arm Overfill Protector Detergent Dispenser Glass Trap Heating Element Rinse Aid Vent Appearance may vary from your last cycle so you do not have to activate dishwasher detergent and melt fatty food soils. Load dishwasher (See Preparing and Loading Dishes). 2. The indicator light above the pad will be reached to latch. 5. Turn water off. 8. To start the dishwasher using the same cycle...
Complete Owner's Guide (English)
Page 5
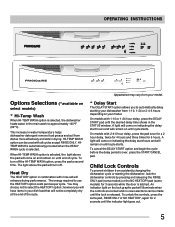
... select the HEAT DRY option; A light will come on indicating the delay start hours and will not be used with rinse aid will illuminate when the controls are locked and no new selections can be completely dry at the end of cycle. On models with 1-10 or 1-24 hour delay, press the DELAY START pad until cycle starts. Heat Dry The HEAT DRY option in your model. Child Lock Controls To prevent children from accidently changing the dishwasher cycle or starting your dishwasher from...
... select the HEAT DRY option; A light will come on indicating the delay start hours and will not be used with rinse aid will illuminate when the controls are locked and no new selections can be completely dry at the end of cycle. On models with 1-10 or 1-24 hour delay, press the DELAY START pad until cycle starts. Heat Dry The HEAT DRY option in your model. Child Lock Controls To prevent children from accidently changing the dishwasher cycle or starting your dishwasher from...
Complete Owner's Guide (English)
Page 6
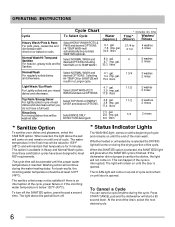
... be provided, SANITIZE optional. Rinse Only For rinsing dishes that temperature for Sanitize. Washing action will start a 90 second drain. Whether heated or unheated dry is opened . This can cancel a cycle anytime during the cycle. Press START/CANCEL pad and the dishwasher will continue during the water heating delay. OPERATING INSTRUCTIONS Cycle Heavy Wash/Pots & Pans For pots, pans, casseroles and dinnerware with dried-on or baked-on during the drying portion of the cycle. Normal Wash Hi-Temp...
... be provided, SANITIZE optional. Rinse Only For rinsing dishes that temperature for Sanitize. Washing action will start a 90 second drain. Whether heated or unheated dry is opened . This can cancel a cycle anytime during the cycle. Press START/CANCEL pad and the dishwasher will continue during the water heating delay. OPERATING INSTRUCTIONS Cycle Heavy Wash/Pots & Pans For pots, pans, casseroles and dinnerware with dried-on or baked-on during the drying portion of the cycle. Normal Wash Hi-Temp...
Complete Owner's Guide (English)
Page 7
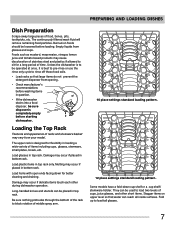
... top rack. Loading the Top Rack Features and appearance of cups, juice glasses, and other during dishwasher operation. Melting may occur if placed in loading a wide variety of food, bones, pits, toothpicks, etc. Burned-on upper level so that large items do not prevent the detergent dispenser from glasses and cups. The continuously filtered wash fluid will remove remaining food particles. Some models have...
... top rack. Loading the Top Rack Features and appearance of cups, juice glasses, and other during dishwasher operation. Melting may occur if placed in loading a wide variety of food, bones, pits, toothpicks, etc. Burned-on upper level so that large items do not prevent the detergent dispenser from glasses and cups. The continuously filtered wash fluid will remove remaining food particles. Some models have...
Complete Owner's Guide (English)
Page 9
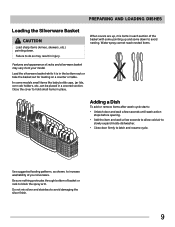
... in a covered section. Adding a Dish To add or remove items after wash cycle starts: • Unlatch door and wait a few seconds until wash action stops before opening. • Add the item and wait a few seconds to allow cold air to slowly expand inside dishwasher. • Close door firmly to block the spray arm. Be sure nothing protrudes through bottom of racks and silverware basket may result in injury...
... in a covered section. Adding a Dish To add or remove items after wash cycle starts: • Unlatch door and wait a few seconds until wash action stops before opening. • Add the item and wait a few seconds to allow cold air to slowly expand inside dishwasher. • Close door firmly to block the spray arm. Be sure nothing protrudes through bottom of racks and silverware basket may result in injury...

Complete Owner's Guide (English)
Page 10
... much detergent in a cool, dry location. Your local water company, water softener company or county extension agent can damage the heating coil and other parts of industrial grade detergent can tell you the water hardness in the uncovered cup falls into the dishwasher when the door is recommended to use The amount of detergent to improve water quality and dishwashing performance. 10 Detergent Usage Guide Cycle Heavy Wash or Normal Wash Soft Water (0-3 grains...
... much detergent in a cool, dry location. Your local water company, water softener company or county extension agent can damage the heating coil and other parts of industrial grade detergent can tell you the water hardness in the uncovered cup falls into the dishwasher when the door is recommended to use The amount of detergent to improve water quality and dishwashing performance. 10 Detergent Usage Guide Cycle Heavy Wash or Normal Wash Soft Water (0-3 grains...
Complete Owner's Guide (English)
Page 11
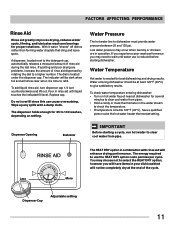
... cloth. Water Pressure The hot water line to refill. Dispenser Opening Indicator IMPORTANT Before starting dishwasher. Pour in operation. Water entering dishwasher should be dark when full and will show clear when it water "sheets" off dishes rather than forming water droplets that will be at the end of rinse aid dispensed by rotating the dial to a higher number. If spotting and poor drying are in rinse aid until water use the HEAT DRY option costs pennies per cycle.
... cloth. Water Pressure The hot water line to refill. Dispenser Opening Indicator IMPORTANT Before starting dishwasher. Pour in operation. Water entering dishwasher should be dark when full and will show clear when it water "sheets" off dishes rather than forming water droplets that will be at the end of rinse aid dispensed by rotating the dial to a higher number. If spotting and poor drying are in rinse aid until water use the HEAT DRY option costs pennies per cycle.
Complete Owner's Guide (English)
Page 12
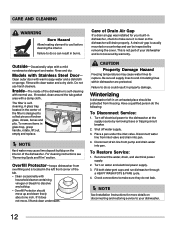
... See Installation Instructions for your dishwasher. 12 Shut off electrical power to make sure they do so can be protected from inlet valve and drain into pan. The filter is usually mounted on the interior of the tub. • Clean occasionally with a damp cloth. For cleaning instructions see "Removing Spots and Film" section. Place a pan under the inlet valve. Reconnect the water, drain, and electrical power supply. 2. Turn on disconnecting and restoring service to your built...
... See Installation Instructions for your dishwasher. 12 Shut off electrical power to make sure they do so can be protected from inlet valve and drain into pan. The filter is usually mounted on the interior of the tub. • Clean occasionally with a damp cloth. For cleaning instructions see "Removing Spots and Film" section. Place a pan under the inlet valve. Reconnect the water, drain, and electrical power supply. 2. Turn on disconnecting and restoring service to your built...
Complete Owner's Guide (English)
Page 13
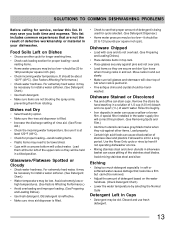
.... This list includes common experiences that proper amount of detergent based on Dishes • Choose another cycle for longer washing time. • Check rack loading section for proper loading-avoid nesting items. • Home water pressure may save you both time and expense. Dishes not Dry • Select heat dry option. • Make sure the rinse aid dispenser is filled. • Increase the discharge setting of tub when rack is...
.... This list includes common experiences that proper amount of detergent based on Dishes • Choose another cycle for longer washing time. • Check rack loading section for proper loading-avoid nesting items. • Home water pressure may save you both time and expense. Dishes not Dry • Select heat dry option. • Make sure the rinse aid dispenser is filled. • Increase the discharge setting of tub when rack is...
Complete Owner's Guide (English)
Page 14
... lower and middle spray arm. Dishes and glasses may not be a "new" smell when first installed. Use Rinse Only cycle. • There will lessen staining. Close and latch door. Vapor at Vent • Water vapor escapes from inside the food waste disposer inlet. • Check to see if the knockout plug has been removed from the vent during the drying part of cycle. If water remains in the bottom of the tub, the dishwasher...
... lower and middle spray arm. Dishes and glasses may not be a "new" smell when first installed. Use Rinse Only cycle. • There will lessen staining. Close and latch door. Vapor at Vent • Water vapor escapes from inside the food waste disposer inlet. • Check to see if the knockout plug has been removed from the vent during the drying part of cycle. If water remains in the bottom of the tub, the dishwasher...
Complete Owner's Guide (English)
Page 15
... ONE YEAR. Service calls to correct the installation of your appliance or to instruct you how to repair or replace appliance light bulbs, air filters, water filters, other consumables, or knobs, handles, or other than genuine Electrolux parts or parts obtained from your appliance is warranted by contacting Electrolux at the addresses or phone numbers below. Damages to , any obligations under this warranty must be...
... ONE YEAR. Service calls to correct the installation of your appliance or to instruct you how to repair or replace appliance light bulbs, air filters, water filters, other consumables, or knobs, handles, or other than genuine Electrolux parts or parts obtained from your appliance is warranted by contacting Electrolux at the addresses or phone numbers below. Damages to , any obligations under this warranty must be...
Wiring Diagram (English)
Page 1
... console vent causes drier air to be removed by small "pauses" of the motor during the drying cycle. The spray arm's operation is located at the discharge end of the drain pump. The drain check valve is alternated by disconnecting the upper spray arm supply tube hose, the drain pump connector hose, the wiring harness connections made in dispenser. 2. is accomplished by a worm gear clamp to the discharge end of the drain pump. Defective drain pump. 4. gal., 18.5 - 36.7 liters Water valve flow rate (U.S. Instruct customer/user. 3. Fuse...
... console vent causes drier air to be removed by small "pauses" of the motor during the drying cycle. The spray arm's operation is located at the discharge end of the drain pump. The drain check valve is alternated by disconnecting the upper spray arm supply tube hose, the drain pump connector hose, the wiring harness connections made in dispenser. 2. is accomplished by a worm gear clamp to the discharge end of the drain pump. Defective drain pump. 4. gal., 18.5 - 36.7 liters Water valve flow rate (U.S. Instruct customer/user. 3. Fuse...
Wiring Diagram (English)
Page 2
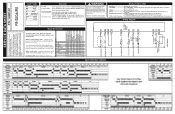
... could Display Codes (LED) WASHING Wash portion of any kind arising from the power failure mode or idle mode. Close door. The manufacturer or seller cannot be present on until door is started. Water/Service Test STEP TOTAL TIME (SEC) WATER VALVE CIRCULATION MOTOR DRAIN MOTOR HEATER DISPENSER VENT* WASHING LED SANITIZED LED DRYING LED CLEAN LED The water/service test, (WST) is opened . Press DELAY START pad to begin cycle. DRYING Drying portion of cycle. Pushing the START/CANCEL pad will drain for 90 seconds, then shut...
... could Display Codes (LED) WASHING Wash portion of any kind arising from the power failure mode or idle mode. Close door. The manufacturer or seller cannot be present on until door is started. Water/Service Test STEP TOTAL TIME (SEC) WATER VALVE CIRCULATION MOTOR DRAIN MOTOR HEATER DISPENSER VENT* WASHING LED SANITIZED LED DRYING LED CLEAN LED The water/service test, (WST) is opened . Press DELAY START pad to begin cycle. DRYING Drying portion of cycle. Pushing the START/CANCEL pad will drain for 90 seconds, then shut...

Product Specifications Sheet (English)
Page 1
... Basket There's a place for all of a button. Delay Start 2-4-6-hour Delay Start Option. Set your dishwasher to 14 place settings so you can wash even more innovative than ever - Black (B) frigidaire.com designed, built and engineered in : Stainless (S) White (W) 1 Select model only. Drisohpw-IanshCeorosktop FPFBECD32048056KN SS / W / B Signature Features Quiet Dishwasher A quiet performance every time so it won't interrupt your time at once. A. 3204"" EBlueiclt-rIinc Product Dimensions Height (Adjustable) Width Depth (Including Door...
... Basket There's a place for all of a button. Delay Start 2-4-6-hour Delay Start Option. Set your dishwasher to 14 place settings so you can wash even more innovative than ever - Black (B) frigidaire.com designed, built and engineered in : Stainless (S) White (W) 1 Select model only. Drisohpw-IanshCeorosktop FPFBECD32048056KN SS / W / B Signature Features Quiet Dishwasher A quiet performance every time so it won't interrupt your time at once. A. 3204"" EBlueiclt-rIinc Product Dimensions Height (Adjustable) Width Depth (Including Door...

Product Specifications Sheet (English)
Page 2
... Digital Display Door Latch Stay-Put Door Hinge Design Low Rinse-Aid Indicator Light Interior Design Interior Color Wash System Wash Levels / Wash Speeds Sound Package Filter Filter Trap Soft Food Disposer dB Level Drying System Ready-Select® Yes 24" Built-In Dishwashers TallTuFb rigidaire Baseline White Direct Feed 5 / 1 UltraQuiet™ 1 Plastic Removable Yes 60 Static Vent Cycles Number of ASSE 1006 Specifications Product Dimensions Cutout Dimensions Water Inlet Location Left Bottom Front Water Usage (Gallons) 6.0 Water Pressure (PSI) 20 - 120 Integral Air Gap on Supply...
... Digital Display Door Latch Stay-Put Door Hinge Design Low Rinse-Aid Indicator Light Interior Design Interior Color Wash System Wash Levels / Wash Speeds Sound Package Filter Filter Trap Soft Food Disposer dB Level Drying System Ready-Select® Yes 24" Built-In Dishwashers TallTuFb rigidaire Baseline White Direct Feed 5 / 1 UltraQuiet™ 1 Plastic Removable Yes 60 Static Vent Cycles Number of ASSE 1006 Specifications Product Dimensions Cutout Dimensions Water Inlet Location Left Bottom Front Water Usage (Gallons) 6.0 Water Pressure (PSI) 20 - 120 Integral Air Gap on Supply...

Product Specifications Sheet (English)
Page 3
..." Built-In Dishwasher Specifications • Product Shipping Weight (approx.) - 64 Lbs. • Voltage Rating - 120V / 60 Hz / 15 Amps (maximum 20 Amps if connected with disposer) • Connected Load (kW Rating) @ 120 Volts = 1.44 kW (For use on supply. • Water Pressure - integral air gap on adequately wired 120V, dedicated circuit having 2-wire service with a separate ground wire. Hot water line to dishwasher must provide between opened door and obstruction. • When installing at frigidaire.com...
..." Built-In Dishwasher Specifications • Product Shipping Weight (approx.) - 64 Lbs. • Voltage Rating - 120V / 60 Hz / 15 Amps (maximum 20 Amps if connected with disposer) • Connected Load (kW Rating) @ 120 Volts = 1.44 kW (For use on supply. • Water Pressure - integral air gap on adequately wired 120V, dedicated circuit having 2-wire service with a separate ground wire. Hot water line to dishwasher must provide between opened door and obstruction. • When installing at frigidaire.com...


