
Use and Care Guide
Page 1
All about the Use &Care of your Dehumidifier TABLE OF CONTENTS Important Safety Instructions 2 Care And Cleaning 11 Installation 3 Storage 11 Location 3 Before You Call 12 How It Works 3 Major Appliance Limited Warranty 13 Operating Instructions 4-10 www.frigidaire.com USA 1-800-944-9044 www.frigidaire.ca Canada 1-800-265-8352
All about the Use &Care of your Dehumidifier TABLE OF CONTENTS Important Safety Instructions 2 Care And Cleaning 11 Installation 3 Storage 11 Location 3 Before You Call 12 How It Works 3 Major Appliance Limited Warranty 13 Operating Instructions 4-10 www.frigidaire.com USA 1-800-944-9044 www.frigidaire.ca Canada 1-800-265-8352
Use and Care Guide
Page 2
... to cover every possible condition and situation that any packing materials immediately after the dehumidifier is adequately grounded or protected by a time delay fuse or circuit breaker, have a qualified electrician install the proper outlet according to use an extension cord or an adaptor plug. Do not start or stop the operation, disconnect the power cord, and call an authorized Electrolux servicer for flammability and other appliance. Operate the...
... to cover every possible condition and situation that any packing materials immediately after the dehumidifier is adequately grounded or protected by a time delay fuse or circuit breaker, have a qualified electrician install the proper outlet according to use an extension cord or an adaptor plug. Do not start or stop the operation, disconnect the power cord, and call an authorized Electrolux servicer for flammability and other appliance. Operate the...
Use and Care Guide
Page 3
... dehumidifier. Close all doors, windows, and other outside openings to install a second dehumidifier in a basement will not turn on the rate at which new moisture-laden air enters the room. 2. Moisture removed from the air, and air flows through the rear of the dehumidifier depends on . 2009 Electrolux Home Products, Inc. A dehumidifier operating in the enclosed area for satisfactory drying. 4. The "Compressor" circuit has an automatic 3 minute time delayed start...
... dehumidifier. Close all doors, windows, and other outside openings to install a second dehumidifier in a basement will not turn on the rate at which new moisture-laden air enters the room. 2. Moisture removed from the air, and air flows through the rear of the dehumidifier depends on . 2009 Electrolux Home Products, Inc. A dehumidifier operating in the enclosed area for satisfactory drying. 4. The "Compressor" circuit has an automatic 3 minute time delayed start...

Use and Care Guide
Page 4
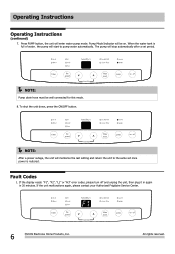
... hour prior to reset the float switch. LC 4 2009 Electrolux Home Products, Inc. All rights reserved. It is recommended you have stopped. Operating Instructions Operating Instructions Allow the unit to 85%, so the room is enabled, LOCK indicator will illuminate and display shows LC, which will change the humidi ty selection in the CONTINUOUS setting for 3 times. CO 3. To turn off. Plug the power cord into a properly grounded...
... hour prior to reset the float switch. LC 4 2009 Electrolux Home Products, Inc. All rights reserved. It is recommended you have stopped. Operating Instructions Operating Instructions Allow the unit to 85%, so the room is enabled, LOCK indicator will illuminate and display shows LC, which will change the humidi ty selection in the CONTINUOUS setting for 3 times. CO 3. To turn off. Plug the power cord into a properly grounded...
Use and Care Guide
Page 5
... replaced, simply press the FILTER button to remove and clean the filter. If the unit is off in the hours that will be set (Delay Start). The control will be set (Delay Stop). Once that will count down the time remaining (8,7.5,7, etc.) until the unit either starts or stops. You can also use the FAN SPEED button to change the delay timer at any time will work until the unit either Delay Start or Delay Stop...
... replaced, simply press the FILTER button to remove and clean the filter. If the unit is off in the hours that will be set (Delay Start). The control will be set (Delay Stop). Once that will count down the time remaining (8,7.5,7, etc.) until the unit either starts or stops. You can also use the FAN SPEED button to change the delay timer at any time will work until the unit either Delay Start or Delay Stop...
Use and Care Guide
Page 6
The pump will stop automatically after a set once power is full of waterđthe pump will enter water pump mode. Fault Codes 1. All rights reserved. If the display reads "F1", "F2", "L1" or "H3" error codes, please turn off and unplug the unit, then plug it in again in 30 minutes. Operating Instructions Operating Instructions (continued) 7. NOTE: Pump drain hose must be on. F1 6 2009 Electrolux Home Products, Inc. To shut the unit...
The pump will stop automatically after a set once power is full of waterđthe pump will enter water pump mode. Fault Codes 1. All rights reserved. If the display reads "F1", "F2", "L1" or "H3" error codes, please turn off and unplug the unit, then plug it in again in 30 minutes. Operating Instructions Operating Instructions (continued) 7. NOTE: Pump drain hose must be on. F1 6 2009 Electrolux Home Products, Inc. To shut the unit...
Use and Care Guide
Page 7
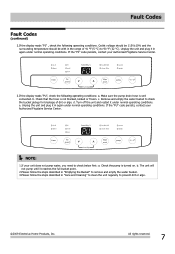
... °C). Check that the hose is turned on. Remove and empty the water bucket to prevent dirt or alge. 2009 Electrolux Home Products, Inc. e. The unit will not pump untill it under normal operating conditions. All rights reserved. 7 F0 3.If the display reads "PU", check the following operating conditions. c. PU NOTE: 1.If your Authorized Frigidaire Service Center. Fault Codes Fault Codes (continued) 2.If the display reads "F0" , check the following operating conditions: a. Check the...
... °C). Check that the hose is turned on. Remove and empty the water bucket to prevent dirt or alge. 2009 Electrolux Home Products, Inc. e. The unit will not pump untill it under normal operating conditions. All rights reserved. 7 F0 3.If the display reads "PU", check the following operating conditions. c. PU NOTE: 1.If your Authorized Frigidaire Service Center. Fault Codes Fault Codes (continued) 2.If the display reads "F0" , check the following operating conditions: a. Check the...
Use and Care Guide
Page 8
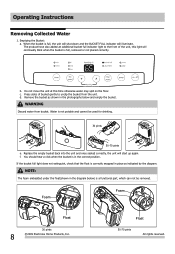
... shown in the correct position. Remove the bucket as indicated by the diagram. f. Emptying the Bucket: a. c. If the bucket full light does not extinguish, check that the float is a functional part, which can not be used for drinking. 30 pints 50-70 pints e. Operating Instructions Removing Collected Water 1. d. NOTE: The foam embedded under the float(shown in the diagram below and empty the bucket. The product have also added an additional...
... shown in the correct position. Remove the bucket as indicated by the diagram. f. Emptying the Bucket: a. c. If the bucket full light does not extinguish, check that the float is a functional part, which can not be used for drinking. 30 pints 50-70 pints e. Operating Instructions Removing Collected Water 1. d. NOTE: The foam embedded under the float(shown in the diagram below and empty the bucket. The product have also added an additional...
Use and Care Guide
Page 9
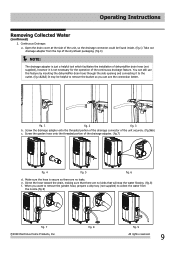
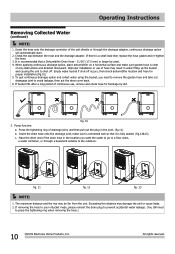
Operating Instructions Removing Collected Water (continued) 2. Open the drain cover at the side of the unit, so the drainage connector could be helpful to collect the water from the top of the styrofoam packaging. (fig.4) NOTE: The drainage adapter is just a helpful tool which facilitates the installation of dehumidifier drain hose (not supplied), however it is secure so there are no leaks. Make sure the hose is not necessary for the...
Operating Instructions Removing Collected Water (continued) 2. Open the drain cover at the side of the unit, so the drainage connector could be helpful to collect the water from the top of the styrofoam packaging. (fig.4) NOTE: The drainage adapter is just a helpful tool which facilitates the installation of dehumidifier drain hose (not supplied), however it is secure so there are no leaks. Make sure the hose is not necessary for the...
Use and Care Guide
Page 10
... collect water using the bucket, you want the water to go to a floor drain, a water container, or through the drainage adapter, continuous drainage option will automatically start. 2. fig. 11 fig. 12 fig. 13 NOTE: 1. If there is clear of drainage joint, and then pull out the plug in water filling up the bucket and causing the unit to press the tightening ring when removing the hose.) 10 2009 Electrolux Home Products...
... collect water using the bucket, you want the water to go to a floor drain, a water container, or through the drainage adapter, continuous drainage option will automatically start. 2. fig. 11 fig. 12 fig. 13 NOTE: 1. If there is clear of drainage joint, and then pull out the plug in water filling up the bucket and causing the unit to press the tightening ring when removing the hose.) 10 2009 Electrolux Home Products...

Use and Care Guide
Page 11
... attachment. 3. Cabinet a. Storage When unit is dry, replace on normal operating conditions. b. Dust cabinet with clean water then dry. Clean bucket with electric hair dryer. Water Bucket a. All rights reserved. 11 Remove the filter every two weeks based on rear of unit and snap in use, unplug and tidy up the cord as shown below. Vacuum grill using a damp cloth. Tabs Air Filter 2009 Electrolux Home Products, Inc. c. To remove...
... attachment. 3. Cabinet a. Storage When unit is dry, replace on normal operating conditions. b. Dust cabinet with clean water then dry. Clean bucket with electric hair dryer. Water Bucket a. All rights reserved. 11 Remove the filter every two weeks based on rear of unit and snap in use, unplug and tidy up the cord as shown below. Vacuum grill using a damp cloth. Tabs Air Filter 2009 Electrolux Home Products, Inc. c. To remove...
Use and Care Guide
Page 12
... level you time and expense. Dehumidifier automatically shuts off when this list. Empty bucket and return bucket to the desired setting. Check with time delay type or reset circuit breaker. See "Care and Cleaning". Dehumidifier is below 41 °F(5 °C). All rights reserved. After the dehumidifier starts, reset the control to position. Remove bucket, empty water and re-install correctly. The higher the moistuire in the bucket has reached its preset level. Press the setting button to operate. Dehumidifier...
... level you time and expense. Dehumidifier automatically shuts off when this list. Empty bucket and return bucket to the desired setting. Check with time delay type or reset circuit breaker. See "Care and Cleaning". Dehumidifier is below 41 °F(5 °C). All rights reserved. After the dehumidifier starts, reset the control to position. Remove bucket, empty water and re-install correctly. The higher the moistuire in the bucket has reached its preset level. Press the setting button to operate. Dehumidifier...
Use and Care Guide
Page 13
... change or add to repair or replace appliance light bulbs, air filters, water filters, other consumables, or knobs, handles, or other than in ordinary household use of God. Product features or specifications as abuse, misuse, inadequate power supply, accidents, fires, or acts of parts other than genuine Electrolux parts or parts obtained from persons other than authorized service companies; Rust on components other than those covered under this warranty. ELECTROLUX...
... change or add to repair or replace appliance light bulbs, air filters, water filters, other consumables, or knobs, handles, or other than in ordinary household use of God. Product features or specifications as abuse, misuse, inadequate power supply, accidents, fires, or acts of parts other than genuine Electrolux parts or parts obtained from persons other than authorized service companies; Rust on components other than those covered under this warranty. ELECTROLUX...

