

Complete Owners Guide
Page 1
use care FOOD WASTE DISPOSER & English 2 p/n 5304525393
use care FOOD WASTE DISPOSER & English 2 p/n 5304525393
Complete Owners Guide
Page 2
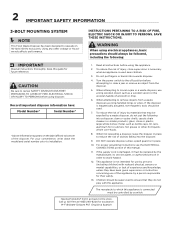
... plastic; Having Problems? When attempting to loosen a jam in order to remove objects from the disposer. 5. When attempting to avoid hazard. 12. When not operating a disposer, leave the stopper in place. 10. 2 IMPORTANT SAFETY INFORMATION 3-BOLT MOUNTING SYSTEM Í NOTE This Food Waste Disposer has been designed to installation. 1. WARNING When using disposer. For your convenience, write down the model and serial number prior to operate...
... plastic; Having Problems? When attempting to loosen a jam in order to remove objects from the disposer. 5. When attempting to avoid hazard. 12. When not operating a disposer, leave the stopper in place. 10. 2 IMPORTANT SAFETY INFORMATION 3-BOLT MOUNTING SYSTEM Í NOTE This Food Waste Disposer has been designed to installation. 1. WARNING When using disposer. For your convenience, write down the model and serial number prior to operate...
Complete Owners Guide
Page 3
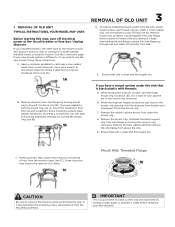
... drain line where it attaches to use the already installed mount, proceed to section 3 on your new disposer. Some mounts will provide additional leverage for turning the mount ring (see 1B). 1B 3 REMOVAL OF OLD UNIT D. While holding the sink flange in place, turn off old putty from under the sink that is a good time to pop off ring (see 1A). 1A B. REMOVAL OF OLD UNIT TYPICAL INSTRUCTIONS, YOUR MODEL...
... drain line where it attaches to use the already installed mount, proceed to section 3 on your new disposer. Some mounts will provide additional leverage for turning the mount ring (see 1B). 1B 3 REMOVAL OF OLD UNIT D. While holding the sink flange in place, turn off old putty from under the sink that is a good time to pop off ring (see 1A). 1A B. REMOVAL OF OLD UNIT TYPICAL INSTRUCTIONS, YOUR MODEL...
Complete Owners Guide
Page 4
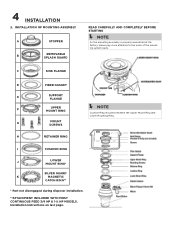
... disengaged during disposer installation. **ATTACHMENT INCLUDED WITH MOST CONTINUOUS FEED 3/4 HP & 1-¼ HP MODELS. 4 INSTALLATION 2. C SINK FLANGE D FIBER GASKET E SUPPORT FLANGE F UPPER MOUNT RING Í NOTE Cushion Ring included between the Upper Mount Ring and Lower Mounting Ring. INSTALLATION OF MOUNTING ASSEMBLY A STOPPER B REMOVABLE SPLASH GUARD READ CAREFULLY AND COMPLETELY BEFORE STARTING Í NOTE As the mounting assembly is properly assembled at the factory, please pay close attention to the order of the mounting system parts. Installation instructions on...
... disengaged during disposer installation. **ATTACHMENT INCLUDED WITH MOST CONTINUOUS FEED 3/4 HP & 1-¼ HP MODELS. 4 INSTALLATION 2. C SINK FLANGE D FIBER GASKET E SUPPORT FLANGE F UPPER MOUNT RING Í NOTE Cushion Ring included between the Upper Mount Ring and Lower Mounting Ring. INSTALLATION OF MOUNTING ASSEMBLY A STOPPER B REMOVABLE SPLASH GUARD READ CAREFULLY AND COMPLETELY BEFORE STARTING Í NOTE As the mounting assembly is properly assembled at the factory, please pay close attention to the order of the mounting system parts. Installation instructions on...
Complete Owners Guide
Page 5
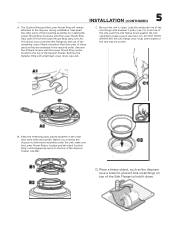
... disposer (use a towel to pull the Sink Flange up and out of the disposer hopper (see C2). C. Place a heavy object, such as they were removed (see C1). The Cushion Ring and the Lower Mount Ring will remain attached to make sure the Lower Mount Ring is in the order they are arranged in the required order. This allows you connect the disposer to the mount assembly...
... disposer (use a towel to pull the Sink Flange up and out of the disposer hopper (see C2). C. Place a heavy object, such as they were removed (see C1). The Cushion Ring and the Lower Mount Ring will remain attached to make sure the Lower Mount Ring is in the order they are arranged in the required order. This allows you connect the disposer to the mount assembly...
Complete Owners Guide
Page 6
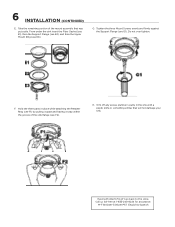
... Retainer Ring (see F1) by pulling it apart and having it snap within the groove of the mount assembly that will not damage your sink. Do not over tighten. H. Don't go back to the store. Call us toll-free at 1-833-240-6224 for assistance. G. M-F 8:00am-5:00pm PST English & Spanish 6 INSTALLATION (CONTINUED) E. Hold the three parts in the sink with...
... Retainer Ring (see F1) by pulling it apart and having it snap within the groove of the mount assembly that will not damage your sink. Do not over tighten. H. Don't go back to the store. Call us toll-free at 1-833-240-6224 for assistance. G. M-F 8:00am-5:00pm PST English & Spanish 6 INSTALLATION (CONTINUED) E. Hold the three parts in the sink with...
Complete Owners Guide
Page 7
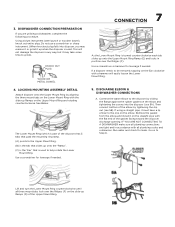
... all plumbing connections are utilizing a dishwasher, complete the following procedure. If a disposer needs to Step 6. Connect the waste elbow to the Upper Mount Ring. (B) is part of the disposer) has 3 tabs that grab the mounting ring ramp. (A) points to the disposer by tightening the slip nut (see 5A). Using a blunt instrument (steel punch or wooden dowel), knock out entire plug. DISCHARGE ELBOW & DISHWASHER CONNECTIONS A. The Lower Mount Ring (which is...
... all plumbing connections are utilizing a dishwasher, complete the following procedure. If a disposer needs to Step 6. Connect the waste elbow to the Upper Mount Ring. (B) is part of the disposer) has 3 tabs that grab the mounting ring ramp. (A) points to the disposer by tightening the slip nut (see 5A). Using a blunt instrument (steel punch or wooden dowel), knock out entire plug. DISCHARGE ELBOW & DISHWASHER CONNECTIONS A. The Lower Mount Ring (which is...
Complete Owners Guide
Page 8
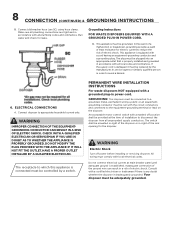
... codes and ordinances. Do not connect electrical current at the time of the sink opening for leaks. An acceptable motor control switch with all local codes and ordinances. Consult with all ungrounded supply conductors. This appliance must be controlled by the manufacturer, its service agent or similarly qualified person in accordance with a marked off power before installing or servicing disposer. The switch...
... codes and ordinances. Do not connect electrical current at the time of the sink opening for leaks. An acceptable motor control switch with all local codes and ordinances. Consult with all ungrounded supply conductors. This appliance must be controlled by the manufacturer, its service agent or similarly qualified person in accordance with a marked off power before installing or servicing disposer. The switch...
Complete Owners Guide
Page 9
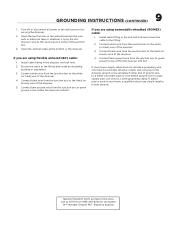
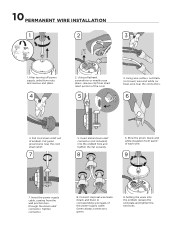
... the old disposer wire to the electrical wire inside of the disposer. 3. 9 GROUNDING INSTRUCTIONS (CONTINUED) 1. Turn off or disconnect all power to the black (or brown) wire of the disposer. 4. Open the end bell plate at 1-833-240-6224 for assistance. Install cable fitting in the end bell hole and secure the cable to the fitting and install an insulating bushing or equivalent. 3. Connect black wire...
... the old disposer wire to the electrical wire inside of the disposer. 3. 9 GROUNDING INSTRUCTIONS (CONTINUED) 1. Turn off or disconnect all power to the black (or brown) wire of the disposer. 4. Open the end bell plate at 1-833-240-6224 for assistance. Install cable fitting in the end bell hole and secure the cable to the fitting and install an insulating bushing or equivalent. 3. Connect black wire...
Complete Owners Guide
Page 10
... last ½" of the cord. 5 3. After turning off power supply, unbolt two nuts and remove end plate. 4 2. Insert metal strain relief connector (not included) into the endbell, replace the end plate and tighten the two bolts. Tighten connector. 8. Cut green ground wire near the connectors. 6 4. Setting the wires into the endbell hole and tighten the nut securely. 8 6. Using a flathead screwdriver or...
... last ½" of the cord. 5 3. After turning off power supply, unbolt two nuts and remove end plate. 4 2. Insert metal strain relief connector (not included) into the endbell, replace the end plate and tighten the two bolts. Tighten connector. 8. Cut green ground wire near the connectors. 6 4. Setting the wires into the endbell hole and tighten the nut securely. 8 6. Using a flathead screwdriver or...
Complete Owners Guide
Page 11
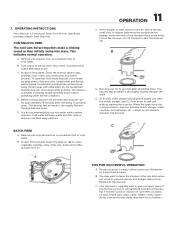
... trouble free service. Scrape in food waste. 7. OPERATING INSTRUCTIONS Your disposer is lined up with the switch plunger (see C). When the large sized slot in stopper base is Continuous Feed if you many years of the two small slots in use hot water while running disposer. You may drain properly. It is operating under normal conditions. Lift stopper to prevent utensils and foreign objects from falling into place. Remove sink stopper...
... trouble free service. Scrape in food waste. 7. OPERATING INSTRUCTIONS Your disposer is lined up with the switch plunger (see C). When the large sized slot in stopper base is Continuous Feed if you many years of the two small slots in use hot water while running disposer. You may drain properly. It is operating under normal conditions. Lift stopper to prevent utensils and foreign objects from falling into place. Remove sink stopper...
Complete Owners Guide
Page 12
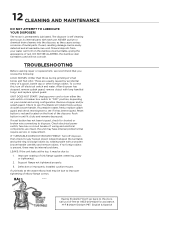
...: Turn off electrical switch and water. Call us toll-free at the waste elbow, leak may have internal problems that you review the following: LOUD NOISES: (Other than those during grinding of elbow flange screws. 8A Having Problems? TROUBLESHOOTING Before seeking repair or replacement, we recommend that require service or replacement. If reset button has not been tripped, check for shorted or broken wire connecting to the store. If wiring and electrical components...
...: Turn off electrical switch and water. Call us toll-free at the waste elbow, leak may have internal problems that you review the following: LOUD NOISES: (Other than those during grinding of elbow flange screws. 8A Having Problems? TROUBLESHOOTING Before seeking repair or replacement, we recommend that require service or replacement. If reset button has not been tripped, check for shorted or broken wire connecting to the store. If wiring and electrical components...
Complete Owners Guide
Page 13
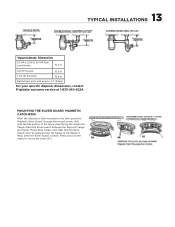
... & 3/4 HP SlimLine Models 10.2 in 3/4 HP Deluxe 10.5 in 1-1/4 HP Premium 10.5 in Batch Feed units add approx. 2.1"/53mm For your specific disposer dimensions, contact Frigidaire customer service at portion of the Support Ring. MOUNTING THE SILVER GUARD® MAGNETIC CATCH RING After the disposer is fitted, firmly press on the snaps to the sink, guide the Magnetic Silver Guard® through the mount screws (6A...
... & 3/4 HP SlimLine Models 10.2 in 3/4 HP Deluxe 10.5 in 1-1/4 HP Premium 10.5 in Batch Feed units add approx. 2.1"/53mm For your specific disposer dimensions, contact Frigidaire customer service at portion of the Support Ring. MOUNTING THE SILVER GUARD® MAGNETIC CATCH RING After the disposer is fitted, firmly press on the snaps to the sink, guide the Magnetic Silver Guard® through the mount screws (6A...
Complete Owners Guide
Page 14
.../or the power cord tag. Additional conditions not covered by the company at 1-833-240-6224 for us toll-free at no charge to the consumer/purchaser. Always reference the model number and serial number when contacting customer service about any disposer that fall into disrepair due to be replaced. Some states do not allow the exclusion or limitation of screwed connections; WARRANTY: Frigidaire disposers are located...
.../or the power cord tag. Additional conditions not covered by the company at 1-833-240-6224 for us toll-free at no charge to the consumer/purchaser. Always reference the model number and serial number when contacting customer service about any disposer that fall into disrepair due to be replaced. Some states do not allow the exclusion or limitation of screwed connections; WARRANTY: Frigidaire disposers are located...
Complete Owners Guide
Page 15
home welcome Our home is your home. Visit us if you need help with any of these things: owner support accessories service 1-833-240-6224
home welcome Our home is your home. Visit us if you need help with any of these things: owner support accessories service 1-833-240-6224