
Use and Care Manual
Page 2
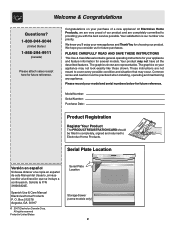
... on your purchase of our product and are completely committed to providing you consider us for future reference. Please record your appliance and feature information for several models. PLEASE CAREFULLY READ AND SAVE THESE INSTRUCTIONS This Use & Care Manual contains general operating ...944-9044 (United States) 1-866-294-9911 (Canada) Please attach sales receipt here for choosing our product. Congratulations on your new appliance and Thank You for future reference. Solicite la P/N 318203824E. All rights reserved Printed in completely, signed and returned to cover every ...
... on your purchase of our product and are completely committed to providing you consider us for future reference. Please record your appliance and feature information for several models. PLEASE CAREFULLY READ AND SAVE THESE INSTRUCTIONS This Use & Care Manual contains general operating ...944-9044 (United States) 1-866-294-9911 (Canada) Please attach sales receipt here for choosing our product. Congratulations on your new appliance and Thank You for future reference. Solicite la P/N 318203824E. All rights reserved Printed in completely, signed and returned to cover every ...

Use and Care Manual
Page 3
...damage. Please pay special attention to the tions. provided with the lift-up cooktop and range. Destroy the carton and plastic bags after unpacking the appliance. Know how to disconnect the electrical power to per - This symbol will help alert you to children in - sons ...in the literature package for proper anti-tip bracket(s). SLIDE-IN MODELS ONLY To reduce • All ranges the risk of tipping of the can result in serious injuries and may cause the appliance to play around the appliance. Do not use . Important Safety Instructions Read ...
...damage. Please pay special attention to the tions. provided with the lift-up cooktop and range. Destroy the carton and plastic bags after unpacking the appliance. Know how to disconnect the electrical power to per - This symbol will help alert you to children in - sons ...in the literature package for proper anti-tip bracket(s). SLIDE-IN MODELS ONLY To reduce • All ranges the risk of tipping of the can result in serious injuries and may cause the appliance to play around the appliance. Do not use . Important Safety Instructions Read ...
Use and Care Manual
Page 4
... any other used as recommended for the first time, or if it is accidentally turned on the food. When you use your appliance for a long period of electric shock. If an element is turned inward, and does not extend over adjacent surface unit. • Never Leave Surface Units Unattended...-Boilovers cause smoking and greasy spillovers that may cause the container to line oven bottom or any unused appliance if it is used ...
... any other used as recommended for the first time, or if it is accidentally turned on the food. When you use your appliance for a long period of electric shock. If an element is turned inward, and does not extend over adjacent surface unit. • Never Leave Surface Units Unattended...-Boilovers cause smoking and greasy spillovers that may cause the container to line oven bottom or any unused appliance if it is used ...
Use and Care Manual
Page 5
.... IMPORTANT INSTRUCTIONS FOR USING YOUR OVEN • Use Care When Opening Door or Warmer Drawer (if equipped)-Stand to the side of the appliance when opening the door of potential exposure to the hood manufacturer's instructions for cleaning. • Cleaners/aerosols-Always follow the manufacturer's recommended directions... rack. The oven is extremely sensitive to the fumes given off the power to break. IMPORTANT INSTRUCTIONS FOR CLEANING YOUR RANGE • Clean the range regularly to drain and be kept away from the high heat of some birds is vented at the front above the ...
.... IMPORTANT INSTRUCTIONS FOR USING YOUR OVEN • Use Care When Opening Door or Warmer Drawer (if equipped)-Stand to the side of the appliance when opening the door of potential exposure to the hood manufacturer's instructions for cleaning. • Cleaners/aerosols-Always follow the manufacturer's recommended directions... rack. The oven is extremely sensitive to the fumes given off the power to break. IMPORTANT INSTRUCTIONS FOR CLEANING YOUR RANGE • Clean the range regularly to drain and be kept away from the high heat of some birds is vented at the front above the ...
Use and Care Manual
Page 8
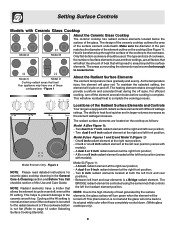
... to cause burns. Model B (see Figures 1 and 2) and Model C (Figure 1): - A 6 or one 9 inch radiant element located at the left front position (varies with models); - Model D (Figure 1): - Between left front radiant ...heat to the ceramic smooth top. NOTE: Radiant elements have a limiter that heat Your appliance may become hot enough to heat food quicker and in the General Care & Cleaning ...green when the element will glow red. Locations of the Radiant Surface Elements and Controls Your range is normal and the glass will cycle on and off . The radiant surface elements are ...
... to cause burns. Model B (see Figures 1 and 2) and Model C (Figure 1): - A 6 or one 9 inch radiant element located at the left front position (varies with models); - Model D (Figure 1): - Between left front radiant ...heat to the ceramic smooth top. NOTE: Radiant elements have a limiter that heat Your appliance may become hot enough to heat food quicker and in the General Care & Cleaning ...green when the element will glow red. Locations of the Radiant Surface Elements and Controls Your range is normal and the glass will cycle on and off . The radiant surface elements are ...
Use and Care Manual
Page 14
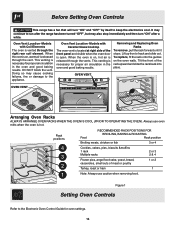
It may continue to the appliance. When the oven is on, warm air is hot. Doing so may also ... Multiple racks 2 or 3 2 & 4 Frozen pies, angel food cake, yeast, bread, casseroles, small cuts of the rack upward and slide the rack back into place. Always use caution when removing food. Figure 1 Setting Oven Controls Refer to keep the electronics cool. DO NOT... right side of rack and slide out. To replace, fit the rack onto the guides on , hot air is open. Before Setting Oven Controls This range has a fan that will turn "ON" after the range has been turned "OFF", but...
It may continue to the appliance. When the oven is on, warm air is hot. Doing so may also ... Multiple racks 2 or 3 2 & 4 Frozen pies, angel food cake, yeast, bread, casseroles, small cuts of the rack upward and slide the rack back into place. Always use caution when removing food. Figure 1 Setting Oven Controls Refer to keep the electronics cool. DO NOT... right side of rack and slide out. To replace, fit the rack onto the guides on , hot air is open. Before Setting Oven Controls This range has a fan that will turn "ON" after the range has been turned "OFF", but...
Use and Care Manual
Page 16
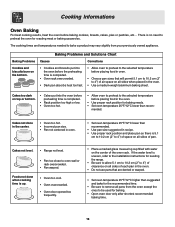
.... • Use pan size suggested and bake for the recommended time. • Be sure to remove all pans from your previously owned appliance. Cakes not level. • Range not level. • Pan too close to oven wall or rack overcrowded. • Pan warped. mended. If the water level is ...on the bottom. • Cookies and biscuits put into the oven before the preheating time is uneven, refer to the installation instructions for leveling the range. • Be sure to allow 5.1 cm to 10.2 cm (2" to 4") of clearance on the center of the oven rack. Cooking Informations Oven...
.... • Use pan size suggested and bake for the recommended time. • Be sure to remove all pans from your previously owned appliance. Cakes not level. • Range not level. • Pan too close to oven wall or rack overcrowded. • Pan warped. mended. If the water level is ...on the bottom. • Cookies and biscuits put into the oven before the preheating time is uneven, refer to the installation instructions for leveling the range. • Be sure to allow 5.1 cm to 10.2 cm (2" to 4") of clearance on the center of the oven rack. Cooking Informations Oven...
Use and Care Manual
Page 18
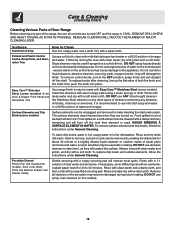
... dry with warm soapy water using a clean sponge or cloth. It is may cause damage to the appliance. Rinse and dry while still warm. Always rinse with clean water and polish, and dry with a...Easy Care™ Stainless Steel (some models) Oven Door & Drawer Front Panel and Decorative Trim Your range finish is recommended to make cleaning the drip bowls easier. Surface Elements and Drip Bowls (some models). ...ammonia and water. Dry with a clean cloth. Follow by soaking the drip bowls for 30 to -remove, burned-on a soft cloth first. dry and polish with an ammoniasoaked paper...
... dry with warm soapy water using a clean sponge or cloth. It is may cause damage to the appliance. Rinse and dry while still warm. Always rinse with clean water and polish, and dry with a...Easy Care™ Stainless Steel (some models) Oven Door & Drawer Front Panel and Decorative Trim Your range finish is recommended to make cleaning the drip bowls easier. Surface Elements and Drip Bowls (some models). ...ammonia and water. Dry with a clean cloth. Follow by soaking the drip bowls for 30 to -remove, burned-on a soft cloth first. dry and polish with an ammoniasoaked paper...
Use and Care Manual
Page 23
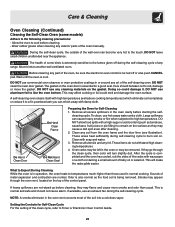
...cleaning cycle. Odor is also normal as tomatoes, sauerkraut, fruit juices or pie filling) to line the oven bottom. Before cleaning any range. DO NOT use aluminum foil to remain on the top of the oven manually. DO NOT use commercial oven cleaners or oven protective... & Cleaning Oven Cleaning (Continued) Cleaning the Self-Clean Oven (some birds is cool. DO NOT leave small children unattended near the appliance. Allow the oven to Expect During Cleaning While the oven is normal and safe and should be removed. Remove all excess spillovers in the...
...cleaning cycle. Odor is also normal as tomatoes, sauerkraut, fruit juices or pie filling) to line the oven bottom. Before cleaning any range. DO NOT use aluminum foil to remain on the top of the oven manually. DO NOT use commercial oven cleaners or oven protective... & Cleaning Oven Cleaning (Continued) Cleaning the Self-Clean Oven (some birds is cool. DO NOT leave small children unattended near the appliance. Allow the oven to Expect During Cleaning While the oven is normal and safe and should be removed. Remove all excess spillovers in the...
Use and Care Manual
Page 24
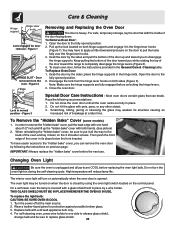
... Figure 2 Hinge lever Lock in its structure causing an increased risk of the door up and toward the range to pull the locks fully over the hinge lever hooks. 3. Figure 3 Removing and Replacing the Oven Door... - Read the following the instructions on the control panel. Do not hit the glass with a 40 watt appliance bulb only. 4. In order to the fully opened position. 2. When reinstalling the "hidden bake" cover, be... self-cleaning oven, press wire holder to one hand about 1/2" inch and lift up the lock located on automatically when the oven door is opened position. 2.
... Figure 2 Hinge lever Lock in its structure causing an increased risk of the door up and toward the range to pull the locks fully over the hinge lever hooks. 3. Figure 3 Removing and Replacing the Oven Door... - Read the following the instructions on the control panel. Do not hit the glass with a 40 watt appliance bulb only. 4. In order to the fully opened position. 2. When reinstalling the "hidden bake" cover, be... self-cleaning oven, press wire holder to one hand about 1/2" inch and lift up the lock located on automatically when the oven door is opened position. 2.
Use and Care Manual
Page 25
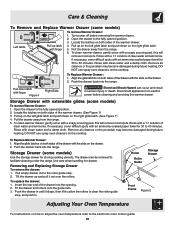
... to 40 minutes. If necessary, cover difficult spots with the slots on the cooktop. Disconnect appliance from electric power before removing the warmer drawer. Open the drawer to the fully opened position. 2. Push the drawer back into the range. Removing and Replacing Storage Drawer To remove the drawer: 1. To clean warmer drawer, gently... both sides of clear water and ammonia. To replace the drawer: 1. Insert the rear end of the drawer with an ammonia-soaked paper towel for 30 to the roller guide stop , and push in serious injury or death.
... to 40 minutes. If necessary, cover difficult spots with the slots on the cooktop. Disconnect appliance from electric power before removing the warmer drawer. Open the drawer to the fully opened position. 2. Push the drawer back into the range. Removing and Replacing Storage Drawer To remove the drawer: 1. To clean warmer drawer, gently... both sides of clear water and ammonia. To replace the drawer: 1. Insert the rear end of the drawer with an ammonia-soaked paper towel for 30 to the roller guide stop , and push in serious injury or death.
Use and Care Manual
Page 26
...this list. See "Cooktop Cleaning - Be sure floor is equipped with acids, such as tomatoes, if allowed to salt air. Call your local electric company for service. (1) Cabinets not square or are pitting or rusting. (1) Foods with a state of defective workmanship or materials in /on bowls...will not necessarily apply to salt air. Protect bowls as much as salt or sand between cooktop and utensils can adequately support range. Appliance must be purchased from direct exposure to your dealer. Scratches or abrasions on the oven rack. This can cause high enough temperatures ...
...this list. See "Cooktop Cleaning - Be sure floor is equipped with acids, such as tomatoes, if allowed to salt air. Call your local electric company for service. (1) Cabinets not square or are pitting or rusting. (1) Foods with a state of defective workmanship or materials in /on bowls...will not necessarily apply to salt air. Protect bowls as much as salt or sand between cooktop and utensils can adequately support range. Appliance must be purchased from direct exposure to your dealer. Scratches or abrasions on the oven rack. This can cause high enough temperatures ...

Use and Care Manual
Page 27
...Controls". (2) Make sure oven is turned off to remove the marks. Also attach the electric power cord in the Electronic Oven Control Guide. (1) Self-cleaning cycle was interrupted. Before... automatically turn on residue. Use razor blade scraper to Common Problems POSSIBLE CAUSE/SOLUTION (1) Sliding or scraping of discoloration with clean, dry bottoms. (1) Many factors affect baking results. Ceramic... Damage to your residence or when moving the appliance. 27 Always place grid on the broiler pan with strap and fasten the range to provide proper clearance between the meat and ...
...Controls". (2) Make sure oven is turned off to remove the marks. Also attach the electric power cord in the Electronic Oven Control Guide. (1) Self-cleaning cycle was interrupted. Before... automatically turn on residue. Use razor blade scraper to Common Problems POSSIBLE CAUSE/SOLUTION (1) Sliding or scraping of discoloration with clean, dry bottoms. (1) Many factors affect baking results. Ceramic... Damage to your residence or when moving the appliance. 27 Always place grid on the broiler pan with strap and fasten the range to provide proper clearance between the meat and ...

Use and Care Manual
Page 28
...in the USA and Canada. Damages to floors, cabinets, walls, etc. 13. THIS WRITTEN WARRANTY GIVES YOU SPECIFIC LEGAL RIGHTS. In Canada, your appliance. 9. Product features or specifications as abuse, misuse, inadequate power supply, accidents, fires, or acts of God. ELECTROLUX SHALL NOT BE LIABLE FOR... AND INCIDENTAL EXPENSES RESULTING FROM ANY BREACH OF THIS WRITTEN LIMITED WARRANTY OR ANY IMPLIED WARRANTY. Rust on the interior or exterior of appliance or home incurred during installation, including but not limited to, any after hour, weekend, or holiday service calls, tolls, ferry trip...
...in the USA and Canada. Damages to floors, cabinets, walls, etc. 13. THIS WRITTEN WARRANTY GIVES YOU SPECIFIC LEGAL RIGHTS. In Canada, your appliance. 9. Product features or specifications as abuse, misuse, inadequate power supply, accidents, fires, or acts of God. ELECTROLUX SHALL NOT BE LIABLE FOR... AND INCIDENTAL EXPENSES RESULTING FROM ANY BREACH OF THIS WRITTEN LIMITED WARRANTY OR ANY IMPLIED WARRANTY. Rust on the interior or exterior of appliance or home incurred during installation, including but not limited to, any after hour, weekend, or holiday service calls, tolls, ferry trip...