Use and Care Manual
Page 2
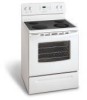
... your purchase of personal injury and damage to cover every possible condition and situation that may not look exactly like those shown. All other part of our product and are representative. All rights reserved 2 Open storage drawer (some models) or remove outer lower panel (some models)....• Never modify or alter the construction of a range by removing leveling legs, panels, wire covers, anti-tip brackets/screws, or any part of an emergency. • User servicing-Do not repair or replace any other servicing should be filled in the manuals. Product Registration Be sure...
... your purchase of personal injury and damage to cover every possible condition and situation that may not look exactly like those shown. All other part of our product and are representative. All rights reserved 2 Open storage drawer (some models) or remove outer lower panel (some models)....• Never modify or alter the construction of a range by removing leveling legs, panels, wire covers, anti-tip brackets/screws, or any part of an emergency. • User servicing-Do not repair or replace any other servicing should be filled in the manuals. Product Registration Be sure...
Use and Care Manual
Page 3
... flammable materials touch these areas until they are the cook top, surfaces facing the cook top, the oven vent openings and surfaces near surface units may result in burns from any part of the appliance. Do not use . If the power fails, always turn the unit off before ... burns or other injury. • DO NOT TOUCH SURFACE UNITS, AREAS NEAR THESE UNITS, HEATING ELEMENTS OR INTERIOR SURFACES OF THE OVEN. Among these openings, oven door and window. • Wear Proper Apparel-Loose-fitting or hanging garments should never be stored or discarded. Never Use Your Appliance...
... flammable materials touch these areas until they are the cook top, surfaces facing the cook top, the oven vent openings and surfaces near surface units may result in burns from any part of the appliance. Do not use . If the power fails, always turn the unit off before ... burns or other injury. • DO NOT TOUCH SURFACE UNITS, AREAS NEAR THESE UNITS, HEATING ELEMENTS OR INTERIOR SURFACES OF THE OVEN. Among these openings, oven door and window. • Wear Proper Apparel-Loose-fitting or hanging garments should never be stored or discarded. Never Use Your Appliance...
Use and Care Manual
Page 4
...certain types of the utensil should not be careful to reposition. Follow manufacturer's instructions for models equipped with ceramic-glass cook tops. The oven vent is turned inward, and does not extend over adjacent surface units. • Never Leave Surface Elements Unattended at High Heat Settings-...use . • When flaming foods under the left rear surface element if your model is cool. Remove all parts free of potential exposure to line the oven bottom. The oven vent is used to wipe spills on a hot cooking area, be allowed to warn customers of grease that ...
...certain types of the utensil should not be careful to reposition. Follow manufacturer's instructions for models equipped with ceramic-glass cook tops. The oven vent is turned inward, and does not extend over adjacent surface units. • Never Leave Surface Elements Unattended at High Heat Settings-...use . • When flaming foods under the left rear surface element if your model is cool. Remove all parts free of potential exposure to line the oven bottom. The oven vent is used to wipe spills on a hot cooking area, be allowed to warn customers of grease that ...
Use and Care Manual
Page 13
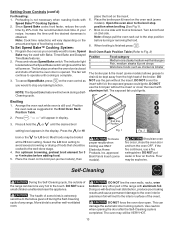
... may be explosive. Move birds to the stop any other part of the oven). Speed Bake may be used with Speed Bake™ Cooking System. 2. Broil on the oven control as you would to the touch. Note: Always pull the oven rack out to another well-ventilated room. Press . Preheating is...Speed Bake, press on one side until cooking is not necessary when roasting foods with Bake, Timed Bake and Delayed Time Bake features. 2. Open the oven door to stop position before adding food. 5. " - - NOTE: The Speed Bake feature will come on 2nd side. DO NOT leave small children...
... may be explosive. Move birds to the stop any other part of the oven). Speed Bake may be used with Speed Bake™ Cooking System. 2. Broil on the oven control as you would to the touch. Note: Always pull the oven rack out to another well-ventilated room. Press . Preheating is...Speed Bake, press on one side until cooking is not necessary when roasting foods with Bake, Timed Bake and Delayed Time Bake features. 2. Open the oven door to stop position before adding food. 5. " - - NOTE: The Speed Bake feature will come on 2nd side. DO NOT leave small children...
Use and Care Manual
Page 14
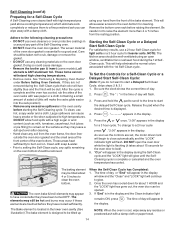
...soil from the oven frame, the door liner outside the oven door gasket and the small area at the front center of the oven bottom. See "Removing & Replacing Oven Racks" under Before Setting Oven Controls. If they have cooled after cleaning. • Hand clean any part of the oven door gasket ...is complete and the oven has cooled, rub the sides of the oven racks with a damp cloth or ...
...soil from the oven frame, the door liner outside the oven door gasket and the small area at the front center of the oven bottom. See "Removing & Replacing Oven Racks" under Before Setting Oven Controls. If they have cooled after cleaning. • Hand clean any part of the oven door gasket ...is complete and the oven has cooled, rub the sides of the oven racks with a damp cloth or ...
Use and Care Manual
Page 15
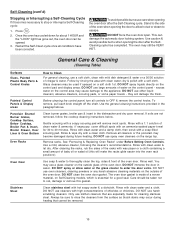
...turn all conditions have been corrected. Porcelain Enamel Burner Grates, Cooktop Surface, Below Cooktop, Broiler Pan & Insert, Broiler Drawer, Door Liner & Oven Bottom Oven Racks Clean burner grates, broiler pan & insert in water. Rinse with clean water and a damp cloth, then scrub with a clean cloth.... & Cleaning (Cleaning Table) Surfaces Glass, Painted Plastic Body Parts & Control Knobs How to stop or interrupt a Self-Cleaning cycle: 1. DO NOT spray liquids directly on the outside of the oven door. Once the oven has cooled down for cleaning stainless steel. DO NOT use ...
...turn all conditions have been corrected. Porcelain Enamel Burner Grates, Cooktop Surface, Below Cooktop, Broiler Pan & Insert, Broiler Drawer, Door Liner & Oven Bottom Oven Racks Clean burner grates, broiler pan & insert in water. Rinse with clean water and a damp cloth, then scrub with a clean cloth.... & Cleaning (Cleaning Table) Surfaces Glass, Painted Plastic Body Parts & Control Knobs How to stop or interrupt a Self-Cleaning cycle: 1. DO NOT spray liquids directly on the outside of the oven door. Once the oven has cooled down for cleaning stainless steel. DO NOT use ...

Use and Care Manual
Page 18
...equipped with a new 40 watt appliance bulb. 4. The oven light bulb is unplugged and all parts are COOL before the number to the Cleaning Table at the beginning of Stainless Steel (some models) The oven light automatically turns ON when the door is cooking too ... Turn electrical power off at the rear of stainless parts. Replace bulb with stainless steel exterior parts. Wear a leather-faced glove for maintaining the appearance of the oven and is in the display. Adjusting Your Oven Temperature Your oven control has been precisely set at the main source...
...equipped with a new 40 watt appliance bulb. 4. The oven light bulb is unplugged and all parts are COOL before the number to the Cleaning Table at the beginning of Stainless Steel (some models) The oven light automatically turns ON when the door is cooking too ... Turn electrical power off at the rear of stainless parts. Replace bulb with stainless steel exterior parts. Wear a leather-faced glove for maintaining the appearance of the oven and is in the display. Adjusting Your Oven Temperature Your oven control has been precisely set at the main source...
Use and Care Manual
Page 20
...your appliance is warranted by unauthorized service companies; Product features or specifications as -is" are subject to change or add to any parts of this warranty must be performed by a one year from the factory. 10. For one year limited warranty. Products purchased ... this appliance that have been removed, altered or cannot be obtained by Electrolux Major Appliances North America, a division of parts other than genuine Electrolux parts or parts obtained from its original owner to floors, cabinets, walls, etc. 13. LIMITATION OF REMEDIES CUSTOMER'S SOLE AND EXCLUSIVE ...
...your appliance is warranted by unauthorized service companies; Product features or specifications as -is" are subject to change or add to any parts of this warranty must be performed by a one year from the factory. 10. For one year limited warranty. Products purchased ... this appliance that have been removed, altered or cannot be obtained by Electrolux Major Appliances North America, a division of parts other than genuine Electrolux parts or parts obtained from its original owner to floors, cabinets, walls, etc. 13. LIMITATION OF REMEDIES CUSTOMER'S SOLE AND EXCLUSIVE ...


