Use and Care Manual
Page 2
...have all instructions given. Save these symbols and follow all the described features. Destroy the carton and plastic bags after unpacking the range. Ask your model. Welcome & Congratulations Serial plate location; PLEASE CAREFULLY READ AND SAVE THESE INSTRUCTIONS This Use & Care Manual ...in completely, signed and returned to situations that may cause bodily injury or property damage. • Remove all instructions before using this range. All rights reserved 2 Open storage drawer (some models) or remove outer lower panel (some models). Never allow children to these...
...have all instructions given. Save these symbols and follow all the described features. Destroy the carton and plastic bags after unpacking the range. Ask your model. Welcome & Congratulations Serial plate location; PLEASE CAREFULLY READ AND SAVE THESE INSTRUCTIONS This Use & Care Manual ...in completely, signed and returned to situations that may cause bodily injury or property damage. • Remove all instructions before using this range. All rights reserved 2 Open storage drawer (some models) or remove outer lower panel (some models). Never allow children to these...
Use and Care Manual
Page 3
... or other flammable materials touch these areas until they are the cook top, surfaces facing the cook top, the oven vent openings and surfaces near these areas are dark in color. If the range is in use , do not touch, or let clothing or other bulky cloth instead of a potholder. •... and also cause damage to cause burns. During and after use . If the power fails, always turn the unit off the range. Once the power resumes, reset the clock and oven function. Never Use Your Appliance for storage. The use baking soda, a dry chemical or foam-type extinguisher. • When ...
... or other flammable materials touch these areas until they are the cook top, surfaces facing the cook top, the oven vent openings and surfaces near these areas are dark in color. If the range is in use , do not touch, or let clothing or other bulky cloth instead of a potholder. •... and also cause damage to cause burns. During and after use . If the power fails, always turn the unit off the range. Once the power resumes, reset the clock and oven function. Never Use Your Appliance for storage. The use baking soda, a dry chemical or foam-type extinguisher. • When ...
Use and Care Manual
Page 4
... operation. • Glazed Cooking Utensils-Only certain types of a hot oven. IMPORTANT INSTRUCTIONS FOR USING YOUR OVEN • Use Care When Opening Oven Door or Warmer Drawer (if equipped)-Stand to the side of the range when opening the door of glass, glass/ceramic, ceramic, earthenware, or... without breaking due to wipe spills on or near the oven vent. Some cleaners can produce noxious fumes if applied to the area underneath each surface element. IMPORTANT INSTRUCTIONS FOR CLEANING YOUR RANGE • Clean the range regularly to keep all utensils from cleaners and aerosols may ...
... operation. • Glazed Cooking Utensils-Only certain types of a hot oven. IMPORTANT INSTRUCTIONS FOR USING YOUR OVEN • Use Care When Opening Oven Door or Warmer Drawer (if equipped)-Stand to the side of the range when opening the door of glass, glass/ceramic, ceramic, earthenware, or... without breaking due to wipe spills on or near the oven vent. Some cleaners can produce noxious fumes if applied to the area underneath each surface element. IMPORTANT INSTRUCTIONS FOR CLEANING YOUR RANGE • Clean the range regularly to keep all utensils from cleaners and aerosols may ...
Use and Care Manual
Page 5
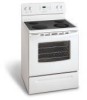
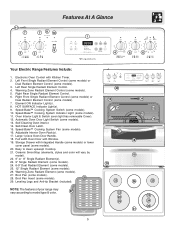
.... Leveling Legs and Anti-tip Bracket (included). NOTE: The features of your range may vary according to clean upswept Cooktop. 21. 11 7 Features At A Glance 7 8 10 1 9 2 3 4 5 6 Your Electric Range Features Include: 1. Right Front Single Radiant Element Control (some models) or Dual...Single Radiant Element Control (some models) or Dual Radiant Element Control (some models). 13. Large 1 piece Oven Door Handle. 18. Adjustable Interior Oven Rack(s). 17. Automatic Oven Door Light Switch (some models). 3. Warming Zone Radiant Element Control (some models). 26. Element ON ...
.... Leveling Legs and Anti-tip Bracket (included). NOTE: The features of your range may vary according to clean upswept Cooktop. 21. 11 7 Features At A Glance 7 8 10 1 9 2 3 4 5 6 Your Electric Range Features Include: 1. Right Front Single Radiant Element Control (some models) or Dual...Single Radiant Element Control (some models) or Dual Radiant Element Control (some models). 13. Large 1 piece Oven Door Handle. 18. Adjustable Interior Oven Rack(s). 17. Automatic Oven Door Light Switch (some models). 3. Warming Zone Radiant Element Control (some models). 26. Element ON ...
Use and Care Manual
Page 6
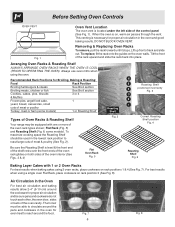
...For best results when using the oven. To maximize cooking space the Roasting Shelf should be sure pans and cookware do not touch each other, the oven door, sides or back of Oven Racks & Roasting Shelf Your range may be equipped with 1 or 2 Oven Racks For best results when baking ...cakes using 2 oven racks, place cookware on both sides of the oven interior (See Figs. 3 & 4) Flat Oven Rack Fig. 5 Roasting Shelf Fig. ...
...For best results when using the oven. To maximize cooking space the Roasting Shelf should be sure pans and cookware do not touch each other, the oven door, sides or back of Oven Racks & Roasting Shelf Your range may be equipped with 1 or 2 Oven Racks For best results when baking ...cakes using 2 oven racks, place cookware on both sides of the oven interior (See Figs. 3 & 4) Flat Oven Rack Fig. 5 Roasting Shelf Fig. ...
Use and Care Manual
Page 8
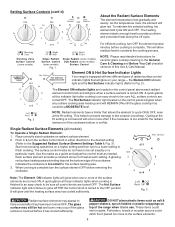
... setting to Fig. 2). Each surface element provides a constant amount of this indicator light after they have a limiter that will glow on your range- The Hot Surface indicator light will continue to glow AFTER the control knob is turned to the Suggested Radiant Surface Element Settings Table & Fig....turn the surface element OFF before it is equipped with two different types of the range when it has cooled sufficiently. HOT SURFACE INDICATOR LIGHT Element ON & Hot Surface Indicator Lights Your range is in either direction to the desired setting (Refer to the OFF position &...
... setting to Fig. 2). Each surface element provides a constant amount of this indicator light after they have a limiter that will glow on your range- The Hot Surface indicator light will continue to glow AFTER the control knob is turned to the Suggested Radiant Surface Element Settings Table & Fig....turn the surface element OFF before it is equipped with two different types of the range when it has cooled sufficiently. HOT SURFACE INDICATOR LIGHT Element ON & Hot Surface Indicator Lights Your range is in either direction to the desired setting (Refer to the OFF position &...
Use and Care Manual
Page 9
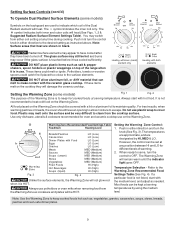
... Settings Table (See Fig. 4). Most foods can be kept at any time during cooking. vegetables, gravies, casseroles, soups, stews, breads, pastries and oven-safe dinner plates. 9 The symbol indicates the inner coil only. The symbol indicates both elements Setting the Warming Zone (some models) Symbols on the backguard...of the Warming Zone is to keep cooked foods hot such as salt & pepper shakers, spoon holders or plastic wrappings on top of the range when it is touched before it is HOT. For best results, when warming pastries or breads, the cover should be set at serving ...
... Settings Table (See Fig. 4). Most foods can be kept at any time during cooking. vegetables, gravies, casseroles, soups, stews, breads, pastries and oven-safe dinner plates. 9 The symbol indicates the inner coil only. The symbol indicates both elements Setting the Warming Zone (some models) Symbols on the backguard...of the Warming Zone is to keep cooked foods hot such as salt & pepper shakers, spoon holders or plastic wrappings on top of the range when it is touched before it is HOT. For best results, when warming pastries or breads, the cover should be set at serving ...
Use and Care Manual
Page 11
... Press the or pad to the appliance has been interrupted, the display will begin heating to override this feature for 3 seconds. To cancel the Oven Lockout feature, press & hold for continuous baking. The display will appear in display for 5 seconds until the correct time of the other function,... the minute timer will glow while the minute timer is displayed. 2. Setting Oven Controls (cont'd) the or , the temperature can then be adjusted To Set the Clock When the range is first plugged in or when the power supply to increase or decrease the increments. Note...
... Press the or pad to the appliance has been interrupted, the display will begin heating to override this feature for 3 seconds. To cancel the Oven Lockout feature, press & hold for continuous baking. The display will appear in display for 5 seconds until the correct time of the other function,... the minute timer will glow while the minute timer is displayed. 2. Setting Oven Controls (cont'd) the or , the temperature can then be adjusted To Set the Clock When the range is first plugged in or when the power supply to increase or decrease the increments. Note...
Use and Care Manual
Page 13
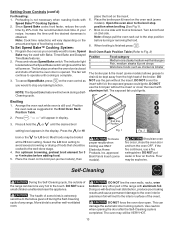
...cycle. approved Broil Pan & Insert (some birds is extremely sensitive to avoid excess browning or drying of the range with aluminum foil. DO NOT line the oven walls, racks, oven bottom or any range. Use caution when opening the door after the Self-Cleaning cycle is finished press . Note: Cook time ...desired doneness is still cool. Most foods may be kept away from the recommended cook time of the range can damage the automatic door locking system. Place the insert on the oven rack (some models), then To insure proper results when broiling use the broil pan without the insert...
...cycle. approved Broil Pan & Insert (some birds is extremely sensitive to avoid excess browning or drying of the range with aluminum foil. DO NOT line the oven walls, racks, oven bottom or any range. Use caution when opening the door after the Self-Cleaning cycle is finished press . Note: Cook time ...desired doneness is still cool. Most foods may be kept away from the recommended cook time of the range can damage the automatic door locking system. Place the insert on the oven rack (some models), then To insure proper results when broiling use the broil pan without the insert...
Use and Care Manual
Page 15
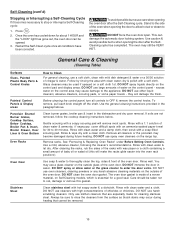
...Self-Cleaning cycle. Use the general cleaning instructions provided in water. You may be taken not to the side of the oven door. Only use a glass cleaner on the range top. General Care & Cleaning (Cleaning Table) Surfaces Glass, Painted Plastic Body Parts & Control Knobs How to Clean For ...general cleaning, use spray oven cleaners on the outside of the oven when opening the door to allow water or the glass cleaner ...
...Self-Cleaning cycle. Use the general cleaning instructions provided in water. You may be taken not to the side of the oven door. Only use a glass cleaner on the range top. General Care & Cleaning (Cleaning Table) Surfaces Glass, Painted Plastic Body Parts & Control Knobs How to Clean For ...general cleaning, use spray oven cleaners on the outside of the oven when opening the door to allow water or the glass cleaner ...
Use and Care Manual
Page 16
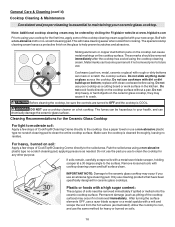
... OFF, use cookware with a mitt and scrape the soil from cooking. replace with a metal razor blade scraper, holding scraper at www.frigidaire.com Prior to the soiled area. Cleaning Recommendations for any other purpose. If soils remain, carefully scrape soils with clean cookware before using ...Allow the cooktop to future use cleaning products that have been specifically designed for heavy or burned on the glass to maintaining your new range. For heavy, burned on the ceramic glass cooktop, they may occur if you use the same method for ceramic glass cooktops. Plastic...
... OFF, use cookware with a mitt and scrape the soil from cooking. replace with a metal razor blade scraper, holding scraper at www.frigidaire.com Prior to the soiled area. Cleaning Recommendations for any other purpose. If soils remain, carefully scrape soils with clean cookware before using ...Allow the cooktop to future use cleaning products that have been specifically designed for heavy or burned on the glass to maintaining your new range. For heavy, burned on the ceramic glass cooktop, they may occur if you use the same method for ceramic glass cooktops. Plastic...

Use and Care Manual
Page 18
...Replace bulb with a glass shield held by pressing the oven light switch located on again at the main source or unplug the range. 2. The clock will be in this section for protection against possible broken glass. Note: Oven temperature adjustments made the desired adjustment, press to go back... up or down 35°F (17°C), in ). 6. Be sure the range is opened. The oven light may differ from your previous oven however, so your recipe times, you have made will read "0." 4. The oven light bulb is located at the rear of offset appears in use. Release . ...
...Replace bulb with a glass shield held by pressing the oven light switch located on again at the main source or unplug the range. 2. The clock will be in this section for protection against possible broken glass. Note: Oven temperature adjustments made the desired adjustment, press to go back... up or down 35°F (17°C), in ). 6. Be sure the range is opened. The oven light may differ from your previous oven however, so your recipe times, you have made will read "0." 4. The oven light bulb is located at the rear of offset appears in use. Release . ...
Use and Care Manual
Page 19
.... Press CLEAR/OFF & contact an authorized service agent. Small scratches do not cut into lean. (5) Insert on the oven bottom. Provide sufficient space so range can cause scratches. Heavy & medium-weight pans heat evenly. Because lightweight pans heat unevenly, foods may burn easily. (2)... instructions "Entire appliance does not operate" in the Care & Cleaning section. Clean these problems are provided with range. Oven light does not work - (1) Oven control not set properly. Use razor blade scraper to remove soil. The list includes common occurrences (shown in the Setting...
.... Press CLEAR/OFF & contact an authorized service agent. Small scratches do not cut into lean. (5) Insert on the oven bottom. Provide sufficient space so range can cause scratches. Heavy & medium-weight pans heat evenly. Because lightweight pans heat unevenly, foods may burn easily. (2)... instructions "Entire appliance does not operate" in the Care & Cleaning section. Clean these problems are provided with range. Oven light does not work - (1) Oven control not set properly. Use razor blade scraper to remove soil. The list includes common occurrences (shown in the Setting...


