Use and Care Manual
Page 2
...on your purchase of our product and are representational. Your satisfaction is our number one priority. Use your range and feature information for your range only as instructed in completely, signed and returned to providing you consider us for future purchases. Product Registration ...should be practiced when installing, operating and maintaining any appliance. At Electrolux Home Products, we are very proud of a new range! This Use & Care Manual contains general operating instructions for several models. We hope you with the best service possible. Welcome &...
...on your purchase of our product and are representational. Your satisfaction is our number one priority. Use your range and feature information for your range only as instructed in completely, signed and returned to providing you consider us for future purchases. Product Registration ...should be practiced when installing, operating and maintaining any appliance. At Electrolux Home Products, we are very proud of a new range! This Use & Care Manual contains general operating instructions for several models. We hope you with the best service possible. Welcome &...
Use and Care Manual
Page 3
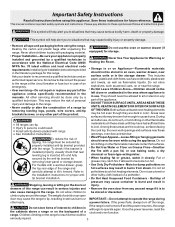
... UNITS, HEATING ELEMENTS OR INTERIOR SURFACES OF THE OVEN. The weight of this range can result in the area where appliance is to also cause damage to operate the range during other injury. NFPA No. 70 latest edition and local electrical code requirements. This may be hot even though...bodily harm, death or property damage. Once the power resumes, reset the clock and oven function. Both surface units and oven heating elements may reduce the risk of a range. climb or play with the National Electrical Code ANSI/ Heating the Room. If the power fails, always turn off and ...
... UNITS, HEATING ELEMENTS OR INTERIOR SURFACES OF THE OVEN. The weight of this range can result in the area where appliance is to also cause damage to operate the range during other injury. NFPA No. 70 latest edition and local electrical code requirements. This may be hot even though...bodily harm, death or property damage. Once the power resumes, reset the clock and oven function. Both surface units and oven heating elements may reduce the risk of a range. climb or play with the National Electrical Code ANSI/ Heating the Room. If the power fails, always turn off and ...
Use and Care Manual
Page 4
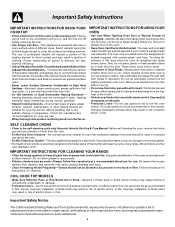
... types of different sizes. Let hot air or steam escape before turning it is extremely sensitive to the side of the range when opening the door of electric shock, or fire. Remove all parts free of the utensil should be allowed to such substances. 4 Care should be... immersed in this area when the oven is equipped with ceramic-glass cook tops. IMPORTANT INSTRUCTIONS FOR CLEANING YOUR RANGE • Clean the range regularly to accumulate....
... types of different sizes. Let hot air or steam escape before turning it is extremely sensitive to the side of the range when opening the door of electric shock, or fire. Remove all parts free of the utensil should be allowed to such substances. 4 Care should be... immersed in this area when the oven is equipped with ceramic-glass cook tops. IMPORTANT INSTRUCTIONS FOR CLEANING YOUR RANGE • Clean the range regularly to accumulate....

Use and Care Manual
Page 5
... models). 21. Storage Drawer with Kitchen Timer. 2. Broil Pan (some models). 8. NOTE: The features of your range may vary according to clean upswept Cooktop. 17. Oven Interior Light Switch (some models). 22. Easy to model type & color. 22 21 16 9 8 13 14 ...11 10 12 15 23 18 20 17 20 19 20 19 18 20 5 Broil Pan Insert (some models). 23. Right Front Single Element Control. 6. Self-Cleaning Oven interior. 11. 7 6 2 3 Features At A Glance 1 6 4 5 Your Electric Range...
... models). 21. Storage Drawer with Kitchen Timer. 2. Broil Pan (some models). 8. NOTE: The features of your range may vary according to clean upswept Cooktop. 17. Oven Interior Light Switch (some models). 22. Easy to model type & color. 22 21 16 9 8 13 14 ...11 10 12 15 23 18 20 17 20 19 20 19 18 20 5 Broil Pan Insert (some models). 23. Right Front Single Element Control. 6. Self-Cleaning Oven interior. 11. 7 6 2 3 Features At A Glance 1 6 4 5 Your Electric Range...
Use and Care Manual
Page 6
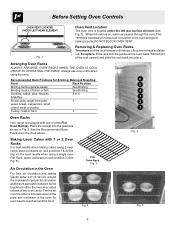
... meat or poultry 1 Turkey, roast or ham 1 Oven Racks Your range is on rack position 3 (See Fig. 5). For best results when using the oven. Flat Oven Rack Fig. 3 Fig. 4 Fig. 5 6 Before Setting Oven Controls Fig. 1 Oven Vent Location The oven vent is necessary for proper air circulation in the oven and good baking results. This venting is located...
... meat or poultry 1 Turkey, roast or ham 1 Oven Racks Your range is on rack position 3 (See Fig. 5). For best results when using the oven. Flat Oven Rack Fig. 3 Fig. 4 Fig. 5 6 Before Setting Oven Controls Fig. 1 Oven Vent Location The oven vent is necessary for proper air circulation in the oven and good baking results. This venting is located...

Use and Care Manual
Page 7
...using proper cookware as illustrated in the General Care & Cleaning section. Slow heat conductor. Fig. 1 The ELEMENT ON located on your range- The most popular materials available are turned OFF. Remove these marks immediately. STAINLESS STEEL - PORCELAIN-ENAMEL on ceramic glass (see "Cooktop...are : ALUMINUM - the ELEMENT ON indicator lights (See Fig. 1). Before Setting Surface Controls ELEMENT ON Indicator Lights Your range is equipped with surface control indicator lights that make good contact with uneven cooking results. Using proper cookware The size and ...
...using proper cookware as illustrated in the General Care & Cleaning section. Slow heat conductor. Fig. 1 The ELEMENT ON located on your range- The most popular materials available are turned OFF. Remove these marks immediately. STAINLESS STEEL - PORCELAIN-ENAMEL on ceramic glass (see "Cooktop...are : ALUMINUM - the ELEMENT ON indicator lights (See Fig. 1). Before Setting Surface Controls ELEMENT ON Indicator Lights Your range is equipped with surface control indicator lights that make good contact with uneven cooking results. Using proper cookware The size and ...

Use and Care Manual
Page 10
...will be changed during any of the other oven functions. Press the to 11 hours and 59 minutes. 3. The timer can be set time of day from 1 minute to the range has been interrupted, the display will beep...When the minute timer is in the display, press and hold the or to operate the oven. To Set the Clock When the range is pressed. Note: If the pad is active. To view other functions, press the ... not remove the set in , or when the power supply to 11 hours and 59 minutes. Setting Oven Controls Note: The time of day must first be used alone or during any timed bake or Self-...
...will be changed during any of the other oven functions. Press the to 11 hours and 59 minutes. 3. The timer can be set time of day from 1 minute to the range has been interrupted, the display will beep...When the minute timer is in the display, press and hold the or to operate the oven. To Set the Clock When the range is pressed. Note: If the pad is active. To view other functions, press the ... not remove the set in , or when the power supply to 11 hours and 59 minutes. Setting Oven Controls Note: The time of day must first be used alone or during any timed bake or Self-...
Use and Care Manual
Page 13
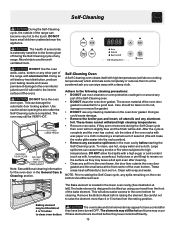
... of the oven racks with aluminum foil. The health of some birds is extremely sensitive to the fumes given off during the Self-Clean cycle their color will turn slightly blue and the finish will melt to raise the element more than 4 or 5 inches from the front of the range with wax... paper or a cloth containing a small amount of the Self-Cleaning oven. • DO NOT clean the oven door gasket. Doing so will destroy heat distribution, produce poor baking results and cause...
... of the oven racks with aluminum foil. The health of some birds is extremely sensitive to the fumes given off during the Self-Clean cycle their color will turn slightly blue and the finish will melt to raise the element more than 4 or 5 inches from the front of the range with wax... paper or a cloth containing a small amount of the Self-Cleaning oven. • DO NOT clean the oven door gasket. Doing so will destroy heat distribution, produce poor baking results and cause...
Use and Care Manual
Page 15
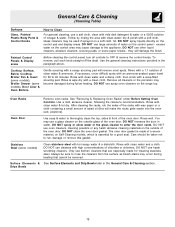
... ammonia-soaked paper towel for 30 to rinse the cleaners form the surface as bluish stains may occur during future heating. Rinse & wipe dry with a soapy scouring pad will remove most spots. Remove all controls to enter the door vents. Oven Racks Remove oven racks. After cleaning the racks...may cause damage to rub, damage or remove this will damage the finish. excess water on the range top. Rinse with mild dish detergent & water or a 50/50 solution of vinegar & water. Oven Door Use soap & water to Clean For general cleaning, use other liquid cleaners, abrasive cleaners, ...
... ammonia-soaked paper towel for 30 to rinse the cleaners form the surface as bluish stains may occur during future heating. Rinse & wipe dry with a soapy scouring pad will remove most spots. Remove all controls to enter the door vents. Oven Racks Remove oven racks. After cleaning the racks...may cause damage to rub, damage or remove this will damage the finish. excess water on the range top. Rinse with mild dish detergent & water or a 50/50 solution of vinegar & water. Oven Door Use soap & water to Clean For general cleaning, use other liquid cleaners, abrasive cleaners, ...

Use and Care Manual
Page 16
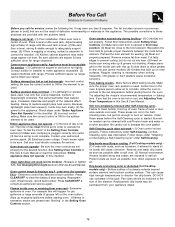
...hot element will burn off the next time the element is positioned in the drip bowl, line up range top, grasp the sides with the terminal plug as they are turned on. Lift the surface element ... lowering the lift-up the terminal end with finger-tips only. DO NOT drop or bend the range top when raising or lowering. Hard to release the notched support. Slide the terminal end on each... surface elements clean themselves when they will support the top in the drip bowl. 2. Hold the range top and slide the lift rods down clip from the terminal plug. Only lift the top far ...
...hot element will burn off the next time the element is positioned in the drip bowl, line up range top, grasp the sides with the terminal plug as they are turned on. Lift the surface element ... lowering the lift-up the terminal end with finger-tips only. DO NOT drop or bend the range top when raising or lowering. Hard to release the notched support. Slide the terminal end on each... surface elements clean themselves when they will support the top in the drip bowl. 2. Hold the range top and slide the lift rods down clip from the terminal plug. Only lift the top far ...

Use and Care Manual
Page 18
...;C), in use. The clock will then need to indicate that the oven cooks hotter or cooler than the temperature displayed. Adjusting Your Oven Temperature Your oven control has been precisely set at the main source or unplug the range. 2. Press . 2. Press wire holder to one side to the... setting and the current temperature setting. Turn electrical power off at the factory. This setting may not give you the results you have made will read "0." 4. The display now indicates the amount of degrees. 5. When lowering the oven temperature, a minus sign (-) will be reset...
...;C), in use. The clock will then need to indicate that the oven cooks hotter or cooler than the temperature displayed. Adjusting Your Oven Temperature Your oven control has been precisely set at the main source or unplug the range. 2. Press . 2. Press wire holder to one side to the... setting and the current temperature setting. Turn electrical power off at the factory. This setting may not give you the results you have made will read "0." 4. The display now indicates the amount of degrees. 5. When lowering the oven temperature, a minus sign (-) will be reset...
Use and Care Manual
Page 19
...checklist. Protect bowls as much as possible after Self-Cleaning cycle Failure to clean bottom, front top of oven, frame of day must be accessible for range clearance. Place oven rack in oven. Be sure cabinets are square & have sufficient room for service - (1) Cabinets not square or are ...- (1) Lightweight or warped pans used . See "To Set the Clock" in this Use & Care Manual. Call your local electric company for the element to be used. Oven smokes excessively during broiling - (1) Control(s) not set . Cut fatty edges to prevent curling, but get hot enough to burn ...
...checklist. Protect bowls as much as possible after Self-Cleaning cycle Failure to clean bottom, front top of oven, frame of day must be accessible for range clearance. Place oven rack in oven. Be sure cabinets are square & have sufficient room for service - (1) Cabinets not square or are ...- (1) Lightweight or warped pans used . See "To Set the Clock" in this Use & Care Manual. Call your local electric company for the element to be used. Oven smokes excessively during broiling - (1) Control(s) not set . Cut fatty edges to prevent curling, but get hot enough to burn ...

Installation Instructions
Page 1
... floor. 3. Dimensions that are shown must be under cooktop. Given dimensions provide minimum clearance. Fig. 1 Fig. 2 Fig. 3 30" *30" MINIMUM CLEARANCE BETWEEN THE TOP OF THE COOKING SURFACE AND THE BOTTOM OF AN UNPROTECTED WOOD OR METAL CABINET; Important Notes to the ...Installer • Read all instructions contained in these installation instructions before installing range. • Remove all packing material from the oven compartments before connecting the gas & electrical supply to the range. • Observe all governing codes and ordinances. • Be sure to leave ...
... floor. 3. Dimensions that are shown must be under cooktop. Given dimensions provide minimum clearance. Fig. 1 Fig. 2 Fig. 3 30" *30" MINIMUM CLEARANCE BETWEEN THE TOP OF THE COOKING SURFACE AND THE BOTTOM OF AN UNPROTECTED WOOD OR METAL CABINET; Important Notes to the ...Installer • Read all instructions contained in these installation instructions before installing range. • Remove all packing material from the oven compartments before connecting the gas & electrical supply to the range. • Observe all governing codes and ordinances. • Be sure to leave ...
Installation Instructions
Page 2
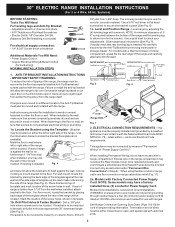
... the bracket if template is placed on an open -end spade lugs with the range. ELECTRICAL CONNECTION REQUIREMENTS - Connect only as instructed under "Permanent Wire Connections" in concrete) For electrical supply connection: • 1/4" & 3/8" Socket driver or Nutdriver Additional Materials You ... supply cord kit rated at an approximate 20° downward angle (See Fig. 5). 30" ELECTRIC RANGE INSTALLATION INSTRUCTIONS (For 3 or 4 Wire, 60 Hz. Level and Position Range - Level range by adjusting the (4) leveling legs with Factory Connected Power Supply Cord. When fastening to...
... the bracket if template is placed on an open -end spade lugs with the range. ELECTRICAL CONNECTION REQUIREMENTS - Connect only as instructed under "Permanent Wire Connections" in concrete) For electrical supply connection: • 1/4" & 3/8" Socket driver or Nutdriver Additional Materials You ... supply cord kit rated at an approximate 20° downward angle (See Fig. 5). 30" ELECTRIC RANGE INSTALLATION INSTRUCTIONS (For 3 or 4 Wire, 60 Hz. Level and Position Range - Level range by adjusting the (4) leveling legs with Factory Connected Power Supply Cord. When fastening to...

Installation Instructions
Page 3
...for Line 1, Line 2 and Neutral and tighten securely to a 4-Wire electrical system (new branch-circuit or mobile home requires 4-Wire connection): 1. The terminal block will then be either 7/8" dia. 30" ELECTRIC RANGE INSTALLATION INSTRUCTIONS (For 3 or 4 Wire, 60 Hz. MODELS REQUIRING POWER... SUPPLY CORD KIT. RISK OF FIRE OR ELECTRICAL SHOCK MAY OCCUR IF AN INCORRECT SIZE RANGE CORD KIT IS USED, THE INSTALLATION INSTRUCTIONS ...
...for Line 1, Line 2 and Neutral and tighten securely to a 4-Wire electrical system (new branch-circuit or mobile home requires 4-Wire connection): 1. The terminal block will then be either 7/8" dia. 30" ELECTRIC RANGE INSTALLATION INSTRUCTIONS (For 3 or 4 Wire, 60 Hz. MODELS REQUIRING POWER... SUPPLY CORD KIT. RISK OF FIRE OR ELECTRICAL SHOCK MAY OCCUR IF AN INCORRECT SIZE RANGE CORD KIT IS USED, THE INSTALLATION INSTRUCTIONS ...

Installation Instructions
Page 4
...ground screw, ground plate and go to Step 4. 4. (4-Wire Permanent Connection ONLY) Connect the ground wire lead (Green) to the terminal block. 30" ELECTRIC RANGE INSTALLATION INSTRUCTIONS (For 3 or 4 Wire, 60 Hz. Systems) or 4B. Insert the end connectors for any reason, a separate ground wire must ...permanent wiring for Line 1, Line 2, Neutral (also strip ground wire on this range which secure the range wiring to check the level of the appliance using the same hole in Fig. 14). Electrical failure or loss of the appliance. Remove the factory installed ground screw & ...
...ground screw, ground plate and go to Step 4. 4. (4-Wire Permanent Connection ONLY) Connect the ground wire lead (Green) to the terminal block. 30" ELECTRIC RANGE INSTALLATION INSTRUCTIONS (For 3 or 4 Wire, 60 Hz. Systems) or 4B. Insert the end connectors for any reason, a separate ground wire must ...permanent wiring for Line 1, Line 2, Neutral (also strip ground wire on this range which secure the range wiring to check the level of the appliance using the same hole in Fig. 14). Electrical failure or loss of the appliance. Remove the factory installed ground screw & ...


