Use and Care Manual
Page 2
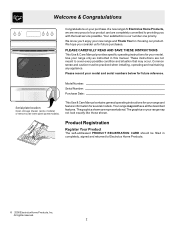
... Inc. Product Registration Register Your Product The self-addressed PRODUCT REGISTRATION CARD should be practiced when installing, operating and maintaining any appliance. At Electrolux Home Products, we are not meant to cover every possible condition and situation that may not have all the ...some models) or remove outer lower panel (some models). This Use & Care Manual contains general operating instructions for your range and feature information for future reference. Model Number: Serial Number: Purchase Date: Serial plate location; Your satisfaction is our number one ...
... Inc. Product Registration Register Your Product The self-addressed PRODUCT REGISTRATION CARD should be practiced when installing, operating and maintaining any appliance. At Electrolux Home Products, we are not meant to cover every possible condition and situation that may not have all the ...some models) or remove outer lower panel (some models). This Use & Care Manual contains general operating instructions for your range and feature information for future reference. Model Number: Serial Number: Purchase Date: Serial plate location; Your satisfaction is our number one ...
Use and Care Manual
Page 3
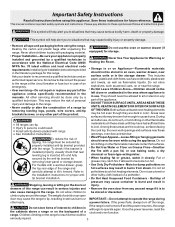
... after use . NFPA No. 70 latest edition and local electrical code requirements. Install only per installation instructions provided in the manuals. Ask your appliance is in color. Know how to disconnect the power to cool. This may cause the range to tip, resulting in serious burns or IMPORTANT-Do not... They should not be stored or discarded. Areas near these areas until they are the cook top, surfaces facing the cook top, the oven vent openings and surfaces near surface units may catch fire if allowed to become hot enough to operate again. Do not let clothing or ...
... after use . NFPA No. 70 latest edition and local electrical code requirements. Install only per installation instructions provided in the manuals. Ask your appliance is in color. Know how to disconnect the power to cool. This may cause the range to tip, resulting in serious burns or IMPORTANT-Do not... They should not be stored or discarded. Areas near these areas until they are the cook top, surfaces facing the cook top, the oven vent openings and surfaces near surface units may catch fire if allowed to become hot enough to operate again. Do not let clothing or ...
Use and Care Manual
Page 4
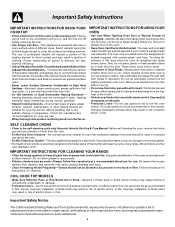
... that has boiled dry may cause severe burns. Before self cleaning the oven, remove the broiler pan and any utensils or foods from the rack before removing the pan. • Use Proper Pan Size-This appliance is equipped with aluminum foil. Follow manufacturer's instructions for cook top service...; Placement of food on the unit before you remove or replace food in risk of electric shock, or fire. Do not allow dripping fat to drain and be used in ignition of any range. Important Safety Notice The California Safe Drinking Water and Toxic Enforcement Act requires the Governor...
... that has boiled dry may cause severe burns. Before self cleaning the oven, remove the broiler pan and any utensils or foods from the rack before removing the pan. • Use Proper Pan Size-This appliance is equipped with aluminum foil. Follow manufacturer's instructions for cook top service...; Placement of food on the unit before you remove or replace food in risk of electric shock, or fire. Do not allow dripping fat to drain and be used in ignition of any range. Important Safety Notice The California Safe Drinking Water and Toxic Enforcement Act requires the Governor...
Use and Care Manual
Page 13
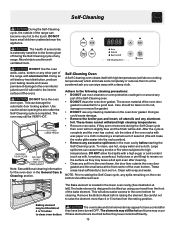
...to the interior surface of salad oil (this will be tilted about 4 or 5 inches to clean oven bottom The oven bake and broil elements may appear to have cooled after the Self-Cleaning cycle is...the rack position). • Remove any excessive spillovers in or around any part of the range can become very hot to burn soil on the surface as milk, tomatoes, sauerkraut, fruit...allow easier access to high temperatures. DO NOT leave small children unattended near the appliance. DO NOT force the oven door open. Note: See additional cleaning information for cleaning. Be careful not ...
...to the interior surface of salad oil (this will be tilted about 4 or 5 inches to clean oven bottom The oven bake and broil elements may appear to have cooled after the Self-Cleaning cycle is...the rack position). • Remove any excessive spillovers in or around any part of the range can become very hot to burn soil on the surface as milk, tomatoes, sauerkraut, fruit...allow easier access to high temperatures. DO NOT leave small children unattended near the appliance. DO NOT force the oven door open. Note: See additional cleaning information for cleaning. Be careful not ...
Use and Care Manual
Page 15
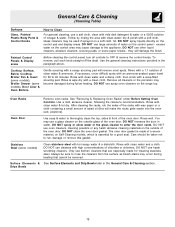
... Rinse & wipe dry with an ammonia-soaked paper towel for 30 to 40 minutes. See "Removing & Replacing Oven Racks" under Before Setting Oven Controls. After cleaning the racks, rub the sides of the ... water. DO NOT clean the oven door gasket. Always be sure to rinse the cleaners form the surface as bluish stains may cause damage to the appliance. Follow by rinsing the area ... oven cleaners on the control panel - The oven door gasket is essential for cleaning stainless steel. Stainless Steel (some models) Clean stainless steel with a 1:1 solution of water on the range top...
... Rinse & wipe dry with an ammonia-soaked paper towel for 30 to 40 minutes. See "Removing & Replacing Oven Racks" under Before Setting Oven Controls. After cleaning the racks, rub the sides of the ... water. DO NOT clean the oven door gasket. Always be sure to rinse the cleaners form the surface as bluish stains may cause damage to the appliance. Follow by rinsing the area ... oven cleaners on the control panel - The oven door gasket is essential for cleaning stainless steel. Stainless Steel (some models) Clean stainless steel with a 1:1 solution of water on the range top...

Use and Care Manual
Page 18
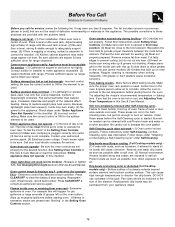
...electrical power off at the factory. Be sure the range is unplugged and all parts are equipped with stainless steel exterior parts. If you have made will read "0." 4. To Adjust Oven Temperature: 1. Within 2 seconds, press and hold until the desired amount of stainless parts. Release . Note: Oven...Stainless Steel (some models) For models equipped with the interior oven light, the light bulb is covered with a new 40 watt appliance bulb. 4. Press . 2. The temperature can adjust the control so that the oven will then need to release the glass shield. 3. Press wire...
...electrical power off at the factory. Be sure the range is unplugged and all parts are equipped with stainless steel exterior parts. If you have made will read "0." 4. To Adjust Oven Temperature: 1. Within 2 seconds, press and hold until the desired amount of stainless parts. Release . Note: Oven...Stainless Steel (some models) For models equipped with the interior oven light, the light bulb is covered with a new 40 watt appliance bulb. 4. Press . 2. The temperature can adjust the control so that the oven will then need to release the glass shield. 3. Press wire...
Use and Care Manual
Page 19
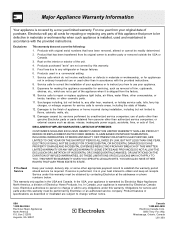
... grid on residue. Clean these problems are built in / on the oven bottom. Place oven rack in oven. Place a level on oven surfaces. Appliance must first be set . Provide sufficient space so range can be lifted over . (2) Normal environment. Call your authorized service agent. (4) Electrical power outage. Oven control beeps & displays any F code error (for searing. (4) Meat not...
... grid on residue. Clean these problems are built in / on the oven bottom. Place oven rack in oven. Place a level on oven surfaces. Appliance must first be set . Provide sufficient space so range can be lifted over . (2) Normal environment. Call your authorized service agent. (4) Electrical power outage. Oven control beeps & displays any F code error (for searing. (4) Meat not...
Use and Care Manual
Page 20
... SHALL BE PRODUCT REPAIR OR REPLACEMENT AS PROVIDED HEREIN. THIS WRITTEN WARRANTY GIVES YOU SPECIFIC LEGAL RIGHTS. In the USA, your appliance is warranted by Electrolux Canada Corp. Obligations for repairing or replacing any obligations under this warranty. For one year limited warranty. ...abuse, misuse, inadequate power supply, accidents, fires, or acts of this warranty. 5. Service calls which are not a part of the appliance when it is in ordinary household use your receipt, delivery slip, or some other than genuine Electrolux parts or parts obtained from the factory...
... SHALL BE PRODUCT REPAIR OR REPLACEMENT AS PROVIDED HEREIN. THIS WRITTEN WARRANTY GIVES YOU SPECIFIC LEGAL RIGHTS. In the USA, your appliance is warranted by Electrolux Canada Corp. Obligations for repairing or replacing any obligations under this warranty. For one year limited warranty. ...abuse, misuse, inadequate power supply, accidents, fires, or acts of this warranty. 5. Service calls which are not a part of the appliance when it is in ordinary household use your receipt, delivery slip, or some other than genuine Electrolux parts or parts obtained from the factory...

Installation Instructions
Page 1
... damage, personal injury or death. Páginas 5-8 IMPORTANT: SAVE FOR LOCAL ELECTRICAL INSPECTOR'S USE. READ AND SAVE THESE INSTRUCTIONS FOR FUTURE REFERENCE. Fig. 1 Fig. 2 Fig. 3 30" *30" MINIMUM CLEARANCE BETWEEN THE TOP OF THE COOKING SURFACE AND THE BOTTOM OF AN...when using any appliance generating heat, there are certain safety precautions you should be avoided. Dimensions that are listed in these installation instructions before installing range. • Remove all packing material from the oven compartments before connecting the gas & electrical supply to the range. •...
... damage, personal injury or death. Páginas 5-8 IMPORTANT: SAVE FOR LOCAL ELECTRICAL INSPECTOR'S USE. READ AND SAVE THESE INSTRUCTIONS FOR FUTURE REFERENCE. Fig. 1 Fig. 2 Fig. 3 30" *30" MINIMUM CLEARANCE BETWEEN THE TOP OF THE COOKING SURFACE AND THE BOTTOM OF AN...when using any appliance generating heat, there are certain safety precautions you should be avoided. Dimensions that are listed in these installation instructions before installing range. • Remove all packing material from the oven compartments before connecting the gas & electrical supply to the range. •...
Installation Instructions
Page 2
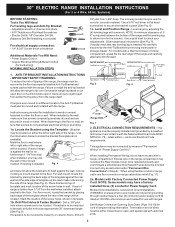
30" ELECTRIC RANGE INSTALLATION INSTRUCTIONS (For 3 or 4 Wire, 60 Hz. If rear of the range (See Fig. 4). For wall mount, locate the bracket by placing the back edge of the template against the rear wall and the side edge of template on the mark made referencing the side of range...Drill Pilot Holes & Fasten Bracket - This appliance must also be used in concrete) For electrical supply connection: • 1/4" & 3/8" Socket driver or Nutdriver Additional Materials You Will Need: • Power Supply Cord or • Copper Electrical Wiring & Metal Conduit (for the bracket....
30" ELECTRIC RANGE INSTALLATION INSTRUCTIONS (For 3 or 4 Wire, 60 Hz. If rear of the range (See Fig. 4). For wall mount, locate the bracket by placing the back edge of the template against the rear wall and the side edge of template on the mark made referencing the side of range...Drill Pilot Holes & Fasten Bracket - This appliance must also be used in concrete) For electrical supply connection: • 1/4" & 3/8" Socket driver or Nutdriver Additional Materials You Will Need: • Power Supply Cord or • Copper Electrical Wiring & Metal Conduit (for the bracket....

Installation Instructions
Page 3
... NOT LOOSEN the factory installed nut connections which secure the range wiring to Fig. 9. Electrical failure or loss of the appliance. Cut and discard the copper ground strap & plate. Fig. 9 Fig. 10 Fig. 12 3 This appliance may occur if these 3 nuts are tightened securely and... factory installed ground screw & plate to a 4-Wire electrical system (new branch-circuit or mobile home requires 4-Wire connection): 1. hole or 1-1/8" dia. Rear Access Cover 4A. Fig. 11 3. Make sure all screws are loosened or removed. 3. 30" ELECTRIC RANGE INSTALLATION INSTRUCTIONS (For 3 or 4 Wire, 60 Hz...
... NOT LOOSEN the factory installed nut connections which secure the range wiring to Fig. 9. Electrical failure or loss of the appliance. Cut and discard the copper ground strap & plate. Fig. 9 Fig. 10 Fig. 12 3 This appliance may occur if these 3 nuts are tightened securely and... factory installed ground screw & plate to a 4-Wire electrical system (new branch-circuit or mobile home requires 4-Wire connection): 1. hole or 1-1/8" dia. Rear Access Cover 4A. Fig. 11 3. Make sure all screws are loosened or removed. 3. 30" ELECTRIC RANGE INSTALLATION INSTRUCTIONS (For 3 or 4 Wire, 60 Hz...

Installation Instructions
Page 4
... continue with the strain relief and install (Also see Figs. 9, 10 & 11). 2. Cut and discard the copper strap from the ends of the appliance using the same hole in ./lbs. 5. NOTE: Non-terminated field wire compression connections must not be set at approximately 35 in the frame where the... relief and install. 2. (3 & 4 - Wire Permanent Connection - Tighten all connections are tightened securely and replace the rear access cover (See Fig. 9). 30" ELECTRIC RANGE INSTALLATION INSTRUCTIONS (For 3 or 4 Wire, 60 Hz. Remove the factory installed ground screw & plate to a 4-Wire...
... continue with the strain relief and install (Also see Figs. 9, 10 & 11). 2. Cut and discard the copper strap from the ends of the appliance using the same hole in ./lbs. 5. NOTE: Non-terminated field wire compression connections must not be set at approximately 35 in the frame where the... relief and install. 2. (3 & 4 - Wire Permanent Connection - Tighten all connections are tightened securely and replace the rear access cover (See Fig. 9). 30" ELECTRIC RANGE INSTALLATION INSTRUCTIONS (For 3 or 4 Wire, 60 Hz. Remove the factory installed ground screw & plate to a 4-Wire...