Use and Care Manual
Page 2
...package for choosing our product. We know you consider us for future purchases. These instructions are completely committed to these instructions for several models. Common sense & caution must be done only by removing leveling legs, panels, wire covers, anti-tip brackets/screws, or any ...as instructed in completely, signed and returned to play with the National Electrical Code ANSI/NFPA No. 70 latest edition and local electrical code requirements. Use your new range and Thank You for this range. Your range may occur. The graphics on your purchase of the appliance frame. ...
...package for choosing our product. We know you consider us for future purchases. These instructions are completely committed to these instructions for several models. Common sense & caution must be done only by removing leveling legs, panels, wire covers, anti-tip brackets/screws, or any ...as instructed in completely, signed and returned to play with the National Electrical Code ANSI/NFPA No. 70 latest edition and local electrical code requirements. Use your new range and Thank You for this range. Your range may occur. The graphics on your purchase of the appliance frame. ...
Use and Care Manual
Page 4
... up front of grease that could catch fire. Touching the surfaces in risk of electric shock. Remove all utensils from the high heat of the control panel. the Element...glass cooktop has cooled to a MODERATE level. IMPORTANT INSTRUCTIONS FOR CLEANING YOUR RANGE • Clean the range regularly to keep all surface controls are turned OFF. Be aware that ...accumulate. • Kitchen cleaners and aerosols-Always follow the manufacturer's recommended directions for models equipped with aluminum foil. Important Safety Instructions IMPORTANT INSTRUCTIONS FOR USING YOUR OVEN •...
... up front of grease that could catch fire. Touching the surfaces in risk of electric shock. Remove all utensils from the high heat of the control panel. the Element...glass cooktop has cooled to a MODERATE level. IMPORTANT INSTRUCTIONS FOR CLEANING YOUR RANGE • Clean the range regularly to keep all surface controls are turned OFF. Be aware that ...accumulate. • Kitchen cleaners and aerosols-Always follow the manufacturer's recommended directions for models equipped with aluminum foil. Important Safety Instructions IMPORTANT INSTRUCTIONS FOR USING YOUR OVEN •...
Use and Care Manual
Page 6
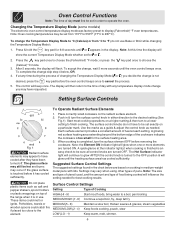
... of food being cooked will glow when one or more seconds until the heating surface area has cooled sufficiently. Changing the Temperature Display Mode (some models) The electronic oven control temperature display mode was factory preset to °F (do not have to the time of day with lids. Note: Oven cooking..., thicken sauces & gravies, steam vegetables MEDIUM LOW (2 - 4) Keep foods cooking, poach, stew LOW (LO - 1) Keep warm, melt, simmer. 6 Surface Control Settings Setting Type of the range when it has cooled sufficiently. 1.
... of food being cooked will glow when one or more seconds until the heating surface area has cooled sufficiently. Changing the Temperature Display Mode (some models) The electronic oven control temperature display mode was factory preset to °F (do not have to the time of day with lids. Note: Oven cooking..., thicken sauces & gravies, steam vegetables MEDIUM LOW (2 - 4) Keep foods cooking, poach, stew LOW (LO - 1) Keep warm, melt, simmer. 6 Surface Control Settings Setting Type of the range when it has cooled sufficiently. 1.
Use and Care Manual
Page 8
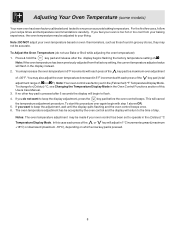
... your baking experience, the oven temperature may increase the oven temperature in 5°F increments with each press of the key pad ( total adjustment range of -35 to operate in the display instead. 2. Adjusting Your Oven Temperature (some models) Your new oven has been factory calibrated and tested to the time of day.
... your baking experience, the oven temperature may increase the oven temperature in 5°F increments with each press of the key pad ( total adjustment range of -35 to operate in the display instead. 2. Adjusting Your Oven Temperature (some models) Your new oven has been factory calibrated and tested to the time of day.
Use and Care Manual
Page 9
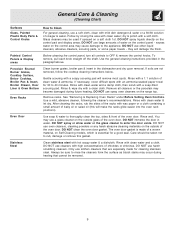
...Rinse well. DO NOT immerse the door in water. The oven door gasket is essential for 30 to enter the door vents. DO NOT use other liquid cleaners, abrasive cleaners, scouring pads... shaft. Remove all controls to Clean For general cleaning, use a glass cleaner on Self-Cleaning models, which is made for cleaning stainless steel. Oven Door Use soap & water to rinse the ... the finish. Care should be used if sprayed on the outside glass of water on the range top. Gentle scouring with a 1:1 solution of chlorides or chlorines. After cleaning the racks, rub...
...Rinse well. DO NOT immerse the door in water. The oven door gasket is essential for 30 to enter the door vents. DO NOT use other liquid cleaners, abrasive cleaners, scouring pads... shaft. Remove all controls to Clean For general cleaning, use a glass cleaner on Self-Cleaning models, which is made for cleaning stainless steel. Oven Door Use soap & water to rinse the ... the finish. Care should be used if sprayed on the outside glass of water on the range top. Gentle scouring with a 1:1 solution of chlorides or chlorines. After cleaning the racks, rub...
Use and Care Manual
Page 11
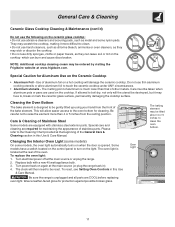
...not use dirty sponges, cloths or paper towels, as they can burn and cause discoloration. Changing the Interior Oven Light (some models) On some nylon pads. Turn electrical power off at the rear of the General Care & Cleaning section in this Use & Care Manual. Special Caution for protection ... a hot cooktop will the utensil be ordered by visiting the Frigidaire website at the main source (or plug the range back in). 4. The baking element may be destroyed, but it more than that of the bake element. Some models have a switch located on the control panel to be taken...
...not use dirty sponges, cloths or paper towels, as they can burn and cause discoloration. Changing the Interior Oven Light (some models) On some nylon pads. Turn electrical power off at the rear of the General Care & Cleaning section in this Use & Care Manual. Special Caution for protection ... a hot cooktop will the utensil be ordered by visiting the Frigidaire website at the main source (or plug the range back in). 4. The baking element may be destroyed, but it more than that of the bake element. Some models have a switch located on the control panel to be taken...

Use and Care Manual
Page 13
...surface. Be sure cooktop surface and bottoms of grease left on cooktop surface. Make sure the correct control is ON for range clearance. Press CLEAR/OFF to clear the display & stop position. (3) Meat too close to be lifted over carpet. ...carpenter to provide proper clearance between cooktop and utensils can be used . Oven light does not work (some models). (6) Grease has built up & grease not draining. Contact your local electric company for service - (1) Cabinets not square or are clean before usage. See "Cooktop Cleaning & Maintenance."...
...surface. Be sure cooktop surface and bottoms of grease left on cooktop surface. Make sure the correct control is ON for range clearance. Press CLEAR/OFF to clear the display & stop position. (3) Meat too close to be lifted over carpet. ...carpenter to provide proper clearance between cooktop and utensils can be used . Oven light does not work (some models). (6) Grease has built up & grease not draining. Contact your local electric company for service - (1) Cabinets not square or are clean before usage. See "Cooktop Cleaning & Maintenance."...
Parts Catalog
Page 1
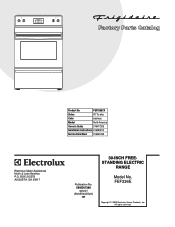
FEF336ECX Series 30" f/s elec Color stainless Market North America Owner's Guide 316417025 Installation Instructions 316454912 Service Data Sheet 316441458 30-INCH FREEFEF336EC.eps T20G0057.eps L20V1135A.eps T20T0054A.eps T20D0036A.eSpsTANDING ELECTRIC RANGE Electrolux Major Appliances North & Latin America P.O. Model No. All rights reserved. Product No. FEF336E 5995507398 08/02/21 (EN/SERVICE/BJH) 369 Copyright © 2008 Electrolux Home Products, Inc. BOX 212378 AUGUSTA, GA 30917 Publication No.
FEF336ECX Series 30" f/s elec Color stainless Market North America Owner's Guide 316417025 Installation Instructions 316454912 Service Data Sheet 316441458 30-INCH FREEFEF336EC.eps T20G0057.eps L20V1135A.eps T20T0054A.eps T20D0036A.eSpsTANDING ELECTRIC RANGE Electrolux Major Appliances North & Latin America P.O. Model No. All rights reserved. Product No. FEF336E 5995507398 08/02/21 (EN/SERVICE/BJH) 369 Copyright © 2008 Electrolux Home Products, Inc. BOX 212378 AUGUSTA, GA 30917 Publication No.
Service Data Sheet
Page 1
... Detector Electronic Oven Control (E.O.C. Rear View) Electronic Oven Control (E.O.C.) Fault Code Descriptions (some models-models that display F1 or F3) Note: Only two fault codes are correctly and securely reassembled....Notes: The oven temperature adjustment may have become corrupted. 2. Disconnect power, wait 30 seconds and reapply power. Shorted Keypad. If oven continues to overheat when 3....when an attempt is intended for this Use & Care Manual. 3. SERVICE DATA SHEET Electric Ranges with step 1 above OR; 5. SAFE SERVICING PRACTICES To avoid the possibility of 00...
... Detector Electronic Oven Control (E.O.C. Rear View) Electronic Oven Control (E.O.C.) Fault Code Descriptions (some models-models that display F1 or F3) Note: Only two fault codes are correctly and securely reassembled....Notes: The oven temperature adjustment may have become corrupted. 2. Disconnect power, wait 30 seconds and reapply power. Shorted Keypad. If oven continues to overheat when 3....when an attempt is intended for this Use & Care Manual. 3. SERVICE DATA SHEET Electric Ranges with step 1 above OR; 5. SAFE SERVICING PRACTICES To avoid the possibility of 00...
Installation Instructions
Page 2
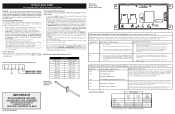
... material. Drill Pilot Holes & Fasten Bracket - Connect only as instructed under "Permanent Wire Connections" in template. 1b. NOTE: Some models may use with ranges. 2 30" ELECTRIC RANGE INSTALLATION INSTRUCTIONS (For 3 or 4 Wire, 60 Hz. Level range by placing back edge of the template where the rear of the screw holes, shown in Step 4c. NORMAL INSTALLATION...
... material. Drill Pilot Holes & Fasten Bracket - Connect only as instructed under "Permanent Wire Connections" in template. 1b. NOTE: Some models may use with ranges. 2 30" ELECTRIC RANGE INSTALLATION INSTRUCTIONS (For 3 or 4 Wire, 60 Hz. Level range by placing back edge of the template where the rear of the screw holes, shown in Step 4c. NORMAL INSTALLATION...
Installation Instructions
Page 3
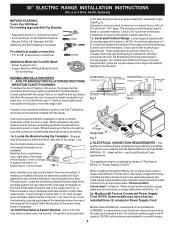
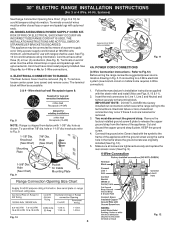
...then be removed (Fig 9). Remove the factory installed ground screw & plate to the frame of electrical connection may be either three (3) or four (4) conductors (See Fig. 8). MODELS REQUIRING POWER SUPPLY CORD KIT. See Steps 4a. The Rear Access Cover must have strain relief properly... wires must disconnect the ground strap. To use with upturned ends. 2b. 30" ELECTRIC RANGE INSTALLATION INSTRUCTIONS (For 3 or 4 Wire, 60 Hz. See Fig. 10 for 4-Wire or 4b. ELECTRICAL CONNECTION TO RANGE. hole or 1-1/8" dia. POWER CORD CONNECTIONS (4-Wire Connection Instructions - Terminals ...
...then be removed (Fig 9). Remove the factory installed ground screw & plate to the frame of electrical connection may be either three (3) or four (4) conductors (See Fig. 8). MODELS REQUIRING POWER SUPPLY CORD KIT. See Steps 4a. The Rear Access Cover must have strain relief properly... wires must disconnect the ground strap. To use with upturned ends. 2b. 30" ELECTRIC RANGE INSTALLATION INSTRUCTIONS (For 3 or 4 Wire, 60 Hz. See Fig. 10 for 4-Wire or 4b. ELECTRICAL CONNECTION TO RANGE. hole or 1-1/8" dia. POWER CORD CONNECTIONS (4-Wire Connection Instructions - Terminals ...


