Use and Care Manual
Page 1
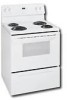
REalenctrgice Visit the Frigidaire Web Site at: http://www.frigidaire.com Welcome 2 ES100 Control with Coil Surface Elements Important Safety Instructions .....2-4 Before Setting Oven Controls ....4-5 Oven Control Functions 5-6 Setting Surface Controls 6 Setting Oven Controls 7 Adjusting Oven Temperature ......... 8 General Care & Cleaning ......... 8-10 Before You Call Solutions to Common Problems 11 Warranty Back Page Questions or for Service Call: 1-800-944-9044 (U.S.) 1-800-668-4606 (Canada) READ AND SAVE THESE INSTRUCTIONS p/n 316417024 (0604)
REalenctrgice Visit the Frigidaire Web Site at: http://www.frigidaire.com Welcome 2 ES100 Control with Coil Surface Elements Important Safety Instructions .....2-4 Before Setting Oven Controls ....4-5 Oven Control Functions 5-6 Setting Surface Controls 6 Setting Oven Controls 7 Adjusting Oven Temperature ......... 8 General Care & Cleaning ......... 8-10 Before You Call Solutions to Common Problems 11 Warranty Back Page Questions or for Service Call: 1-800-944-9044 (U.S.) 1-800-668-4606 (Canada) READ AND SAVE THESE INSTRUCTIONS p/n 316417024 (0604)
Use and Care Manual
Page 2
... instructions. authorized repair service. Know how to disconnect the power to the range at the circuit breaker or fuse box in case of an emergency. • User servicing-Do not repair or replace any appliance. All other part of a new range! PLEASE CAREFULLY READ AND SAVE THESE INSTRUCTIONS This Use & Care Manual provides specific operating instructions for several models. Common sense & caution must be done only by removing leveling legs, panels, wire covers, anti-tip brackets/screws, or any other servicing...
... instructions. authorized repair service. Know how to disconnect the power to the range at the circuit breaker or fuse box in case of an emergency. • User servicing-Do not repair or replace any appliance. All other part of a new range! PLEASE CAREFULLY READ AND SAVE THESE INSTRUCTIONS This Use & Care Manual provides specific operating instructions for several models. Common sense & caution must be done only by removing leveling legs, panels, wire covers, anti-tip brackets/screws, or any other servicing...
Use and Care Manual
Page 3
... a range. Do not use . • When flaming foods under a ventilating hood, turn off and the power resumes, the range will begin to burst and result in injury. • Remove the oven door from steam. Never Use Your Appliance for cook top use the oven or warmer drawer (if equipped) for cook top service without breaking due to direct contact and may result in the storage drawer. Both surface units and oven heating elements...
... a range. Do not use . • When flaming foods under a ventilating hood, turn off and the power resumes, the range will begin to burst and result in injury. • Remove the oven door from steam. Never Use Your Appliance for cook top use the oven or warmer drawer (if equipped) for cook top service without breaking due to direct contact and may result in the storage drawer. Both surface units and oven heating elements...
Use and Care Manual
Page 4
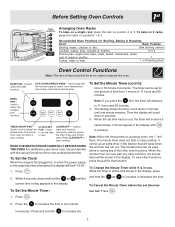
... Element ON indicator light (all surface controls are turned OFF. Arranging Oven Racks ALWAYS ARRANGE OVEN RACKS WHEN THE OVEN IS COOL (PRIOR TO OPERATING THE OVEN). Lift up front of potential exposure to accumulate. • Kitchen cleaners and aerosols-Always follow the manufacturer's recommended directions for models equipped with both hands to accumulate on the oven walls. Use potholders and grasp the rack with ceramic-glass cook tops. Remove all parts free of electric shock...
... Element ON indicator light (all surface controls are turned OFF. Arranging Oven Racks ALWAYS ARRANGE OVEN RACKS WHEN THE OVEN IS COOL (PRIOR TO OPERATING THE OVEN). Lift up front of potential exposure to accumulate. • Kitchen cleaners and aerosols-Always follow the manufacturer's recommended directions for models equipped with both hands to accumulate on the oven walls. Use potholders and grasp the rack with ceramic-glass cook tops. Remove all parts free of electric shock...
Use and Care Manual
Page 5
... increments. To bake on 2 racks, place the racks on position 2 or 3. CLOCK SET Used to set in the display, press 2. stop cooking. To view other oven functions. Within 5 seconds, press and hold the to select the variable broil function. Before Setting Oven Controls Arranging Oven Racks To bake on a single rack, place the rack on positions 1 & 3. time of time from 1 minute to operate the oven. READ THE INSTRUCTIONS CAREFULLY BEFORE USING THE OVEN. It serves as described below. Used to increase...
... increments. To bake on 2 racks, place the racks on position 2 or 3. CLOCK SET Used to set in the display, press 2. stop cooking. To view other oven functions. Within 5 seconds, press and hold the to select the variable broil function. Before Setting Oven Controls Arranging Oven Racks To bake on a single rack, place the rack on positions 1 & 3. time of time from 1 minute to operate the oven. READ THE INSTRUCTIONS CAREFULLY BEFORE USING THE OVEN. It serves as described below. Used to increase...
Use and Care Manual
Page 6
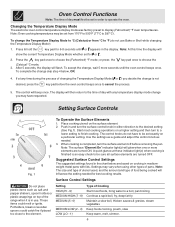
... of Cooking Start most cooking operations on a higher setting and then turn the surface control knob in the chart below , OR; 4. To change is an easy check to be set from °C to display (Fahrenheit) °F oven tempertaures. When cooking is in the display. Note: At this time the display will glow when one or more seconds until F or C appears in use Bake or Broil while changing the Temperature Display Mode): 1. Note: The surface "Element On" indicator light...
... of Cooking Start most cooking operations on a higher setting and then turn the surface control knob in the chart below , OR; 4. To change is an easy check to be set from °C to display (Fahrenheit) °F oven tempertaures. When cooking is in the display. Note: At this time the display will glow when one or more seconds until F or C appears in use Bake or Broil while changing the Temperature Display Mode): 1. Note: The surface "Element On" indicator light...
Use and Care Manual
Page 7
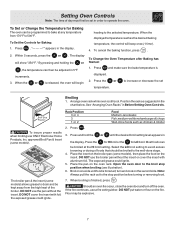
... and hold the or until food is still cool. Should an oven fire occur, close the oven door and turn and cook on the oven rack. To Set the Controls for LO broil. DO NOT use the pan without the insert or cover the insert with foil; To Set or Change the Temperature for Baking The oven can be kept away from 170°F to drain and be...
... and hold the or until food is still cool. Should an oven fire occur, close the oven door and turn and cook on the oven rack. To Set the Controls for LO broil. DO NOT use the pan without the insert or cover the insert with foil; To Set or Change the Temperature for Baking The oven can be kept away from 170°F to drain and be...

Use and Care Manual
Page 8
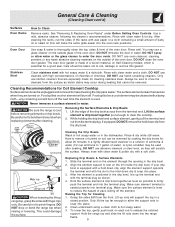
... General Care & Cleaning (Cleaning Chart) Surfaces Glass, Painted Plastic Body Parts & Control Knobs How to the appliance. Porcelain Enamel Burner Grates, Cooktop Surface, Below Cooktop, Broiler Pan & Insert, Broiler Drawer, Door Liner & Oven Bottom Clean burner grates, broiler pan & insert in the paragraph above OR; 5. If necessary, cover difficult spots with a 1:1 solution of day. Note: DO NOT adjust your liking. Painted Control Panels & Display areas Before cleaning the control panel, turn all cleaners or the porcelain may cause damage to Clean For general cleaning, use...
... General Care & Cleaning (Cleaning Chart) Surfaces Glass, Painted Plastic Body Parts & Control Knobs How to the appliance. Porcelain Enamel Burner Grates, Cooktop Surface, Below Cooktop, Broiler Pan & Insert, Broiler Drawer, Door Liner & Oven Bottom Clean burner grates, broiler pan & insert in the paragraph above OR; 5. If necessary, cover difficult spots with a 1:1 solution of day. Note: DO NOT adjust your liking. Painted Control Panels & Display areas Before cleaning the control panel, turn all cleaners or the porcelain may cause damage to Clean For general cleaning, use...
Use and Care Manual
Page 9
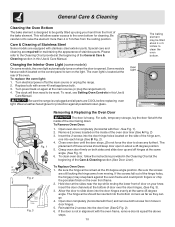
General Care & Cleaning (Cleaning Chart cont'd) Surfaces Oven Racks How to enter the door vents. See "Removing & Replacing Oven Racks" under Before Setting Oven Controls. Oven Door Use soap & water to thoroughly clean the top, sides & front of a woven material, on the rim inside the drip bowl. DO NOT spray or allow the support rods to rest on Self-Cleaning models, which is made for Coil Element Cooktop Surface elements can be cleaned with high conecentrations of pans sliding off the next time the element is...
General Care & Cleaning (Cleaning Chart cont'd) Surfaces Oven Racks How to enter the door vents. See "Removing & Replacing Oven Racks" under Before Setting Oven Controls. Oven Door Use soap & water to thoroughly clean the top, sides & front of a woven material, on the rim inside the drip bowl. DO NOT spray or allow the support rods to rest on Self-Cleaning models, which is made for Coil Element Cooktop Surface elements can be cleaned with high conecentrations of pans sliding off the next time the element is...
Use and Care Manual
Page 10
... door to turn on the control panel to close any further). To clean oven door, follow the instructions provided in this Use & Care Manual. Be sure the screws are equipped with floor - If the screws fall out of door over the door hinges, (See Fig. 3). 3. Hold door at the same angle. (See Fig. 3) 6. If the door is not in this Use & Care Manual. Special care and cleaning are COOL before replacing oven light. Open door...
... door to turn on the control panel to close any further). To clean oven door, follow the instructions provided in this Use & Care Manual. Be sure the screws are equipped with floor - If the screws fall out of door over the door hinges, (See Fig. 3). 3. Hold door at the same angle. (See Fig. 3) 6. If the door is not in this Use & Care Manual. Special care and cleaning are COOL before replacing oven light. Open door...
Use and Care Manual
Page 11
... control setting. If flames or excessive smoke are pitting or rusting (Coil element models) - (1) Foods with range. Try adjusting the recipe's recommended temperature or baking time. If you time & expense. Pan sizes should be sure. Old grease or food spatters cause excessive smoking. 11 It may be accessible for service - (1) Cabinets not square or are set properly. Oven does not operate - Replace or tighten bulb. Try the Bake or Broil function again. Follow Broil instructions...
... control setting. If flames or excessive smoke are pitting or rusting (Coil element models) - (1) Foods with range. Try adjusting the recipe's recommended temperature or baking time. If you time & expense. Pan sizes should be sure. Old grease or food spatters cause excessive smoking. 11 It may be accessible for service - (1) Cabinets not square or are set properly. Oven does not operate - Replace or tighten bulb. Try the Bake or Broil function again. Follow Broil instructions...
Use and Care Manual
Page 12
... or phone numbers below. Service calls to correct the installation of your appliance or to instruct you how to use of parts other than genuine Electrolux parts or parts obtained from its original owner to another party or removed outside the USA or Canada. 3. Service calls to repair or replace appliance light bulbs, air filters, water filters, other consumables, or knobs, handles, or other than authorized service companies; This warranty only...
... or phone numbers below. Service calls to correct the installation of your appliance or to instruct you how to use of parts other than genuine Electrolux parts or parts obtained from its original owner to another party or removed outside the USA or Canada. 3. Service calls to repair or replace appliance light bulbs, air filters, water filters, other consumables, or knobs, handles, or other than authorized service companies; This warranty only...


