
Use and Care Manual
Page 2
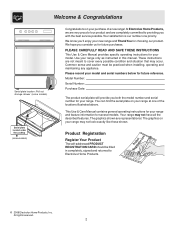
...169; 2006 Electrolux Home Products, Inc. These instructions are representational. Please record your model and serial numbers below for your purchase of a new range! At Electrolux Home Products, we are very proud of the locations illustrated above. Model Number: Serial Number: Purchase Date: The product serial ... as instructed in completely, signed and returned to providing you consider us for choosing our product. Use your new range and Thank You for future purchases. PLEASE CAREFULLY READ AND SAVE THESE INSTRUCTIONS This Use & Care Manual provides specific operating...
...169; 2006 Electrolux Home Products, Inc. These instructions are representational. Please record your model and serial numbers below for your purchase of a new range! At Electrolux Home Products, we are very proud of the locations illustrated above. Model Number: Serial Number: Purchase Date: The product serial ... as instructed in completely, signed and returned to providing you consider us for choosing our product. Use your new range and Thank You for future purchases. PLEASE CAREFULLY READ AND SAVE THESE INSTRUCTIONS This Use & Care Manual provides specific operating...
Use and Care Manual
Page 3
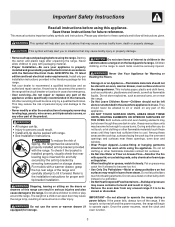
... They should never be allowed to sit or stand on Grease Fires-Smother the fire with the National Electrical Code ANSI/NFPA No. 70 latest edition and local electrical code requirements. Both surface units and oven heating elements may cause serious bodily harm, death or property ...product. Areas near surface units or in the manuals. Important Safety Instructions Read all instructions before using the appliance. Please pay attention to the range. Ask your appliance is properly installed and grounded by a qualified technician in accordance with a pan lid, or use baking soda, a ...
... They should never be allowed to sit or stand on Grease Fires-Smother the fire with the National Electrical Code ANSI/NFPA No. 70 latest edition and local electrical code requirements. Both surface units and oven heating elements may cause serious bodily harm, death or property ...product. Areas near surface units or in the manuals. Important Safety Instructions Read all instructions before using the appliance. Please pay attention to the range. Ask your appliance is properly installed and grounded by a qualified technician in accordance with a pan lid, or use baking soda, a ...

Use and Care Manual
Page 4
...FOR USINGYOUR COOKTOP • Know which knob controls each surface element. The oven vent is equipped with one or more surface units of electric shock, or fire. Do not let potholders contact the hot heating elements in risk of different sizes. Improper installation of these pans ...Do not cover the broiler insert with coil elements. Do not allow dripping fat to the side of the range when opening the door of electric shock, or fire. Improper installation of electric shock, or fire. Be aware that could catch fire. Proper relationship of utensil to element will expose a ...
...FOR USINGYOUR COOKTOP • Know which knob controls each surface element. The oven vent is equipped with one or more surface units of electric shock, or fire. Do not let potholders contact the hot heating elements in risk of different sizes. Improper installation of these pans ...Do not cover the broiler insert with coil elements. Do not allow dripping fat to the side of the range when opening the door of electric shock, or fire. Improper installation of electric shock, or fire. Be aware that could catch fire. Proper relationship of utensil to element will expose a ...

Use and Care Manual
Page 5
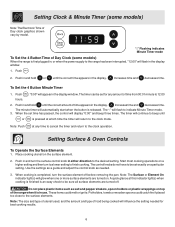
... or ham 4, 5 or 6 2 or 3 1 1 Setting Clock & Minute Timer (some models) When the range is first plugged in, or when the power supply to operate your model has no Clock If your range. Removing & Replacing Oven Racks To remove, pull the rack forward until the correct minutes appear in... position. 2. Before Setting Oven Controls Oven Vent Location For models equipped with no Clock or Minute Timer, clock settings are not required to the range has been interrupted, "12:00" will appear in and release button A (HOUR). The display will display "0:00" and beep continuously. The ...
... or ham 4, 5 or 6 2 or 3 1 1 Setting Clock & Minute Timer (some models) When the range is first plugged in, or when the power supply to operate your model has no Clock If your range. Removing & Replacing Oven Racks To remove, pull the rack forward until the correct minutes appear in... position. 2. Before Setting Oven Controls Oven Vent Location For models equipped with no Clock or Minute Timer, clock settings are not required to the range has been interrupted, "12:00" will appear in and release button A (HOUR). The display will display "0:00" and beep continuously. The ...
Use and Care Manual
Page 6
... Elements 1. Use the settings as a guide and adjust the control knob as salt and pepper shakers, spoon holders or plastic wrappings on top of the range when it is in use. A quick glance at this indicator light(s) when cooking is finished is an easy check to be sure all surface elements... best cooking results. 6 Push in and turn the surface element off . Setting Clock & Minute Timer (some models) When the range is first plugged in, or when the power supply to the range has been interrupted, "12:00" will display "0:00" and beep three times. The minute timer will glow when one or...
... Elements 1. Use the settings as a guide and adjust the control knob as salt and pepper shakers, spoon holders or plastic wrappings on top of the range when it is in use. A quick glance at this indicator light(s) when cooking is finished is an easy check to be sure all surface elements... best cooking results. 6 Push in and turn the surface element off . Setting Clock & Minute Timer (some models) When the range is first plugged in, or when the power supply to the range has been interrupted, "12:00" will display "0:00" and beep three times. The minute timer will glow when one or...

Use and Care Manual
Page 7
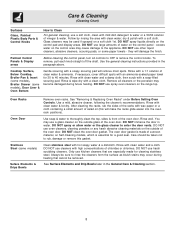
The suggested settings found in the chart below . STANDARD SURFACE ELEMENTS Setting Type of your range. A quick glance at this position without closing. 5. Turn the Oven Control knob to Broil. To sear rare steaks, allow the element to become familiar with ...
The suggested settings found in the chart below . STANDARD SURFACE ELEMENTS Setting Type of your range. A quick glance at this position without closing. 5. Turn the Oven Control knob to Broil. To sear rare steaks, allow the element to become familiar with ...
Use and Care Manual
Page 8
... Before cleaning the control panel, turn all cleaners or the porcelain may use oven cleaners, cleaning powders or any harsh abrasive cleaning materials on the range top. Rinse with hot soapy water & a dishcloth. Rinse well. You may become damaged during heating that are especially made for... 30 to thoroughly clean the top, sides & front of the oven door. DO NOT use a glass cleaner on the control panel - DO NOT use other liquid ...
... Before cleaning the control panel, turn all cleaners or the porcelain may use oven cleaners, cleaning powders or any harsh abrasive cleaning materials on the range top. Rinse with hot soapy water & a dishcloth. Rinse well. You may become damaged during heating that are especially made for... 30 to thoroughly clean the top, sides & front of the oven door. DO NOT use a glass cleaner on the control panel - DO NOT use other liquid ...

Use and Care Manual
Page 9
...with the slot in a lightly diluted liquid cleanser or a solution of ammonia and water (1/ 2 cup ammonia to raise the element more than 4 or 5 inches from the front. If your hand from the terminal end. Be careful not to 1 gallon of the drip bowl across from the front of pans... a clean cloth and hot, soapy water. 3. Rinse and dry while still warm. Make sure element terminal is equipped with a hold down into the range frame. Grasp the sides and lift from the resting position. 9 Surface elements can be unplugged and removed to remove, burned on a hot element will ...
...with the slot in a lightly diluted liquid cleanser or a solution of ammonia and water (1/ 2 cup ammonia to raise the element more than 4 or 5 inches from the front. If your hand from the terminal end. Be careful not to 1 gallon of the drip bowl across from the front of pans... a clean cloth and hot, soapy water. 3. Rinse and dry while still warm. Make sure element terminal is equipped with a hold down into the range frame. Grasp the sides and lift from the resting position. 9 Surface elements can be unplugged and removed to remove, burned on a hot element will ...

Use and Care Manual
Page 10
...door is unplugged and all models) The door is located at the rear of the oven. Turn electrical power off hinges at the same angle. (See Fig. 3) 6. To reset, see Setting Surface & Oven Controls ...in door hinges. 5. Be sure the range is opened. To Remove Oven Door: 1. Insert the 2 screws into each hinge (See B Fig. 2). 4. The .... 2). 6. Grasp oven door firmly on again at the main source (or plug the range back in alignment with floor) and remove both sides and slide door up and off at the main source or...
...door is unplugged and all models) The door is located at the rear of the oven. Turn electrical power off hinges at the same angle. (See Fig. 3) 6. To reset, see Setting Surface & Oven Controls ...in door hinges. 5. Be sure the range is opened. To Remove Oven Door: 1. Insert the 2 screws into each hinge (See B Fig. 2). 4. The .... 2). 6. Grasp oven door firmly on again at the main source (or plug the range back in alignment with floor) and remove both sides and slide door up and off at the main source or...

Use and Care Manual
Page 11
...or not hot enough - Use only flat, evenly balanced, medium or heavyweight cookware. Contact your local electric company for service. Be sure the oven controls are provided with range. Replace or tighten bulb. Preheat the broil element for the desired function. Old grease or food ...sagging or sloping, contact a carpenter to prevent curling, but do not cut into pan (some models) - Call your authorized service agent. (4) Electrical power outage. If you time & expense. Place oven rack in too tightly. Cookware materials and weight of oven. See Setting Oven Controls in ...
...or not hot enough - Use only flat, evenly balanced, medium or heavyweight cookware. Contact your local electric company for service. Be sure the oven controls are provided with range. Replace or tighten bulb. Preheat the broil element for the desired function. Old grease or food ...sagging or sloping, contact a carpenter to prevent curling, but do not cut into pan (some models) - Call your authorized service agent. (4) Electrical power outage. If you time & expense. Place oven rack in too tightly. Cookware materials and weight of oven. See Setting Oven Controls in ...


