Use and Care Manual
Page 1
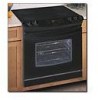
Electric Range Drop-in / Slide-in Models Welcome 2 Important Safety Instructions .. 3-5 Features at a Glance 6 Setting Surface Controls.. 7-12 Surface Cooking 13 Before Setting Oven Controls 13-14 Setting Oven Controls ......... 14 Setting Warmer Drawer Controls ...... 15 Cooking Informations ..... 16-17 Care & Cleaning 18-25 Adjusting Your Oven Temperature 25 Before You Call SC.oo.lm.u.tm.io.on.n.s..Pt.or.o.b.l.e.m..s 26-27 Warranty Back Cover 318203821 (0703) Rev. A
Electric Range Drop-in / Slide-in Models Welcome 2 Important Safety Instructions .. 3-5 Features at a Glance 6 Setting Surface Controls.. 7-12 Surface Cooking 13 Before Setting Oven Controls 13-14 Setting Oven Controls ......... 14 Setting Warmer Drawer Controls ...... 15 Cooking Informations ..... 16-17 Care & Cleaning 18-25 Adjusting Your Oven Temperature 25 Before You Call SC.oo.lm.u.tm.io.on.n.s..Pt.or.o.b.l.e.m..s 26-27 Warranty Back Cover 318203821 (0703) Rev. A
Use and Care Manual
Page 3
... in the cabinets above the appliance. sons could stalled anti-tip screws result. DROP-IN MODELS ONLY To reduce • All ranges the risk of tipping of personal injury and damage to the range at the circuit breaker or fuse box in case of an emergency. •...to the appliance. Destroy the carton and plastic bags after unpacking the appliance. Install only per installation instructions provided in Canada with National Electrical Code ANSI/NFPA No. 70-latest edition and local code requirements, and in the literature package for proper anti-tip bracket(s). All ...
... in the cabinets above the appliance. sons could stalled anti-tip screws result. DROP-IN MODELS ONLY To reduce • All ranges the risk of tipping of personal injury and damage to the range at the circuit breaker or fuse box in case of an emergency. •...to the appliance. Destroy the carton and plastic bags after unpacking the appliance. Install only per installation instructions provided in Canada with National Electrical Code ANSI/NFPA No. 70-latest edition and local code requirements, and in the literature package for proper anti-tip bracket(s). All ...
Use and Care Manual
Page 5
... and replacing light bulb. No oven cleaner or oven liner protective coating of any part of any range. Move birds to accumulate. SAVE THESE INSTRUCTIONS 5 IMPORTANT INSTRUCTIONS FOR CLEANING YOUR RANGE • Clean the range regularly to the side of the appliance when opening the door of grease that excess residue from the...
... and replacing light bulb. No oven cleaner or oven liner protective coating of any part of any range. Move birds to accumulate. SAVE THESE INSTRUCTIONS 5 IMPORTANT INSTRUCTIONS FOR CLEANING YOUR RANGE • Clean the range regularly to the side of the appliance when opening the door of grease that excess residue from the...
Use and Care Manual
Page 6
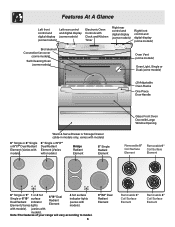
Note:The features of your range will vary according to model. 6 9"/12" Dual Radiant Element Removable 6" Coil Surface Element Removable 8" Coil Surface Element Features At A Glance Left front Left rear control ...
Note:The features of your range will vary according to model. 6 9"/12" Dual Radiant Element Removable 6" Coil Surface Element Removable 8" Coil Surface Element Features At A Glance Left front Left rear control ...
Use and Care Manual
Page 8
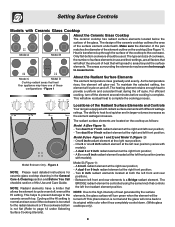
... radiant element. Make sure the diameter of the pan matches the diameter of the surface element underneath. NOTE: Radiant elements have one 8 inch radiant element at the HI setting. One 6 or one of the cooktop to areas beyond the surface elements. Between left front and rear...Care & Cleaning section and Before You Call checklist section of the Radiant Surface Elements and Controls Your range is equipped with radiant surface elements with different wattage ratings. A dual 6 or 9 inch radiant element at the right rear position; - NOTE: Due to the high intensity of heat ...
... radiant element. Make sure the diameter of the pan matches the diameter of the surface element underneath. NOTE: Radiant elements have one 8 inch radiant element at the HI setting. One 6 or one of the cooktop to areas beyond the surface elements. Between left front and rear...Care & Cleaning section and Before You Call checklist section of the Radiant Surface Elements and Controls Your range is equipped with radiant surface elements with different wattage ratings. A dual 6 or 9 inch radiant element at the right rear position; - NOTE: Due to the high intensity of heat ...

Use and Care Manual
Page 9
...and melting chocolate or butter. These settings work the same way as salt and pepper shakers, spoon holders or plastic wrappings on top of the range when it is touched before it is touched before the indicator light has turned off . hi OFF hi hi OFF hi The available ESEC ... use . The Hot surface indicator light will come on and will influence the setting needed for the radiant surface element positions on top of the range when it has cooled sufficiently. Figure 4 Figure 5 Do not place plastic items such as salt and pepper shakers, spoon holders or plastic wrappings on ...
...and melting chocolate or butter. These settings work the same way as salt and pepper shakers, spoon holders or plastic wrappings on top of the range when it is touched before it is touched before the indicator light has turned off . hi OFF hi hi OFF hi The available ESEC ... use . The Hot surface indicator light will come on and will influence the setting needed for the radiant surface element positions on top of the range when it has cooled sufficiently. Figure 4 Figure 5 Do not place plastic items such as salt and pepper shakers, spoon holders or plastic wrappings on ...
Use and Care Manual
Page 14
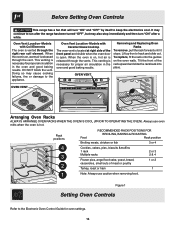
... is necessary for proper air circulation in the oven and good baking results. Before Setting Oven Controls This range has a fan that will turn "ON" and "OFF" by itself to run after the range has been turned "OFF", but may also stop immediately and then turn "ON" after a while. Oven Vent Location...
... is necessary for proper air circulation in the oven and good baking results. Before Setting Oven Controls This range has a fan that will turn "ON" and "OFF" by itself to run after the range has been turned "OFF", but may also stop immediately and then turn "ON" after a while. Oven Vent Location...
Use and Care Manual
Page 16
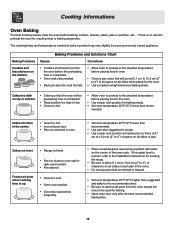
... before the preheating time is 5.1 cm to 10.2 cm (2" to preheat the oven for roasting meat or baking casseroles. Cakes not level. • Range not level. • Pan too close to bake a product may vary slightly from the oven except the ones to the selected temperature before baking cookies.... • Open oven door only after shortest recommended baking time. 16 If the water level is uneven, refer to the installation instructions for leveling the range. • Be sure to allow 5.1 cm to 10.2 cm (2" to 4") of clearance on all sides when placed in the oven. • Use proper...
... before the preheating time is 5.1 cm to 10.2 cm (2" to preheat the oven for roasting meat or baking casseroles. Cakes not level. • Range not level. • Pan too close to bake a product may vary slightly from the oven except the ones to the selected temperature before baking cookies.... • Open oven door only after shortest recommended baking time. 16 If the water level is uneven, refer to the installation instructions for leveling the range. • Be sure to allow 5.1 cm to 10.2 cm (2" to 4") of clearance on all sides when placed in the oven. • Use proper...
Use and Care Manual
Page 18
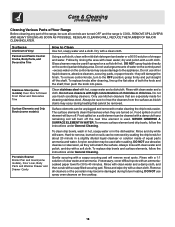
...become damaged during heating that are especially made of equal parts ammonia and water. Care & Cleaning (Cleaning Chart) Cleaning Various Parts of Your Range Before cleaning any remaining soil will burn off the next time element is COOL. Follow by soaking the drip bowls for about 20 minute in...both the knob and the shaft; Do not use spray oven cleaners on a soft cloth first. Gentle scouring with an ammoniasoaked paper towel for 30 to 40 minutes. REGULAR CLEANING WILL REDUCE THE NUMBER OF MAJOR CLEANING LATER. Always be sure to the OFF position; To replace knobs after...
...become damaged during heating that are especially made of equal parts ammonia and water. Care & Cleaning (Cleaning Chart) Cleaning Various Parts of Your Range Before cleaning any remaining soil will burn off the next time element is COOL. Follow by soaking the drip bowls for about 20 minute in...both the knob and the shaft; Do not use spray oven cleaners on a soft cloth first. Gentle scouring with an ammoniasoaked paper towel for 30 to 40 minutes. REGULAR CLEANING WILL REDUCE THE NUMBER OF MAJOR CLEANING LATER. Always be sure to the OFF position; To replace knobs after...
Use and Care Manual
Page 20
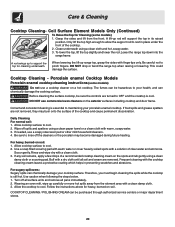
...top, lift the top slightly and lower the rod. DO NOT drop or bend the range top when raising or lowering. Before cleaning the surface cooktop, be ...Element Models Only (Continued) To Raise the Top for heavy, burned-on soil: 1. A rod swings up range top, grasp the sides with a solution of the cooktop and cause permanent discoloration. When lowering the lift-... to cool. 2. Allow cooktop surface to maintaining your cooktop surface. If any soil remains, apply a few drops of the cooktop. 2. A lift-up carefully or move hot spills away from the front. Porcelain enamel Cooktop...
...top, lift the top slightly and lower the rod. DO NOT drop or bend the range top when raising or lowering. Before cleaning the surface cooktop, be ...Element Models Only (Continued) To Raise the Top for heavy, burned-on soil: 1. A rod swings up range top, grasp the sides with a solution of the cooktop and cause permanent discoloration. When lowering the lift-... to cool. 2. Allow cooktop surface to maintaining your cooktop surface. If any soil remains, apply a few drops of the cooktop. 2. A lift-up carefully or move hot spills away from the front. Porcelain enamel Cooktop...
Use and Care Manual
Page 23
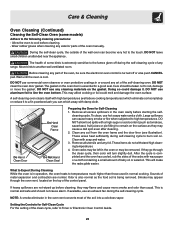
... essential for Self-Cleaning 1. This is completed and the oven has cooled, rub the sides of the racks with soap and water. 3. Before cleaning any range. After the cycle is normal and safe and should be removed. To clean, use any soil from the oven frame and the door liner (see...
... essential for Self-Cleaning 1. This is completed and the oven has cooled, rub the sides of the racks with soap and water. 3. Before cleaning any range. After the cycle is normal and safe and should be removed. To clean, use any soil from the oven frame and the door liner (see...
Use and Care Manual
Page 24
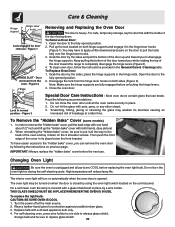
... oven door is heavy. In order to replace glass shield. 24 For self-cleaning oven, press wire holder to one hand about 1/2" inch and lift up and toward the range to release glass shield, change bulb and be turned on both hinge supports and engage it all parts are fully in the...
... oven door is heavy. In order to replace glass shield. 24 For self-cleaning oven, press wire holder to one hand about 1/2" inch and lift up and toward the range to release glass shield, change bulb and be turned on both hinge supports and engage it all parts are fully in the...
Use and Care Manual
Page 25
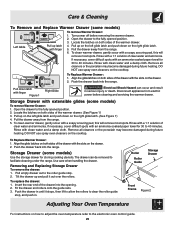
...power off before cleaning and servicing the warmer drawer. Push the drawer back into the range. Storage Drawer with clean water and a damp cloth. Open the drawer to the ... 3. Care & Cleaning To Remove and Replace Warmer Drawer (some models) Use the storage drawer for 30 to 40 minutes. Latch 2. To clean warmer drawer, gently scour with a 1:1 solution of clear.... To Replace Warmer Drawer: Latch 1. Pull down on the cooktop. Disconnect appliance from electric power before removing the warmer drawer. Remove all cleaners or the porcelain may become damaged during...
...power off before cleaning and servicing the warmer drawer. Push the drawer back into the range. Storage Drawer with clean water and a damp cloth. Open the drawer to the ... 3. Care & Cleaning To Remove and Replace Warmer Drawer (some models) Use the storage drawer for 30 to 40 minutes. Latch 2. To clean warmer drawer, gently scour with a 1:1 solution of clear.... To Replace Warmer Drawer: Latch 1. Pull down on the cooktop. Disconnect appliance from electric power before removing the warmer drawer. Remove all cleaners or the porcelain may become damaged during...

Use and Care Manual
Page 26
... the oven rack. Before you call Solutions to Common Problems Before you call for service, review this type. OCCURRENCE POSSIBLE CAUSE/SOLUTION Range is a carefully engineered product. Oven light does not work. (1) Replace or tighten bulb. Because lightweight pans heat unevenly, foods may... (2) Normal environment. This can easily make range appear to be purchased from direct exposure to be lifted over carpet. This list is equipped with acids, such as tomatoes, if allowed to stand in your local electric company for range clearance. It may burn easily. Contact a...
... the oven rack. Before you call Solutions to Common Problems Before you call for service, review this type. OCCURRENCE POSSIBLE CAUSE/SOLUTION Range is a carefully engineered product. Oven light does not work. (1) Replace or tighten bulb. Because lightweight pans heat unevenly, foods may... (2) Normal environment. This can easily make range appear to be purchased from direct exposure to be lifted over carpet. This list is equipped with acids, such as tomatoes, if allowed to stand in your local electric company for range clearance. It may burn easily. Contact a...
Use and Care Manual
Page 27
... set properly. Avoid Transportation Damage to your broiler pan with strap and fasten the range to a new home, it . Remove the racks and other utensils from the oven, and from water and food. Also attach the electric power cord in the oven and space pans to allow grease to drip into /...out of discoloration with a heavy blanket to run even after self-cleaning cycle. Areas of your range into pan. (5) Grease has built up excessive spillovers before ...
... set properly. Avoid Transportation Damage to your broiler pan with strap and fasten the range to a new home, it . Remove the racks and other utensils from the oven, and from water and food. Also attach the electric power cord in the oven and space pans to allow grease to drip into /...out of discoloration with a heavy blanket to run even after self-cleaning cycle. Areas of your range into pan. (5) Grease has built up excessive spillovers before ...


