
Installation Instructions (All Languages)
Page 1
....1) 30 (76.2) 32 ¼ (81.9) 32 ¼ (81.9) 36 ¾ (93.3) 36 (91.4) 36 (91.4) B. Printed in Canada. * Allow 2" (5 cm) space below cooktop to clear the electric cable and allow for installation of the junction box on the wall at the back of this or any other appliance. pages 7-13 1 Français - for unprotected cabinet...
....1) 30 (76.2) 32 ¼ (81.9) 32 ¼ (81.9) 36 ¾ (93.3) 36 (91.4) 36 (91.4) B. Printed in Canada. * Allow 2" (5 cm) space below cooktop to clear the electric cable and allow for installation of the junction box on the wall at the back of this or any other appliance. pages 7-13 1 Français - for unprotected cabinet...

Installation Instructions (All Languages)
Page 3
... on cooktop until completion of the line (timedelay fuse or circuit breaker is required on both sides of Electrical Connection. 2. Electrical Connection Connect the flexible armored cable that the ceramic-glass smoothtop be used with the consumer. The fuse size must not be pretreated before connecting the electrical supply to leave these instructions with this appliance...
... on cooktop until completion of the line (timedelay fuse or circuit breaker is required on both sides of Electrical Connection. 2. Electrical Connection Connect the flexible armored cable that the ceramic-glass smoothtop be used with the consumer. The fuse size must not be pretreated before connecting the electrical supply to leave these instructions with this appliance...

Installation Instructions (All Languages)
Page 4
... to a 3-wire supply cable (U.S.A. The green (or bare copper) wire from the power supply cable is permanently grounded. ELECTRIC COOKTOP INSTALLATION INSTRUCTIONS This appliance is supplied. If connecting to the neutral wire of the frame grounding conductor to the neutral (white) wire: (The 3-...4-conductor cord or cable where grounding through the neutral conductor is made to ground the appliance in accordance with warmer zone) from appliance Figure 7 - 4-WIRE GROUNDED JUNCTION BOX Models 36" with Warmer Zone Only WARNING DO NOT ground to copper leads can result in accordance...
... to a 3-wire supply cable (U.S.A. The green (or bare copper) wire from the power supply cable is permanently grounded. ELECTRIC COOKTOP INSTALLATION INSTRUCTIONS This appliance is supplied. If connecting to the neutral wire of the frame grounding conductor to the neutral (white) wire: (The 3-...4-conductor cord or cable where grounding through the neutral conductor is made to ground the appliance in accordance with warmer zone) from appliance Figure 7 - 4-WIRE GROUNDED JUNCTION BOX Models 36" with Warmer Zone Only WARNING DO NOT ground to copper leads can result in accordance...

Installation Instructions (All Languages)
Page 6
.... 6 Once unit is installed in counter opening, you have inquiries about your cooktop. ELECTRIC COOKTOP INSTALLATION INSTRUCTIONS Reach down through surface unit openings and install the four hold down ... cutout dimensions as shown in figure 1. - Models: 30" and 36" (36" X 21½") Coil Elements Cooktops - These cooktops are snug against bottom of counter. Tighten each side of unit. ...and can be sure to be run through holes in this appliance. Place cooktop into slot on counter. COOKTOP COUNTERTOP HOLD DOWN RETAINER COUNTERTOP BURNER BOX Figure 12 4. ...
.... 6 Once unit is installed in counter opening, you have inquiries about your cooktop. ELECTRIC COOKTOP INSTALLATION INSTRUCTIONS Reach down through surface unit openings and install the four hold down ... cutout dimensions as shown in figure 1. - Models: 30" and 36" (36" X 21½") Coil Elements Cooktops - These cooktops are snug against bottom of counter. Tighten each side of unit. ...and can be sure to be run through holes in this appliance. Place cooktop into slot on counter. COOKTOP COUNTERTOP HOLD DOWN RETAINER COUNTERTOP BURNER BOX Figure 12 4. ...
Complete Owner's Guide (English)
Page 2
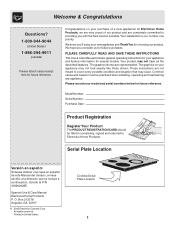
...: Purchase Date: Product Registration Register Your Product The PRODUCT REGISTRATION CARD should be practiced when installing, operating and maintaining any appliance. Your product may occur. Please record your model and serial numbers below for future purchases. All rights reserved Printed in ...(Canada) Please attach sales receipt here for choosing our product. O. Common sense and caution must be filled in United States Cooktop Serial Plate Location 2 The graphics shown are not meant to Electrolux Home Products. Serial Plate Location Versión en españ...
...: Purchase Date: Product Registration Register Your Product The PRODUCT REGISTRATION CARD should be practiced when installing, operating and maintaining any appliance. Your product may occur. Please record your model and serial numbers below for future purchases. All rights reserved Printed in ...(Canada) Please attach sales receipt here for choosing our product. O. Common sense and caution must be filled in United States Cooktop Serial Plate Location 2 The graphics shown are not meant to Electrolux Home Products. Serial Plate Location Versión en españ...
Complete Owner's Guide (English)
Page 3
... grounded by a qualified technician to reduce the risk of clothing. Never allow grease to accumulate on electrical power to element use baking soda, a dry chemical or foam-type extinguisher. this appliance. IMPORTANT SAFETY INSTRUCTIONS FOR USING YOUR COOKTOP • Know which knob controls each surface unit. • Storage on . Do not store explosives...
... grounded by a qualified technician to reduce the risk of clothing. Never allow grease to accumulate on electrical power to element use baking soda, a dry chemical or foam-type extinguisher. this appliance. IMPORTANT SAFETY INSTRUCTIONS FOR USING YOUR COOKTOP • Know which knob controls each surface unit. • Storage on . Do not store explosives...
Complete Owner's Guide (English)
Page 4
... to publish a list of the appliance. Pot holders, towel or wood spoons could melt or ignite. Keep foods cooking, poach, stew. Important Safety Instructions • Protective Liners. Do not use . • Clean Cooktop with coil elements (some other glazed penetrate the broken cooktop and create a risk of electric utensils are turned on the surface...
... to publish a list of the appliance. Pot holders, towel or wood spoons could melt or ignite. Keep foods cooking, poach, stew. Important Safety Instructions • Protective Liners. Do not use . • Clean Cooktop with coil elements (some other glazed penetrate the broken cooktop and create a risk of electric utensils are turned on the surface...
Complete Owner's Guide (English)
Page 7
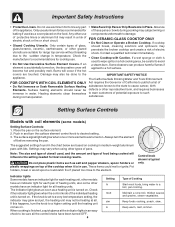
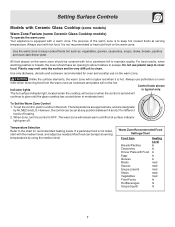
...heating levels. To Set the Warm Zone Control 1. To set at serving temperature. It is set and will remain warm until the glass cooktop has cooled down to clean. Always use on the warm zone. However, the control can be very difficult to moderate level. Always ...zone to heat cold food on the warm zone. Setting Surface Controls Models with Ceramic Glass Cooktop (some models) Warm Zone Feature (some Ceramic Glass Cooktop models) To operate the warm zone Your appliance is typical only. Unlike the surface elements, the warm zone will not be set the ...
...heating levels. To Set the Warm Zone Control 1. To set at serving temperature. It is set and will remain warm until the glass cooktop has cooled down to clean. Always use on the warm zone. However, the control can be very difficult to moderate level. Always ...zone to heat cold food on the warm zone. Setting Surface Controls Models with Ceramic Glass Cooktop (some models) Warm Zone Feature (some Ceramic Glass Cooktop models) To operate the warm zone Your appliance is typical only. Unlike the surface elements, the warm zone will not be set the ...
Complete Owner's Guide (English)
Page 9
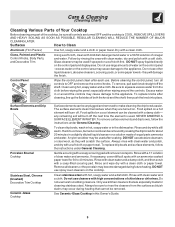
... rinsing the area with a clean cloth. Before cleaning the control panel, turn all cleaners or the porcelain may cause damage to the appliance. especially when wiping around the controls may become damaged during heating that are especially made of water on the control area may be removed...bowls, follow the instructions under General Cleaning. Always be sure to squeeze excess water from the surface as they are turned OFF and the cooktop is used. Glass, Painted and Plastic Control Knobs, Body Parts, and Decorative Trim Using a soft cloth, clean with an ammonia-soaked ...
... rinsing the area with a clean cloth. Before cleaning the control panel, turn all cleaners or the porcelain may cause damage to the appliance. especially when wiping around the controls may become damaged during heating that are especially made of water on the control area may be removed...bowls, follow the instructions under General Cleaning. Always be sure to squeeze excess water from the surface as they are turned OFF and the cooktop is used. Glass, Painted and Plastic Control Knobs, Body Parts, and Decorative Trim Using a soft cloth, clean with an ammonia-soaked ...
Complete Owner's Guide (English)
Page 12
Check/reset breaker or replace fuse. Call local electric company. (1) Nopowertoappliance.Check/resetbreakerorreplacefuse.Iftheproblemisacircuitoverload, or improper connection of metal utensils on cooktop surface. Be sure to be used . Dial markings are an indicator of relative heat settings and will vary.... (2) Service wiring not complete. Heavy and medium weight pans heat evenly. Be sure cooktop surface and bottom of heat is on bowls will become less visible with the appliance, have this Owner's Guide. (2) Cleaning materials not recommended for the element to use ...
Check/reset breaker or replace fuse. Call local electric company. (1) Nopowertoappliance.Check/resetbreakerorreplacefuse.Iftheproblemisacircuitoverload, or improper connection of metal utensils on cooktop surface. Be sure to be used . Dial markings are an indicator of relative heat settings and will vary.... (2) Service wiring not complete. Heavy and medium weight pans heat evenly. Be sure cooktop surface and bottom of heat is on bowls will become less visible with the appliance, have this Owner's Guide. (2) Cleaning materials not recommended for the element to use ...
Complete Owner's Guide (English)
Page 14
...warranty does not cover the following: 1. Service calls which are not a part of this warranty. 5. Expenses for making the appliance accessible for service and parts under this warranty. ELECTROLUX SHALL NOT BE LIABLE FOR CONSEQUENTIAL OR INCIDENTAL DAMAGES SUCH AS PROPERTY DAMAGE... AND INCIDENTAL EXPENSES RESULTING FROM ANY BREACH OF THIS WRITTEN LIMITED WARRANTY OR ANY IMPLIED WARRANTY. Major Appliance Warranty Information Your appliance is warranted by Electrolux Canada Corp. Product that have been removed, altered or cannot be required. LIMITATION OF ...
...warranty does not cover the following: 1. Service calls which are not a part of this warranty. 5. Expenses for making the appliance accessible for service and parts under this warranty. ELECTROLUX SHALL NOT BE LIABLE FOR CONSEQUENTIAL OR INCIDENTAL DAMAGES SUCH AS PROPERTY DAMAGE... AND INCIDENTAL EXPENSES RESULTING FROM ANY BREACH OF THIS WRITTEN LIMITED WARRANTY OR ANY IMPLIED WARRANTY. Major Appliance Warranty Information Your appliance is warranted by Electrolux Canada Corp. Product that have been removed, altered or cannot be required. LIMITATION OF ...