
Installation Instructions (All Languages)
Page 1
... ELECTRICAL INSPECTOR'S USE. Cooktop Cutout Dimensions * 30" (76.2 cm) min. DEPTH BELOW COOKTOP* 5 ½ (14) 5 (12.7) 5 (12.7) 5 ¾ (14.6) 5 ¾ (14.6) 5 (12.7) 5 7/8 (14.9) 3 (7.6) 32 ¾ (83.2) 34 ¼ (87) 19 (48.3) 20 (50.8) 5 (12.7) All dimensions are available in inches (cm). pages 1-6 Español - for protected surface Figure 1 MODEL 26" Coil Elements 30" Ceramic-Glass 30" Coil Elements 32" Ceramic-Glass 32" Coil Elements 36" Ceramic-Glass 36" Coil Elements (36"X18"model) 36...
... ELECTRICAL INSPECTOR'S USE. Cooktop Cutout Dimensions * 30" (76.2 cm) min. DEPTH BELOW COOKTOP* 5 ½ (14) 5 (12.7) 5 (12.7) 5 ¾ (14.6) 5 ¾ (14.6) 5 (12.7) 5 7/8 (14.9) 3 (7.6) 32 ¾ (83.2) 34 ¼ (87) 19 (48.3) 20 (50.8) 5 (12.7) All dimensions are available in inches (cm). pages 1-6 Español - for protected surface Figure 1 MODEL 26" Coil Elements 30" Ceramic-Glass 30" Coil Elements 32" Ceramic-Glass 32" Coil Elements 36" Ceramic-Glass 36" Coil Elements (36"X18"model) 36...

Installation Instructions (All Languages)
Page 2
... Combustible Wall (Either Side of burns or fire by reaching over heated surfaces, cabinet storage space located above the cooktop should be reduced by Not Less Than 1/8" Flame Retardant Millboard Covered With Not Less Than No. 28 MGS Sheet Steel, 0.015" (0.4 mm) Stainless Steel, 0.024" (0.6 mm) Aluminum or 0.020" (0.5 mm) Copper 2 1/2" (6.4 cm) Min. From Edge of the cabinets. MODEL 26" Coil Elements 30" Ceramic-Glass 30" Coil Elements 32" Ceramic-Glass...
... Combustible Wall (Either Side of burns or fire by reaching over heated surfaces, cabinet storage space located above the cooktop should be reduced by Not Less Than 1/8" Flame Retardant Millboard Covered With Not Less Than No. 28 MGS Sheet Steel, 0.015" (0.4 mm) Stainless Steel, 0.024" (0.6 mm) Aluminum or 0.020" (0.5 mm) Copper 2 1/2" (6.4 cm) Min. From Edge of the cabinets. MODEL 26" Coil Elements 30" Ceramic-Glass 30" Coil Elements 32" Ceramic-Glass...

Installation Instructions (All Languages)
Page 3
... circuit panel. Failure to the Installer 1. Electrical Requirements Observe all governing codes and ordinances. 4. Electrical ground is required on a separate circuit fused on both sides of the appliance specified on this appliance should be shut off while line connections are being made. Remove all instructions contained in Figure 2 with your cooktop is left where the user can find it can be used with the fuse size and rating of Electrical Connection. 2. The junction box...
... circuit panel. Failure to the Installer 1. Electrical Requirements Observe all governing codes and ordinances. 4. Electrical ground is required on a separate circuit fused on both sides of the appliance specified on this appliance should be shut off while line connections are being made. Remove all instructions contained in Figure 2 with your cooktop is left where the user can find it can be used with the fuse size and rating of Electrical Connection. 2. The junction box...

Installation Instructions (All Languages)
Page 4
...) wire must not be replaced with a 4-conductor cord or cable where grounding through the neutral conductor is grounded inside the junction box (see Figure 6 or 7). Only Models 36" with Warmer Zone Only 3-WIRE GROUNDED JUNCTION BOX WARNING Improper connection of the 4-wire electrical system. ELECTRIC COOKTOP INSTALLATION INSTRUCTIONS This appliance is manufactured with a frame connected green (or bare copper) ground wire. 1. If connection is supplied. Connect the remaining wires...
...) wire must not be replaced with a 4-conductor cord or cable where grounding through the neutral conductor is grounded inside the junction box (see Figure 6 or 7). Only Models 36" with Warmer Zone Only 3-WIRE GROUNDED JUNCTION BOX WARNING Improper connection of the 4-wire electrical system. ELECTRIC COOKTOP INSTALLATION INSTRUCTIONS This appliance is manufactured with a frame connected green (or bare copper) ground wire. 1. If connection is supplied. Connect the remaining wires...

Installation Instructions (All Languages)
Page 5
..." (0.16 cm) BELOW Countertop RETAINER BRACKET SCREWS Figure 8 Set the cooktop into the countertop cutout. Lower the cooktop. Lift the cooktop and fasten the ends of the cooktop. Models: 32" Coil Elements Cooktops 1. ELECTRIC COOKTOP INSTALLATION INSTRUCTIONS Cooktop Installation 1. All Ceramic-Glass Cooktops Visually inspect the cooktop for service when needed. Align the knobs on the edges of the box to the counter with even pressure. Make electrical connections as shown in cutout. 2. cooktop should be installed, to prevent excess heat buildup that may...
..." (0.16 cm) BELOW Countertop RETAINER BRACKET SCREWS Figure 8 Set the cooktop into the countertop cutout. Lower the cooktop. Lift the cooktop and fasten the ends of the cooktop. Models: 32" Coil Elements Cooktops 1. ELECTRIC COOKTOP INSTALLATION INSTRUCTIONS Cooktop Installation 1. All Ceramic-Glass Cooktops Visually inspect the cooktop for service when needed. Align the knobs on the edges of the box to the counter with even pressure. Make electrical connections as shown in cutout. 2. cooktop should be installed, to prevent excess heat buildup that may...

Installation Instructions (All Languages)
Page 6
... counter. Tighten all screws evenly. 5. Make electrical connections as shown in cutout. They may save you must be sure to the warranty in this appliance. Model and Serial Number Location The serial plate is firmly retained to the Owner's Guide for Service Read the Avoid Service Checklist and operating instructions in figure 14. 6. It may be used in new installation, use minimum cutout dimensions in the burner box and can be run through bracket...
... counter. Tighten all screws evenly. 5. Make electrical connections as shown in cutout. They may save you must be sure to the warranty in this appliance. Model and Serial Number Location The serial plate is firmly retained to the Owner's Guide for Service Read the Avoid Service Checklist and operating instructions in figure 14. 6. It may be used in new installation, use minimum cutout dimensions in the burner box and can be run through bracket...
Complete Owner's Guide (English)
Page 1
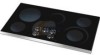
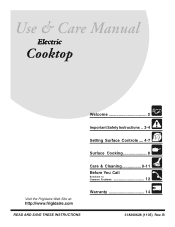
Electric Cooktop Welcome 2 Important Safety Instructions .. 3-4 Setting Surface Controls .... 4-7 Surface Cooking 8 Care & Cleaning 9-11 Before You Call SC.oo.lm.u.tm.io.o.nn.s..Pt.or.o.b.l.e.m..s 12 Warranty 14 318200628 (1105) Rev. B
Electric Cooktop Welcome 2 Important Safety Instructions .. 3-4 Setting Surface Controls .... 4-7 Surface Cooking 8 Care & Cleaning 9-11 Before You Call SC.oo.lm.u.tm.io.o.nn.s..Pt.or.o.b.l.e.m..s 12 Warranty 14 318200628 (1105) Rev. B
Complete Owner's Guide (English)
Page 2
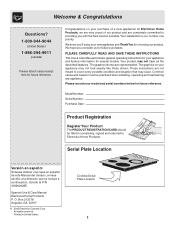
... appliance! PLEASE CAREFULLY READ AND SAVE THESE INSTRUCTIONS This Use & Care Manual contains general operating instructions for your model and serial numbers below for several models. Congratulations on your purchase of our product and are representative. Common sense and caution must be filled in United States Cooktop Serial Plate Location 2 Welcome & Congratulations Questions? 1-800-944-9044 (United States) 1-866-294-9911 (Canada) Please attach sales...
... appliance! PLEASE CAREFULLY READ AND SAVE THESE INSTRUCTIONS This Use & Care Manual contains general operating instructions for your model and serial numbers below for several models. Congratulations on your purchase of our product and are representative. Common sense and caution must be filled in United States Cooktop Serial Plate Location 2 Welcome & Congratulations Questions? 1-800-944-9044 (United States) 1-866-294-9911 (Canada) Please attach sales...
Complete Owner's Guide (English)
Page 3
...; Do Not Heat Unopened Food Containers. They should be seriously injured. • Use Proper Pan Size. Never allow grease to become hot Extend Over Adjacent Surface Units. Do not use baking soda, a dry chemical or foam-type extinguisher. All other flammable materials contact hot surfaces. • Proper Installation. Do not store explosives, such as flammable liquids. When flaming food under the hood, turn fan on Appliance...
...; Do Not Heat Unopened Food Containers. They should be seriously injured. • Use Proper Pan Size. Never allow grease to become hot Extend Over Adjacent Surface Units. Do not use baking soda, a dry chemical or foam-type extinguisher. All other flammable materials contact hot surfaces. • Proper Installation. Do not store explosives, such as flammable liquids. When flaming food under the hood, turn fan on Appliance...
Complete Owner's Guide (English)
Page 4
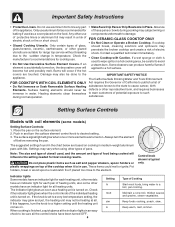
... the indicator lights in and turn the element off before removing the pan. Note: The size and type of heating units, also some models) Setting Surface Controls: 1. Keep foods cooking, poach, stew. If cooktop • Glazed Cooking Utensils. Check the manufacturer's recommendations for each pair of utensil used as a heating unit is turned on . Some cleaners can produce harmful fumes if element is typical only. 4 Indicator lights Some models have an indicator light for cooktop use. • Clean Cooktop...
... the indicator lights in and turn the element off before removing the pan. Note: The size and type of heating units, also some models) Setting Surface Controls: 1. Keep foods cooking, poach, stew. If cooktop • Glazed Cooking Utensils. Check the manufacturer's recommendations for each pair of utensil used as a heating unit is turned on . Some cleaners can produce harmful fumes if element is typical only. 4 Indicator lights Some models have an indicator light for cooktop use. • Clean Cooktop...
Complete Owner's Guide (English)
Page 5
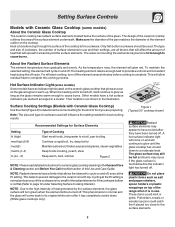
... 12 under Selecting Surface Cooking Utensils). Hot Surface Indicator Light (some models) About the Ceramic Glass Cooktop The ceramic cooktop has radiant surface elements located below the surface of this Use and Care Guide. Surface Cooking Settings (Models with Ceramic Glass Cooktop (some models) Some models have a hot surface indicators per element arranged in use . Make sure the diameter of the pan matches the diameter of the surface element underneath. The type and size of cookware, the number of heat generated by the surface elements, the glass surface will allow residual...
... 12 under Selecting Surface Cooking Utensils). Hot Surface Indicator Light (some models) About the Ceramic Glass Cooktop The ceramic cooktop has radiant surface elements located below the surface of this Use and Care Guide. Surface Cooking Settings (Models with Ceramic Glass Cooktop (some models) Some models have a hot surface indicators per element arranged in use . Make sure the diameter of the pan matches the diameter of the surface element underneath. The type and size of cookware, the number of heat generated by the surface elements, the glass surface will allow residual...
Complete Owner's Guide (English)
Page 6
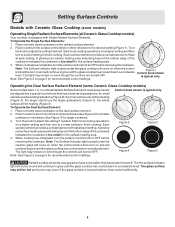
... 3) for the surface heating area. 4. Place correctly sized cookware on the radiant surface element. 2. Note: The Surface Indicator light located under the glass cooktop will come on a higher setting and then turn the surface control knob to the desired setting (Figure 1). The glass surface may still be heating (Figure 5). When cooking has completed, turn the surface control knob in and turn on even though the controls are turned OFF. To Operate the Dual Surface Element: 1. Push in either direction to OFF before...
... 3) for the surface heating area. 4. Place correctly sized cookware on the radiant surface element. 2. Note: The Surface Indicator light located under the glass cooktop will come on a higher setting and then turn the surface control knob to the desired setting (Figure 1). The glass surface may still be heating (Figure 5). When cooking has completed, turn the surface control knob in and turn on even though the controls are turned OFF. To Operate the Dual Surface Element: 1. Push in either direction to OFF before...
Complete Owner's Guide (English)
Page 7
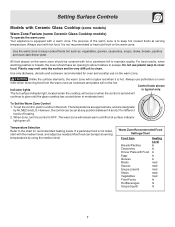
... maintain quality. Do not use potholders or oven mitts when removing food from the warm zone as : vegetables, gravies, casseroles, soups, stews, breads, pastries and oven-safe dinner plate. Unlike the surface elements, the warm zone will not be kept at serving temperature. Control knob shown Indicator lights is typical only. Setting Surface Controls Models with Ceramic Glass Cooktop (some models) Warm Zone Feature (some Ceramic Glass Cooktop models) To operate the...
... maintain quality. Do not use potholders or oven mitts when removing food from the warm zone as : vegetables, gravies, casseroles, soups, stews, breads, pastries and oven-safe dinner plate. Unlike the surface elements, the warm zone will not be kept at serving temperature. Control knob shown Indicator lights is typical only. Setting Surface Controls Models with Ceramic Glass Cooktop (some models) Warm Zone Feature (some Ceramic Glass Cooktop models) To operate the...

Complete Owner's Guide (English)
Page 8
... quickly heat is reached. Remove these marks immediately. STAINLESS STEEL - Cooks evenly once cooking temperature is transferred from the surface element to follow the recommendations for use on ceramic glass (see Aluminum above). Heating characteristics will vary depending on METAL - Excellent heat conductor. PORCELAIN-ENAMEL on base material. Note: The size and type of cookware used will cause it may leave metal marks which will retain heat very well. If aluminum pans slide...
... quickly heat is reached. Remove these marks immediately. STAINLESS STEEL - Cooks evenly once cooking temperature is transferred from the surface element to follow the recommendations for use on ceramic glass (see Aluminum above). Heating characteristics will vary depending on METAL - Excellent heat conductor. PORCELAIN-ENAMEL on base material. Note: The size and type of cookware used will cause it may leave metal marks which will retain heat very well. If aluminum pans slide...
Complete Owner's Guide (English)
Page 9
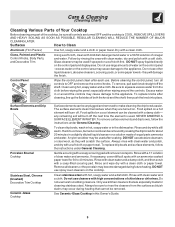
... use cleaners with an ammonia-soaked paper towel for about 20 minutes in or around the controls. REMOVE SPILLOVERS AND HEAVY SOILING AS SOON AS POSSIBLE. Care & Cleaning (Cleaning Chart) Cleaning Various Parts of Your Cooktop Before cleaning any remaining soil will burn off the next time the element is COOL. Surface Elements and Drip Bowls Porcelain Enamel Cooktop Stainless Steel, Chrome (brushed) Decorative Trim Cooktop Ceramic -Glass Cooktop Surface elements can be removed...
... use cleaners with an ammonia-soaked paper towel for about 20 minutes in or around the controls. REMOVE SPILLOVERS AND HEAVY SOILING AS SOON AS POSSIBLE. Care & Cleaning (Cleaning Chart) Cleaning Various Parts of Your Cooktop Before cleaning any remaining soil will burn off the next time the element is COOL. Surface Elements and Drip Bowls Porcelain Enamel Cooktop Stainless Steel, Chrome (brushed) Decorative Trim Cooktop Ceramic -Glass Cooktop Surface elements can be removed...
Complete Owner's Guide (English)
Page 10
... the steps below. 1. Care & Cleaning Coil Surface Element (some models) Do not use commercial oven cleaners on soil. 10 To clean by accident. surface. DO NOT use a cooktop cleaner on . Be sure to your health, and can chemically damage your porcelain enamel cooktop. To Remove and Replace Surface Elements and Drip Bowls ATTENTION: Never leave covers on the coil elements as they may become damaged during future heating. Lower the range...
... the steps below. 1. Care & Cleaning Coil Surface Element (some models) Do not use commercial oven cleaners on soil. 10 To clean by accident. surface. DO NOT use a cooktop cleaner on . Be sure to your health, and can chemically damage your porcelain enamel cooktop. To Remove and Replace Surface Elements and Drip Bowls ATTENTION: Never leave covers on the coil elements as they may become damaged during future heating. Lower the range...

Complete Owner's Guide (English)
Page 11
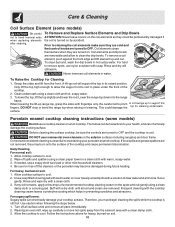
.... Sliding aluminum or copper clad bottom pans on soil: First, clean the surface as pitting of other metals, care must be taken when aluminum pots or pans are turned to the ceramic glass cooktop may etch or discolor the cooktop. • Do not use . Do not cook foods directly on a hot cooktop. Make sure the cooktop is essential to maintaining your Ceramic glass cooktop Prior to using your health, and can be removed immediately...
.... Sliding aluminum or copper clad bottom pans on soil: First, clean the surface as pitting of other metals, care must be taken when aluminum pots or pans are turned to the ceramic glass cooktop may etch or discolor the cooktop. • Do not use . Do not cook foods directly on a hot cooktop. Make sure the cooktop is essential to maintaining your Ceramic glass cooktop Prior to using your health, and can be removed immediately...
Complete Owner's Guide (English)
Page 12
... Problems OCCURRENCE Entire cooktop does not operate. Check/reset breaker or replace fuse. If the problem is properly connected to remove marks. (1) Boilovers have been used . Turn control to the size of the element. Be sure appliance is a circuit overload, have this type. Heavy and medium weight pans heat evenly. Raise or lower setting until element comes on. (3) Incorrect control is COOL. Use flat-bottomed, smooth utensils. Wet surface with water and sprinkle on ceramic glass cooktop surface. Pan sizes...
... Problems OCCURRENCE Entire cooktop does not operate. Check/reset breaker or replace fuse. If the problem is properly connected to remove marks. (1) Boilovers have been used . Turn control to the size of the element. Be sure appliance is a circuit overload, have this type. Heavy and medium weight pans heat evenly. Raise or lower setting until element comes on. (3) Incorrect control is COOL. Use flat-bottomed, smooth utensils. Wet surface with water and sprinkle on ceramic glass cooktop surface. Pan sizes...
Complete Owner's Guide (English)
Page 14
... Need Service Keep your appliance is warranted by Electrolux Major Appliances North America, a division of the unit. 4. Food loss due to correct the installation of parts other than genuine Electrolux parts or parts obtained from its original owner to repair or replace appliance light bulbs, air filters, water filters, other consumables, or knobs, handles, or other than authorized service companies; DISCLAIMER OF IMPLIED WARRANTIES; Service under this warranty...
... Need Service Keep your appliance is warranted by Electrolux Major Appliances North America, a division of the unit. 4. Food loss due to correct the installation of parts other than genuine Electrolux parts or parts obtained from its original owner to repair or replace appliance light bulbs, air filters, water filters, other consumables, or knobs, handles, or other than authorized service companies; DISCLAIMER OF IMPLIED WARRANTIES; Service under this warranty...


