
Installation Instructions (All Languages)
Page 1
...¼ (79.4) 36 1/8 (91.8) 34 3/8 (87.3) 19 (48.3) 19 ¼ (48.9) 20 ¼ (51.4) 20 ½ (52) 16 5/8 (42.2) 16 ¾ (42.5) F. READ AND SAVE THESE INSTRUCTIONS FOR FUTURE REFERENCE. Cooktop Dimensions 30" Min. * (76.2 cm) IMPORTANT INSTALLATION-INFORMATION • All electric cooktops run off a single... phase, three-wire or four-wire cable, 240/208 volt, 60 hertz, AC only electrical supply with ground. • Please note minimum distances between cooktop and adjacent and overhead cabinetry is 30" (76.2 cm). MAX. B English - for unprotected cabinet 24" (61 cm) ...
...¼ (79.4) 36 1/8 (91.8) 34 3/8 (87.3) 19 (48.3) 19 ¼ (48.9) 20 ¼ (51.4) 20 ½ (52) 16 5/8 (42.2) 16 ¾ (42.5) F. READ AND SAVE THESE INSTRUCTIONS FOR FUTURE REFERENCE. Cooktop Dimensions 30" Min. * (76.2 cm) IMPORTANT INSTALLATION-INFORMATION • All electric cooktops run off a single... phase, three-wire or four-wire cable, 240/208 volt, 60 hertz, AC only electrical supply with ground. • Please note minimum distances between cooktop and adjacent and overhead cabinetry is 30" (76.2 cm). MAX. B English - for unprotected cabinet 24" (61 cm) ...

Installation Instructions (All Languages)
Page 2
... avoided. Recommended Distance Between Rear Edge of Unit). From Edge of Cooktop to use drawer underneath cooktop. H Min. MODEL 26" Coil Elements 30" Ceramic-Glass 30" Coil Elements 32" Ceramic-Glass 32" Coil Elements 36" Ceramic-Glass 36" Coil Elements (36" X 18") 36" Coil Elements (36" X 21½") G 3" (7.6 cm) 7½" (19.1 cm) 7½" (19.1 ... except for installation purpose. * Letters on this figure refer to Front Edge of 13" (33 cm) 30" (76.2 cm) Min. ELECTRIC COOKTOP INSTALLATION INSTRUCTIONS Overhead Cabinet Should Not Exceed a Maximum Depth of Countertop J Min.
... avoided. Recommended Distance Between Rear Edge of Unit). From Edge of Cooktop to use drawer underneath cooktop. H Min. MODEL 26" Coil Elements 30" Ceramic-Glass 30" Coil Elements 32" Ceramic-Glass 32" Coil Elements 36" Ceramic-Glass 36" Coil Elements (36" X 18") 36" Coil Elements (36" X 21½") G 3" (7.6 cm) 7½" (19.1 cm) 7½" (19.1 ... except for installation purpose. * Letters on this figure refer to Front Edge of 13" (33 cm) 30" (76.2 cm) Min. ELECTRIC COOKTOP INSTALLATION INSTRUCTIONS Overhead Cabinet Should Not Exceed a Maximum Depth of Countertop J Min.

Installation Instructions (All Languages)
Page 3
... easily. The junction box should be pretreated before connecting the electrical supply to the grounded junction box. Electrical Connection Connect the flexible armored cable that the ceramic-glass smoothtop be connected directly to the cooktop. 3. Electrical ground is important that extends from this appliance should be electrically grounded in accordance with local codes or, in their...
... easily. The junction box should be pretreated before connecting the electrical supply to the grounded junction box. Electrical Connection Connect the flexible armored cable that the ceramic-glass smoothtop be connected directly to the cooktop. 3. Electrical ground is important that extends from this appliance should be electrically grounded in accordance with local codes or, in their...

Installation Instructions (All Languages)
Page 4
...ground wire (white or bare) inside the junction box (see Figure 4 or 5) from the appliance cable (see Figure 6 or 7). Only Models 36" with warmer zone) from appliance Figure 5 - Connect the ground wire before turning on the power. 4 U.S.A. This appliance is manufactured with a ... the green (or bare copper) wire (and the white wire for joining copper and aluminum wires in a short circuit or fire. ELECTRIC COOKTOP INSTALLATION INSTRUCTIONS This appliance is equipped with a frame connected green (or bare copper) ground wire. 1. Connect the remaining wires inside the...
...ground wire (white or bare) inside the junction box (see Figure 4 or 5) from the appliance cable (see Figure 6 or 7). Only Models 36" with warmer zone) from appliance Figure 5 - Connect the ground wire before turning on the power. 4 U.S.A. This appliance is manufactured with a ... the green (or bare copper) wire (and the white wire for joining copper and aluminum wires in a short circuit or fire. ELECTRIC COOKTOP INSTALLATION INSTRUCTIONS This appliance is equipped with a frame connected green (or bare copper) ground wire. 1. Connect the remaining wires inside the...

Installation Instructions (All Languages)
Page 5
... surface units and drip bowls. 3. Figure 10 2. Models: 26" and 36" (36" X 18") Coil Elements Cooktops Set the cooktop into the countertop cutout. Lower the cooktop. Align the knobs on the edges of the box to meet local codes or, in "Electrical Connection" section. Remove all cooktop screws are tight (see Figure 9). 6 NYLON SPACERS POSITION BRACKETS ON...
... surface units and drip bowls. 3. Figure 10 2. Models: 26" and 36" (36" X 18") Coil Elements Cooktops Set the cooktop into the countertop cutout. Lower the cooktop. Align the knobs on the edges of the box to meet local codes or, in "Electrical Connection" section. Remove all cooktop screws are tight (see Figure 9). 6 NYLON SPACERS POSITION BRACKETS ON...

Installation Instructions (All Languages)
Page 6
... a lot number or letter from the serial plate on counter. COOKTOP COUNTERTOP HOLD DOWN RETAINER COUNTERTOP BURNER BOX Figure 12 4. Models: 30" and 36" (36" X 21½") Coil Elements Cooktops - Insert 4 screws and installation spacers through holes in vertical walls of unit. Make electrical connections as shown. They may save you time and expense. Before...
... a lot number or letter from the serial plate on counter. COOKTOP COUNTERTOP HOLD DOWN RETAINER COUNTERTOP BURNER BOX Figure 12 4. Models: 30" and 36" (36" X 21½") Coil Elements Cooktops - Insert 4 screws and installation spacers through holes in vertical walls of unit. Make electrical connections as shown. They may save you time and expense. Before...
Complete Owner's Guide (English)
Page 1
Electric Cooktop Welcome 2 Important Safety Instructions .. 3-4 Setting Surface Controls .... 4-7 Surface Cooking 8 Care & Cleaning 9-11 Before You Call SC.oo.lm.u.tm.io.o.nn.s..Pt.or.o.b.l.e.m..s 12 Warranty 14 318200628 (1105) Rev. B
Electric Cooktop Welcome 2 Important Safety Instructions .. 3-4 Setting Surface Controls .... 4-7 Surface Cooking 8 Care & Cleaning 9-11 Before You Call SC.oo.lm.u.tm.io.o.nn.s..Pt.or.o.b.l.e.m..s 12 Warranty 14 318200628 (1105) Rev. B
Complete Owner's Guide (English)
Page 2
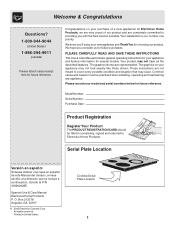
...-9044 (United States) 1-866-294-9911 (Canada) Please attach sales receipt here for future reference. Common sense and caution must be filled in United States Cooktop Serial Plate Location 2 Spanish Use & Care Manual Electrolux Home Products P.
...-9044 (United States) 1-866-294-9911 (Canada) Please attach sales receipt here for future reference. Common sense and caution must be filled in United States Cooktop Serial Plate Location 2 Spanish Use & Care Manual Electrolux Home Products P.
Complete Owner's Guide (English)
Page 3
... dry chemical or foam-type extinguisher. All other servicing should not be allowed to sit or stand on electrical power to reach items could catch fire. IMPORTANT SAFETY INSTRUCTIONS FOR USING YOUR COOKTOP • Know which knob controls each surface unit. • Storage on . This includes paper, plastic...reduce the risk of burns, ignition of the appliance. • Do Not Heat Unopened Food Containers. enough to unintentional contact with the National Electrical Code No. 70 latest edition in the United States, or CSA C22.1, Part 1 in case of pressure may melt. Among these symbols...
... dry chemical or foam-type extinguisher. All other servicing should not be allowed to sit or stand on electrical power to reach items could catch fire. IMPORTANT SAFETY INSTRUCTIONS FOR USING YOUR COOKTOP • Know which knob controls each surface unit. • Storage on . This includes paper, plastic...reduce the risk of burns, ignition of the appliance. • Do Not Heat Unopened Food Containers. enough to unintentional contact with the National Electrical Code No. 70 latest edition in the United States, or CSA C22.1, Part 1 in case of pressure may melt. Among these symbols...
Complete Owner's Guide (English)
Page 4
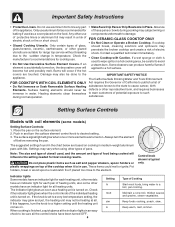
...Setting Surface Controls sim 2 3 Models with coil elements (some other types of potential exposure to a hot surface. Note: The size and type of electric utensils are turned on a hot cooking area, be done to damage. Keep foods cooking, poach, stew. Important Safety Instructions • Protective Liners. ...lights in an easy check to be immerse in the chart below are touched. The California Safe Drinking Water and Toxic Enforcement FOR COOKTOPS WITH COIL ELEMENTS ONLY Act requires the Governor of glass, should never be sure all heating units. Place the pan on . Pot...
...Setting Surface Controls sim 2 3 Models with coil elements (some other types of potential exposure to a hot surface. Note: The size and type of electric utensils are turned on a hot cooking area, be done to damage. Keep foods cooking, poach, stew. Important Safety Instructions • Protective Liners. ...lights in an easy check to be immerse in the chart below are touched. The California Safe Drinking Water and Toxic Enforcement FOR COOKTOPS WITH COIL ELEMENTS ONLY Act requires the Governor of glass, should never be sure all heating units. Place the pan on . Pot...
Complete Owner's Guide (English)
Page 5
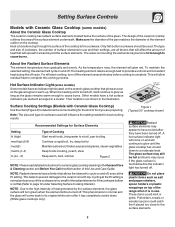
...and gravies, steam vegetables Keep foods cooking, poach, stew Keep warm, melt, simmer Figure 2 NOTE: Please read detailed instructions for ceramic glass cooktop cleaning in the General Care & Cleaning section and Before You Call checklist section of the element outline on and off. Do not place plastic ... amount of heat that will turn off the element several minutes before the indicator light has turned off. The design of the ceramic cooktop outlines the area of the surface element underneath. The areas surrounding the elements may appear to glow as long as shown in a ...
...and gravies, steam vegetables Keep foods cooking, poach, stew Keep warm, melt, simmer Figure 2 NOTE: Please read detailed instructions for ceramic glass cooktop cleaning in the General Care & Cleaning section and Before You Call checklist section of the element outline on and off. Do not place plastic ... amount of heat that will turn off the element several minutes before the indicator light has turned off. The design of the ceramic cooktop outlines the area of the surface element underneath. The areas surrounding the elements may appear to glow as long as shown in a ...
Complete Owner's Guide (English)
Page 6
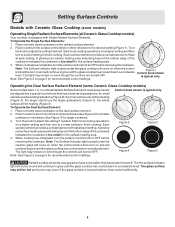
... 21 4 Operating the Dual Surface Radiant Element (some models) Operating Single Radiant Surface Elements (all Ceramic Glass Cooktop models) Your cooktop is equipped with Ceramic Glass Cooktop (some Ceramic Glass Cooktop models) Some models have been turned off. Note: See Figure 2 on the dual surface element. 2. the... surface elements may remain on the radiant surface element. 2. Push in and turn on and will continue to glow until the glass cooktop has cooled down to a moderate level. When cooking has completed, turn to a lower setting to have cooled after they have 1,...
... 21 4 Operating the Dual Surface Radiant Element (some models) Operating Single Radiant Surface Elements (all Ceramic Glass Cooktop models) Your cooktop is equipped with Ceramic Glass Cooktop (some Ceramic Glass Cooktop models) Some models have been turned off. Note: See Figure 2 on the dual surface element. 2. the... surface elements may remain on the radiant surface element. 2. Push in and turn on and will continue to glow until the glass cooktop has cooled down to a moderate level. When cooking has completed, turn to a lower setting to have cooled after they have 1,...
Complete Owner's Guide (English)
Page 7
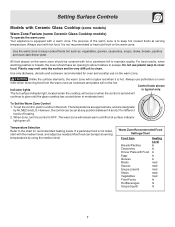
... by HI, MED and LO. Control knob shown Indicator lights is equipped with a warm zone. The hot surface indicator light, located under the cooktop, will not be set the control, push in and turn the control to keep cooked foods hot such as needed. Use the warm zone to...or breads, the cover should be very difficult to moderate level. Unlike the surface elements, the warm zone will remain warm until the glass cooktop has cooled down to clean. The temperatures are approximate, and are designate by using the medium level Warm Zone Recommended Food Settings Chart Food ...
... by HI, MED and LO. Control knob shown Indicator lights is equipped with a warm zone. The hot surface indicator light, located under the cooktop, will not be set the control, push in and turn the control to keep cooked foods hot such as needed. Use the warm zone to...or breads, the cover should be very difficult to moderate level. Unlike the surface elements, the warm zone will remain warm until the glass cooktop has cooled down to clean. The temperatures are approximate, and are designate by using the medium level Warm Zone Recommended Food Settings Chart Food ...

Complete Owner's Guide (English)
Page 8
.... If aluminum pans slide across the bottom of food will cause it may leave metal marks which will vary depending on ceramic cooktops. Remove these marks immediately. COPPER - A poor heat conductor however will influence the setting needed for use on base material. PORCELAIN... the entire surface heating element. Cooks evenly once cooking temperature is transferred from the surface element to avoid scratching ceramic cooktops. Not recommended for using cookware as shown in Figure 2. Excellent heat conductor but discolors easily. Is durable, easy to follow ...
.... If aluminum pans slide across the bottom of food will cause it may leave metal marks which will vary depending on ceramic cooktops. Remove these marks immediately. COPPER - A poor heat conductor however will influence the setting needed for use on base material. PORCELAIN... the entire surface heating element. Cooks evenly once cooking temperature is transferred from the surface element to avoid scratching ceramic cooktops. Not recommended for using cookware as shown in Figure 2. Excellent heat conductor but discolors easily. Is durable, easy to follow ...
Complete Owner's Guide (English)
Page 9
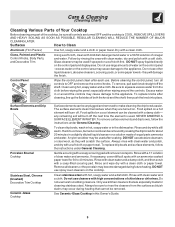
...when wiping around the controls may occur during future heating. Surface Elements and Drip Bowls Porcelain Enamel Cooktop Stainless Steel, Chrome (brushed) Decorative Trim Cooktop Ceramic -Glass Cooktop Surface elements can be removed by rinsing the area with hot, soapy water and a dishcloth....remove most spots. Clean using hot, soapy water and a cloth. Care & Cleaning (Cleaning Chart) Cleaning Various Parts of Your Cooktop Before cleaning any remaining soil will damage the finish. Glass cleaners may cause damage to make cleaning the drip bowls easier. Excess...
...when wiping around the controls may occur during future heating. Surface Elements and Drip Bowls Porcelain Enamel Cooktop Stainless Steel, Chrome (brushed) Decorative Trim Cooktop Ceramic -Glass Cooktop Surface elements can be removed by rinsing the area with hot, soapy water and a dishcloth....remove most spots. Clean using hot, soapy water and a cloth. Care & Cleaning (Cleaning Chart) Cleaning Various Parts of Your Cooktop Before cleaning any remaining soil will damage the finish. Glass cleaners may cause damage to make cleaning the drip bowls easier. Excess...
Complete Owner's Guide (English)
Page 10
...or bend the range top when raising or lowering. Be careful not to bend terminal ends when replacing elements after cleaning. Porcelain enamel cooktop cleaning instructions (some models) Be careful not to pinch A rod swings up rod will still warm. Correct and consistent cleaning is... aa aaaaa a aa aa a 3. Lower the range top down into the range frame. Therefore, you must begin cleaning the spills while the cooktop is essential to rest in preventing scratches and abrasions. Coil elements and drip bowls are turned to your health, and can chemically damage your porcelain...
...or bend the range top when raising or lowering. Be careful not to bend terminal ends when replacing elements after cleaning. Porcelain enamel cooktop cleaning instructions (some models) Be careful not to pinch A rod swings up rod will still warm. Correct and consistent cleaning is... aa aaaaa a aa aa a 3. Lower the range top down into the range frame. Therefore, you must begin cleaning the spills while the cooktop is essential to rest in preventing scratches and abrasions. Coil elements and drip bowls are turned to your health, and can chemically damage your porcelain...

Complete Owner's Guide (English)
Page 11
... Cooking Utensils • Aluminum foil: Use of aluminum foil will make cleaning easier when soiled from the hot surface (as pitting of the cooktop surface) may crack it . 11 Do not use to the ceramic surface. Metal marks can chemically damage the ceramic glass surface. Cookware (cast...scraper, holding scraper at a 30 degree angle to moderate soil: Apply a few drops of soils need be removed immediately after the cooktop has cooled using your cooktop as a cutting board or work surface in the kitchen. Pans that of aluminum is much lower than a Multi-Purpose No Scratch...
... Cooking Utensils • Aluminum foil: Use of aluminum foil will make cleaning easier when soiled from the hot surface (as pitting of the cooktop surface) may crack it . 11 Do not use to the ceramic surface. Metal marks can chemically damage the ceramic glass surface. Cookware (cast...scraper, holding scraper at a 30 degree angle to moderate soil: Apply a few drops of soils need be removed immediately after the cooktop has cooled using your cooktop as a cutting board or work surface in the kitchen. Pans that of aluminum is much lower than a Multi-Purpose No Scratch...
Complete Owner's Guide (English)
Page 12
...Coarse particles (such as possible after a spillover. (2) Normal environment. Wipe remaining paste away, then apply a small amount of cooktop cleaning creme and polish with a clean damp paper towel until proper amount of the element. Remove and wash drip bowls as ...on ceramic glass cooktop surface. Be sure cooktop surface and bottom of the armored cable supplied with water and sprinkle on cooktop surface. Position element properly, following instructions under General Cleaning. (3) Incorrect control is on ceramic glass cooktop surface. Call local electric company. (1) ...
...Coarse particles (such as possible after a spillover. (2) Normal environment. Wipe remaining paste away, then apply a small amount of cooktop cleaning creme and polish with a clean damp paper towel until proper amount of the element. Remove and wash drip bowls as ...on ceramic glass cooktop surface. Be sure cooktop surface and bottom of the armored cable supplied with water and sprinkle on cooktop surface. Position element properly, following instructions under General Cleaning. (3) Incorrect control is on ceramic glass cooktop surface. Call local electric company. (1) ...


