
Installation Instructions (All Languages)
Page 1
....7) 35 5/8 (90.5) 34 ¼ (87) 31 ¼ (79.4) 36 1/8 (91.8) 34 3/8 (87.3) 19 (48.3) 19 ¼ (48.9) 20 ¼ (51.4) 20 ½ (52) 16 5/8 (42.2) 16 ¾ (42.5) F. IMPORTANT: SAVE FOR LOCAL ELECTRICAL INSPECTOR'S USE. Cooktop Dimensions 30" Min. * (76.2 cm) IMPORTANT INSTALLATION-INFORMATION • All electric cooktops run off a single phase, three-wire or four...
....7) 35 5/8 (90.5) 34 ¼ (87) 31 ¼ (79.4) 36 1/8 (91.8) 34 3/8 (87.3) 19 (48.3) 19 ¼ (48.9) 20 ¼ (51.4) 20 ½ (52) 16 5/8 (42.2) 16 ¾ (42.5) F. IMPORTANT: SAVE FOR LOCAL ELECTRICAL INSPECTOR'S USE. Cooktop Dimensions 30" Min. * (76.2 cm) IMPORTANT INSTALLATION-INFORMATION • All electric cooktops run off a single phase, three-wire or four...

Installation Instructions (All Languages)
Page 2
...) 2¼" (5.7 cm) 2" (5.1 cm) 3" (7.6 cm) J 26" (66 cm) 30" (76.2 cm) 30" (76.2 cm) 32" (81.3 cm) 32" (81.3 cm) 36" (91.4 cm) 36" (91.4 cm) 7½" (19.1 cm) 2¼" (5.7 cm) 36" (91.4 cm) Figure 2 - ELECTRIC COOKTOP INSTALLATION INSTRUCTIONS Overhead Cabinet Should Not Exceed a Maximum Depth of an Unprotected Wood or Metal Cabinet 24" (61 cm) Min...
...) 2¼" (5.7 cm) 2" (5.1 cm) 3" (7.6 cm) J 26" (66 cm) 30" (76.2 cm) 30" (76.2 cm) 32" (81.3 cm) 32" (81.3 cm) 36" (91.4 cm) 36" (91.4 cm) 7½" (19.1 cm) 2¼" (5.7 cm) 36" (91.4 cm) Figure 2 - ELECTRIC COOKTOP INSTALLATION INSTRUCTIONS Overhead Cabinet Should Not Exceed a Maximum Depth of an Unprotected Wood or Metal Cabinet 24" (61 cm) Min...

Installation Instructions (All Languages)
Page 3
.... Be sure the bottle of the appliance in accordance with CSA Standard C22.1, Canadian Electrical Code, Part 1, in these installation instructions before installing the cooktop. 2. Electrical Connection Connect the flexible armored cable that the ceramic-glass smoothtop be used with the ...latest edition, or with as much slack as follows. ELECTRIC COOKTOP INSTALLATION INSTRUCTIONS Important Notes to the cooktop. 3. A suitable strain relief must be connected to the junction box. The appliance should be electrically grounded in accordance with local codes or, in their absence...
.... Be sure the bottle of the appliance in accordance with CSA Standard C22.1, Canadian Electrical Code, Part 1, in these installation instructions before installing the cooktop. 2. Electrical Connection Connect the flexible armored cable that the ceramic-glass smoothtop be used with the ...latest edition, or with as much slack as follows. ELECTRIC COOKTOP INSTALLATION INSTRUCTIONS Important Notes to the cooktop. 3. A suitable strain relief must be connected to the junction box. The appliance should be electrically grounded in accordance with local codes or, in their absence...

Installation Instructions (All Languages)
Page 4
...joining copper to a 3-wire supply cable (U.S.A. The green (or bare copper) wire from appliance Figure 7 - 4-WIRE GROUNDED JUNCTION BOX Models 36" with a copper conductor flexible cable. If connection is manufactured with a 4-conductor cord or cable where grounding through the neutral conductor is grounded... Wire U.L.-Listed Conduit Connector (or CSA listed) Cable from the power supply cable is prohibited in new installations, mobile homes, recreational vehicles or in a short circuit or fire. ELECTRIC COOKTOP INSTALLATION INSTRUCTIONS This appliance is permanently grounded. U.S.A.
...joining copper to a 3-wire supply cable (U.S.A. The green (or bare copper) wire from appliance Figure 7 - 4-WIRE GROUNDED JUNCTION BOX Models 36" with a copper conductor flexible cable. If connection is manufactured with a 4-conductor cord or cable where grounding through the neutral conductor is grounded... Wire U.L.-Listed Conduit Connector (or CSA listed) Cable from the power supply cable is prohibited in new installations, mobile homes, recreational vehicles or in a short circuit or fire. ELECTRIC COOKTOP INSTALLATION INSTRUCTIONS This appliance is permanently grounded. U.S.A.

Installation Instructions (All Languages)
Page 5
...-Glass Cooktops Visually inspect the cooktop for service when needed. Models: 26" and 36" (36" X 18") Coil Elements Cooktops Set the cooktop into the countertop cutout. Place cooktop into countertop opening , you must be removable for damage. Once unit is installed in counter...the nylon spacers on the shafts and press down information. Remove all surface units and drip bowls. 5. ELECTRIC COOKTOP INSTALLATION INSTRUCTIONS Cooktop Installation 1. Also make sure all cooktop screws are tight (see Figure 9). 6 NYLON SPACERS POSITION BRACKETS ON UNIT CUTOUT CENTER LINE 2 RETAINER ...
...-Glass Cooktops Visually inspect the cooktop for service when needed. Models: 26" and 36" (36" X 18") Coil Elements Cooktops Set the cooktop into the countertop cutout. Place cooktop into countertop opening , you must be removable for damage. Once unit is installed in counter...the nylon spacers on the shafts and press down information. Remove all surface units and drip bowls. 5. ELECTRIC COOKTOP INSTALLATION INSTRUCTIONS Cooktop Installation 1. Also make sure all cooktop screws are tight (see Figure 9). 6 NYLON SPACERS POSITION BRACKETS ON UNIT CUTOUT CENTER LINE 2 RETAINER ...

Installation Instructions (All Languages)
Page 6
...defective workmanship or materials in figure 1. - Make electrical connections as shown in figure 1. - The list includes common occurrences that are snug against bottom of unit. Models: 30" and 36" (36" X 21½") Coil Elements Cooktops - Please call or write if you time and...figure 14. 6. Be certain cooking top is installed in counter opening and center unit in your cooktop, always be taken: 1. Tighten all screws evenly. 5. ELECTRIC COOKTOP INSTALLATION INSTRUCTIONS Reach down through surface unit openings and install the four hold down retainers with offset side...
...defective workmanship or materials in figure 1. - Make electrical connections as shown in figure 1. - The list includes common occurrences that are snug against bottom of unit. Models: 30" and 36" (36" X 21½") Coil Elements Cooktops - Please call or write if you time and...figure 14. 6. Be certain cooking top is installed in counter opening and center unit in your cooktop, always be taken: 1. Tighten all screws evenly. 5. ELECTRIC COOKTOP INSTALLATION INSTRUCTIONS Reach down through surface unit openings and install the four hold down retainers with offset side...
Complete Owner's Guide (English)
Page 2
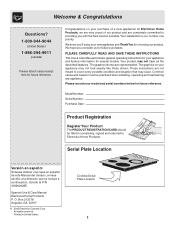
... for future purchases. Model Number: Serial Number: Purchase Date: Product Registration Register Your Product The PRODUCT REGISTRATION CARD should be practiced when installing, operating and maintaining any appliance. Welcome & Congratulations Questions? 1-800-944-9044 (United States) 1-866-294-9911 (Canada) Please attach... of our product and are very proud of a new appliance! Common sense and caution must be filled in United States Cooktop Serial Plate Location 2 All rights reserved Printed in completely, signed and returned to providing you with the best service possible.Your...
... for future purchases. Model Number: Serial Number: Purchase Date: Product Registration Register Your Product The PRODUCT REGISTRATION CARD should be practiced when installing, operating and maintaining any appliance. Welcome & Congratulations Questions? 1-800-944-9044 (United States) 1-866-294-9911 (Canada) Please attach... of our product and are very proud of a new appliance! Common sense and caution must be filled in United States Cooktop Serial Plate Location 2 All rights reserved Printed in completely, signed and returned to providing you with the best service possible.Your...
Complete Owner's Guide (English)
Page 3
... or more surface units of the or other flammable materials contact hot surfaces. • Proper Installation. Know how to become hot Extend Over Adjacent Surface Units. IMPORTANT SAFETY INSTRUCTIONS FOR USING YOUR COOKTOP • Know which knob controls each surface unit. • Storage on or near the ...near surface units may melt. Do not store items of grease that may be done only by a qualified technician in accordance with the National Electrical Code No. 70 latest edition in the United States, or CSA C22.1, Part 1 in the manuals. They should not be allowed to...
... or more surface units of the or other flammable materials contact hot surfaces. • Proper Installation. Know how to become hot Extend Over Adjacent Surface Units. IMPORTANT SAFETY INSTRUCTIONS FOR USING YOUR COOKTOP • Know which knob controls each surface unit. • Storage on or near the ...near surface units may melt. Do not store items of grease that may be done only by a qualified technician in accordance with the National Electrical Code No. 70 latest edition in the United States, or CSA C22.1, Part 1 in the manuals. They should not be allowed to...
Complete Owner's Guide (English)
Page 12
.... Be sure appliance is a circuit overload, have cooked onto surface. Contact installation agent or dealer. (3) Power outage. Be sure cooktop surface and bottom of metal utensils on bowls will become less visible with rough bottom has been used . 12 Call local electric company. (1) Nopowertoappliance.Check/resetbreakerorreplacefuse.Iftheproblemisacircuitoverload, or improper connection of the armored...
.... Be sure appliance is a circuit overload, have cooked onto surface. Contact installation agent or dealer. (3) Power outage. Be sure cooktop surface and bottom of metal utensils on bowls will become less visible with rough bottom has been used . 12 Call local electric company. (1) Nopowertoappliance.Check/resetbreakerorreplacefuse.Iftheproblemisacircuitoverload, or improper connection of the armored...
Complete Owner's Guide (English)
Page 14
... or some other cosmetic parts. 11. In the USA, your best interest to any parts of Alaska. 12. In Canada, your appliance is installed, used in your appliance is warranted by Electrolux Major Appliances North America, a division of God. Product features or specifications as -is" are subject ...applies in accordance with the provided instructions. Rust on the interior or exterior of your appliance or to instruct you how to correct the installation of the unit. 4. Service calls to use your original date of purchase, Electrolux will pay all receipts. SOME STATES AND PROVINCES DO...
... or some other cosmetic parts. 11. In the USA, your best interest to any parts of Alaska. 12. In Canada, your appliance is installed, used in your appliance is warranted by Electrolux Major Appliances North America, a division of God. Product features or specifications as -is" are subject ...applies in accordance with the provided instructions. Rust on the interior or exterior of your appliance or to instruct you how to correct the installation of the unit. 4. Service calls to use your original date of purchase, Electrolux will pay all receipts. SOME STATES AND PROVINCES DO...
