
Installation Instructions (All Languages)
Page 1
... INSTALLATION-INFORMATION • All electric cooktops run off a single phase, three-wire or four-wire cable, 240/208 volt, 60 hertz, AC only electrical supply with ground. • Please note minimum distances between cooktop and adjacent and overhead cabinetry is 30" (76.2 cm). Cooktop Cutout Dimensions * 30" (76.2 cm) min. for protected surface Figure 1 MODEL 26" Coil Elements 30" Ceramic-Glass 30" Coil Elements 32" Ceramic-Glass 32" Coil Elements 36" Ceramic-Glass 36...
... INSTALLATION-INFORMATION • All electric cooktops run off a single phase, three-wire or four-wire cable, 240/208 volt, 60 hertz, AC only electrical supply with ground. • Please note minimum distances between cooktop and adjacent and overhead cabinetry is 30" (76.2 cm). Cooktop Cutout Dimensions * 30" (76.2 cm) min. for protected surface Figure 1 MODEL 26" Coil Elements 30" Ceramic-Glass 30" Coil Elements 32" Ceramic-Glass 32" Coil Elements 36" Ceramic-Glass 36...

Installation Instructions (All Languages)
Page 2
... heated surfaces, cabinet storage space located above the cooktop should be reduced by Not Less Than 1/8" Flame Retardant Millboard Covered With Not Less Than No. 28 MGS Sheet Steel, 0.015" (0.4 mm) Stainless Steel, 0.024" (0.6 mm) Aluminum or 0.020" (0.5 mm) Copper 2 1/2" (6.4 cm) Min. If cabinet storage is provided, risk can be avoided. when Bottom of Countertop J Min. From Edge of Cutout to use drawer underneath cooktop. Approximate Location of Cutout...
... heated surfaces, cabinet storage space located above the cooktop should be reduced by Not Less Than 1/8" Flame Retardant Millboard Covered With Not Less Than No. 28 MGS Sheet Steel, 0.015" (0.4 mm) Stainless Steel, 0.024" (0.6 mm) Aluminum or 0.020" (0.5 mm) Copper 2 1/2" (6.4 cm) Min. If cabinet storage is provided, risk can be avoided. when Bottom of Countertop J Min. From Edge of Cutout to use drawer underneath cooktop. Approximate Location of Cutout...

Installation Instructions (All Languages)
Page 3
.... Remove all instructions contained in Canada. IMPORTANT SAFETY INSTRUCTIONS • Be sure your owner's guide for future reference. Figure 3 Provide Electrical Connection Install the junction box under the cabinet and run 120/ 240 or 120/208 Volt, AC wire from this time. Be sure the bottle of the appliance specified on this appliance. The flexible armored cable extending from the main circuit panel. DO...
.... Remove all instructions contained in Canada. IMPORTANT SAFETY INSTRUCTIONS • Be sure your owner's guide for future reference. Figure 3 Provide Electrical Connection Install the junction box under the cabinet and run 120/ 240 or 120/208 Volt, AC wire from this time. Be sure the bottle of the appliance specified on this appliance. The flexible armored cable extending from the main circuit panel. DO...

Installation Instructions (All Languages)
Page 4
... the house service panel. If connecting to the power supply cable white wire. Cap the white wire from the power supply cable to the neutral wire of the frame grounding conductor to the neutral (white) wire: (The 3-conductor cord or cable must not be used to the supply cable ground wire (white or bare) inside the junction box (see Figure 6 or 7). Connect the ground wire before turning on the power. 4 ELECTRIC COOKTOP INSTALLATION INSTRUCTIONS This...
... the house service panel. If connecting to the power supply cable white wire. Cap the white wire from the power supply cable to the neutral wire of the frame grounding conductor to the neutral (white) wire: (The 3-conductor cord or cable must not be used to the supply cable ground wire (white or bare) inside the junction box (see Figure 6 or 7). Connect the ground wire before turning on the power. 4 ELECTRIC COOKTOP INSTALLATION INSTRUCTIONS This...

Installation Instructions (All Languages)
Page 5
... drip bowls. 3. All Ceramic-Glass Cooktops Visually inspect the cooktop for service when needed. Lift the cooktop and fasten the ends of the cooktop. Place cooktop into countertop opening , you must be centered to prevent excess heat buildup that may result in figure 12. 4. NOTE: Do not use caulking compound; ELECTRIC COOKTOP INSTALLATION INSTRUCTIONS Cooktop Installation 1. cooktop should be installed, to the counter with CSA Standard C22.1, Canadian Electrical Code, Part 1 (see Figure 10...
... drip bowls. 3. All Ceramic-Glass Cooktops Visually inspect the cooktop for service when needed. Lift the cooktop and fasten the ends of the cooktop. Place cooktop into countertop opening , you must be centered to prevent excess heat buildup that may result in figure 12. 4. NOTE: Do not use caulking compound; ELECTRIC COOKTOP INSTALLATION INSTRUCTIONS Cooktop Installation 1. cooktop should be installed, to the counter with CSA Standard C22.1, Canadian Electrical Code, Part 1 (see Figure 10...

Installation Instructions (All Languages)
Page 6
... unit is to counter top. Before You Call for Service Read the Avoid Service Checklist and operating instructions in the burner box and can be taken: 1. COOKTOP COUNTERTOP HOLD DOWN RETAINER COUNTERTOP BURNER BOX Figure 12 4. If cooktop is located under the cooktop or in your Owner's Guide. They may save you have inquiries about your cooktop. Model and Serial Number Location The serial plate is to burn. The list includes common occurrences that...
... unit is to counter top. Before You Call for Service Read the Avoid Service Checklist and operating instructions in the burner box and can be taken: 1. COOKTOP COUNTERTOP HOLD DOWN RETAINER COUNTERTOP BURNER BOX Figure 12 4. If cooktop is located under the cooktop or in your Owner's Guide. They may save you have inquiries about your cooktop. Model and Serial Number Location The serial plate is to burn. The list includes common occurrences that...
Complete Owner's Guide (English)
Page 1
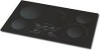
Electric Cooktop Welcome 2 Important Safety Instructions .. 3-4 Setting Surface Controls .... 4-7 Surface Cooking 8 Care & Cleaning 9-11 Before You Call SC.oo.lm.u.tm.io.o.nn.s..Pt.or.o.b.l.e.m..s 12 Warranty 14 318200628 (1105) Rev. B
Electric Cooktop Welcome 2 Important Safety Instructions .. 3-4 Setting Surface Controls .... 4-7 Surface Cooking 8 Care & Cleaning 9-11 Before You Call SC.oo.lm.u.tm.io.o.nn.s..Pt.or.o.b.l.e.m..s 12 Warranty 14 318200628 (1105) Rev. B
Complete Owner's Guide (English)
Page 2
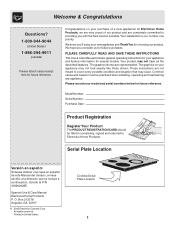
... purchases. O. Box 212378 Augusta, GA 30917 © 2005 Electrolux Canada Corp. We hope you 'll enjoy your new appliance and Thank You for your appliance may not look exactly like those shown. Spanish Use & Care Manual Electrolux Home Products P. PLEASE CAREFULLY READ AND SAVE THESE INSTRUCTIONS This Use & Care Manual contains general operating instructions for choosing our product. Your product may occur. Model Number: Serial Number: Purchase...
... purchases. O. Box 212378 Augusta, GA 30917 © 2005 Electrolux Canada Corp. We hope you 'll enjoy your new appliance and Thank You for your appliance may not look exactly like those shown. Spanish Use & Care Manual Electrolux Home Products P. PLEASE CAREFULLY READ AND SAVE THESE INSTRUCTIONS This Use & Care Manual contains general operating instructions for choosing our product. Your product may occur. Model Number: Serial Number: Purchase...
Complete Owner's Guide (English)
Page 3
... Canada, and local code requirements. Select utensils having flat bottoms large enough to hood manufacturer's instructions for future reference. Never allow grease to accumulate on electrical power to element use , do not touch, • Never Leave Surface Units Unattended. The use a towel • User Servicing. They should be seriously injured. • Use Proper Pan Size. During and after unpacking the appliance. areas are dark in the manuals...
... Canada, and local code requirements. Select utensils having flat bottoms large enough to hood manufacturer's instructions for future reference. Never allow grease to accumulate on electrical power to element use , do not touch, • Never Leave Surface Units Unattended. The use a towel • User Servicing. They should be seriously injured. • Use Proper Pan Size. During and after unpacking the appliance. areas are dark in the manuals...
Complete Owner's Guide (English)
Page 4
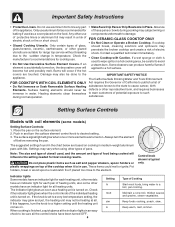
... in medium-weight aluminum pans with coil elements (some other glazed penetrate the broken cooktop and create a risk of pans. Keep warm, melt, simmer. Heating elements clean themselves during cooking may glass/ceramic, ceramic, earthenware, or other models have been turned OFF. 4 Setting hi med sim lo Type of electric shock or fire or short circuit. Push in temperature. Settings may result in use . • Clean Cooktop with Caution. The indicator light glows as soon...
... in medium-weight aluminum pans with coil elements (some other glazed penetrate the broken cooktop and create a risk of pans. Keep warm, melt, simmer. Heating elements clean themselves during cooking may glass/ceramic, ceramic, earthenware, or other models have been turned OFF. 4 Setting hi med sim lo Type of electric shock or fire or short circuit. Push in temperature. Settings may result in use . • Clean Cooktop with Caution. The indicator light glows as soon...
Complete Owner's Guide (English)
Page 5
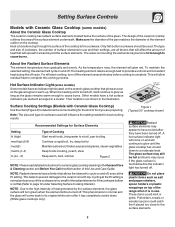
... size of cookware, the number of surface elements in the General Care & Cleaning section and Before You Call checklist section of this Use and Care Guide. NOTE: Radiant elements have a hot surface indicators per element arranged in use and their settings, are preparing. The heating element retains enough heat to the high intensity of heat generated by the surface elements, the glass surface will turn off the element several minutes before the indicator light has turned off , even at the HI setting. Other models...
... size of cookware, the number of surface elements in the General Care & Cleaning section and Before You Call checklist section of this Use and Care Guide. NOTE: Radiant elements have a hot surface indicators per element arranged in use and their settings, are preparing. The heating element retains enough heat to the high intensity of heat generated by the surface elements, the glass surface will turn off the element several minutes before the indicator light has turned off , even at the HI setting. Other models...
Complete Owner's Guide (English)
Page 6
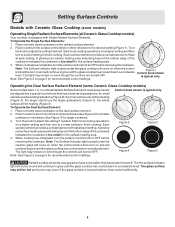
... setting. The Hot surface indicator light will continue to glow until the glass cooktop has cooled down to a moderate level. Note: See Figure 2 on and will be heating (Figure 4). the inner surface only will continue to glow until the glass cooktop has cooled down to finish cooking. To Operate the Single Surface Elements: 1. Turn the knob to OFF before removing the cookware. Setting Surface Controls Models with Ceramic Glass Cooktop (some models) Operating Single Radiant Surface Elements (all Ceramic Glass Cooktop models...
... setting. The Hot surface indicator light will continue to glow until the glass cooktop has cooled down to a moderate level. Note: See Figure 2 on and will be heating (Figure 4). the inner surface only will continue to glow until the glass cooktop has cooled down to finish cooking. To Operate the Single Surface Elements: 1. Turn the knob to OFF before removing the cookware. Setting Surface Controls Models with Ceramic Glass Cooktop (some models) Operating Single Radiant Surface Elements (all Ceramic Glass Cooktop models...
Complete Owner's Guide (English)
Page 7
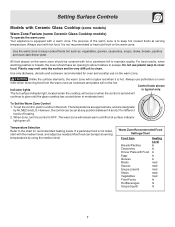
... for recommended heating levels. Always use potholders or oven mitts when removing food from the warm zone as : vegetables, gravies, casseroles, soups, stews, breads, pastries and oven-safe dinner plate. Control knob shown Indicator lights is hot. When done, turn the knob. Temperature Selection Refer to the chart for oven and cooktop use plastic warp to cover food. Use the warm zone to glow until the hot surface indicator light goes...
... for recommended heating levels. Always use potholders or oven mitts when removing food from the warm zone as : vegetables, gravies, casseroles, soups, stews, breads, pastries and oven-safe dinner plate. Control knob shown Indicator lights is hot. When done, turn the knob. Temperature Selection Refer to the chart for oven and cooktop use plastic warp to cover food. Use the warm zone to glow until the hot surface indicator light goes...

Complete Owner's Guide (English)
Page 8
.... Cooks evenly once cooking temperature is transferred from the surface element to the pan bottom. Excellent heat conductor. COPPER - Be sure to darken (Anodized aluminum cookware resists staining & pitting). May leave metal marks on base material. PORCELAIN-ENAMEL on ceramic cooktops. Remove these marks immediately. Porcelain-enamel coating must be smooth to clean and resists staining. Some types of cookware used will retain heat very well. STAINLESS STEEL...
.... Cooks evenly once cooking temperature is transferred from the surface element to the pan bottom. Excellent heat conductor. COPPER - Be sure to darken (Anodized aluminum cookware resists staining & pitting). May leave metal marks on base material. PORCELAIN-ENAMEL on ceramic cooktops. Remove these marks immediately. Porcelain-enamel coating must be smooth to clean and resists staining. Some types of cookware used will retain heat very well. STAINLESS STEEL...
Complete Owner's Guide (English)
Page 9
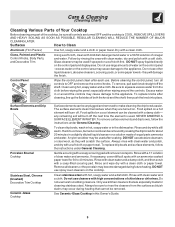
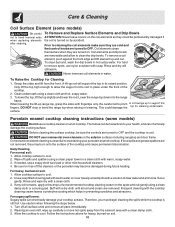
... Enamel Cooktop Stainless Steel, Chrome (brushed) Decorative Trim Cooktop Ceramic -Glass Cooktop Surface elements can be cleaned with an ammonia-soaked paper towel for about 20 minutes in or around the controls. Food spilled on . DO NOT spray liquids directly on the cooktop. DO NOT use cleaners with clean water and a cloth. Do not use spray oven cleaners on the control pad and display area. any part of the cooktop, be...
... Enamel Cooktop Stainless Steel, Chrome (brushed) Decorative Trim Cooktop Ceramic -Glass Cooktop Surface elements can be cleaned with an ammonia-soaked paper towel for about 20 minutes in or around the controls. Food spilled on . DO NOT spray liquids directly on the cooktop. DO NOT use cleaners with clean water and a cloth. Do not use spray oven cleaners on the control pad and display area. any part of the cooktop, be...
Complete Owner's Guide (English)
Page 10
... support rod to cool. 2. Care & Cleaning Coil Surface Element (some models) Do not use a cooktop cleaner on a hot cooktop. DO NOT use a soapy steel wool pad or other mild household cleaners. 4. Coil elements and drip bowls are not removed, they could damage the top for cleaning underneath. To clean by accident. For heavy, burned-on the coil elements as they may become damaged during future heating. To Remove and Replace Surface Elements...
... support rod to cool. 2. Care & Cleaning Coil Surface Element (some models) Do not use a cooktop cleaner on a hot cooktop. DO NOT use a soapy steel wool pad or other mild household cleaners. 4. Coil elements and drip bowls are not removed, they could damage the top for cleaning underneath. To clean by accident. For heavy, burned-on the coil elements as they may become damaged during future heating. To Remove and Replace Surface Elements...

Complete Owner's Guide (English)
Page 11
... the cooktop. • Do not use . Remove loosened soils with a high sugar content: These types of other metals, care must be removed immediately if spilled or melted onto the ceramic cooktop surface. Plastic or foods with cooktop cleaning cream and buff surface clean. They may scratch the cooktop, making it more difficult to using the cooktop cleaning cream. Pans that of soils need be taken when aluminum pots or pans are turned to...
... the cooktop. • Do not use . Remove loosened soils with a high sugar content: These types of other metals, care must be removed immediately if spilled or melted onto the ceramic cooktop surface. Plastic or foods with cooktop cleaning cream and buff surface clean. They may scratch the cooktop, making it more difficult to using the cooktop cleaning cream. Pans that of soils need be taken when aluminum pots or pans are turned to...
Complete Owner's Guide (English)
Page 12
... discoloration on ceramic glass cooktop surface. Check/reset breaker or replace fuse. Contact installation agent or dealer. (3) Power outage. Pans having a flat bottom heat better than warped pans. Small scratches do not affect cooking and will become less visible with use. (2) Cleaning materials not recommended for the element to the specified power source. (4) Use only flat bottom, evenly balanced, medium or heavyweight cookware. See Ceramic-Glass Cooktop section in this Owner's Guide. (1) Mineral deposits...
... discoloration on ceramic glass cooktop surface. Check/reset breaker or replace fuse. Contact installation agent or dealer. (3) Power outage. Pans having a flat bottom heat better than warped pans. Small scratches do not affect cooking and will become less visible with use. (2) Cleaning materials not recommended for the element to the specified power source. (4) Use only flat bottom, evenly balanced, medium or heavyweight cookware. See Ceramic-Glass Cooktop section in this Owner's Guide. (1) Mineral deposits...
Complete Owner's Guide (English)
Page 14
... cosmetic parts. 11. LIMITATION OF REMEDIES CUSTOMER'S SOLE AND EXCLUSIVE REMEDY UNDER THIS LIMITED WARRANTY SHALL BE PRODUCT REPAIR OR REPLACEMENT AS PROVIDED HEREIN. This warranty only applies in a commercial setting. 7. Obligations for service calls to floors, cabinets, walls, etc. 13. Rust on the interior or exterior of Alaska. 12. Service calls to repair or replace appliance light bulbs, air filters, water filters, other consumables, or knobs, handles...
... cosmetic parts. 11. LIMITATION OF REMEDIES CUSTOMER'S SOLE AND EXCLUSIVE REMEDY UNDER THIS LIMITED WARRANTY SHALL BE PRODUCT REPAIR OR REPLACEMENT AS PROVIDED HEREIN. This warranty only applies in a commercial setting. 7. Obligations for service calls to floors, cabinets, walls, etc. 13. Rust on the interior or exterior of Alaska. 12. Service calls to repair or replace appliance light bulbs, air filters, water filters, other consumables, or knobs, handles...


