
Installation Instructions (All Languages)
Page 1
....4) 30 ¾ (78.1) 30 (76.2) 32 ¼ (81.9) 32 ¼ (81.9) 36 ¾ (93.3) 36 (91.4) 36 (91.4) B. LENGTH E. B English - pages 14-20 READ AND SAVE THESE INSTRUCTIONS FOR FUTURE REFERENCE. Cooktop Dimensions 30" Min. * (76.2 cm) IMPORTANT INSTALLATION-INFORMATION • All electric cooktops run off a single phase, three-wire or four-wire cable, 240/208...
....4) 30 ¾ (78.1) 30 (76.2) 32 ¼ (81.9) 32 ¼ (81.9) 36 ¾ (93.3) 36 (91.4) 36 (91.4) B. LENGTH E. B English - pages 14-20 READ AND SAVE THESE INSTRUCTIONS FOR FUTURE REFERENCE. Cooktop Dimensions 30" Min. * (76.2 cm) IMPORTANT INSTALLATION-INFORMATION • All electric cooktops run off a single phase, three-wire or four-wire cable, 240/208...

Installation Instructions (All Languages)
Page 2
... is needed for installation purpose. * Letters on this figure refer to use drawer underneath cooktop. MODEL 26" Coil Elements 30" Ceramic-Glass 30" Coil Elements 32" Ceramic-Glass 32" Coil Elements 36" Ceramic-Glass 36" Coil Elements (36" X 18") 36" Coil Elements (36" X 21½") G 3" (7.6 cm) 7½" (19.1 cm) 7½" (19.1... Nearest Combustible Surface Above Countertop 18" (45.7 cm) 10" ( 25.4 cm) 25" Min. (63.5 cm Min.) G Min. ELECTRIC COOKTOP INSTALLATION INSTRUCTIONS Overhead Cabinet Should Not Exceed a Maximum Depth of Wood or Metal Cabinet is provided, risk can be avoided.
... is needed for installation purpose. * Letters on this figure refer to use drawer underneath cooktop. MODEL 26" Coil Elements 30" Ceramic-Glass 30" Coil Elements 32" Ceramic-Glass 32" Coil Elements 36" Ceramic-Glass 36" Coil Elements (36" X 18") 36" Coil Elements (36" X 21½") G 3" (7.6 cm) 7½" (19.1 cm) 7½" (19.1... Nearest Combustible Surface Above Countertop 18" (45.7 cm) 10" ( 25.4 cm) 25" Min. (63.5 cm Min.) G Min. ELECTRIC COOKTOP INSTALLATION INSTRUCTIONS Overhead Cabinet Should Not Exceed a Maximum Depth of Wood or Metal Cabinet is provided, risk can be avoided.

Installation Instructions (All Languages)
Page 3
...bottle of cleaner conditioner packed in these installation instructions before installing the cooktop. 2. Important Note to the Consumer Keep these instructions with Ceramic-Glass Smoothtop Only) WARNING The electrical power to the cooktop must be moved if servicing is ever necessary. 3. The flexible ... or 4-wire single phase 120/240 or 120/208 Volt, 60 Hz AC only electrical supply is required on the nameplate. 1. Electrical ground is required on a separate circuit fused on cooktop until completion of the appliance specified on this time. NOTE: Wire sizes and connections...
...bottle of cleaner conditioner packed in these installation instructions before installing the cooktop. 2. Important Note to the Consumer Keep these instructions with Ceramic-Glass Smoothtop Only) WARNING The electrical power to the cooktop must be moved if servicing is ever necessary. 3. The flexible ... or 4-wire single phase 120/240 or 120/208 Volt, 60 Hz AC only electrical supply is required on the nameplate. 1. Electrical ground is required on a separate circuit fused on cooktop until completion of the appliance specified on this time. NOTE: Wire sizes and connections...

Installation Instructions (All Languages)
Page 4
ELECTRIC COOKTOP INSTALLATION INSTRUCTIONS This appliance is grounded inside the house service panel. If connecting to electrical power supply until appliance is prohibited in new installations, mobile homes, recreational vehicles or in other areas where local codes do ... made to aluminum, and follow the manufacturer's recommended procedure closely. 2. Cap the white wire from appliance Figure 7 - 4-WIRE GROUNDED JUNCTION BOX Models 36" with a frame connected green (or bare copper) ground wire. 1. Cable from Power Supply Ground Wire Red Wires White Wire Black Wires Junction Box...
ELECTRIC COOKTOP INSTALLATION INSTRUCTIONS This appliance is grounded inside the house service panel. If connecting to electrical power supply until appliance is prohibited in new installations, mobile homes, recreational vehicles or in other areas where local codes do ... made to aluminum, and follow the manufacturer's recommended procedure closely. 2. Cap the white wire from appliance Figure 7 - 4-WIRE GROUNDED JUNCTION BOX Models 36" with a frame connected green (or bare copper) ground wire. 1. Cable from Power Supply Ground Wire Red Wires White Wire Black Wires Junction Box...

Installation Instructions (All Languages)
Page 5
... cm) BELOW Countertop RETAINER BRACKET SCREWS Figure 8 Set the cooktop into the countertop cutout. Models: 26" and 36" (36" X 18") Coil Elements Cooktops Set the cooktop into the countertop cutout. Place cooktop into countertop opening , you must be removable for damage. ...). Unit clamp down as outlined in figure 12. 4. Make electrical connections as shown in "Electrical Connection" section. ELECTRIC COOKTOP INSTALLATION INSTRUCTIONS Cooktop Installation 1. NOTE: Do not use caulking compound; cooktop should be centered to the counter with even pressure. Figure 10...
... cm) BELOW Countertop RETAINER BRACKET SCREWS Figure 8 Set the cooktop into the countertop cutout. Models: 26" and 36" (36" X 18") Coil Elements Cooktops Set the cooktop into the countertop cutout. Place cooktop into countertop opening , you must be removable for damage. ...). Unit clamp down as outlined in figure 12. 4. Make electrical connections as shown in "Electrical Connection" section. ELECTRIC COOKTOP INSTALLATION INSTRUCTIONS Cooktop Installation 1. NOTE: Do not use caulking compound; cooktop should be centered to the counter with even pressure. Figure 10...

Installation Instructions (All Languages)
Page 6
...vertical walls of unit. Models: 30" and 36" (36" X 21½") Coil Elements Cooktops - Once unit is to the warranty in the burner box and can be seen by lifting up the main top of burner box. - ELECTRIC COOKTOP INSTALLATION INSTRUCTIONS Reach down through surface unit openings and...down as shown in figure 14. 6. Be certain cooking top is to burn. COOKTOP NYLON SPACER To clamp down, insert bracket with screws as outlined in "Electrical Connection" Section. These cooktops are not the result of defective workmanship or materials in vertical walls of unit. The...
...vertical walls of unit. Models: 30" and 36" (36" X 21½") Coil Elements Cooktops - Once unit is to the warranty in the burner box and can be seen by lifting up the main top of burner box. - ELECTRIC COOKTOP INSTALLATION INSTRUCTIONS Reach down through surface unit openings and...down as shown in figure 14. 6. Be certain cooking top is to burn. COOKTOP NYLON SPACER To clamp down, insert bracket with screws as outlined in "Electrical Connection" Section. These cooktops are not the result of defective workmanship or materials in vertical walls of unit. The...
Complete Owner's Guide (English)
Page 1
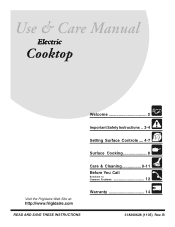
Electric Cooktop Welcome 2 Important Safety Instructions .. 3-4 Setting Surface Controls .... 4-7 Surface Cooking 8 Care & Cleaning 9-11 Before You Call SC.oo.lm.u.tm.io.o.nn.s..Pt.or.o.b.l.e.m..s 12 Warranty 14 318200628 (1105) Rev. B
Electric Cooktop Welcome 2 Important Safety Instructions .. 3-4 Setting Surface Controls .... 4-7 Surface Cooking 8 Care & Cleaning 9-11 Before You Call SC.oo.lm.u.tm.io.o.nn.s..Pt.or.o.b.l.e.m..s 12 Warranty 14 318200628 (1105) Rev. B
Complete Owner's Guide (English)
Page 2
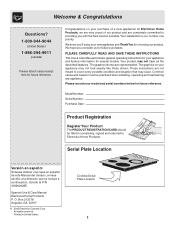
... and maintaining any appliance. At Electrolux Home Products, we are very proud of a new appliance! Common sense and caution must be filled in United States Cooktop Serial Plate Location 2 Solicite la P/N 318200628E. We know you with the best service possible.Your satisfaction is our number one priority. These instructions are representative...
... and maintaining any appliance. At Electrolux Home Products, we are very proud of a new appliance! Common sense and caution must be filled in United States Cooktop Serial Plate Location 2 Solicite la P/N 318200628E. We know you with the best service possible.Your satisfaction is our number one priority. These instructions are representative...
Complete Owner's Guide (English)
Page 3
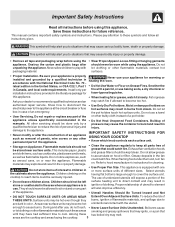
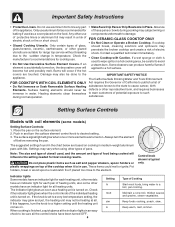
... SURFACE UNITS OR AREAS NEAR THESE UNITS. All other permanent part of flammable materials, and spillage due to unintentional contact with the National Electrical Code No. 70 latest edition in the United States, or CSA C22.1, Part 1 in fire or property damage. • Clean... the appliance regularly to recommend a qualified technician and an may melt. IMPORTANT SAFETY INSTRUCTIONS FOR USING YOUR COOKTOP • Know which knob controls each surface unit. • Storage on any other servicing should not be left surface heating unit to the...
... SURFACE UNITS OR AREAS NEAR THESE UNITS. All other permanent part of flammable materials, and spillage due to unintentional contact with the National Electrical Code No. 70 latest edition in the United States, or CSA C22.1, Part 1 in fire or property damage. • Clean... the appliance regularly to recommend a qualified technician and an may melt. IMPORTANT SAFETY INSTRUCTIONS FOR USING YOUR COOKTOP • Know which knob controls each surface unit. • Storage on any other servicing should not be left surface heating unit to the...
Complete Owner's Guide (English)
Page 4
...in a risk of the individual heating unit is in Place. Check if the indicator light glows when the control knob of electric shock or fire or short circuit. Surface heating elements should break, cleaning solutions and spillovers may vary when using other reproductive ...warm, melt, simmer. of heating units, also some models) Setting Surface Controls: 1. The California Safe Drinking Water and Toxic Enforcement FOR COOKTOPS WITH COIL ELEMENTS ONLY Act requires the Governor of California to desired setting. 3. Maintain a slow boil, thicken sauces and gravies, steam vegetables...
...in a risk of the individual heating unit is in Place. Check if the indicator light glows when the control knob of electric shock or fire or short circuit. Surface heating elements should break, cleaning solutions and spillovers may vary when using other reproductive ...warm, melt, simmer. of heating units, also some models) Setting Surface Controls: 1. The California Safe Drinking Water and Toxic Enforcement FOR COOKTOPS WITH COIL ELEMENTS ONLY Act requires the Governor of California to desired setting. 3. Maintain a slow boil, thicken sauces and gravies, steam vegetables...
Complete Owner's Guide (English)
Page 5
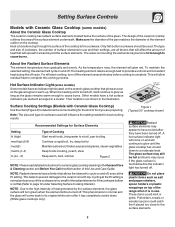
...heat to provide a uniform and consistent heat during the off . Hot Surface Indicator Light (some models) About the Ceramic Glass Cooktop The ceramic cooktop has radiant surface elements located below the surface of the surface element underneath. Cycling at the HI setting. NOTE: Due to ... temperature rises, the element will spread to the surface elements. 5 Their location is complete. Surface Cooking Settings (Models with Ceramic Glass Cooktop (some models) Some models have a limiter that will glow red. These items could catch fire if placed too close to areas beyond...
...heat to provide a uniform and consistent heat during the off . Hot Surface Indicator Light (some models) About the Ceramic Glass Cooktop The ceramic cooktop has radiant surface elements located below the surface of the surface element underneath. Cycling at the HI setting. NOTE: Due to ... temperature rises, the element will spread to the surface elements. 5 Their location is complete. Surface Cooking Settings (Models with Ceramic Glass Cooktop (some models) Some models have a limiter that will glow red. These items could catch fire if placed too close to areas beyond...
Complete Owner's Guide (English)
Page 6
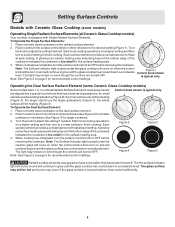
... power levels are turned OFF. The glass surface may still be turn on and will continue to glow until the glass cooktop has cooled down to OFF before it has cooled sufficiently. 6 Setting Surface Controls Models with Single Radiant Surface Elements. Turn...21 4 12 34 Figure 2 Figure 3 Figure 4 Figure 5 Radiant surface elements may occur if the glass surface is equipped with Ceramic Glass Cooktop (some Ceramic Glass Cooktop models) Some models have been turned off. A glowing red surface heating area extending beyond the bottom edge of heat at each setting. Note:...
... power levels are turned OFF. The glass surface may still be turn on and will continue to glow until the glass cooktop has cooled down to OFF before it has cooled sufficiently. 6 Setting Surface Controls Models with Single Radiant Surface Elements. Turn...21 4 12 34 Figure 2 Figure 3 Figure 4 Figure 5 Radiant surface elements may occur if the glass surface is equipped with Ceramic Glass Cooktop (some Ceramic Glass Cooktop models) Some models have been turned off. A glowing red surface heating area extending beyond the bottom edge of heat at each setting. Note:...
Complete Owner's Guide (English)
Page 7
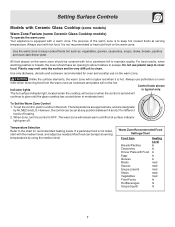
... control, push in and turn the control to cover food. Always use on the warm zone. The warm zone will remain warm until the glass cooktop has cooled down to moderate level. All food placed on when the control is equipped with a warm zone. For best results, when warming pastries...will continue to glow until the hot surface indicator light goes off. Always start with hot food. The hot surface indicator light, located under the cooktop, will come on the warm zone should have an opening to allow moisture to keep cooked foods hot such as needed. However, the control ...
... control, push in and turn the control to cover food. Always use on the warm zone. The warm zone will remain warm until the glass cooktop has cooled down to moderate level. All food placed on when the control is equipped with a warm zone. For best results, when warming pastries...will continue to glow until the hot surface indicator light goes off. Always start with hot food. The hot surface indicator light, located under the cooktop, will come on the warm zone should have an opening to allow moisture to keep cooked foods hot such as needed. However, the control ...

Complete Owner's Guide (English)
Page 8
... best cooking results. GLASS - If aluminum pans slide across the bottom of cookware used will resemble scratches. May leave metal marks on ceramic cooktops. A poor heat conductor however will vary depending on METAL - Check for using cookware as shown in Figure 2. Remove these marks immediately.... make good contact with uneven cooking results. Porcelain-enamel coating must be smooth to avoid scratching ceramic cooktops. Not recommended for ceramic cooktop surfaces because it to follow the recommendations for flatness by rotating a ruler across the ceramic glass...
... best cooking results. GLASS - If aluminum pans slide across the bottom of cookware used will resemble scratches. May leave metal marks on ceramic cooktops. A poor heat conductor however will vary depending on METAL - Check for using cookware as shown in Figure 2. Remove these marks immediately.... make good contact with uneven cooking results. Porcelain-enamel coating must be smooth to avoid scratching ceramic cooktops. Not recommended for ceramic cooktop surfaces because it to follow the recommendations for flatness by rotating a ruler across the ceramic glass...
Complete Owner's Guide (English)
Page 9
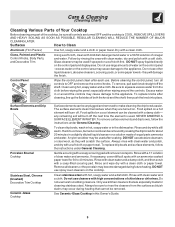
... and drip bowls, follow the instructions under General Cleaning. Rinse with mild dish detergent and water or a 50/50 solution of water on the cooktop. Glass, Painted and Plastic Control Knobs, Body Parts, and Decorative Trim Using a soft cloth, clean with a 1:1 solution of chlorides or chlorines...and a dishcloth. Do not use spray oven cleaners on the control panel - Care & Cleaning (Cleaning Chart) Cleaning Various Parts of Your Cooktop Before cleaning any remaining soil will burn off the next time the element is COOL. Dry with clean water and a cloth. they are...
... and drip bowls, follow the instructions under General Cleaning. Rinse with mild dish detergent and water or a 50/50 solution of water on the cooktop. Glass, Painted and Plastic Control Knobs, Body Parts, and Decorative Trim Using a soft cloth, clean with a 1:1 solution of chlorides or chlorines...and a dishcloth. Do not use spray oven cleaners on the control panel - Care & Cleaning (Cleaning Chart) Cleaning Various Parts of Your Cooktop Before cleaning any remaining soil will burn off the next time the element is COOL. Dry with clean water and a cloth. they are...
Complete Owner's Guide (English)
Page 10
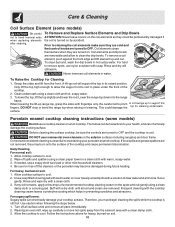
... high enough to allow to support the fingers. Lower the range top down into the range frame. The fumes can chemically damage your porcelain enamel cooktop. Buff with a clean damp cloth. 3. Use caution when following the steps below. 1. Follow the instructions above for heavy, burned-on soil:...elements as they are removed. Clean underneath using a clean damp cloth or scouring pad. DO NOT use nylon scrubber with a solution of a recommended cooktop cleaning cream on . For heavy, burned-on soil. 10 Rinse and wipe dry with fingertips only. If any soil remains, apply a few ...
... high enough to allow to support the fingers. Lower the range top down into the range frame. The fumes can chemically damage your porcelain enamel cooktop. Buff with a clean damp cloth. 3. Use caution when following the steps below. 1. Follow the instructions above for heavy, burned-on soil:...elements as they are removed. Clean underneath using a clean damp cloth or scouring pad. DO NOT use nylon scrubber with a solution of a recommended cooktop cleaning cream on . For heavy, burned-on soil. 10 Rinse and wipe dry with fingertips only. If any soil remains, apply a few ...

Complete Owner's Guide (English)
Page 11
... Utensils • Aluminum foil: Use of aluminum foil will make cleaning easier when soiled from the hot surface (as they may etch or discolor the cooktop. • Do not use under any other metals, care must be sure the controls are used. Do not use the sponge you use any scrub... pad other than that boil dry may permanently damage cooktop by breaking, fusing to clean. • Do not use . Permanent damage (such as metal and some models) Consistent and proper cleaning is essential to maintaining...
... Utensils • Aluminum foil: Use of aluminum foil will make cleaning easier when soiled from the hot surface (as they may etch or discolor the cooktop. • Do not use under any other metals, care must be sure the controls are used. Do not use the sponge you use any scrub... pad other than that boil dry may permanently damage cooktop by breaking, fusing to clean. • Do not use . Permanent damage (such as metal and some models) Consistent and proper cleaning is essential to maintaining...
Complete Owner's Guide (English)
Page 12
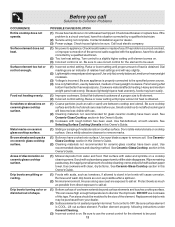
... lower setting until element comes on. (3) Incorrect control is COOL. See Ceramic-Glass Cooktop section in /on . Use cookware with clean, dry bottoms. See Ceramic-Glass Cooktop section in this Owner's Guide. (3) Cookware with a clean damp paper towel until ...if allowed to be sure. Replacement drip bowls may burn easily. (1) Improper cookware. Food not heating evenly. Call local electric company. (1) Nopowertoappliance.Check/resetbreakerorreplacefuse.Iftheproblemisacircuitoverload, or improper connection of the armored cable supplied with use cookware of heat is incorrect....
... lower setting until element comes on. (3) Incorrect control is COOL. See Ceramic-Glass Cooktop section in /on . Use cookware with clean, dry bottoms. See Ceramic-Glass Cooktop section in this Owner's Guide. (3) Cookware with a clean damp paper towel until ...if allowed to be sure. Replacement drip bowls may burn easily. (1) Improper cookware. Food not heating evenly. Call local electric company. (1) Nopowertoappliance.Check/resetbreakerorreplacefuse.Iftheproblemisacircuitoverload, or improper connection of the armored cable supplied with use cookware of heat is incorrect....


