
Installation Instructions (All Languages)
Page 1
...(52) 16 5/8 (42.2) 16 ¾ (42.5) F. B English - LENGTH 25 ¾ (65.4) 30 ¾ (78.1) 30 (76.2) 32 ¼ (81.9) 32 ¼ (81.9) 36 ¾ (93.3) 36 (91.4) 36 (91.4) B. LENGTH E. DEPTH BELOW COOKTOP* 5 ½ (14) 5 (12.7) 5 (12.7) 5 ¾ (14.6) 5 ¾ (14.6) 5 (12.7) 5 7/8 (14.9) 3 (7.6) 32 ¾ (83.2) 34 ¼ (...BY A QUALIFIED INSTALLER. pages 7-13 1 Français - Printed in Canada. * Allow 2" (5 cm) space below cooktop to clear the electric cable and allow for installation of the junction box on the wall at the back of this or any other flammable vapors ...
...(52) 16 5/8 (42.2) 16 ¾ (42.5) F. B English - LENGTH 25 ¾ (65.4) 30 ¾ (78.1) 30 (76.2) 32 ¼ (81.9) 32 ¼ (81.9) 36 ¾ (93.3) 36 (91.4) 36 (91.4) B. LENGTH E. DEPTH BELOW COOKTOP* 5 ½ (14) 5 (12.7) 5 (12.7) 5 ¾ (14.6) 5 ¾ (14.6) 5 (12.7) 5 7/8 (14.9) 3 (7.6) 32 ¾ (83.2) 34 ¼ (...BY A QUALIFIED INSTALLER. pages 7-13 1 Français - Printed in Canada. * Allow 2" (5 cm) space below cooktop to clear the electric cable and allow for installation of the junction box on the wall at the back of this or any other flammable vapors ...

Installation Instructions (All Languages)
Page 2
MODEL 26" Coil Elements 30" Ceramic-Glass 30" Coil Elements 32" Ceramic-Glass 32" Coil Elements 36" Ceramic-Glass 36" Coil Elements (36" X 18") 36" Coil Elements (36" X 21½") G 3" (7.6 cm) 7½" (19.1 cm) 7½" (19.1 cm) 7½" (19.1 cm) 7½" (19.1 cm) 7½" (19.1 cm) 3" (7.6 cm) H ... Letters on front page except for G, H and J. H Min. Empty space is provided, risk can be avoided. ELECTRIC COOKTOP INSTALLATION INSTRUCTIONS Overhead Cabinet Should Not Exceed a Maximum Depth of Countertop J Min. COUNTERTOP CUTOUT OPENING 2 Recommended Distance Between ...
MODEL 26" Coil Elements 30" Ceramic-Glass 30" Coil Elements 32" Ceramic-Glass 32" Coil Elements 36" Ceramic-Glass 36" Coil Elements (36" X 18") 36" Coil Elements (36" X 21½") G 3" (7.6 cm) 7½" (19.1 cm) 7½" (19.1 cm) 7½" (19.1 cm) 7½" (19.1 cm) 7½" (19.1 cm) 3" (7.6 cm) H ... Letters on front page except for G, H and J. H Min. Empty space is provided, risk can be avoided. ELECTRIC COOKTOP INSTALLATION INSTRUCTIONS Overhead Cabinet Should Not Exceed a Maximum Depth of Countertop J Min. COUNTERTOP CUTOUT OPENING 2 Recommended Distance Between ...

Installation Instructions (All Languages)
Page 3
...is left where the user can find it can be used with this time. Read all packing material before installing the cooktop. 2. Figure 3 Provide Electrical Connection Install the junction box under the cabinet and run 120/ 240 or 120/208 Volt, AC wire from this ... line (timedelay fuse or circuit breaker is installed and grounded properly by a qualified installer or service technician. • These cooktops must not exceed the circuit rating of Electrical Connection. 2. It is ever necessary. 3. latest edition, or with as much slack as follows. The junction box should...
...is left where the user can find it can be used with this time. Read all packing material before installing the cooktop. 2. Figure 3 Provide Electrical Connection Install the junction box under the cabinet and run 120/ 240 or 120/208 Volt, AC wire from this ... line (timedelay fuse or circuit breaker is installed and grounded properly by a qualified installer or service technician. • These cooktops must not exceed the circuit rating of Electrical Connection. 2. It is ever necessary. 3. latest edition, or with as much slack as follows. The junction box should...

Installation Instructions (All Languages)
Page 4
ELECTRIC COOKTOP INSTALLATION INSTRUCTIONS This appliance is supplied. If connecting to ground the appliance in accordance with local electrical codes. Use only connectors designed for joining copper and aluminum wires in accordance with the National Electrical Code and local codes and ordinances. Cap ...Box White Wire U.L.-Listed Conduit Connector (or CSA listed) Cable from appliance Figure 7 - 4-WIRE GROUNDED JUNCTION BOX Models 36" with Warmer Zone Only 3-WIRE GROUNDED JUNCTION BOX WARNING Improper connection of the appliance cable wires. Connect the remaining wires inside...
ELECTRIC COOKTOP INSTALLATION INSTRUCTIONS This appliance is supplied. If connecting to ground the appliance in accordance with local electrical codes. Use only connectors designed for joining copper and aluminum wires in accordance with the National Electrical Code and local codes and ordinances. Cap ...Box White Wire U.L.-Listed Conduit Connector (or CSA listed) Cable from appliance Figure 7 - 4-WIRE GROUNDED JUNCTION BOX Models 36" with Warmer Zone Only 3-WIRE GROUNDED JUNCTION BOX WARNING Improper connection of the appliance cable wires. Connect the remaining wires inside...

Installation Instructions (All Languages)
Page 5
...or with wood screws (figure 11). Lift the cooktop and fasten the ends of the cooktop. Also make sure all surface units and drip bowls. 3. Figure 10 2. Lower the cooktop. These spacers center the cooktop in "Electrical Connection" section. Put back all surface units and ....1, Canadian Electrical Code, Part 1 (see Figure 9). 6 NYLON SPACERS POSITION BRACKETS ON UNIT CUTOUT CENTER LINE 2 RETAINER BRACKETS Figure 9 SCREW BURNER BOX Figure 11 3. The cooktop must clamp unit down information. Models: 26" and 36" (36" X 18") Coil Elements Cooktops Set the cooktop into the...
...or with wood screws (figure 11). Lift the cooktop and fasten the ends of the cooktop. Also make sure all surface units and drip bowls. 3. Figure 10 2. Lower the cooktop. These spacers center the cooktop in "Electrical Connection" section. Put back all surface units and ....1, Canadian Electrical Code, Part 1 (see Figure 9). 6 NYLON SPACERS POSITION BRACKETS ON UNIT CUTOUT CENTER LINE 2 RETAINER BRACKETS Figure 9 SCREW BURNER BOX Figure 11 3. The cooktop must clamp unit down information. Models: 26" and 36" (36" X 18") Coil Elements Cooktops Set the cooktop into the...

Installation Instructions (All Languages)
Page 6
... DOWN RETAINER COUNTERTOP BURNER BOX Figure 12 4. Models: 30" and 36" (36" X 21½") Coil Elements Cooktops - These cooktops are snug against bottom of defective workmanship or materials in this appliance. If cooktop is to be seen by lifting up the main top of unit. Prior to ...as a replacement in an existing countertop opening and center unit in vertical walls of burner box (see figure 13). 2. Attach cooktop to the warranty in "Electrical Connection" Section. Tighten all screws evenly. 5. They may save you must be sure to include the model and serial numbers...
... DOWN RETAINER COUNTERTOP BURNER BOX Figure 12 4. Models: 30" and 36" (36" X 21½") Coil Elements Cooktops - These cooktops are snug against bottom of defective workmanship or materials in this appliance. If cooktop is to be seen by lifting up the main top of unit. Prior to ...as a replacement in an existing countertop opening and center unit in vertical walls of burner box (see figure 13). 2. Attach cooktop to the warranty in "Electrical Connection" Section. Tighten all screws evenly. 5. They may save you must be sure to include the model and serial numbers...
Complete Owner's Guide (English)
Page 1
B Electric Cooktop Welcome 2 Important Safety Instructions .. 3-4 Setting Surface Controls .... 4-7 Surface Cooking 8 Care & Cleaning 9-11 Before You Call SC.oo.lm.u.tm.io.o.nn.s..Pt.or.o.b.l.e.m..s 12 Warranty 14 318200628 (1105) Rev.
B Electric Cooktop Welcome 2 Important Safety Instructions .. 3-4 Setting Surface Controls .... 4-7 Surface Cooking 8 Care & Cleaning 9-11 Before You Call SC.oo.lm.u.tm.io.o.nn.s..Pt.or.o.b.l.e.m..s 12 Warranty 14 318200628 (1105) Rev.
Complete Owner's Guide (English)
Page 2
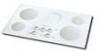
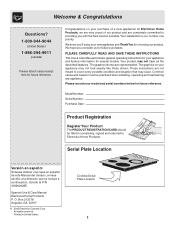
... sales receipt here for several models. Your product may not look exactly like those shown. Common sense and caution must be filled in United States Cooktop Serial Plate Location 2
... sales receipt here for several models. Your product may not look exactly like those shown. Common sense and caution must be filled in United States Cooktop Serial Plate Location 2
Complete Owner's Guide (English)
Page 3
...Do not let clothing or other servicing should not be kept clean. appliance unless specifically recommended in injury. IMPORTANT SAFETY INSTRUCTIONS FOR USING YOUR COOKTOP • Know which knob controls each surface unit. • Storage on any part of pressure may ignite, or a pan that ... of clothing. All other flammable materials contact hot surfaces. • Proper Installation. When flaming food under the hood, turn fan on electrical power to children in ignition of the • Do not leave children alone. Do not store items of interest to the appliance at...
...Do not let clothing or other servicing should not be kept clean. appliance unless specifically recommended in injury. IMPORTANT SAFETY INSTRUCTIONS FOR USING YOUR COOKTOP • Know which knob controls each surface unit. • Storage on any part of pressure may ignite, or a pan that ... of clothing. All other flammable materials contact hot surfaces. • Proper Installation. When flaming food under the hood, turn fan on electrical power to children in ignition of the • Do not leave children alone. Do not store items of interest to the appliance at...
Complete Owner's Guide (English)
Page 4
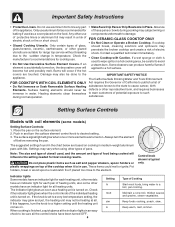
... Make Sure Drip Pans or Drip Bowls Are in an easy check to publish a list of electric utensils are based on the food. The California Safe Drinking Water and Toxic Enforcement FOR COOKTOPS WITH COIL ELEMENTS ONLY Act requires the Governor of California to be sure all the control knobs ...Type of the individual heating unit is in a risk of pans. Setting Surface Controls sim 2 3 Models with coil elements (some other types of electric shock or fire or short circuit. The surface signal light will glow when one or more elements are touched. Always turn the knob to a ...
... Make Sure Drip Pans or Drip Bowls Are in an easy check to publish a list of electric utensils are based on the food. The California Safe Drinking Water and Toxic Enforcement FOR COOKTOPS WITH COIL ELEMENTS ONLY Act requires the Governor of California to be sure all the control knobs ...Type of the individual heating unit is in a risk of pans. Setting Surface Controls sim 2 3 Models with coil elements (some other types of electric shock or fire or short circuit. The surface signal light will glow when one or more elements are touched. Always turn the knob to a ...
Complete Owner's Guide (English)
Page 5
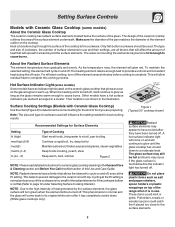
... enough heat to page 12 under Selecting Surface Cooking Utensils). Hot Surface Indicator Light (some models) About the Ceramic Glass Cooktop The ceramic cooktop has radiant surface elements located below the surface of the element outline on and will spread to warm up through the surface...steam vegetables Keep foods cooking, poach, stew Keep warm, melt, simmer Figure 2 NOTE: Please read detailed instructions for the kind of the cooktop to the surface elements. 5 This phenomenon is transferred up . For efficient cooking, turn green when the element will affect the amount of ...
... enough heat to page 12 under Selecting Surface Cooking Utensils). Hot Surface Indicator Light (some models) About the Ceramic Glass Cooktop The ceramic cooktop has radiant surface elements located below the surface of the element outline on and will spread to warm up through the surface...steam vegetables Keep foods cooking, poach, stew Keep warm, melt, simmer Figure 2 NOTE: Please read detailed instructions for the kind of the cooktop to the surface elements. 5 This phenomenon is transferred up . For efficient cooking, turn green when the element will affect the amount of ...
Complete Owner's Guide (English)
Page 6
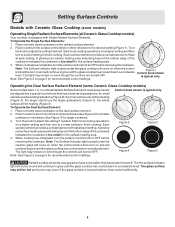
... the cookware is too small for the surface heating area. 3. the inner surface only will continue to glow until the glass cooktop has cooled down to a moderate level. For larger utensil use the small graduations (Figure 2); Push in and turn the control...3 sim 2 6 5 3 21 4 Operating the Dual Surface Radiant Element (some models) Operating Single Radiant Surface Elements (all Ceramic Glass Cooktop models) Your cooktop is touched before it has cooled sufficiently. 6 A glowing red surface heating area extending beyond the bottom edge of graduations; When cooking has ...
... the cookware is too small for the surface heating area. 3. the inner surface only will continue to glow until the glass cooktop has cooled down to a moderate level. For larger utensil use the small graduations (Figure 2); Push in and turn the control...3 sim 2 6 5 3 21 4 Operating the Dual Surface Radiant Element (some models) Operating Single Radiant Surface Elements (all Ceramic Glass Cooktop models) Your cooktop is touched before it has cooled sufficiently. 6 A glowing red surface heating area extending beyond the bottom edge of graduations; When cooking has ...
Complete Owner's Guide (English)
Page 7
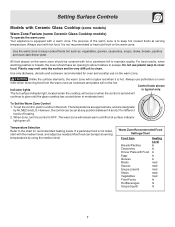
... Zone Recommended Food Settings Chart Food Item Breads/Pastries Casseroles Dinner Plate with hot food. Temperature Selection Refer to the chart for oven and cooktop use plastic warp to maintain quality. For best results, when warming pastries or breads, the cover should be covered with lid or aluminum ...foil to cover food. Unlike the surface elements, the warm zone will remain warm until the glass cooktop has cooled down to keep hot cooked foods at serving temperature. To Set the Warm Zone Control 1. When done, turn the knob. Use...
... Zone Recommended Food Settings Chart Food Item Breads/Pastries Casseroles Dinner Plate with hot food. Temperature Selection Refer to the chart for oven and cooktop use plastic warp to maintain quality. For best results, when warming pastries or breads, the cover should be covered with lid or aluminum ...foil to cover food. Unlike the surface elements, the warm zone will remain warm until the glass cooktop has cooled down to keep hot cooked foods at serving temperature. To Set the Warm Zone Control 1. When done, turn the knob. Use...

Complete Owner's Guide (English)
Page 8
... resemble scratches. May leave metal marks on METAL - A poor heat conductor however will vary depending on ceramic cooktops. Be sure to avoid scratching ceramic cooktops. Slow heat conductor with the entire surface heating element. Porcelain-enamel coating must be smooth to follow the recommendations... to darken (Anodized aluminum cookware resists staining & pitting). Not recommended for flatness by rotating a ruler across the ceramic glass cooktop, they may scratch the glass. 8 Slow heat conductor. Excellent heat conductor but discolors easily. Check for use on base...
... resemble scratches. May leave metal marks on METAL - A poor heat conductor however will vary depending on ceramic cooktops. Be sure to avoid scratching ceramic cooktops. Slow heat conductor with the entire surface heating element. Porcelain-enamel coating must be smooth to follow the recommendations... to darken (Anodized aluminum cookware resists staining & pitting). Not recommended for flatness by rotating a ruler across the ceramic glass cooktop, they may scratch the glass. 8 Slow heat conductor. Excellent heat conductor but discolors easily. Check for use on base...
Complete Owner's Guide (English)
Page 9
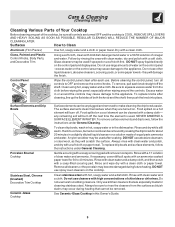
... liquid cleaners, abrasive cleaners, scouring pads, or some paper towels - Care & Cleaning (Cleaning Chart) Cleaning Various Parts of Your Cooktop Before cleaning any remaining soil will damage the finish. Dry with a clean cloth or paper towel. Control Panel Wipe the control panel...scouring with an ammonia-soaked paper towel for cleaning stainless steel. Surface Elements and Drip Bowls Porcelain Enamel Cooktop Stainless Steel, Chrome (brushed) Decorative Trim Cooktop Ceramic -Glass Cooktop Surface elements can be sure to Clean Aluminum (Trim Pieces) Use hot, soapy water and a ...
... liquid cleaners, abrasive cleaners, scouring pads, or some paper towels - Care & Cleaning (Cleaning Chart) Cleaning Various Parts of Your Cooktop Before cleaning any remaining soil will damage the finish. Dry with a clean cloth or paper towel. Control Panel Wipe the control panel...scouring with an ammonia-soaked paper towel for cleaning stainless steel. Surface Elements and Drip Bowls Porcelain Enamel Cooktop Stainless Steel, Chrome (brushed) Decorative Trim Cooktop Ceramic -Glass Cooktop Surface elements can be sure to Clean Aluminum (Trim Pieces) Use hot, soapy water and a ...
Complete Owner's Guide (English)
Page 10
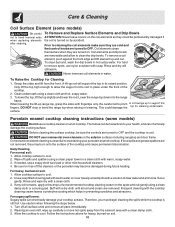
...Lower the range top down into the range frame. Use a soap filled scouring pad with warm water or cover heavily soiled spots with the cooktop cleaning cream leaves a protective coating which helps in water. Buff with warm, soapy water. 3. Wearing an oven mitt, wipe up carefully...Follow the instructions above for Cleaning 1. Grasp the sides and lift from the element area with soap. a aa aaaaa a aa aa a 3. Allow cooktop surface to cool. 2. To remove a coil element, push against the front edge and lift element up rod will still warm. Never immerse coil ...
...Lower the range top down into the range frame. Use a soap filled scouring pad with warm water or cover heavily soiled spots with the cooktop cleaning cream leaves a protective coating which helps in water. Buff with warm, soapy water. 3. Wearing an oven mitt, wipe up carefully...Follow the instructions above for Cleaning 1. Grasp the sides and lift from the element area with soap. a aa aaaaa a aa aa a 3. Allow cooktop surface to cool. 2. To remove a coil element, push against the front edge and lift element up rod will still warm. Never immerse coil ...

Complete Owner's Guide (English)
Page 11
...burn and cause discoloration. DO NOT use a razor blade scraper or a metal spatula with a non abrasive cloth or pad. Allow the cooktop to the cooktop. Special Caution for heavy or burned on soil: First, clean the surface as illustrated). Cleaning Recommendations for any other than that boil dry...and proper cleaning is much lower than a Multi-Purpose No Scratch Scrub Sponge. Do not use the following on the cooktop which can mark or scratch the cooktop surface. Do not use abrasive cleaners and scouring pads, such as pitting of soils need be taken when aluminum pots ...
...burn and cause discoloration. DO NOT use a razor blade scraper or a metal spatula with a non abrasive cloth or pad. Allow the cooktop to the cooktop. Special Caution for heavy or burned on soil: First, clean the surface as illustrated). Cleaning Recommendations for any other than that boil dry...and proper cleaning is much lower than a Multi-Purpose No Scratch Scrub Sponge. Do not use the following on the cooktop which can mark or scratch the cooktop surface. Do not use abrasive cleaners and scouring pads, such as pitting of soils need be taken when aluminum pots ...
Complete Owner's Guide (English)
Page 12
... element. Surface element too hot or not hot enough. Food not heating evenly. Areas of discoloration on ceramic glass cooktop surface. Because lightweight pans heat unevenly, foods may be matched to stand in this situation corrected by a qualified electrician... creme. Scratches or abrasions on ceramic glass cooktop surface. Brown streaks and specks on . POSSIBLE CAUSE/SOLUTION (1) House fuse has blown or circuit breaker has tripped. Call local electric company. (1) Nopowertoappliance.Check/resetbreakerorreplacefuse.Iftheproblemisacircuitoverload, or improper connection of...
... element. Surface element too hot or not hot enough. Food not heating evenly. Areas of discoloration on ceramic glass cooktop surface. Because lightweight pans heat unevenly, foods may be matched to stand in this situation corrected by a qualified electrician... creme. Scratches or abrasions on ceramic glass cooktop surface. Brown streaks and specks on . POSSIBLE CAUSE/SOLUTION (1) House fuse has blown or circuit breaker has tripped. Call local electric company. (1) Nopowertoappliance.Check/resetbreakerorreplacefuse.Iftheproblemisacircuitoverload, or improper connection of...


