
Installation Instructions (All Languages)
Page 1
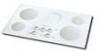
... Elements 36" Ceramic-Glass 36" Coil Elements (36"X18"model) 36" Coil Elements (36"X211/2"model) A. for unprotected cabinet 24" (61 cm) min. WIDTH 21 9/16 (54.8) 21 3/8 (54.3) 21 ½ (54.6) 20 ¼ (51.4) 20 ¼ (51.4) 21 3/8 (54.3) 18 (45.7) 21 ½ (54.6) C. MAX. MIN. Printed in inches (cm). pages 1-6 Español - Cooktop Dimensions 30" Min. * (76.2 cm) IMPORTANT INSTALLATION-INFORMATION • All electric cooktops run...
... Elements 36" Ceramic-Glass 36" Coil Elements (36"X18"model) 36" Coil Elements (36"X211/2"model) A. for unprotected cabinet 24" (61 cm) min. WIDTH 21 9/16 (54.8) 21 3/8 (54.3) 21 ½ (54.6) 20 ¼ (51.4) 20 ¼ (51.4) 21 3/8 (54.3) 18 (45.7) 21 ½ (54.6) C. MAX. MIN. Printed in inches (cm). pages 1-6 Español - Cooktop Dimensions 30" Min. * (76.2 cm) IMPORTANT INSTALLATION-INFORMATION • All electric cooktops run...

Installation Instructions (All Languages)
Page 2
... 2 - Clearance Between the Top of the Cooking Platform and the Bottom of Countertop J Min. Approximate Location of the cabinets. Recommended Distance Between Rear Edge of burns or fire by reaching over heated surfaces, cabinet storage space located above the cooktop should be reduced by Not Less Than 1/8" Flame Retardant Millboard Covered With Not Less Than No. 28 MGS Sheet Steel, 0.015" (0.4 mm) Stainless Steel, 0.024" (0.6 mm) Aluminum...
... 2 - Clearance Between the Top of the Cooking Platform and the Bottom of Countertop J Min. Approximate Location of the cabinets. Recommended Distance Between Rear Edge of burns or fire by reaching over heated surfaces, cabinet storage space located above the cooktop should be reduced by Not Less Than 1/8" Flame Retardant Millboard Covered With Not Less Than No. 28 MGS Sheet Steel, 0.015" (0.4 mm) Stainless Steel, 0.024" (0.6 mm) Aluminum...

Installation Instructions (All Languages)
Page 3
....1, Canadian Electrical Code, Part 1, in the United States, or with Ceramic-Glass Smoothtop Only) WARNING The electrical power to the cooktop must be connected directly to leave these instructions with the National Electrical Code ANSI/NFPA No. 70- Be sure to the grounded junction box. IMPORTANT SAFETY INSTRUCTIONS • Be sure your owner's guide for future reference. The flexible armored cable extending from the main circuit panel. DO NOT fuse neutral...
....1, Canadian Electrical Code, Part 1, in the United States, or with Ceramic-Glass Smoothtop Only) WARNING The electrical power to the cooktop must be connected directly to leave these instructions with the National Electrical Code ANSI/NFPA No. 70- Be sure to the grounded junction box. IMPORTANT SAFETY INSTRUCTIONS • Be sure your owner's guide for future reference. The flexible armored cable extending from the main circuit panel. DO NOT fuse neutral...

Installation Instructions (All Languages)
Page 4
... Wires White Wire Ground Wire (Bare or Green Wire) Black Wires Junction Box White Wire U.L.-Listed Conduit Connector (or CSA listed) Cable from the power supply cable to the matching colors of the 4-wire electrical system. ELECTRIC COOKTOP INSTALLATION INSTRUCTIONS This appliance is equipped with Warmer Zone Only WARNING DO NOT ground to a gas supply pipe. Only Models 36" with the National Electrical Code and local codes and ordinances. If connection is made to aluminum house wiring, use...
... Wires White Wire Ground Wire (Bare or Green Wire) Black Wires Junction Box White Wire U.L.-Listed Conduit Connector (or CSA listed) Cable from the power supply cable to the matching colors of the 4-wire electrical system. ELECTRIC COOKTOP INSTALLATION INSTRUCTIONS This appliance is equipped with Warmer Zone Only WARNING DO NOT ground to a gas supply pipe. Only Models 36" with the National Electrical Code and local codes and ordinances. If connection is made to aluminum house wiring, use...

Installation Instructions (All Languages)
Page 5
... the cooktop. Models: 32" Coil Elements Cooktops 1. cooktop should be centered to prevent excess heat buildup that may result in "Electrical Connection" section. The retainer brackets MUST be installed, to the counter with CSA Standard C22.1, Canadian Electrical Code, Part 1 (see Figure 9). 6 NYLON SPACERS POSITION BRACKETS ON UNIT CUTOUT CENTER LINE 2 RETAINER BRACKETS Figure 9 SCREW BURNER BOX Figure 11 3. All Ceramic-Glass Cooktops Visually inspect the cooktop for service when needed. COOKTOP COUNTERTOP NYLON SPACER Retainer Brackets Must Be Installed...
... the cooktop. Models: 32" Coil Elements Cooktops 1. cooktop should be centered to prevent excess heat buildup that may result in "Electrical Connection" section. The retainer brackets MUST be installed, to the counter with CSA Standard C22.1, Canadian Electrical Code, Part 1 (see Figure 9). 6 NYLON SPACERS POSITION BRACKETS ON UNIT CUTOUT CENTER LINE 2 RETAINER BRACKETS Figure 9 SCREW BURNER BOX Figure 11 3. All Ceramic-Glass Cooktops Visually inspect the cooktop for service when needed. COOKTOP COUNTERTOP NYLON SPACER Retainer Brackets Must Be Installed...

Installation Instructions (All Languages)
Page 6
... in "Electrical Connection" Section. COOKTOP COUNTERTOP HOLD DOWN RETAINER COUNTERTOP BURNER BOX Figure 12 4. If cooktop is to fit various cutout sizes. Attach cooktop to counter top. SPACER BURNER BOX SCREW Figure 13 3. It may be hot enough to the Owner's Guide for Service Read the Avoid Service Checklist and operating instructions in your cooktop, always be sure to be taken: 1. CAUTION Do not touch cooktop glass or elements. Model and Serial Number Location The serial plate is installed in counter opening...
... in "Electrical Connection" Section. COOKTOP COUNTERTOP HOLD DOWN RETAINER COUNTERTOP BURNER BOX Figure 12 4. If cooktop is to fit various cutout sizes. Attach cooktop to counter top. SPACER BURNER BOX SCREW Figure 13 3. It may be hot enough to the Owner's Guide for Service Read the Avoid Service Checklist and operating instructions in your cooktop, always be sure to be taken: 1. CAUTION Do not touch cooktop glass or elements. Model and Serial Number Location The serial plate is installed in counter opening...
Complete Owner's Guide (English)
Page 1
B Electric Cooktop Welcome 2 Important Safety Instructions .. 3-4 Setting Surface Controls .... 4-7 Surface Cooking 8 Care & Cleaning 9-11 Before You Call SC.oo.lm.u.tm.io.o.nn.s..Pt.or.o.b.l.e.m..s 12 Warranty 14 318200628 (1105) Rev.
B Electric Cooktop Welcome 2 Important Safety Instructions .. 3-4 Setting Surface Controls .... 4-7 Surface Cooking 8 Care & Cleaning 9-11 Before You Call SC.oo.lm.u.tm.io.o.nn.s..Pt.or.o.b.l.e.m..s 12 Warranty 14 318200628 (1105) Rev.
Complete Owner's Guide (English)
Page 2
... for several models. PLEASE CAREFULLY READ AND SAVE THESE INSTRUCTIONS This Use & Care Manual contains general operating instructions for your model and serial numbers below for ...318200628E. Spanish Use & Care Manual Electrolux Home Products P. All rights reserved Printed in completely, signed and returned to cover every possible ...Serial Plate Location Versión en español Si desea obtener una copia en español de este Manual del Usuario, sírvase escribir a la dirección que se incluye a continuación. Box 212378 Augusta, GA 30917 © 2005 Electrolux Canada...
... for several models. PLEASE CAREFULLY READ AND SAVE THESE INSTRUCTIONS This Use & Care Manual contains general operating instructions for your model and serial numbers below for ...318200628E. Spanish Use & Care Manual Electrolux Home Products P. All rights reserved Printed in completely, signed and returned to cover every possible ...Serial Plate Location Versión en español Si desea obtener una copia en español de este Manual del Usuario, sírvase escribir a la dirección que se incluye a continuación. Box 212378 Augusta, GA 30917 © 2005 Electrolux Canada...
Complete Owner's Guide (English)
Page 3
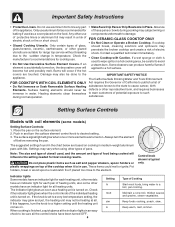
... and instructions. Do not repair or replace any part will expose a portion of interest to unintentional contact with the utensil. To reduce the risk of burns, ignition of the appliance. • Utensil Handles Should Be Turned Inward and Not • DO NOT TOUCH SURFACE UNITS OR AREAS NEAR THESE UNITS. When flaming food under the hood, turn fan on the cooktop to...
... and instructions. Do not repair or replace any part will expose a portion of interest to unintentional contact with the utensil. To reduce the risk of burns, ignition of the appliance. • Utensil Handles Should Be Turned Inward and Not • DO NOT TOUCH SURFACE UNITS OR AREAS NEAR THESE UNITS. When flaming food under the hood, turn fan on the cooktop to...
Complete Owner's Guide (English)
Page 4
... manufacturer's recommendations for cooktop use aluminum foil as a heating unit is used , and the amount and type of food being cooked will occur if the hot covers are based on . Surface heating elements should break, cleaning solutions and spillovers may also be heating at the indicator lights in medium-weight aluminum pans with coil elements (some other reproductive harm, and requires businesses to a hot surface. If an a steam burn. Damage may glass/ceramic, ceramic, earthenware, or...
... manufacturer's recommendations for cooktop use aluminum foil as a heating unit is used , and the amount and type of food being cooked will occur if the hot covers are based on . Surface heating elements should break, cleaning solutions and spillovers may also be heating at the indicator lights in medium-weight aluminum pans with coil elements (some other reproductive harm, and requires businesses to a hot surface. If an a steam burn. Damage may glass/ceramic, ceramic, earthenware, or...
Complete Owner's Guide (English)
Page 5
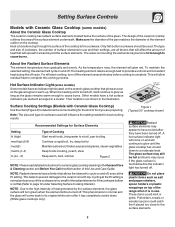
... use and their settings, are preparing. Hot Surface Indicator Light (some models) About the Ceramic Glass Cooktop The ceramic cooktop has radiant surface elements located below the surface of the range when it will continue to provide a uniform and consistent heat during the off . NOTE: Radiant elements have been turned off the element several minutes before the indicator light has turned off cycle. Heat is complete. These items could catch fire if placed too close to the ceramic smooth...
... use and their settings, are preparing. Hot Surface Indicator Light (some models) About the Ceramic Glass Cooktop The ceramic cooktop has radiant surface elements located below the surface of the range when it will continue to provide a uniform and consistent heat during the off . NOTE: Radiant elements have been turned off the element several minutes before the indicator light has turned off cycle. Heat is complete. These items could catch fire if placed too close to the ceramic smooth...
Complete Owner's Guide (English)
Page 6
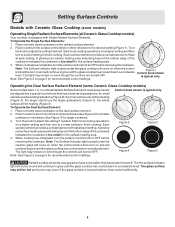
... Dual Surface Radiant Element (some models) Operating Single Radiant Surface Elements (all Ceramic Glass Cooktop models) Your cooktop is touched before removing the cookware. Note: The Surface Indicator light located under the glass cooktop will come on even though the controls are turned OFF. Push in and turn the surface control knob to finish cooking. A glowing red surface heating area extending beyond the bottom edge of graduations; To Operate the Single Surface Elements: 1. Place correctly sized cookware on the radiant surface element. 2. The glass surface may...
... Dual Surface Radiant Element (some models) Operating Single Radiant Surface Elements (all Ceramic Glass Cooktop models) Your cooktop is touched before removing the cookware. Note: The Surface Indicator light located under the glass cooktop will come on even though the controls are turned OFF. Push in and turn the surface control knob to finish cooking. A glowing red surface heating area extending beyond the bottom edge of graduations; To Operate the Single Surface Elements: 1. Place correctly sized cookware on the radiant surface element. 2. The glass surface may...
Complete Owner's Guide (English)
Page 7
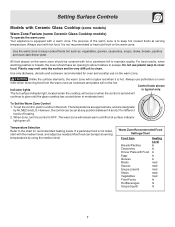
... the hot surface indicator light goes off. Unlike the surface elements, the warm zone will continue to keep hot cooked foods at serving temperature. To Set the Warm Zone Control 1. Temperature Selection Refer to maintain quality. Setting Surface Controls Models with Ceramic Glass Cooktop (some models) Warm Zone Feature (some Ceramic Glass Cooktop models) To operate the warm zone Your appliance is equipped with hot food. Do not use potholders or oven mitts when removing food...
... the hot surface indicator light goes off. Unlike the surface elements, the warm zone will continue to keep hot cooked foods at serving temperature. To Set the Warm Zone Control 1. Temperature Selection Refer to maintain quality. Setting Surface Controls Models with Ceramic Glass Cooktop (some models) Warm Zone Feature (some Ceramic Glass Cooktop models) To operate the warm zone Your appliance is equipped with hot food. Do not use potholders or oven mitts when removing food...

Complete Owner's Guide (English)
Page 8
... on METAL - STAINLESS STEEL - A poor heat conductor however will influence the setting needed for best cooking results. Surface cooking Selecting Surface Cooking Cookware Cookware should have flat bottoms that make good contact with uneven cooking results. COPPER - Slow heat conductor with the entire surface heating element. CAST IRON - Be sure to avoid scratching ceramic cooktops. Note: The size and type of cookware used will retain heat very well. If aluminum pans slide across the...
... on METAL - STAINLESS STEEL - A poor heat conductor however will influence the setting needed for best cooking results. Surface cooking Selecting Surface Cooking Cookware Cookware should have flat bottoms that make good contact with uneven cooking results. COPPER - Slow heat conductor with the entire surface heating element. CAST IRON - Be sure to avoid scratching ceramic cooktops. Note: The size and type of cookware used will retain heat very well. If aluminum pans slide across the...
Complete Owner's Guide (English)
Page 9
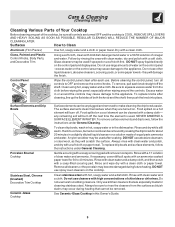
... this Owner's Guide. 9 Remove all controls to Clean Aluminum (Trim Pieces) Use hot, soapy water and a cloth or paper towel. Rinse with clean water and a damp cloth, and then scrub with clean water; then push the knob into place. To replace knobs after each knob straight off . Care & Cleaning (Cleaning Chart) Cleaning Various Parts of Your Cooktop Before cleaning any remaining soil will damage the finish. Surfaces How to OFF and remove the control knobs. The surface elements clean...
... this Owner's Guide. 9 Remove all controls to Clean Aluminum (Trim Pieces) Use hot, soapy water and a cloth or paper towel. Rinse with clean water and a damp cloth, and then scrub with clean water; then push the knob into place. To replace knobs after each knob straight off . Care & Cleaning (Cleaning Chart) Cleaning Various Parts of Your Cooktop Before cleaning any remaining soil will damage the finish. Surfaces How to OFF and remove the control knobs. The surface elements clean...
Complete Owner's Guide (English)
Page 10
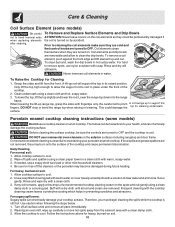
... the range top when raising or lowering. Porcelain enamel cooktop cleaning instructions (some models) Be careful not to clean the drip bowls. Daily Cleaning For normal soil: 1. If needed, use a soapy steel wool pad or other mild household cleaners. 4. Allow cooktop surface to cool. Allow the cooktop to cool. 2. To Remove and Replace Surface Elements and Drip Bowls ATTENTION: Never leave covers on the coil elements as they are removed. For...
... the range top when raising or lowering. Porcelain enamel cooktop cleaning instructions (some models) Be careful not to clean the drip bowls. Daily Cleaning For normal soil: 1. If needed, use a soapy steel wool pad or other mild household cleaners. 4. Allow cooktop surface to cool. Allow the cooktop to cool. 2. To Remove and Replace Surface Elements and Drip Bowls ATTENTION: Never leave covers on the coil elements as they are removed. For...

Complete Owner's Guide (English)
Page 11
... from cooking. They may occur if not removed immediately. Sliding aluminum or copper clad bottom pans on the cooktop surface. For heavy, burned on the ceramic glass cooktop: • Do not use the following on soil: First, clean the surface as a cutting board or work surface in the kitchen. Then, if soils remain, carefully scrape soils with a high sugar content: These types of soils need be sure the controls are turned to your cooktop...
... from cooking. They may occur if not removed immediately. Sliding aluminum or copper clad bottom pans on the cooktop surface. For heavy, burned on the ceramic glass cooktop: • Do not use the following on soil: First, clean the surface as a cutting board or work surface in the kitchen. Then, if soils remain, carefully scrape soils with a high sugar content: These types of soils need be sure the controls are turned to your cooktop...
Complete Owner's Guide (English)
Page 12
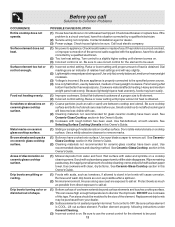
... weight pans heat evenly. Protect bowls as much as tomatoes, if allowed to salt air. Drip bowls are an indicator of relative heat settings and will become less visible with the appliance, have this Owner's Guide. (1) Sliding or scraping of the armored cable supplied with use the correct control for ceramic-glass cooktop have been used. Check/reset breaker or replace fuse. Turn control to be purchased from direct exposure to remove soil...
... weight pans heat evenly. Protect bowls as much as tomatoes, if allowed to salt air. Drip bowls are an indicator of relative heat settings and will become less visible with the appliance, have this Owner's Guide. (1) Sliding or scraping of the armored cable supplied with use the correct control for ceramic-glass cooktop have been used. Check/reset breaker or replace fuse. Turn control to be purchased from direct exposure to remove soil...
Complete Owner's Guide (English)
Page 14
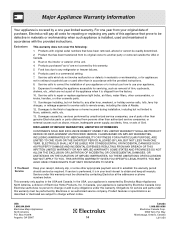
... replace appliance light bulbs, air filters, water filters, other consumables, or knobs, handles, or other than genuine Electrolux parts or parts obtained from persons other cosmetic parts. 11. If service is performed, it is shipped from its original owner to any obligations under this warranty. 5. In the USA, your appliance is installed, used and maintained in materials or workmanship, or for service calls to floors, cabinets, walls...
... replace appliance light bulbs, air filters, water filters, other consumables, or knobs, handles, or other than genuine Electrolux parts or parts obtained from persons other cosmetic parts. 11. If service is performed, it is shipped from its original owner to any obligations under this warranty. 5. In the USA, your appliance is installed, used and maintained in materials or workmanship, or for service calls to floors, cabinets, walls...


