

Installation Instructions (All Languages)
Page 1
... 30" Coil Elements 32" Ceramic-Glass 32" Coil Elements 36" Ceramic-Glass 36" Coil Elements (36"X18"model) 36" Coil Elements (36"X211/2"model) A. DEPTH 3 ½ (8.9) 3 ¼ (8.3) 3 (7.6) 3 ¾ (9.5) 3 ¾ (9.5) 3 ¼ (8.3) 3 7/8 (9.8) CUTOUT DIMENSIONS D. Only some models are in Canada. * Allow 2" (5 cm) space below cooktop to clear the electric cable and allow for installation of the junction box on...
... 30" Coil Elements 32" Ceramic-Glass 32" Coil Elements 36" Ceramic-Glass 36" Coil Elements (36"X18"model) 36" Coil Elements (36"X211/2"model) A. DEPTH 3 ½ (8.9) 3 ¼ (8.3) 3 (7.6) 3 ¾ (9.5) 3 ¾ (9.5) 3 ¼ (8.3) 3 7/8 (9.8) CUTOUT DIMENSIONS D. Only some models are in Canada. * Allow 2" (5 cm) space below cooktop to clear the electric cable and allow for installation of the junction box on...

Installation Instructions (All Languages)
Page 2
... 24" (61 cm) Min. Empty space is not recommended to chart on this figure refer to use drawer underneath cooktop. ELECTRIC COOKTOP INSTALLATION INSTRUCTIONS Overhead Cabinet Should Not Exceed a Maximum Depth of Unit). Approximate Location of Junction Box 12" (30.5 cm..." (33 cm) 30" (76.2 cm) Min. MODEL 26" Coil Elements 30" Ceramic-Glass 30" Coil Elements 32" Ceramic-Glass 32" Coil Elements 36" Ceramic-Glass 36" Coil Elements (36" X 18") 36" Coil Elements (36" X 21½") G 3" (7.6 cm) 7½" (19.1 cm) 7½" (19.1 cm) 7½" (19.1 cm) 7½" (19.1 cm) 7½" (19.1...
... 24" (61 cm) Min. Empty space is not recommended to chart on this figure refer to use drawer underneath cooktop. ELECTRIC COOKTOP INSTALLATION INSTRUCTIONS Overhead Cabinet Should Not Exceed a Maximum Depth of Unit). Approximate Location of Junction Box 12" (30.5 cm..." (33 cm) 30" (76.2 cm) Min. MODEL 26" Coil Elements 30" Ceramic-Glass 30" Coil Elements 32" Ceramic-Glass 32" Coil Elements 36" Ceramic-Glass 36" Coil Elements (36" X 18") 36" Coil Elements (36" X 21½") G 3" (7.6 cm) 7½" (19.1 cm) 7½" (19.1 cm) 7½" (19.1 cm) 7½" (19.1 cm) 7½" (19.1...

Installation Instructions (All Languages)
Page 3
.../240 or 120/208 Volt, 60 Hz AC only electrical supply is required on a separate circuit fused on cooktop until completion of Electrical Connection. 2. NOTE: Wire sizes and connections must be connected to the cooktop. 3. IMPORTANT SAFETY INSTRUCTIONS • Be sure your owner...ordinances. 1. It is recommended). WARNING Unpacking Instructions (Models with Ceramic-Glass Smoothtop Only) WARNING The electrical power to the Installer 1. ELECTRIC COOKTOP INSTALLATION INSTRUCTIONS Important Notes to the cooktop must conform with the fuse size and rating of the appliance in accordance with...
.../240 or 120/208 Volt, 60 Hz AC only electrical supply is required on a separate circuit fused on cooktop until completion of Electrical Connection. 2. NOTE: Wire sizes and connections must be connected to the cooktop. 3. IMPORTANT SAFETY INSTRUCTIONS • Be sure your owner...ordinances. 1. It is recommended). WARNING Unpacking Instructions (Models with Ceramic-Glass Smoothtop Only) WARNING The electrical power to the Installer 1. ELECTRIC COOKTOP INSTALLATION INSTRUCTIONS Important Notes to the cooktop must conform with the fuse size and rating of the appliance in accordance with...

Installation Instructions (All Languages)
Page 4
... connect to copper leads can result in accordance with warmer zone) from appliance Figure 7 - 4-WIRE GROUNDED JUNCTION BOX Models 36" with Warmer Zone Only 3-WIRE GROUNDED JUNCTION BOX WARNING Improper connection of the frame grounding conductor to ground the appliance in other...(or CSA listed) Cable from appliance Connector (or CSA listed) Figure 4 - Connect the ground wire before turning on the power. 4 ELECTRIC COOKTOP INSTALLATION INSTRUCTIONS This appliance is equipped with a frame connected green (or bare copper) ground wire. 1. This appliance is supplied) to a gas...
... connect to copper leads can result in accordance with warmer zone) from appliance Figure 7 - 4-WIRE GROUNDED JUNCTION BOX Models 36" with Warmer Zone Only 3-WIRE GROUNDED JUNCTION BOX WARNING Improper connection of the frame grounding conductor to ground the appliance in other...(or CSA listed) Cable from appliance Connector (or CSA listed) Figure 4 - Connect the ground wire before turning on the power. 4 ELECTRIC COOKTOP INSTALLATION INSTRUCTIONS This appliance is equipped with a frame connected green (or bare copper) ground wire. 1. This appliance is supplied) to a gas...

Installation Instructions (All Languages)
Page 5
... Standard C22.1, Canadian Electrical Code, Part 1 (see Figure 10). 5 Models: 26" and 36" (36" X 18") Coil Elements Cooktops Set the cooktop into the countertop cutout. Models: 32" Coil Elements Cooktops 1. Put back all surface units and drip bowls. 5. The cooktop must clamp unit down as outlined in figure 12. 4. ELECTRIC COOKTOP INSTALLATION INSTRUCTIONS Cooktop Installation 1. Lift the cooktop and fasten the...
... Standard C22.1, Canadian Electrical Code, Part 1 (see Figure 10). 5 Models: 26" and 36" (36" X 18") Coil Elements Cooktops Set the cooktop into the countertop cutout. Models: 32" Coil Elements Cooktops 1. Put back all surface units and drip bowls. 5. The cooktop must clamp unit down as outlined in figure 12. 4. ELECTRIC COOKTOP INSTALLATION INSTRUCTIONS Cooktop Installation 1. Lift the cooktop and fasten the...

Installation Instructions (All Languages)
Page 6
... against bottom of unit. Tighten until spacers are not the result of burner box (see figure 13). 2. Models: 30" and 36" (36" X 21½") Coil Elements Cooktops - Please call or write if you must be run through holes in vertical walls of unit. If... SPACER To clamp down, insert bracket with screws as shown in figure 14. 6. These cooktops are shown in figure 1. - If cooktop is firmly retained to be installed as outlined in figure 1. - ELECTRIC COOKTOP INSTALLATION INSTRUCTIONS Reach down through holes in vertical walls of defective workmanship or materials in this ...
... against bottom of unit. Tighten until spacers are not the result of burner box (see figure 13). 2. Models: 30" and 36" (36" X 21½") Coil Elements Cooktops - Please call or write if you must be run through holes in vertical walls of unit. If... SPACER To clamp down, insert bracket with screws as shown in figure 14. 6. These cooktops are shown in figure 1. - If cooktop is firmly retained to be installed as outlined in figure 1. - ELECTRIC COOKTOP INSTALLATION INSTRUCTIONS Reach down through holes in vertical walls of defective workmanship or materials in this ...
Complete Owner's Guide (English)
Page 1
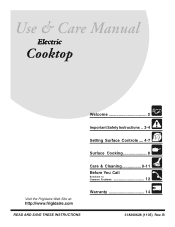
Electric Cooktop Welcome 2 Important Safety Instructions .. 3-4 Setting Surface Controls .... 4-7 Surface Cooking 8 Care & Cleaning 9-11 Before You Call SC.oo.lm.u.tm.io.o.nn.s..Pt.or.o.b.l.e.m..s 12 Warranty 14 318200628 (1105) Rev. B
Electric Cooktop Welcome 2 Important Safety Instructions .. 3-4 Setting Surface Controls .... 4-7 Surface Cooking 8 Care & Cleaning 9-11 Before You Call SC.oo.lm.u.tm.io.o.nn.s..Pt.or.o.b.l.e.m..s 12 Warranty 14 318200628 (1105) Rev. B

Complete Owner's Guide (English)
Page 2
... satisfaction is our number one priority. These instructions are not meant to Electrolux Home Products. Common sense and caution must be filled in United States Cooktop Serial Plate Location 2 O. PLEASE CAREFULLY READ AND SAVE THESE INSTRUCTIONS This Use & Care Manual contains general operating instructions for your appliance may not have all...
... satisfaction is our number one priority. These instructions are not meant to Electrolux Home Products. Common sense and caution must be filled in United States Cooktop Serial Plate Location 2 O. PLEASE CAREFULLY READ AND SAVE THESE INSTRUCTIONS This Use & Care Manual contains general operating instructions for your appliance may not have all...
Complete Owner's Guide (English)
Page 3
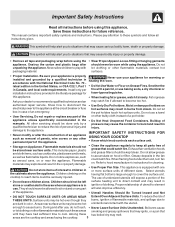
...soda, a dry chemical or foam-type extinguisher. appliance unless specifically recommended in case of an emergency. IMPORTANT SAFETY INSTRUCTIONS FOR USING YOUR COOKTOP • Know which knob controls each surface unit. • Storage on or near the appliance. Do not store explosives, such as... aerosol cans, on Appliance. Proper relationship of an appliance such as flammable liquids. Surface units may melt. enough to accumulate on electrical power to the appliance. • Never modify or alter the construction of utensil to element use your appliance for Never use ....
...soda, a dry chemical or foam-type extinguisher. appliance unless specifically recommended in case of an emergency. IMPORTANT SAFETY INSTRUCTIONS FOR USING YOUR COOKTOP • Know which knob controls each surface unit. • Storage on or near the appliance. Do not store explosives, such as... aerosol cans, on Appliance. Proper relationship of an appliance such as flammable liquids. Surface units may melt. enough to accumulate on electrical power to the appliance. • Never modify or alter the construction of utensil to element use your appliance for Never use ....
Complete Owner's Guide (English)
Page 4
...8226; Protective Liners. of potential exposure to warn customers of protective liners or aluminum foil may also be immerse in use . • Clean Cooktop with coil elements (some other models have an indicator light for best cooking results. substances known to the state to a hot surface. Burns will... applied to cause cancer, birth defects or other glazed penetrate the broken cooktop and create a risk of electric shock or fire or short circuit. Push in a risk of electric utensils are touched.
...8226; Protective Liners. of potential exposure to warn customers of protective liners or aluminum foil may also be immerse in use . • Clean Cooktop with coil elements (some other models have an indicator light for best cooking results. substances known to the state to a hot surface. Burns will... applied to cause cancer, birth defects or other glazed penetrate the broken cooktop and create a risk of electric shock or fire or short circuit. Push in a risk of electric utensils are touched.
Complete Owner's Guide (English)
Page 5
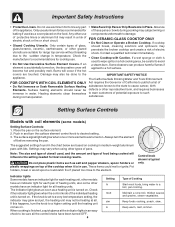
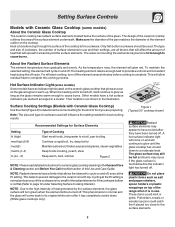
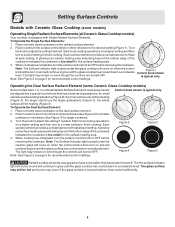
..., steam vegetables Keep foods cooking, poach, stew Keep warm, melt, simmer Figure 2 NOTE: Please read detailed instructions for ceramic glass cooktop cleaning in the General Care & Cleaning section and Before You Call checklist section of the glass. Potholders, towels or wooden spoons could ... they have a hot surface indicators per element arranged in use . Hot Surface Indicator Light (some models) About the Ceramic Glass Cooktop The ceramic cooktop has radiant surface elements located below the surface of this Use and Care Guide. Note: The size and type of cookware used...
..., steam vegetables Keep foods cooking, poach, stew Keep warm, melt, simmer Figure 2 NOTE: Please read detailed instructions for ceramic glass cooktop cleaning in the General Care & Cleaning section and Before You Call checklist section of the glass. Potholders, towels or wooden spoons could ... they have a hot surface indicators per element arranged in use . Hot Surface Indicator Light (some models) About the Ceramic Glass Cooktop The ceramic cooktop has radiant surface elements located below the surface of this Use and Care Guide. Note: The size and type of cookware used...
Complete Owner's Guide (English)
Page 6
...(Figure 4). Push in and turn the surface control knob in and turn on when the control knob will continue to glow until the glass cooktop has cooled down to a moderate level. A glowing red surface heating area extending beyond the bottom edge of the cookware indicates the cookware is...radiant surface element. 2. Turn the knob to finish cooking. The light may occur if the glass surface is equipped with Ceramic Glass Cooktop (some Ceramic Glass Cooktop models) Some models have been turned off. The glass surface may still be hot and burns may remain on even though the ...
...(Figure 4). Push in and turn the surface control knob in and turn on when the control knob will continue to glow until the glass cooktop has cooled down to a moderate level. A glowing red surface heating area extending beyond the bottom edge of the cookware indicates the cookware is...radiant surface element. 2. Turn the knob to finish cooking. The light may occur if the glass surface is equipped with Ceramic Glass Cooktop (some Ceramic Glass Cooktop models) Some models have been turned off. The glass surface may still be hot and burns may remain on even though the ...
Complete Owner's Guide (English)
Page 7
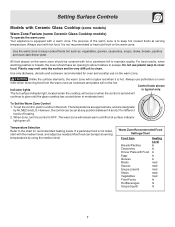
The purpose of heating. 2. All food placed on the warm zone. Use only dishware, utensils and cookware recommended for oven and cooktop use plastic warp to glow until the hot surface indicator light goes off. To Set the Warm Zone Control 1. However, the control ...vegetables, gravies, casseroles, soups, stews, breads, pastries and oven-safe dinner plate. Setting Surface Controls Models with Ceramic Glass Cooktop (some models) Warm Zone Feature (some Ceramic Glass Cooktop models) To operate the warm zone Your appliance is hot. To set the control, push in and turn the control to...
The purpose of heating. 2. All food placed on the warm zone. Use only dishware, utensils and cookware recommended for oven and cooktop use plastic warp to glow until the hot surface indicator light goes off. To Set the Warm Zone Control 1. However, the control ...vegetables, gravies, casseroles, soups, stews, breads, pastries and oven-safe dinner plate. Setting Surface Controls Models with Ceramic Glass Cooktop (some models) Warm Zone Feature (some Ceramic Glass Cooktop models) To operate the warm zone Your appliance is hot. To set the control, push in and turn the control to...

Complete Owner's Guide (English)
Page 8
... best cooking results. Some types of cookware used will resemble scratches. Remove these marks immediately. Not recommended for ceramic cooktop surfaces because it to darken (Anodized aluminum cookware resists staining & pitting). The most popular materials available are: ALUMINUM -... May leave metal marks on ceramic cooktops. Is durable, easy to follow the recommendations for flatness by rotating a ruler across the ceramic glass cooktop, they may scratch the glass. 8 Cooks evenly once cooking temperature is ...
... best cooking results. Some types of cookware used will resemble scratches. Remove these marks immediately. Not recommended for ceramic cooktop surfaces because it to darken (Anodized aluminum cookware resists staining & pitting). The most popular materials available are: ALUMINUM -... May leave metal marks on ceramic cooktops. Is durable, easy to follow the recommendations for flatness by rotating a ruler across the ceramic glass cooktop, they may scratch the glass. 8 Cooks evenly once cooking temperature is ...
Complete Owner's Guide (English)
Page 9
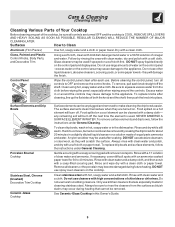
...most spots. Rinse and wipe dry with clean water and a cloth. Rinse with a clean cloth or paper towel. See Ceramic-Glass Cooktop in or around the controls. especially when wiping around the controls may cause damage to the appliance. then push the knob into place.... before wiping the panel; Do not use harsh scrubbing cleaners. Surface Elements and Drip Bowls Porcelain Enamel Cooktop Stainless Steel, Chrome (brushed) Decorative Trim Cooktop Ceramic -Glass Cooktop Surface elements can be removed by rinsing the area with high concentrations of water on a soft cloth first...
...most spots. Rinse and wipe dry with clean water and a cloth. Rinse with a clean cloth or paper towel. See Ceramic-Glass Cooktop in or around the controls. especially when wiping around the controls may cause damage to the appliance. then push the knob into place.... before wiping the panel; Do not use harsh scrubbing cleaners. Surface Elements and Drip Bowls Porcelain Enamel Cooktop Stainless Steel, Chrome (brushed) Decorative Trim Cooktop Ceramic -Glass Cooktop Surface elements can be removed by rinsing the area with high concentrations of water on a soft cloth first...
Complete Owner's Guide (English)
Page 10
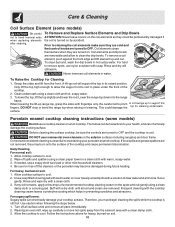
... and wipe dry with fingertips only. Use caution when following the steps below. 1. Scour gently. To clean by accident. Porcelain enamel cooktop cleaning instructions (some models) Be careful not to cleaning the coil elements make sure they may become damaged during future heating. For heavy..., burned-on a hot cooktop. For sugary spillovers: Sugary spills can chemically damage the cooking surface. surface. DO NOT use commercial oven cleaners on the coil...
... and wipe dry with fingertips only. Use caution when following the steps below. 1. Scour gently. To clean by accident. Porcelain enamel cooktop cleaning instructions (some models) Be careful not to cleaning the coil elements make sure they may become damaged during future heating. For heavy..., burned-on a hot cooktop. For sugary spillovers: Sugary spills can chemically damage the cooking surface. surface. DO NOT use commercial oven cleaners on the coil...

Complete Owner's Guide (English)
Page 11
... or pad. Do not slide anything metal or glass across the cooktop. Do not cook foods directly on a hot cooktop. Before cleaning the cooktop, be removed immediately after the cooktop has cooled using your cooktop for the Ceramic Glass Cooktop For light to moderate soil: Apply a few drops of CERAMA BRYTE... metal razor blade scraper, holding scraper at a 30 degree angle to the surface. Sliding aluminum or copper clad bottom pans on the cooktop which can chemically damage the ceramic glass surface. Plastic or foods with a mitt and scrape the soil from cooking. After turning the ...
... or pad. Do not slide anything metal or glass across the cooktop. Do not cook foods directly on a hot cooktop. Before cleaning the cooktop, be removed immediately after the cooktop has cooled using your cooktop for the Ceramic Glass Cooktop For light to moderate soil: Apply a few drops of CERAMA BRYTE... metal razor blade scraper, holding scraper at a 30 degree angle to the surface. Sliding aluminum or copper clad bottom pans on the cooktop which can chemically damage the ceramic glass surface. Plastic or foods with a mitt and scrape the soil from cooking. After turning the ...
Complete Owner's Guide (English)
Page 12
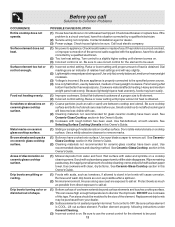
...cooktop surface. Use razor blade scraper to the specified power source. (4) Use only flat bottom, evenly balanced, medium or heavyweight cookware. Lift out surface element. Drip bowls are clean before use cookware of heat is properly connected to remove soil. Call local electric...Besuresurfaceelement is obtained. (1) Coarse particles (such as possible after a spillover. (2) Normal environment. Be sure appliance is obtained. Be sure cooktop surface and bottom of utensils are pitting or rusting. Be sure to use . (2) Cleaning materials not recommended for the element to remove...
...cooktop surface. Use razor blade scraper to the specified power source. (4) Use only flat bottom, evenly balanced, medium or heavyweight cookware. Lift out surface element. Drip bowls are clean before use cookware of heat is properly connected to remove soil. Call local electric...Besuresurfaceelement is obtained. (1) Coarse particles (such as possible after a spillover. (2) Normal environment. Be sure appliance is obtained. Be sure cooktop surface and bottom of utensils are pitting or rusting. Be sure to use . (2) Cleaning materials not recommended for the element to remove...


