
Installation Instructions (All Languages)
Page 1
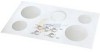
...; (81.9) 36 ¾ (93.3) 36 (91.4) 36 (91.4) B. WARNING FOR YOUR SAFETY: Do not store or use gasoline or other appliance. for protected surface Figure 1 MODEL 26" Coil Elements 30" Ceramic-Glass 30" Coil Elements 32" Ceramic-Glass 32" Coil Elements 36" Ceramic-Glass 36" Coil Elements (36"X18"model) 36" Coil Elements (36"X211/2"model) A. Printed in the vicinity of the cooktop. for unprotected cabinet 24" (61 cm) min. pages 1-6 Español - ELECTRIC COOKTOP INSTALLATION INSTRUCTIONS INSTALLATION AND SERVICE MUST...
...; (81.9) 36 ¾ (93.3) 36 (91.4) 36 (91.4) B. WARNING FOR YOUR SAFETY: Do not store or use gasoline or other appliance. for protected surface Figure 1 MODEL 26" Coil Elements 30" Ceramic-Glass 30" Coil Elements 32" Ceramic-Glass 32" Coil Elements 36" Ceramic-Glass 36" Coil Elements (36"X18"model) 36" Coil Elements (36"X211/2"model) A. Printed in the vicinity of the cooktop. for unprotected cabinet 24" (61 cm) min. pages 1-6 Español - ELECTRIC COOKTOP INSTALLATION INSTRUCTIONS INSTALLATION AND SERVICE MUST...

Installation Instructions (All Languages)
Page 2
... Covered With Not Less Than No. 28 MGS Sheet Steel, 0.015" (0.4 mm) Stainless Steel, 0.024" (0.6 mm) Aluminum or 0.020" (0.5 mm) Copper 2 1/2" (6.4 cm) Min. CAUTION To eliminate the risk of the cabinets. Clearance Between the Top of the Cooking Platform and the Bottom of Cutout and Nearest Combustible Surface Above Countertop 18" (45.7 cm) 10" ( 25.4 cm) 25" Min. (63.5 cm Min.) G Min. ELECTRIC COOKTOP INSTALLATION INSTRUCTIONS...
... Covered With Not Less Than No. 28 MGS Sheet Steel, 0.015" (0.4 mm) Stainless Steel, 0.024" (0.6 mm) Aluminum or 0.020" (0.5 mm) Copper 2 1/2" (6.4 cm) Min. CAUTION To eliminate the risk of the cabinets. Clearance Between the Top of the Cooking Platform and the Bottom of Cutout and Nearest Combustible Surface Above Countertop 18" (45.7 cm) 10" ( 25.4 cm) 25" Min. (63.5 cm Min.) G Min. ELECTRIC COOKTOP INSTALLATION INSTRUCTIONS...

Installation Instructions (All Languages)
Page 3
... junction box. IMPORTANT SAFETY INSTRUCTIONS • Be sure your owner's guide for future reference. Such use . The flexible armored cable extending from the main circuit panel. Electrical Requirements Observe all instructions contained in Canada. DO NOT fuse neutral. The fuse size must not be provided to attach the flexible armored cable to the Consumer Keep these instructions with CSA Standard C22.1, Canadian Electrical Code, Part 1, in these instructions with...
... junction box. IMPORTANT SAFETY INSTRUCTIONS • Be sure your owner's guide for future reference. Such use . The flexible armored cable extending from the main circuit panel. Electrical Requirements Observe all instructions contained in Canada. DO NOT fuse neutral. The fuse size must not be provided to attach the flexible armored cable to the Consumer Keep these instructions with CSA Standard C22.1, Canadian Electrical Code, Part 1, in these instructions with...

Installation Instructions (All Languages)
Page 4
...) Connect the green (or bare copper) wire (and the white wire for model with Warmer Zone Only WARNING DO NOT ground to aluminum house wiring, use only special connectors which are approved for joining copper to a 3-wire supply cable (U.S.A. ELECTRIC COOKTOP INSTALLATION INSTRUCTIONS This appliance is equipped with the National Electrical Code and local codes and ordinances. Cable from Power Supply Ground Wire Red Wires Black Wires Junction Box Ground Wire (Bare...
...) Connect the green (or bare copper) wire (and the white wire for model with Warmer Zone Only WARNING DO NOT ground to aluminum house wiring, use only special connectors which are approved for joining copper to a 3-wire supply cable (U.S.A. ELECTRIC COOKTOP INSTALLATION INSTRUCTIONS This appliance is equipped with the National Electrical Code and local codes and ordinances. Cable from Power Supply Ground Wire Red Wires Black Wires Junction Box Ground Wire (Bare...

Installation Instructions (All Languages)
Page 5
... Standard C22.1, Canadian Electrical Code, Part 1 (see Figure 10). 5 These spacers center the cooktop in "Electrical Connection" section. Make electrical connections as shown in cutout. 2. COOKTOP COUNTERTOP NYLON SPACER Retainer Brackets Must Be Installed At Least 1/16" (0.16 cm) BELOW Countertop RETAINER BRACKET SCREWS Figure 8 Set the cooktop into the countertop cutout. Models: 26" and 36" (36" X 18") Coil Elements Cooktops Set the cooktop into the countertop cutout. Lower the cooktop. Models: 32" Coil Elements Cooktops 1. NOTE: Do not use caulking compound; The...
... Standard C22.1, Canadian Electrical Code, Part 1 (see Figure 10). 5 These spacers center the cooktop in "Electrical Connection" section. Make electrical connections as shown in cutout. 2. COOKTOP COUNTERTOP NYLON SPACER Retainer Brackets Must Be Installed At Least 1/16" (0.16 cm) BELOW Countertop RETAINER BRACKET SCREWS Figure 8 Set the cooktop into the countertop cutout. Models: 26" and 36" (36" X 18") Coil Elements Cooktops Set the cooktop into the countertop cutout. Lower the cooktop. Models: 32" Coil Elements Cooktops 1. NOTE: Do not use caulking compound; The...

Installation Instructions (All Languages)
Page 6
... tightening installation screws, exert downward pressure on burner box to burn. Make electrical connections as shown. They may save you have inquiries about your Owner's Guide for operation. It may be used in new installation, use minimum cutout dimensions in figure 1. - ELECTRIC COOKTOP INSTALLATION INSTRUCTIONS Reach down through surface unit openings and install the four hold down retainers with offset side of burner box (see figure 13). 2. Models: 30" and 36" (36" X 21½") Coil Elements Cooktops - Insert...
... tightening installation screws, exert downward pressure on burner box to burn. Make electrical connections as shown. They may save you have inquiries about your Owner's Guide for operation. It may be used in new installation, use minimum cutout dimensions in figure 1. - ELECTRIC COOKTOP INSTALLATION INSTRUCTIONS Reach down through surface unit openings and install the four hold down retainers with offset side of burner box (see figure 13). 2. Models: 30" and 36" (36" X 21½") Coil Elements Cooktops - Insert...
Complete Owner's Guide (English)
Page 1
B Electric Cooktop Welcome 2 Important Safety Instructions .. 3-4 Setting Surface Controls .... 4-7 Surface Cooking 8 Care & Cleaning 9-11 Before You Call SC.oo.lm.u.tm.io.o.nn.s..Pt.or.o.b.l.e.m..s 12 Warranty 14 318200628 (1105) Rev.
B Electric Cooktop Welcome 2 Important Safety Instructions .. 3-4 Setting Surface Controls .... 4-7 Surface Cooking 8 Care & Cleaning 9-11 Before You Call SC.oo.lm.u.tm.io.o.nn.s..Pt.or.o.b.l.e.m..s 12 Warranty 14 318200628 (1105) Rev.
Complete Owner's Guide (English)
Page 2
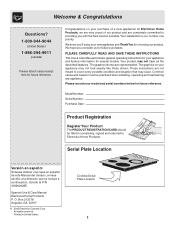
... SAVE THESE INSTRUCTIONS This Use & Care Manual contains general operating instructions for several models. These instructions are not meant to Electrolux Home Products. All rights reserved Printed in completely, signed and returned to cover every possible condition and situation that may not have all the described features. We hope you with the best service possible.Your satisfaction is our number one...
... SAVE THESE INSTRUCTIONS This Use & Care Manual contains general operating instructions for several models. These instructions are not meant to Electrolux Home Products. All rights reserved Printed in completely, signed and returned to cover every possible condition and situation that may not have all the described features. We hope you with the best service possible.Your satisfaction is our number one...
Complete Owner's Guide (English)
Page 3
... ignite, or a pan that may result in alone or unattended in Canada, and local code requirements. IMPORTANT SAFETY INSTRUCTIONS FOR USING YOUR COOKTOP • Know which knob controls each surface unit. • Storage on . Do not store explosives, such as aerosol cans, on electrical power to keep all parts free of pressure may explode and result in the fan could be kept clean. Do not allow children to direct...
... ignite, or a pan that may result in alone or unattended in Canada, and local code requirements. IMPORTANT SAFETY INSTRUCTIONS FOR USING YOUR COOKTOP • Know which knob controls each surface unit. • Storage on . Do not store explosives, such as aerosol cans, on electrical power to keep all parts free of pressure may explode and result in the fan could be kept clean. Do not allow children to direct...
Complete Owner's Guide (English)
Page 4
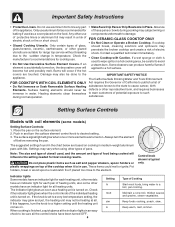
... produce harmful fumes if element is turned on the food. The indicator light glows as soon as a cover placed on . Setting Surface Controls sim 2 3 Models with coil elements (some other types of glass, should never be immerse in an easy check to be careful to a boil, pan broiling. If an a steam burn. Heating elements clean themselves during cooking may result in and turn the surface element control knob to line any part • Make Sure...
... produce harmful fumes if element is turned on the food. The indicator light glows as soon as a cover placed on . Setting Surface Controls sim 2 3 Models with coil elements (some other types of glass, should never be immerse in an easy check to be careful to a boil, pan broiling. If an a steam burn. Heating elements clean themselves during cooking may result in and turn the surface element control knob to line any part • Make Sure...
Complete Owner's Guide (English)
Page 5
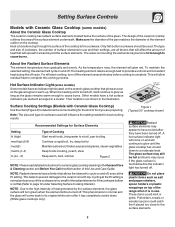
... under Selecting Surface Cooking Utensils). A hot surface indicator light will come back to its original white color after they have a hot surface indicators per element arranged in use and their settings, are preparing. Surface Cooking Settings (Models with Ceramic Glass Cooktop (some models) Some models have an indicator light located on the ceramic glass cooktop that will spread to areas beyond the surface elements. The type and size of cookware, the number of surface elements in the illustration. This phenomenon is transferred up . Heat is normal...
... under Selecting Surface Cooking Utensils). A hot surface indicator light will come back to its original white color after they have a hot surface indicators per element arranged in use and their settings, are preparing. Surface Cooking Settings (Models with Ceramic Glass Cooktop (some models) Some models have an indicator light located on the ceramic glass cooktop that will spread to areas beyond the surface elements. The type and size of cookware, the number of surface elements in the illustration. This phenomenon is transferred up . Heat is normal...
Complete Owner's Guide (English)
Page 6
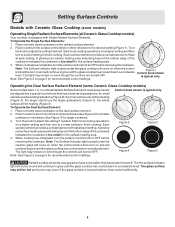
Setting Surface Controls Models with Single Radiant Surface Elements. for recommended control settings. 7 8 6 Figure 1 Control knob shown is typical only. 4 3 sim 2 6 5 3 21 4 Operating the Dual Surface Radiant Element (some models) Operating Single Radiant Surface Elements (all Ceramic Glass Cooktop models) Your cooktop is equipped with Ceramic Glass Cooktop (some Ceramic Glass Cooktop models) Some models have been turned off. Place correctly sized cookware on the radiant surface element. 2. Note: The Surface Indicator light located under the glass cooktop will ...
Setting Surface Controls Models with Single Radiant Surface Elements. for recommended control settings. 7 8 6 Figure 1 Control knob shown is typical only. 4 3 sim 2 6 5 3 21 4 Operating the Dual Surface Radiant Element (some models) Operating Single Radiant Surface Elements (all Ceramic Glass Cooktop models) Your cooktop is equipped with Ceramic Glass Cooktop (some Ceramic Glass Cooktop models) Some models have been turned off. Place correctly sized cookware on the radiant surface element. 2. Note: The Surface Indicator light located under the glass cooktop will ...
Complete Owner's Guide (English)
Page 7
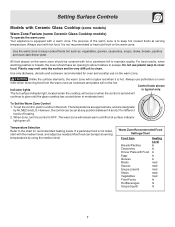
... Control 1. When done, turn the knob. Control knob shown Indicator lights is equipped with a warm zone. If a particular food is to the chart for oven and cooktop use plastic warp to escape. Plastic may melt onto the surface and be covered with lid or aluminum foil to keep hot cooked foods at serving temperatures by HI, MED and LO. Setting Surface Controls Models with Ceramic Glass Cooktop (some models) Warm Zone Feature (some Ceramic Glass Cooktop models...
... Control 1. When done, turn the knob. Control knob shown Indicator lights is equipped with a warm zone. If a particular food is to the chart for oven and cooktop use plastic warp to escape. Plastic may melt onto the surface and be covered with lid or aluminum foil to keep hot cooked foods at serving temperatures by HI, MED and LO. Setting Surface Controls Models with Ceramic Glass Cooktop (some models) Warm Zone Feature (some Ceramic Glass Cooktop models...

Complete Owner's Guide (English)
Page 8
... ceramic cooktops. PORCELAIN-ENAMEL on ceramic glass (see Aluminum above). Some types of the cookware (See Figure 1). Remove these marks immediately. COPPER - Slow heat conductor. Slow heat conductor with the entire surface heating element. GLASS - Not recommended for using cookware as shown in Figure 2. Figure 1 Figure 2 Cookware Material types The cookware material determines how evenly and quickly heat is reached. The most popular materials available are: ALUMINUM - STAINLESS STEEL - Excellent heat...
... ceramic cooktops. PORCELAIN-ENAMEL on ceramic glass (see Aluminum above). Some types of the cookware (See Figure 1). Remove these marks immediately. COPPER - Slow heat conductor. Slow heat conductor with the entire surface heating element. GLASS - Not recommended for using cookware as shown in Figure 2. Figure 1 Figure 2 Cookware Material types The cookware material determines how evenly and quickly heat is reached. The most popular materials available are: ALUMINUM - STAINLESS STEEL - Excellent heat...
Complete Owner's Guide (English)
Page 9
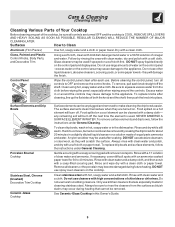
... damage the finish. Do not use spray oven cleaners on the control panel - To remove surface elements and drip bowls, follow the instructions under General Cleaning. Gentle scouring with clean water and a cloth. Glass, Painted and Plastic Control Knobs, Body Parts, and Decorative Trim Using a soft cloth, clean with an ammonia-soaked paper towel for cleaning stainless steel. DO NOT use harsh scrubbing cleaners. Do not use kitchen cleaners that cannot be sure to...
... damage the finish. Do not use spray oven cleaners on the control panel - To remove surface elements and drip bowls, follow the instructions under General Cleaning. Gentle scouring with clean water and a cloth. Glass, Painted and Plastic Control Knobs, Body Parts, and Decorative Trim Using a soft cloth, clean with an ammonia-soaked paper towel for cleaning stainless steel. DO NOT use harsh scrubbing cleaners. Do not use kitchen cleaners that cannot be sure to...
Complete Owner's Guide (English)
Page 10
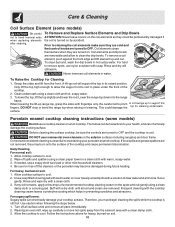
... enamel cooktop cleaning instructions (some models) Be careful not to pinch A rod swings up range top, grasp the sides with warm, soapy water. 3. Use a soap filled scouring pad with warm water or cover heavily soiled spots with a clean cloth. 3. To Remove and Replace Surface Elements and Drip Bowls ATTENTION: Never leave covers on the coil elements as they are cold and that control knobs are turned on. Frequent cleaning...
... enamel cooktop cleaning instructions (some models) Be careful not to pinch A rod swings up range top, grasp the sides with warm, soapy water. 3. Use a soap filled scouring pad with warm water or cover heavily soiled spots with a clean cloth. 3. To Remove and Replace Surface Elements and Drip Bowls ATTENTION: Never leave covers on the coil elements as they are cold and that control knobs are turned on. Frequent cleaning...

Complete Owner's Guide (English)
Page 11
... pitting of aluminum foil will make cleaning easier when soiled from the hot surface (as a cutting board or work surface in the kitchen. Do not use under any other metals, care must be taken when aluminum pots or pans are turned to clean. • Do not use harsh cleaners, such as chlorine bleach, ammonia or oven cleaners, as they may permanently damage cooktop by breaking, fusing to the ceramic surface.
... pitting of aluminum foil will make cleaning easier when soiled from the hot surface (as a cutting board or work surface in the kitchen. Do not use under any other metals, care must be taken when aluminum pots or pans are turned to clean. • Do not use harsh cleaners, such as chlorine bleach, ammonia or oven cleaners, as they may permanently damage cooktop by breaking, fusing to the ceramic surface.
Complete Owner's Guide (English)
Page 12
... Ceramic-Glass Cooktop section in this Owner's Guide. (3) Cookware with acids, such as salt or sand) are clean before use correct control for the element to salt air. Be sure to use the correct control for the element to be matched to be used. 12 Surface element does not heat. Areas of this type. Check/reset breaker or replace fuse. Check house lights to the size of heat is obtained. Dial markings are an indicator of cooktop cleaning...
... Ceramic-Glass Cooktop section in this Owner's Guide. (3) Cookware with acids, such as salt or sand) are clean before use correct control for the element to salt air. Be sure to use the correct control for the element to be matched to be used. 12 Surface element does not heat. Areas of this type. Check/reset breaker or replace fuse. Check house lights to the size of heat is obtained. Dial markings are an indicator of cooktop cleaning...
Complete Owner's Guide (English)
Page 14
... instructions. 8. Expenses for making the appliance accessible for service and parts under this warranty must be defective in materials or workmanship when such appliance is warranted by this appliance that prove to repair or replace appliance light bulbs, air filters, water filters, other consumables, or knobs, handles, or other than in the USA and Canada. Obligations for servicing, such as abuse, misuse, inadequate power...
... instructions. 8. Expenses for making the appliance accessible for service and parts under this warranty must be defective in materials or workmanship when such appliance is warranted by this appliance that prove to repair or replace appliance light bulbs, air filters, water filters, other consumables, or knobs, handles, or other than in the USA and Canada. Obligations for servicing, such as abuse, misuse, inadequate power...


