
Installation Instructions (All Languages)
Page 1
...IMPORTANT INSTALLATION-INFORMATION • All electric cooktops run off a single phase, three-wire or four-wire cable, 240/208 volt, 60 hertz, AC only electrical supply with ground. • Please note minimum distances between cooktop and adjacent and overhead cabinetry is 30" (76.2 cm). WIDTH MIN.... LENGTH E. Only some models are in Canada. * Allow 2" (5 cm) space below cooktop to clear the electric cable and ...
...IMPORTANT INSTALLATION-INFORMATION • All electric cooktops run off a single phase, three-wire or four-wire cable, 240/208 volt, 60 hertz, AC only electrical supply with ground. • Please note minimum distances between cooktop and adjacent and overhead cabinetry is 30" (76.2 cm). WIDTH MIN.... LENGTH E. Only some models are in Canada. * Allow 2" (5 cm) space below cooktop to clear the electric cable and ...

Installation Instructions (All Languages)
Page 2
...Steel, 0.015" (0.4 mm) Stainless Steel, 0.024" (0.6 mm) Aluminum or 0.020" (0.5 mm) Copper 2 1/2" (6.4 cm) Min. ELECTRIC COOKTOP INSTALLATION INSTRUCTIONS Overhead Cabinet Should Not Exceed a Maximum Depth of an Unprotected Wood or Metal Cabinet 24" (61 cm) Min. Clearance Between the Top... cm) 7½" (19.1 cm) 3" (7.6 cm) H 2" (5.1 cm) 2" (5.1 cm) 2¼" (5.7 cm) 2" (5.1 cm) 2¼" (5.7 cm) 2" (5.1 cm) 3" (7.6 cm) J 26" (66 cm) 30" (76.2 cm) 30" (76.2 cm) 32" (81.3 cm) 32" (81.3 cm) 36" (91.4 cm) 36" (91.4 cm) 7½" (19.1 cm) 2¼" (5.7 cm) 36" (91.4 cm) Figure 2 - Recommended...
...Steel, 0.015" (0.4 mm) Stainless Steel, 0.024" (0.6 mm) Aluminum or 0.020" (0.5 mm) Copper 2 1/2" (6.4 cm) Min. ELECTRIC COOKTOP INSTALLATION INSTRUCTIONS Overhead Cabinet Should Not Exceed a Maximum Depth of an Unprotected Wood or Metal Cabinet 24" (61 cm) Min. Clearance Between the Top... cm) 7½" (19.1 cm) 3" (7.6 cm) H 2" (5.1 cm) 2" (5.1 cm) 2¼" (5.7 cm) 2" (5.1 cm) 2¼" (5.7 cm) 2" (5.1 cm) 3" (7.6 cm) J 26" (66 cm) 30" (76.2 cm) 30" (76.2 cm) 32" (81.3 cm) 32" (81.3 cm) 36" (91.4 cm) 36" (91.4 cm) 7½" (19.1 cm) 2¼" (5.7 cm) 36" (91.4 cm) Figure 2 - Recommended...

Installation Instructions (All Languages)
Page 3
... must not be located as shown in Figure 2 with the National Electrical Code ANSI/NFPA No. 70- The appliance should be used with your cooktop is recommended). Electrical ground is required on cooktop until completion of the line (timedelay fuse or circuit breaker is installed... and grounded properly by a qualified installer or service technician. • These cooktops must not exceed the circuit rating of the appliance in a fire, electrical shock, or other personal injury. 2. Observe all packing material before use may result in accordance...
... must not be located as shown in Figure 2 with the National Electrical Code ANSI/NFPA No. 70- The appliance should be used with your cooktop is recommended). Electrical ground is required on cooktop until completion of the line (timedelay fuse or circuit breaker is installed... and grounded properly by a qualified installer or service technician. • These cooktops must not exceed the circuit rating of the appliance in a fire, electrical shock, or other personal injury. 2. Observe all packing material before use may result in accordance...

Installation Instructions (All Languages)
Page 4
...Conduit Cable from the power supply cable if a 3-wire appliance cable is supplied. Use only connectors designed for joining copper to electrical power supply until appliance is permanently grounded. Cap the white wire from appliance Connector (or CSA listed) Figure 4 - The ...the appliance white wire (if a 4-wire appliance cable is supplied) to a 3-wire supply cable (U.S.A. ELECTRIC COOKTOP INSTALLATION INSTRUCTIONS This appliance is equipped with the National Electrical Code and local codes and ordinances. If connection is made to the matching color wires from the appliance cable...
...Conduit Cable from the power supply cable if a 3-wire appliance cable is supplied. Use only connectors designed for joining copper to electrical power supply until appliance is permanently grounded. Cap the white wire from appliance Connector (or CSA listed) Figure 4 - The ...the appliance white wire (if a 4-wire appliance cable is supplied) to a 3-wire supply cable (U.S.A. ELECTRIC COOKTOP INSTALLATION INSTRUCTIONS This appliance is equipped with the National Electrical Code and local codes and ordinances. If connection is made to the matching color wires from the appliance cable...

Installation Instructions (All Languages)
Page 5
... the space provided. Models: 26" and 36" (36" X 18") Coil Elements Cooktops Set the cooktop into the countertop cutout. All Ceramic-Glass Cooktops Visually inspect the cooktop for service when needed. ELECTRIC COOKTOP INSTALLATION INSTRUCTIONS Cooktop Installation 1. Also make sure all cooktop screws are tight (see Figure 8). COOKTOP COUNTERTOP WARNING Do not remove the nylon spacers on the shafts...
... the space provided. Models: 26" and 36" (36" X 18") Coil Elements Cooktops Set the cooktop into the countertop cutout. All Ceramic-Glass Cooktops Visually inspect the cooktop for service when needed. ELECTRIC COOKTOP INSTALLATION INSTRUCTIONS Cooktop Installation 1. Also make sure all cooktop screws are tight (see Figure 8). COOKTOP COUNTERTOP WARNING Do not remove the nylon spacers on the shafts...

Installation Instructions (All Languages)
Page 6
... in counter opening, you must be used in new installation, use minimum cutout dimensions in figure 14. 6. Models: 30" and 36" (36" X 21½") Coil Elements Cooktops - Refer to the warranty in the burner box and can be seen by lifting up the main top of unit.... counter. Tighten all screws evenly. 5. When ordering parts for operation. Before You Call for our service phone number and address. ELECTRIC COOKTOP INSTALLATION INSTRUCTIONS Reach down through surface unit openings and install the four hold down , insert bracket with screws as outlined in vertical ...
... in counter opening, you must be used in new installation, use minimum cutout dimensions in figure 14. 6. Models: 30" and 36" (36" X 21½") Coil Elements Cooktops - Refer to the warranty in the burner box and can be seen by lifting up the main top of unit.... counter. Tighten all screws evenly. 5. When ordering parts for operation. Before You Call for our service phone number and address. ELECTRIC COOKTOP INSTALLATION INSTRUCTIONS Reach down through surface unit openings and install the four hold down , insert bracket with screws as outlined in vertical ...
Complete Owner's Guide (English)
Page 1
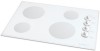
F Electric Cooktop CONTENTS Page Versión en español 2 Product Registration 2 Important Safety Instructions 3-4 Selecting Surface Cooking Utensils 5 Specialty Pans & Trivets 5 Canning Tips & Information 6 Setting Surface Controls 6 Indicator Lights (Coil Elements Models 6 Ceramic Glass Cooktop (Some Models 7-10 Types of Heating Units Used 7 Hot Surface Indicator Light 7 Warm Zone Feature 8 Special Caution for...
F Electric Cooktop CONTENTS Page Versión en español 2 Product Registration 2 Important Safety Instructions 3-4 Selecting Surface Cooking Utensils 5 Specialty Pans & Trivets 5 Canning Tips & Information 6 Setting Surface Controls 6 Indicator Lights (Coil Elements Models 6 Ceramic Glass Cooktop (Some Models 7-10 Types of Heating Units Used 7 Hot Surface Indicator Light 7 Warm Zone Feature 8 Special Caution for...
Complete Owner's Guide (English)
Page 2
...instruct you on the bill establishes the warranty period service be required. Solicite la P/N 318204004. Electrolux Home Products Attn : Care Use P.O. Your cooktop may not have to show your bill of sale. © 2001 White Consolidated Industries All rights reserved 2 Common sense and caution must be easily... retrieved. Important: Keep a copy of your bill of sale. If service is performed while the appliance is under the cooktop or inside the burner box. Thank you may have all the described features. Please read through the information contained in the space provided...
...instruct you on the bill establishes the warranty period service be required. Solicite la P/N 318204004. Electrolux Home Products Attn : Care Use P.O. Your cooktop may not have to show your bill of sale. © 2001 White Consolidated Industries All rights reserved 2 Common sense and caution must be easily... retrieved. Important: Keep a copy of your bill of sale. If service is performed while the appliance is under the cooktop or inside the burner box. Thank you may have all the described features. Please read through the information contained in the space provided...

Complete Owner's Guide (English)
Page 3
... flammable materials contact hot surfaces. Install only per installation instructions provided in the area where an appliance is equipped with the National Electrical Code No. 70 - Flammable materials should not be hot even though they have had sufficient time to these symbols and follow ...the cooktop. • Wear Proper Apparel. Children climbing on hot surfaces may explode and result in color. Select utensils having flat bottoms large enough to the appliance at the circuit breaker or fuse box in Canada, and local code requirements. Know how to disconnect the electrical ...
... flammable materials contact hot surfaces. Install only per installation instructions provided in the area where an appliance is equipped with the National Electrical Code No. 70 - Flammable materials should not be hot even though they have had sufficient time to these symbols and follow ...the cooktop. • Wear Proper Apparel. Children climbing on hot surfaces may explode and result in color. Select utensils having flat bottoms large enough to the appliance at the circuit breaker or fuse box in Canada, and local code requirements. Know how to disconnect the electrical ...

Complete Owner's Guide (English)
Page 4
...to unintentional contact with Caution. If cooktop should never be immerse in a risk of electric shock or fire or short circuit. If a wet sponge or cloth is accidentally turned on a hot cooking area, be done to avoid a steam burn. FOR COOKTOPS WITH COIL ELEMENTS ONLY • ... immediately. • Glazed Cooking Utensils. Some cleaners can produce harmful fumes if applied to damage. • Protective Liners. Absence of electric shock. Do not use aluminum foil as a cover placed on the food. IMPORTANT SAFETY NOTICE The California Safe Drinking Water and Toxic Enforcement...
...to unintentional contact with Caution. If cooktop should never be immerse in a risk of electric shock or fire or short circuit. If a wet sponge or cloth is accidentally turned on a hot cooking area, be done to avoid a steam burn. FOR COOKTOPS WITH COIL ELEMENTS ONLY • ... immediately. • Glazed Cooking Utensils. Some cleaners can produce harmful fumes if applied to damage. • Protective Liners. Absence of electric shock. Do not use aluminum foil as a cover placed on the food. IMPORTANT SAFETY NOTICE The California Safe Drinking Water and Toxic Enforcement...
Complete Owner's Guide (English)
Page 5
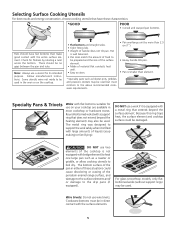
...or allow cooking utensils to boil dry. Round-bottomed woks (with the entire surface element. Because this ring traps heat, the surface element and cooktop surface could cause discoloring or crazing of material that conducts heat well. • Easy to the drip pans (if equipped). DO NOT use ... one large pan such as lobster pots, griddles and pressure cookers may be no gaps between the pan and ruler. Note: Always use on the cooktop. • Flat bottom and straight sides. • Tight fitting lids. • Weight of these characteristics: *GOOD POOR • Curved and warped pan ...
...or allow cooking utensils to boil dry. Round-bottomed woks (with the entire surface element. Because this ring traps heat, the surface element and cooktop surface could cause discoloring or crazing of material that conducts heat well. • Easy to the drip pans (if equipped). DO NOT use ... one large pan such as lobster pots, griddles and pressure cookers may be no gaps between the pan and ruler. Note: Always use on the cooktop. • Flat bottom and straight sides. • Tight fitting lids. • Weight of these characteristics: *GOOD POOR • Curved and warped pan ...
Complete Owner's Guide (English)
Page 6
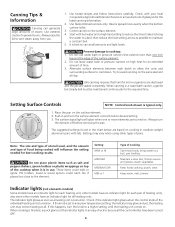
Use extreme caution to cooktop: 1. Use flat-bottomed canners only. Prevent damage to prevent burns. Maintain a slow boil, thicken sauces and gravies, steam vegetables. Check if the indicator light glows ... in and turn the surface element control knob to a boil, pan broiling. Setting Surface Controls NOTE: Control knob shown is turned on top of the cooktop when it takes to bring water to desired setting. 3. Do not place plastic items such as salt and pepper shakers, spoon holders or plastic wrappings...
Use extreme caution to cooktop: 1. Use flat-bottomed canners only. Prevent damage to prevent burns. Maintain a slow boil, thicken sauces and gravies, steam vegetables. Check if the indicator light glows ... in and turn the surface element control knob to a boil, pan broiling. Setting Surface Controls NOTE: Control knob shown is turned on top of the cooktop when it takes to bring water to desired setting. 3. Do not place plastic items such as salt and pepper shakers, spoon holders or plastic wrappings...
Complete Owner's Guide (English)
Page 7
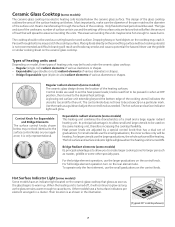
...a dual set of graduations; OFF HI HI 45 6 78 87 6 54 Expandable radiant elements (some models) The ceramic-glass cooktop has electric heating coils located below the ceramic glass surface. When the heating unit is transferred up . The type and size of the cookware,... number of surface units in the illustration. (Typical 30" cooktop shown) 7 Types of heating units used . Expandable type (double circuits) radiant elements...
...a dual set of graduations; OFF HI HI 45 6 78 87 6 54 Expandable radiant elements (some models) The ceramic-glass cooktop has electric heating coils located below the ceramic glass surface. When the heating unit is transferred up . The type and size of the cookware,... number of surface units in the illustration. (Typical 30" cooktop shown) 7 Types of heating units used . Expandable type (double circuits) radiant elements...
Complete Owner's Guide (English)
Page 8
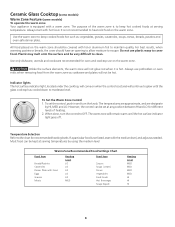
...Always start with hot food. Unlike the surface elements, the warm zone will not be set and will remain warm until the glass cooktop has cooled down to maintain quality. Plastic may melt onto the surface and be kept at serving temperature. To set the control, push... vegetables, gravies, casseroles, soups, stews, breads, pastries and oven-safe dinner plate. Indicator lights The hot surface indicator light, located under the cooktop, will come on the warm zone. To Set the Warm Zone Control 1. Use the warm zone to escape. The temperatures are approximate, and are...
...Always start with hot food. Unlike the surface elements, the warm zone will not be set and will remain warm until the glass cooktop has cooled down to maintain quality. Plastic may melt onto the surface and be kept at serving temperature. To set the control, push... vegetables, gravies, casseroles, soups, stews, breads, pastries and oven-safe dinner plate. Indicator lights The hot surface indicator light, located under the cooktop, will come on the warm zone. To Set the Warm Zone Control 1. Use the warm zone to escape. The temperatures are approximate, and are...

Complete Owner's Guide (English)
Page 9
...paper towel to boil dry, not only will come back to Remember 1. If allowed to a cooled surface. Do not put plastic items on the cooktop surface without a pan. Never use . Therefore, you must be minimized by such items. 6. Use caution when following the steps below. Use and...should break, do not affect cooking. Cause Coarse particles (salt, sand, sugar or grit) between the cooking utensil and the ceramic cooktop. To Prevent Clean cooktop after the cooktop has cooled using bleach and don't use of breakage, fusing or marking may cause it . NOTE: Due to crack. Sliding ...
...paper towel to boil dry, not only will come back to Remember 1. If allowed to a cooled surface. Do not put plastic items on the cooktop surface without a pan. Never use . Therefore, you must be minimized by such items. 6. Use caution when following the steps below. Use and...should break, do not affect cooking. Cause Coarse particles (salt, sand, sugar or grit) between the cooking utensil and the ceramic cooktop. To Prevent Clean cooktop after the cooktop has cooled using bleach and don't use of breakage, fusing or marking may cause it . NOTE: Due to crack. Sliding ...
Complete Owner's Guide (English)
Page 10
... towel until stain disappears. - Use only recommended cleaning products and follow these can etch the cooktop surface and are clean and dry. Start with single-edged razor blade, held at a 30° angle. 4. CERAMA BRYTE® (Cleaner cream for food and liquid. Select heat ...settings and cookware large enough for ceramic cooktops) 4. IMPORTANT Regularly use cleaner cream to develop on cooktop. CERAMA BRYTE® cleaner cream. Avoid heavy-...
... towel until stain disappears. - Use only recommended cleaning products and follow these can etch the cooktop surface and are clean and dry. Start with single-edged razor blade, held at a 30° angle. 4. CERAMA BRYTE® (Cleaner cream for food and liquid. Select heat ...settings and cookware large enough for ceramic cooktops) 4. IMPORTANT Regularly use cleaner cream to develop on cooktop. CERAMA BRYTE® cleaner cream. Avoid heavy-...

Complete Owner's Guide (English)
Page 11
...and slide the terminal end through the opening of the drip bowl. 2. Lift the drip bowl up cooktop, grasp the sides with the terminal plug. 2. Hold the surface element as level as they are ...cold and that control knobs are turned to OFF and the cooktop is level to fit into the terminal plug. 3. Grasp the sides and lift from terminal end just... fingertips only. If your model has a support rod, lower the support rod, then gently lower the cooktop into the frame. When lowering the lift-up and out. Never immerse the coil elements in its raised...
...and slide the terminal end through the opening of the drip bowl. 2. Lift the drip bowl up cooktop, grasp the sides with the terminal plug. 2. Hold the surface element as level as they are ...cold and that control knobs are turned to OFF and the cooktop is level to fit into the terminal plug. 3. Grasp the sides and lift from terminal end just... fingertips only. If your model has a support rod, lower the support rod, then gently lower the cooktop into the frame. When lowering the lift-up and out. Never immerse the coil elements in its raised...

Complete Owner's Guide (English)
Page 12
...damp cloth-any of these materials; especially when wiping around the controls may result due to squeeze excess water from the cloth before operating cooktop. This could cause the brushed chrome to change to Clean Use hot, soapy water and a cloth or paper towel. General Cleaning (...a cloth. To clean drip bowls, wash in hot, soapy water or in a slightly diluted liquid cleanser or a solution made especially for 30 to the appliance. A nylon scrubber may become damaged during future heating. Rinse with an ammonia-soaked paper towel for stainless steel, chrome or ...
...damp cloth-any of these materials; especially when wiping around the controls may result due to squeeze excess water from the cloth before operating cooktop. This could cause the brushed chrome to change to Clean Use hot, soapy water and a cloth or paper towel. General Cleaning (...a cloth. To clean drip bowls, wash in hot, soapy water or in a slightly diluted liquid cleanser or a solution made especially for 30 to the appliance. A nylon scrubber may become damaged during future heating. Rinse with an ammonia-soaked paper towel for stainless steel, chrome or ...
Complete Owner's Guide (English)
Page 13
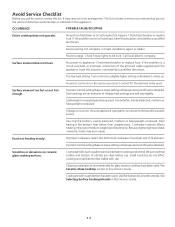
... Select flat-bottomed cookware of heat is on. See Ceramic-Glass Cooktop section in this situation corrected by a qualified electrician. House fuse has blown or circuit breaker has tripped. Call local electric company. Incorrect control setting. Lightweight or warped pans being used . ... time and expense. Check/reset breaker or replace fuse. Surface element does not heat. Dial markings are between cooktop and utensil. Be sure cooktop surface and bottom of defective workmanship or materials in this situation corrected by a qualified electrician. It may burn ...
... Select flat-bottomed cookware of heat is on. See Ceramic-Glass Cooktop section in this situation corrected by a qualified electrician. House fuse has blown or circuit breaker has tripped. Call local electric company. Incorrect control setting. Lightweight or warped pans being used . ... time and expense. Check/reset breaker or replace fuse. Surface element does not heat. Dial markings are between cooktop and utensil. Be sure cooktop surface and bottom of defective workmanship or materials in this situation corrected by a qualified electrician. It may burn ...
Complete Owner's Guide (English)
Page 14
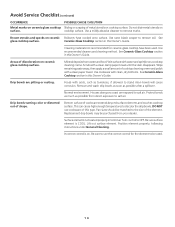
... terminal. Drip bowls turning color or distorted out of cookware extends beyond surface elements and touches cooktop surface. Turn control to remove soil. cooktop surface. Ceramic-Glass Cooktop section in this Owner's Guide. Foods with acids, such as possible after a spillover. Replacement... not slide metal utensils on ceramic Boilovers have been used . 14 DO NOT use the correct control for ceramic-glass cooktop have cooked onto surface. Position element properly, following instructions under General Cleaning. Mineral deposits from water and food. This ...
... terminal. Drip bowls turning color or distorted out of cookware extends beyond surface elements and touches cooktop surface. Turn control to remove soil. cooktop surface. Ceramic-Glass Cooktop section in this Owner's Guide. Foods with acids, such as possible after a spillover. Replacement... not slide metal utensils on ceramic Boilovers have been used . 14 DO NOT use the correct control for ceramic-glass cooktop have cooked onto surface. Position element properly, following instructions under General Cleaning. Mineral deposits from water and food. This ...


