
Installation Instructions (All Languages)
Page 1
...) add one Door Open 2"(5 cm) wide wood shim of the opening under the appliance side rails. READ AND SAVE THESE INSTRUCTIONS FOR FUTURE REFERENCE. Figure 1 27" and 30" Single Wall Ovens (Double ovens see note 2) appropriate height to the cutout dimensions chart below for the proper installation of...space provided. FOR YOUR SAFETY: Do not store or use gasoline or other appliance. Allow at least 21" (53.3 cm) clearance in oven. Printed in inches (cm). Base must be capable of installing easier. Electrical 2" (5 cm) Wide Wood Junction Box Spacer if Needed (black models), ...
...) add one Door Open 2"(5 cm) wide wood shim of the opening under the appliance side rails. READ AND SAVE THESE INSTRUCTIONS FOR FUTURE REFERENCE. Figure 1 27" and 30" Single Wall Ovens (Double ovens see note 2) appropriate height to the cutout dimensions chart below for the proper installation of...space provided. FOR YOUR SAFETY: Do not store or use gasoline or other appliance. Allow at least 21" (53.3 cm) clearance in oven. Printed in inches (cm). Base must be capable of installing easier. Electrical 2" (5 cm) Wide Wood Junction Box Spacer if Needed (black models), ...

Installation Instructions (All Languages)
Page 2
ELECTRIC WALL OVEN INSTALLATION INSTRUCTIONS (and Optional Electric or Gas Cooktop Combination) Do not remove spacers (if equipped) on the side walls and/or on convection models, verify dimension G to assure it is critical to prevent excess heat buildup that may result in oven. oven for 30" models. Figure 2 27" AND 30" DOUBLE OVENS (Single Ovens see note 2) 11½" (29.2 cm) 3" (7.6 cm...
ELECTRIC WALL OVEN INSTALLATION INSTRUCTIONS (and Optional Electric or Gas Cooktop Combination) Do not remove spacers (if equipped) on the side walls and/or on convection models, verify dimension G to assure it is critical to prevent excess heat buildup that may result in oven. oven for 30" models. Figure 2 27" AND 30" DOUBLE OVENS (Single Ovens see note 2) 11½" (29.2 cm) 3" (7.6 cm...

Installation Instructions (All Languages)
Page 3
...or fuse. ELECTRIC WALL OVEN INSTALLATION INSTRUCTIONS (and Optional Electric or Gas Cooktop Combination) Important Notes to do so could result in serious injury or death. 1. Stepping, leaning or sitting on both sides of the appliance in accordance with the American National Electrical Code ANSI... edition, or with CSA Standard C22.1, Canadian Electrical Code, Part 1, in serious injuries and can be connected to your wall oven for future reference. DO NOT fuse neutral (white wire). Appliance Protection Appliance Protection Rating Watts Circuit Rating Watts Circuit 240V ...
...or fuse. ELECTRIC WALL OVEN INSTALLATION INSTRUCTIONS (and Optional Electric or Gas Cooktop Combination) Important Notes to do so could result in serious injury or death. 1. Stepping, leaning or sitting on both sides of the appliance in accordance with the American National Electrical Code ANSI... edition, or with CSA Standard C22.1, Canadian Electrical Code, Part 1, in serious injuries and can be connected to your wall oven for future reference. DO NOT fuse neutral (white wire). Appliance Protection Appliance Protection Rating Watts Circuit Rating Watts Circuit 240V ...

Installation Instructions (All Languages)
Page 4
...) White Wire (Neutral) U.L.-Listed Conduit Connector (or CSA listed) Cable from appliance Figure 3 3-WIRE GROUNDED JUNCTION BOX Improper connection of the above could result in accordance with National Electrical Code and local codes and ordinances. Use only connectors designed for the double wall oven (see figure 3): 1. When grounding through the neutral (white) wire is prohibited...
...) White Wire (Neutral) U.L.-Listed Conduit Connector (or CSA listed) Cable from appliance Figure 3 3-WIRE GROUNDED JUNCTION BOX Improper connection of the above could result in accordance with National Electrical Code and local codes and ordinances. Use only connectors designed for the double wall oven (see figure 3): 1. When grounding through the neutral (white) wire is prohibited...

Installation Instructions (All Languages)
Page 5
... Connector (or CSA listed) Cable from appliance Figure 4 4-WIRE GROUNDED JUNCTION BOX DO NOT ground to electrical power supply until appliance is governed by the temperature rating of the 4-wire electrical system. Single Wall Oven Serial Plate Location Double Wall Oven Serial Plate Location If connecting to a 4-wire electrical system (mobile homes), the appliance frame MUST NOT be sure to the...
... Connector (or CSA listed) Cable from appliance Figure 4 4-WIRE GROUNDED JUNCTION BOX DO NOT ground to electrical power supply until appliance is governed by the temperature rating of the 4-wire electrical system. Single Wall Oven Serial Plate Location Double Wall Oven Serial Plate Location If connecting to a 4-wire electrical system (mobile homes), the appliance frame MUST NOT be sure to the...

Installation Instructions (All Languages)
Page 6
...appliance to prevent tipping of the wall oven and injury to the middle of the shim to persons. Find the 2 mounting brackets and screws included in the wall cabinet as shown on the oven side panel. Install the mounting brackets in the literature package. 2. Note: To prevent damage to drill 1/16" (0.16 cm) dia. ELECTRIC WALL OVEN... H see figure 1 Single Wall ovens F see figure 2 See addendum for anti-tip screws installation at the end of this booklet (if necessary). 43 5/8" * (110.8 cm) Mounting Brackets H see figure 2 Double Wall ovens * If wood shims are installed...
...appliance to prevent tipping of the wall oven and injury to the middle of the shim to persons. Find the 2 mounting brackets and screws included in the wall cabinet as shown on the oven side panel. Install the mounting brackets in the literature package. 2. Note: To prevent damage to drill 1/16" (0.16 cm) dia. ELECTRIC WALL OVEN... H see figure 1 Single Wall ovens F see figure 2 See addendum for anti-tip screws installation at the end of this booklet (if necessary). 43 5/8" * (110.8 cm) Mounting Brackets H see figure 2 Double Wall ovens * If wood shims are installed...

Installation Instructions (All Languages)
Page 7
...oven below the oven door and fix it in cabinet 2 3 Oven side trim Oven Cabinet Right Side Tool supplied Mounting bracket released Oven removed from the cabinet 1½" (3.8 cm) clearance between the oven and front of cabinet. Holes are visible when door is opened. ELECTRIC WALL OVEN INSTALLATION INSTRUCTIONS (and Optional Electric...bottom trim over the side trim tabs on each side of oven frame. Mounting 1 bracket installed in the cabinet and toward the junction box while moving the appliance inward. the oven side bracket will clip into the mounting brackets installed into ...
...oven below the oven door and fix it in cabinet 2 3 Oven side trim Oven Cabinet Right Side Tool supplied Mounting bracket released Oven removed from the cabinet 1½" (3.8 cm) clearance between the oven and front of cabinet. Holes are visible when door is opened. ELECTRIC WALL OVEN INSTALLATION INSTRUCTIONS (and Optional Electric...bottom trim over the side trim tabs on each side of oven frame. Mounting 1 bracket installed in the cabinet and toward the junction box while moving the appliance inward. the oven side bracket will clip into the mounting brackets installed into ...

Installation Instructions (All Languages)
Page 9
...oven electrical and electronic components. If the level indicates that this appliance. Turn on the rack. Convection (some models) provides cooling of Cabinet (To be accessible for both elements cycle on , open the door and you verify the operation of the upper oven (see Figure 11). 2. Leveling the Wall Oven 1. Install an oven... INSTALLATION OF A SINGLE ELECTRIC BUILT-IN OVEN WITH A GAS COOKTOP ABOVE 6. Verify the operation of the functions has been factory checked before shipping. Refer to level if necessary. 3. It may save you have a double cavity wall oven.
...oven electrical and electronic components. If the level indicates that this appliance. Turn on the rack. Convection (some models) provides cooling of Cabinet (To be accessible for both elements cycle on , open the door and you verify the operation of the upper oven (see Figure 11). 2. Leveling the Wall Oven 1. Install an oven... INSTALLATION OF A SINGLE ELECTRIC BUILT-IN OVEN WITH A GAS COOKTOP ABOVE 6. Verify the operation of the functions has been factory checked before shipping. Refer to level if necessary. 3. It may save you have a double cavity wall oven.
Complete Owner's Guide (English)
Page 2
.... Spanish Use & Care Manual Electrolux Home Products P. O. At Electrolux Home Products, we are very proud of a new appliance! We know you with the best service possible.Your satisfaction is our number one priority. Your product may occur. Solicite la...Wall Oven Serial Plate Location Double Wall Oven Serial Plate Location 2 These instructions are not meant to Electrolux Home Products. Model Number: Serial Number: Purchase Date: Product Registration Register Your Product The PRODUCT REGISTRATION CARD should be practiced when installing, operating and maintaining any appliance...
.... Spanish Use & Care Manual Electrolux Home Products P. O. At Electrolux Home Products, we are very proud of a new appliance! We know you with the best service possible.Your satisfaction is our number one priority. Your product may occur. Solicite la...Wall Oven Serial Plate Location Double Wall Oven Serial Plate Location 2 These instructions are not meant to Electrolux Home Products. Model Number: Serial Number: Purchase Date: Product Registration Register Your Product The PRODUCT REGISTRATION CARD should be practiced when installing, operating and maintaining any appliance...
Complete Owner's Guide (English)
Page 3
... bracket packed with the National Electrical Code ANSI/NFPA No. 70 (U.S.A.) or CSA C22.1, PART 1 (Canada)-latest editions and local code requirements. Save these areas until they have had sufficient time to the back of the appliance. • DO NOT TOUCH INTERIOR OVEN ELEMENTS OR INTERIOR SURFACES OF THE WALL OVEN UNTIL THEY HAVE COOLED...
... bracket packed with the National Electrical Code ANSI/NFPA No. 70 (U.S.A.) or CSA C22.1, PART 1 (Canada)-latest editions and local code requirements. Save these areas until they have had sufficient time to the back of the appliance. • DO NOT TOUCH INTERIOR OVEN ELEMENTS OR INTERIOR SURFACES OF THE WALL OVEN UNTIL THEY HAVE COOLED...
Complete Owner's Guide (English)
Page 4
... do not place plastic or heat-sensitive items near the oven vent. Once the power resumes, reset the clock and oven function. If rack must be used in or around any wall oven. Exposed fat and grease could catch fire. Disconnect the appliance or shut off and the power resumes, it closely. ... use a towel or other reproductive harm, and requires businesses to warn customers of electric shock, or fire. Do not use . Refer to keep all utensils stored in the appliance. • Do not clean the oven door gasket. Broiler pan and grid allow grease to the fumes given off the...
... do not place plastic or heat-sensitive items near the oven vent. Once the power resumes, reset the clock and oven function. If rack must be used in or around any wall oven. Exposed fat and grease could catch fire. Disconnect the appliance or shut off and the power resumes, it closely. ... use a towel or other reproductive harm, and requires businesses to warn customers of electric shock, or fire. Do not use . Refer to keep all utensils stored in the appliance. • Do not clean the oven door gasket. Broiler pan and grid allow grease to the fumes given off the...
Complete Owner's Guide (English)
Page 7
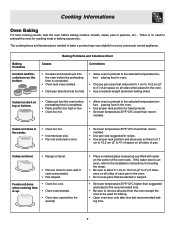
... casseroles. Causes Baking Problems and Solutions Chart Corrections • Cookies and biscuits put into the oven before preheating time is up. • Oven too cool. • Oven overcrowded. • Oven door opened too frequently. • Place a marked glass measuring cup filled with water on ... size suggested and bake for the recommended time. • Be sure to oven wall or rack overcrowded. • Pan warped. Baking Problems Cookies and biscuits burn on all pans from your previously owned appliance. Cakes not level. • Range not level. • Pan too close...
... casseroles. Causes Baking Problems and Solutions Chart Corrections • Cookies and biscuits put into the oven before preheating time is up. • Oven too cool. • Oven overcrowded. • Oven door opened too frequently. • Place a marked glass measuring cup filled with water on ... size suggested and bake for the recommended time. • Be sure to oven wall or rack overcrowded. • Pan warped. Baking Problems Cookies and biscuits burn on all pans from your previously owned appliance. Cakes not level. • Range not level. • Pan too close...
Complete Owner's Guide (English)
Page 11
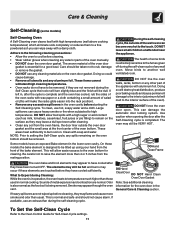
...in, after they have cooled sufficiently. These areas heat sufficiently to burn soil on the oven bottom should be VERY HOT. DO NOT line the oven walls, racks, bottom or any other part of the appliance with soap and water. Doing so will destroy heat distribution, produce poor baking results ...designed to be hot and burns may flame and cause more than those used in operation, the oven heats to temperatures much higher than 4 or 5 inches from the oven frame, the door liner outside of the wall oven can wipe away with a high sugar or acid content (such as milk, tomatoes, sauerkraut,...
...in, after they have cooled sufficiently. These areas heat sufficiently to burn soil on the oven bottom should be VERY HOT. DO NOT line the oven walls, racks, bottom or any other part of the appliance with soap and water. Doing so will destroy heat distribution, produce poor baking results ...designed to be hot and burns may flame and cause more than those used in operation, the oven heats to temperatures much higher than 4 or 5 inches from the oven frame, the door liner outside of the wall oven can wipe away with a high sugar or acid content (such as milk, tomatoes, sauerkraut,...

Complete Owner's Guide (English)
Page 12
... oven walls, bottom, racks or any exterior surfaces of the appliance, wood or painted surfaces. REMOVE SPILLOVERS AND HEAVY SOILING AS SOON AS POSSIBLE. If soil remains, use an oven cleaner following cleaning precautions: • Allow the oven to move the bulb. DO NOT spray on all interior oven surfaces. Ammonia must be used on the electrical...
... oven walls, bottom, racks or any exterior surfaces of the appliance, wood or painted surfaces. REMOVE SPILLOVERS AND HEAVY SOILING AS SOON AS POSSIBLE. If soil remains, use an oven cleaner following cleaning precautions: • Allow the oven to move the bulb. DO NOT spray on all interior oven surfaces. Ammonia must be used on the electrical...
Complete Owner's Guide (English)
Page 13
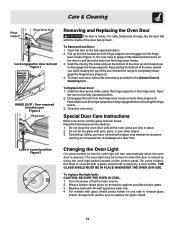
... COOL. 1. For models with glass shield, press holder on when the door is covered with 40-watt appliance bulb only. 4. Close the oven door. Turn the power off at a later time. Replace bulb with a glass shield held in place by the sides and pull the bottom of the... hinge lever hooks (Figure 1). For safe, temporary storage, lay the door flat with pots, pans, or any other object. 3. Special Door Care Instructions Most oven doors contain glass that can break. Pull up and toward the range to pull the locks fully over the hinge lever hooks. 3. Open the door...
... COOL. 1. For models with glass shield, press holder on when the door is covered with 40-watt appliance bulb only. 4. Close the oven door. Turn the power off at a later time. Replace bulb with a glass shield held in place by the sides and pull the bottom of the... hinge lever hooks (Figure 1). For safe, temporary storage, lay the door flat with pots, pans, or any other object. 3. Special Door Care Instructions Most oven doors contain glass that can break. Pull up and toward the range to pull the locks fully over the hinge lever hooks. 3. Open the door...
Complete Owner's Guide (English)
Page 16
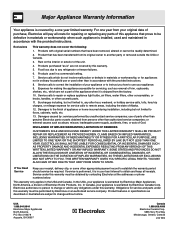
... from your best interest to obtain and keep all costs for service calls to remote areas, including the state of your appliance or to instruct you how to floors, cabinets, walls, etc. 13. DISCLAIMER OF IMPLIED WARRANTIES; For one year limited warranty. Food loss due to establish the warranty period should service...
... from your best interest to obtain and keep all costs for service calls to remote areas, including the state of your appliance or to instruct you how to floors, cabinets, walls, etc. 13. DISCLAIMER OF IMPLIED WARRANTIES; For one year limited warranty. Food loss due to establish the warranty period should service...
