
Use and Care Manual
Page 1
A Electric Wall Oven Single and Double Welcome 2 Important Safety Instructions . 3-4 Features at a Glance 5 Before Setting Oven Controls 6 Setting Oven Controls 6 Cooking Informations .......... 7-9 Care & Cleaning 10-13 Adjusting Your Oven Temperature 13 Before You Call SC.oo.lm.u.tm.io.o.nn.s.P.to.r.o.b.l.e.m..s 14-15 Warranty Back Cover 318205119 (0703) Rev.
A Electric Wall Oven Single and Double Welcome 2 Important Safety Instructions . 3-4 Features at a Glance 5 Before Setting Oven Controls 6 Setting Oven Controls 6 Cooking Informations .......... 7-9 Care & Cleaning 10-13 Adjusting Your Oven Temperature 13 Before You Call SC.oo.lm.u.tm.io.o.nn.s.P.to.r.o.b.l.e.m..s 14-15 Warranty Back Cover 318205119 (0703) Rev.

Use and Care Manual
Page 2
... in completely, signed and returned to providing you with the best service possible.Your satisfaction is our number one priority. All rights reserved Single Wall Oven Serial Plate Location Double Wall Oven Serial Plate Location 2 We hope you 'll enjoy your new appliance and Thank You for choosing our product. Model Number: Serial Number: Purchase...
... in completely, signed and returned to providing you with the best service possible.Your satisfaction is our number one priority. All rights reserved Single Wall Oven Serial Plate Location Double Wall Oven Serial Plate Location 2 We hope you 'll enjoy your new appliance and Thank You for choosing our product. Model Number: Serial Number: Purchase...

Use and Care Manual
Page 3
... bodily harm, death or property damage. Ask your dealer to the appliance. • Never modify or alter the construction of the wall oven. All other literature attached to the back of the appliance by a qualified electrician or installer in serious injuries and may become hot ...enough to reach items could result. • Install anti-tip bracket packed with the wall oven. Stepping, leaning, sitting or pulling down on the appliance to cause burns. This includes paper, plastic and cloth items, such as cookbooks...
... bodily harm, death or property damage. Ask your dealer to the appliance. • Never modify or alter the construction of the wall oven. All other literature attached to the back of the appliance by a qualified electrician or installer in serious injuries and may become hot ...enough to reach items could result. • Install anti-tip bracket packed with the wall oven. Stepping, leaning, sitting or pulling down on the appliance to cause burns. This includes paper, plastic and cloth items, such as cookbooks...

Use and Care Manual
Page 4
...opening the door of the appliance listed in the self-cleaning cycle only the parts of a hot oven. SELF-CLEANING OVEN MODELS • Clean in this Owner's Guide. Before using the appliance. The wall oven is vented at the upper control panel or at the center trim depending of the appliance, remove ... heating elements. Let hot air or steam escape before you remove or replace food in burns from the high heat of the appliance when the wall oven is not turned off during a power failure. Care should never be used in this area • Do not use a broiler pan without its ...
...opening the door of the appliance listed in the self-cleaning cycle only the parts of a hot oven. SELF-CLEANING OVEN MODELS • Clean in this Owner's Guide. Before using the appliance. The wall oven is vented at the upper control panel or at the center trim depending of the appliance, remove ... heating elements. Let hot air or steam escape before you remove or replace food in burns from the high heat of the appliance when the wall oven is not turned off during a power failure. Care should never be used in this area • Do not use a broiler pan without its ...
Use and Care Manual
Page 5
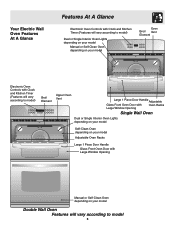
... vary according to model) Upper Oven Broil Element Lower Oven Upper Oven Vent Large 1 Piece Door Handle Adjustable Glass Front Oven Door with Oven Racks Large Window Opening Single Wall Oven Dual or Single Interior Oven Lights depending on your model Self-Clean Oven depending on your model Adjustable Oven Racks Large 1 Piece Door Handle Glass Front Oven Door with Large Window Opening...
... vary according to model) Upper Oven Broil Element Lower Oven Upper Oven Vent Large 1 Piece Door Handle Adjustable Glass Front Oven Door with Oven Racks Large Window Opening Single Wall Oven Dual or Single Interior Oven Lights depending on your model Self-Clean Oven depending on your model Adjustable Oven Racks Large 1 Piece Door Handle Glass Front Oven Door with Large Window Opening...
Use and Care Manual
Page 6
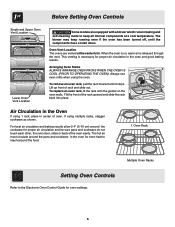
Before Setting Oven Controls Single and Upper Oven Vent Location Upper Oven Lower Oven Lower Oven Vent Location Some models are vented at a cool temperature. When the oven is on the oven walls. Tilt the front of oven. Arranging Oven Racks ALWAYS ARRANGE OVEN RACKS WHEN THE OVEN IS COOL (PRIOR TO OPERATING THE OVEN). To remove an oven rack, pull the rack forward until the...
Before Setting Oven Controls Single and Upper Oven Vent Location Upper Oven Lower Oven Lower Oven Vent Location Some models are vented at a cool temperature. When the oven is on the oven walls. Tilt the front of oven. Arranging Oven Racks ALWAYS ARRANGE OVEN RACKS WHEN THE OVEN IS COOL (PRIOR TO OPERATING THE OVEN). To remove an oven rack, pull the rack forward until the...
Use and Care Manual
Page 7
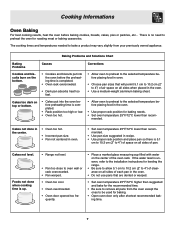
... hot. • Incorrect pan size. • Pan not centered in the oven. • Do not use pans that will permit 5.1 cm to 10.2 cm (2" to oven wall or rack overcrowded. • Pan warped. • Oven too cool. • Oven overcrowded. • Oven door opened too fre- mended. Baking Problems and Solutions Chart Baking Problems Causes Corrections...
... hot. • Incorrect pan size. • Pan not centered in the oven. • Do not use pans that will permit 5.1 cm to 10.2 cm (2" to oven wall or rack overcrowded. • Pan warped. • Oven too cool. • Oven overcrowded. • Oven door opened too fre- mended. Baking Problems and Solutions Chart Baking Problems Causes Corrections...

Use and Care Manual
Page 9
This method of the oven to circulate heated air around the food to be reduced by as much as 30% when using the convection mode. Remember to use tested recipes with times adjusted for even cooking and helps to increase browning on the grid in ... in convection mode when compared to regular radiant cooking. 3. Batch cooking is quicker in the rear wall of cooking enables you to the stop position before removing food. Times may be cooked. Place oven rack on the oven rack. DO NOT use the roasting rack when broiling. 1. The broiler pan will catch grease...
This method of the oven to circulate heated air around the food to be reduced by as much as 30% when using the convection mode. Remember to use tested recipes with times adjusted for even cooking and helps to increase browning on the grid in ... in convection mode when compared to regular radiant cooking. 3. Batch cooking is quicker in the rear wall of cooking enables you to the stop position before removing food. Times may be cooked. Place oven rack on the oven rack. DO NOT use the roasting rack when broiling. 1. The broiler pan will catch grease...
Use and Care Manual
Page 11
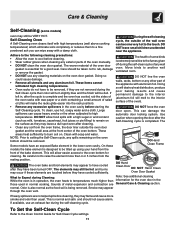
... eliminate soils completely or reduces them to cool before cleaning. • Wear rubber gloves when cleaning any wall oven. These areas heat sufficiently to remain on the oven bottom should be dull. DO NOT line the oven walls, racks, bottom or any aluminum foil. Be careful not to setting the Self-Clean cycle, any soil... on the surface as they may leave a dull spot even after they may flame and cause more than 4 or 5 inches from the front of the wall oven can wipe away with aluminum foil. Doing so could cause damage. • Remove all utensils and any other part of the...
... eliminate soils completely or reduces them to cool before cleaning. • Wear rubber gloves when cleaning any wall oven. These areas heat sufficiently to remain on the oven bottom should be dull. DO NOT line the oven walls, racks, bottom or any aluminum foil. Be careful not to setting the Self-Clean cycle, any soil... on the surface as they may leave a dull spot even after they may flame and cause more than 4 or 5 inches from the front of the wall oven can wipe away with aluminum foil. Doing so could cause damage. • Remove all utensils and any other part of the...

Use and Care Manual
Page 12
... with aluminum foil. The cleaner can be rinsed before cleaning. • Wear rubber gloves when cleaning the appliance manually. DO NOT line the oven walls, bottom, racks or any exterior surfaces of the Care & Cleaning section in the rear of stainless steel parts. Doing so will destroy heat ...the bulb and capillary tube. 3. Adhere to chart provided at beginning of the appliance, wood or painted surfaces. DO NOT spray on the oven door trim or gasket, handles or any other cleaners. REGULAR CLEANINGS WILL REDUCE THE NUMBER OF MAJOR CLEANINGS LATER. DO NOT spray any cleaner...
... with aluminum foil. The cleaner can be rinsed before cleaning. • Wear rubber gloves when cleaning the appliance manually. DO NOT line the oven walls, bottom, racks or any exterior surfaces of the Care & Cleaning section in the rear of stainless steel parts. Doing so will destroy heat ...the bulb and capillary tube. 3. Adhere to chart provided at beginning of the appliance, wood or painted surfaces. DO NOT spray on the oven door trim or gasket, handles or any other cleaners. REGULAR CLEANINGS WILL REDUCE THE NUMBER OF MAJOR CLEANINGS LATER. DO NOT spray any cleaner...

Use and Care Manual
Page 16
... the consumer is responsible for the items listed below apply. or external causes such as removal of the U.S.A., Puerto Rico, and Canada. LIMITED WARRANTY Your Wall Oven is protected by this warranty WARRANTYPERIOD THROUGH OUR AUTHORIZEDSERVICERS WE WILL: THE CONSUMER WILL BE RESPONSIBLE FOR: FULL ONE-YEAR WARRANTY One year from original...
... the consumer is responsible for the items listed below apply. or external causes such as removal of the U.S.A., Puerto Rico, and Canada. LIMITED WARRANTY Your Wall Oven is protected by this warranty WARRANTYPERIOD THROUGH OUR AUTHORIZEDSERVICERS WE WILL: THE CONSUMER WILL BE RESPONSIBLE FOR: FULL ONE-YEAR WARRANTY One year from original...

Installation Instructions
Page 1
... on the back of supporting 150 pounds (68 kg) for 27" 1½" (3.8 cm) models and 200 pounds (90 kg) for your model. Figure 1 27" and 30" Single Wall Ovens (Double ovens see note 2) appropriate height to C G Hole for the proper installation of the built-in front of (see Figure 2) PRODUCT DIMENSIONS MODEL A B C D 27" (68.6 cm...
... on the back of supporting 150 pounds (68 kg) for 27" 1½" (3.8 cm) models and 200 pounds (90 kg) for your model. Figure 1 27" and 30" Single Wall Ovens (Double ovens see note 2) appropriate height to C G Hole for the proper installation of the built-in front of (see Figure 2) PRODUCT DIMENSIONS MODEL A B C D 27" (68.6 cm...

Installation Instructions
Page 2
... (123.5 cm) Cable Door Open (see Figure 1) MODEL 27" (68.6 cm) Wall Oven 30" (76.2 cm) Wall Oven PRODUCT DIMENSIONS A B C 27 (68.6) 30 (76.2) 507/16 (128.1) 507/16 (128.1) 245/8 (62.5) 28¼ (71.8) CUTOUT DIMENSIONS AND CABINET WIDTH MODEL Min. Figure 2 27" AND 30" DOUBLE OVENS (Single Ovens see note 2) 11½" (29.2 cm) 3" (7.6 cm) Max. Spacer 2" D (5.1 cm...
... (123.5 cm) Cable Door Open (see Figure 1) MODEL 27" (68.6 cm) Wall Oven 30" (76.2 cm) Wall Oven PRODUCT DIMENSIONS A B C 27 (68.6) 30 (76.2) 507/16 (128.1) 507/16 (128.1) 245/8 (62.5) 28¼ (71.8) CUTOUT DIMENSIONS AND CABINET WIDTH MODEL Min. Figure 2 27" AND 30" DOUBLE OVENS (Single Ovens see note 2) 11½" (29.2 cm) 3" (7.6 cm) Max. Spacer 2" D (5.1 cm...

Installation Instructions
Page 3
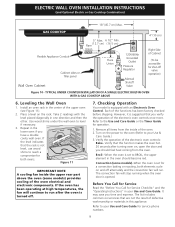
...the junction box. An extension cord should be connected directly to the wall oven. • Never use your wall oven is ever necessary. 3. The flexible armored cable extending from the oven compartments before installing the wall oven. 2. Read all packing material from the appliance should not be supplied... all governing codes and local ordinances 1.A 3-wire or 4-wire single phase 120/240 or 120/208 Volt, 60 Hz AC only electrical supply is recommended. Stepping, leaning or sitting on both sides of the wall oven without adequate ventilation can purchase a 10' (3 m) power cord...
...the junction box. An extension cord should be connected directly to the wall oven. • Never use your wall oven is ever necessary. 3. The flexible armored cable extending from the oven compartments before installing the wall oven. 2. Read all packing material from the appliance should not be supplied... all governing codes and local ordinances 1.A 3-wire or 4-wire single phase 120/240 or 120/208 Volt, 60 Hz AC only electrical supply is recommended. Stepping, leaning or sitting on both sides of the wall oven without adequate ventilation can purchase a 10' (3 m) power cord...

Installation Instructions
Page 4
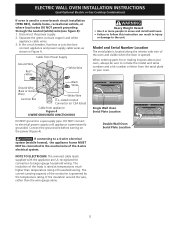
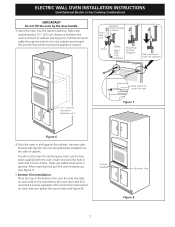
... local codes and ordinances. Failure to fit into an existing cabinet cutout opening, when cutout height exceeds 281/8" (71.4 cm) for the single wall oven or 49½" (125.7 cm) for joining copper to aluminum house wiring, use a 4-wire power supply cable. Electrical ground is required on...wires as shown in a fire, personal injury or electrical shock. Use only connectors designed for the double wall oven (see figure 3): 1. When grounding through the neutral (white) wire if oven is in conformance with the National Electrical Code ANSI/NFPA No. 70-latest edition, or with a ...
... local codes and ordinances. Failure to fit into an existing cabinet cutout opening, when cutout height exceeds 281/8" (71.4 cm) for the single wall oven or 49½" (125.7 cm) for joining copper to aluminum house wiring, use a 4-wire power supply cable. Electrical ground is required on...wires as shown in a fire, personal injury or electrical shock. Use only connectors designed for the double wall oven (see figure 3): 1. When grounding through the neutral (white) wire if oven is in conformance with the National Electrical Code ANSI/NFPA No. 70-latest edition, or with a ...
Installation Instructions
Page 5
...armored cable leads supplied with the appliance are UL-recognized for or making inquires about your oven. ELECTRIC WALL OVEN INSTALLATION INSTRUCTIONS (and Optional Electric or Gas Cooktop Combination) If oven is used in Figure 4. DO NOT connect to a gas supply pipe. Ground Wire ...from appliance Figure 4 4-WIRE GROUNDED JUNCTION BOX DO NOT ground to electrical power supply until appliance is opened. Single Wall Oven Serial Plate Location Double Wall Oven Serial Plate Location If connecting to a 4-wire electrical system (mobile homes), the appliance frame MUST NOT be ...
...armored cable leads supplied with the appliance are UL-recognized for or making inquires about your oven. ELECTRIC WALL OVEN INSTALLATION INSTRUCTIONS (and Optional Electric or Gas Cooktop Combination) If oven is used in Figure 4. DO NOT connect to a gas supply pipe. Ground Wire ...from appliance Figure 4 4-WIRE GROUNDED JUNCTION BOX DO NOT ground to electrical power supply until appliance is opened. Single Wall Oven Serial Plate Location Double Wall Oven Serial Plate Location If connecting to a 4-wire electrical system (mobile homes), the appliance frame MUST NOT be ...

Installation Instructions
Page 6
... literature package. 2. pilot holes before installing the mounting brackets. Note: To prevent damage to persons. Figure 5 6 Unpack the wall oven. Mounting Brackets Installation Instructions 1. F see figure 1 22 3/16" * (56.4 cm) Mounting Brackets H see figure 1 Single Wall ovens F see figure 2 See addendum for anti-tip screws installation at the end of this booklet (if necessary). 43...
... literature package. 2. pilot holes before installing the mounting brackets. Note: To prevent damage to persons. Figure 5 6 Unpack the wall oven. Mounting Brackets Installation Instructions 1. F see figure 1 22 3/16" * (56.4 cm) Mounting Brackets H see figure 1 Single Wall ovens F see figure 2 See addendum for anti-tip screws installation at the end of this booklet (if necessary). 43...
Installation Instructions
Page 7
... mounting brackets installed into hole in each side trim below the oven door and fix it in cabinet 2 3 Oven side trim Oven Cabinet Right Side Tool supplied Mounting bracket released Oven removed from the cabinet 1½" (3.8 cm) clearance between the oven and front of cabinet (see Figure 7). 5.Bottom Trim Installation:... you (see Figure 6). Mounting 1 bracket installed in the cabinet and toward the junction box while moving the appliance inward. ELECTRIC WALL OVEN INSTALLATION INSTRUCTIONS (and Optional Electric or Gas Cooktop Combination) IMPORTANT Do not lift the...
... mounting brackets installed into hole in each side trim below the oven door and fix it in cabinet 2 3 Oven side trim Oven Cabinet Right Side Tool supplied Mounting bracket released Oven removed from the cabinet 1½" (3.8 cm) clearance between the oven and front of cabinet (see Figure 7). 5.Bottom Trim Installation:... you (see Figure 6). Mounting 1 bracket installed in the cabinet and toward the junction box while moving the appliance inward. ELECTRIC WALL OVEN INSTALLATION INSTRUCTIONS (and Optional Electric or Gas Cooktop Combination) IMPORTANT Do not lift the...

Installation Instructions
Page 8
...cm) Min. 285/8" (72.7 cm) Max. 30" (76.2 cm) 28½" (72.4 cm) Min. 27¼" (69.2 cm) Min. TYPICAL UNDER COUNTER INSTALLATION OF A SINGLE ELECTRIC BUILT-IN OVEN WITH AN ELECTRIC COOKTOP MOUNTED ABOVE 8 Approved cooktops and builtin ovens are necessary to the cabinet (s) by the MFG...) for 27" models and 200 pounds (90 kg) for 30" models. ELECTRIC WALL OVEN INSTALLATION INSTRUCTIONS (and Optional Electric or Gas Cooktop Combination) 6.For typical under counter installation of an electric built-in oven see the insert sheet included in the literature package and cooktop ...
...cm) Min. 285/8" (72.7 cm) Max. 30" (76.2 cm) 28½" (72.4 cm) Min. 27¼" (69.2 cm) Min. TYPICAL UNDER COUNTER INSTALLATION OF A SINGLE ELECTRIC BUILT-IN OVEN WITH AN ELECTRIC COOKTOP MOUNTED ABOVE 8 Approved cooktops and builtin ovens are necessary to the cabinet (s) by the MFG...) for 27" models and 200 pounds (90 kg) for 30" models. ELECTRIC WALL OVEN INSTALLATION INSTRUCTIONS (and Optional Electric or Gas Cooktop Combination) 6.For typical under counter installation of an electric built-in oven see the insert sheet included in the literature package and cooktop ...
Installation Instructions
Page 9
... for operation. 1. Figure 11 IMPORTANT NOTE A cooling fan inside of the upper oven (see Figure 11). 2. Verify that you have a double cavity wall oven. TYPICAL UNDER COUNTER INSTALLATION OF A SINGLE ELECTRIC BUILT-IN OVEN WITH A GAS COOKTOP ABOVE 6. Use wood shims under the wall oven to your Use & Care Guide.) 3. If the level indicates that the rack...
... for operation. 1. Figure 11 IMPORTANT NOTE A cooling fan inside of the upper oven (see Figure 11). 2. Verify that you have a double cavity wall oven. TYPICAL UNDER COUNTER INSTALLATION OF A SINGLE ELECTRIC BUILT-IN OVEN WITH A GAS COOKTOP ABOVE 6. Use wood shims under the wall oven to your Use & Care Guide.) 3. If the level indicates that the rack...


