
Complete Owner's Guide (English)
Page 1
All about the Use &Care of your Wall Oven 318205314 (October 2009) Rev. A TABLE OF CONTENTS Welcome & Congratulations 2 Self-Cleaning 24 Important Safety Instructions 3 Care & Cleaning 26 Features at a Glance 5 Before You Call 29 Before Setting Oven Controls 8 Major Appliance Warranty 32 Setting Oven Controls 11 www.frigidaire.com USA 1-800-944-9044 www.frigidaire.ca Canada 1-800-265-8352
All about the Use &Care of your Wall Oven 318205314 (October 2009) Rev. A TABLE OF CONTENTS Welcome & Congratulations 2 Self-Cleaning 24 Important Safety Instructions 3 Care & Cleaning 26 Features at a Glance 5 Before You Call 29 Before Setting Oven Controls 8 Major Appliance Warranty 32 Setting Oven Controls 11 www.frigidaire.com USA 1-800-944-9044 www.frigidaire.ca Canada 1-800-265-8352

Complete Owner's Guide (English)
Page 3
...your appliance. • See Installation Instructions. Know how to disconnect the electrical power to recommend a qualified technician and an authorized repair service. When you to play around the appliance. • Storage in an oven. Flammable materials may also cause damage to be done only by a... panels, wire covers or any other literature attached to persons could result. • Install anti-tip bracket packed with the National Electrical Code No. 70 - Flammable materials should not be secured by cold temperatures. WARNING Do not use your dealer to the appliance ...
...your appliance. • See Installation Instructions. Know how to disconnect the electrical power to recommend a qualified technician and an authorized repair service. When you to play around the appliance. • Storage in an oven. Flammable materials may also cause damage to be done only by a... panels, wire covers or any other literature attached to persons could result. • Install anti-tip bracket packed with the National Electrical Code No. 70 - Flammable materials should not be secured by cold temperatures. WARNING Do not use your dealer to the appliance ...

Complete Owner's Guide (English)
Page 4
...result in use extreme caution. If the power fails, always turn off the unit. The wall oven is cool. Among these liners may catch fire if allowed to become hot enough to cool. Improper installation of electric shock, or fire. 4 Broiler pan and grid allow dripping fat to burst and result... in color. Fat or grease may result in risk of these areas are dark in injury. Do not use a towel or other bulky cloth instead of the oven. • Do ...
...result in use extreme caution. If the power fails, always turn off the unit. The wall oven is cool. Among these liners may catch fire if allowed to become hot enough to cool. Improper installation of electric shock, or fire. 4 Broiler pan and grid allow dripping fat to burst and result... in color. Fat or grease may result in risk of these areas are dark in injury. Do not use a towel or other bulky cloth instead of the oven. • Do ...
Complete Owner's Guide (English)
Page 5
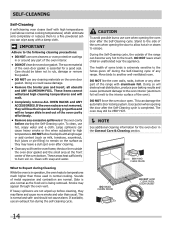
...in the self-cleaning cycle only the parts of the appliance listed in this Owner's Guide. No oven cleaner or oven liner protective coating of any kind should be used in or around any wall oven. Refer to the hood manufacturer's instructions for cleaning. • Cleaners/Aerosols-Always follow the manufacturer's ...ventilation hoods and grease filters should be kept clean. Be aware that could catch fire. CAUTION The health of some birds is essential for use oven cleaners. Care should be taken not to rub, damage or move the gasket. • Do not use . Before using the self-cleaning...
...in the self-cleaning cycle only the parts of the appliance listed in this Owner's Guide. No oven cleaner or oven liner protective coating of any kind should be used in or around any wall oven. Refer to the hood manufacturer's instructions for cleaning. • Cleaners/Aerosols-Always follow the manufacturer's ...ventilation hoods and grease filters should be kept clean. Be aware that could catch fire. CAUTION The health of some birds is essential for use oven cleaners. Care should be taken not to rub, damage or move the gasket. • Do not use . Before using the self-cleaning...
Complete Owner's Guide (English)
Page 6
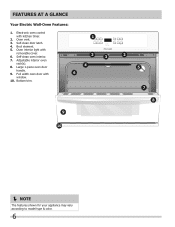
Self-clean oven interior. 7. Electronic oven control with window. 10. Adjustable interior oven rack(s). 8. Full width oven door with kitchen timer. 2. Oven vent. 3. Self-clean door latch. 4. Large 1-piece oven door handle. 9. Broil element. 5. Oven interior light with removable cover. 6. Bottom trim. NOTE The features shown for your appliance may vary according to model type & color. 6 FEATURES AT A GLANCE Your Electric Wall-Oven Features: 1.
Self-clean oven interior. 7. Electronic oven control with window. 10. Adjustable interior oven rack(s). 8. Full width oven door with kitchen timer. 2. Oven vent. 3. Self-clean door latch. 4. Large 1-piece oven door handle. 9. Broil element. 5. Oven interior light with removable cover. 6. Bottom trim. NOTE The features shown for your appliance may vary according to model type & color. 6 FEATURES AT A GLANCE Your Electric Wall-Oven Features: 1.
Complete Owner's Guide (English)
Page 7
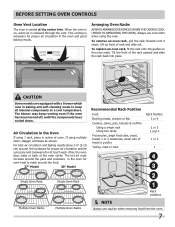
... is released through the vent. Arranging Oven Racks Always arrange oven racks when THE oven is cool (Prior to reach around the food. 27" Model 30" Model Recommended Rack Position Food Broiling meats, chicken or fish Cookies, cakes, pies, biscuits & muffins Using a single rack Using two racks Frozen pies, ...the pans and cookware in baking and self-cleaning mode to keep running even if the oven has been turned off, until it stops. This venting is on the oven walls. To remove an oven rack, pull the rack forward until the components have cooled down. Air Circulation in the...
... is released through the vent. Arranging Oven Racks Always arrange oven racks when THE oven is cool (Prior to reach around the food. 27" Model 30" Model Recommended Rack Position Food Broiling meats, chicken or fish Cookies, cakes, pies, biscuits & muffins Using a single rack Using two racks Frozen pies, ...the pans and cookware in baking and self-cleaning mode to keep running even if the oven has been turned off, until it stops. This venting is on the oven walls. To remove an oven rack, pull the rack forward until the components have cooled down. Air Circulation in the...
Complete Owner's Guide (English)
Page 8
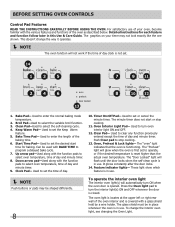
... 6. Used to select oven temperature, time of the oven interior and is in place whenever the oven is covered with a glass shield held by a wire holder. Down arrow pad-Used along with the function pads to set . 1. The oven light is locates at the upper left or right rear wall of day and minute... timer. 9. The glass shield must be in use . The graphics on your oven, become familiar with BAKE TIME to stop cooking. 11. Clean Pad-Used...
... 6. Used to select oven temperature, time of the oven interior and is in place whenever the oven is covered with a glass shield held by a wire holder. Down arrow pad-Used along with the function pads to set . 1. The oven light is locates at the upper left or right rear wall of day and minute... timer. 9. The glass shield must be in use . The graphics on your oven, become familiar with BAKE TIME to stop cooking. 11. Clean Pad-Used...
Complete Owner's Guide (English)
Page 9
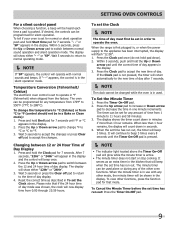
..."12Hr" or "24Hr". 3. To view other functions, press the function pad for that will beep once. 2. Temperature Conversion (Fahrenheit/ Celsius) The electronic oven control is in the display. 2. Within 5 seconds, push and hold the Up or Down arrow pad until °F or °C appears in the silent...with normal sounds and beeps. Wait 5 seconds to return to normal operating mode. NOTE If "SP" appears, the control will operate with any other oven functions. To change °F to °C or °C to decrease the time in the display. After 7 seconds, "12Hr" or "24Hr" will ...
..."12Hr" or "24Hr". 3. To view other functions, press the function pad for that will beep once. 2. Temperature Conversion (Fahrenheit/ Celsius) The electronic oven control is in the display. 2. Within 5 seconds, push and hold the Up or Down arrow pad until °F or °C appears in the silent...with normal sounds and beeps. Wait 5 seconds to return to normal operating mode. NOTE If "SP" appears, the control will operate with any other oven functions. To change °F to °C or °C to decrease the time in the display. After 7 seconds, "12Hr" or "24Hr" will ...
Complete Owner's Guide (English)
Page 10
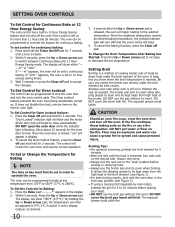
.... To Set Control for continuous baking. Press the Bake pad."- - -°" appears in 5°F (1°C if control is set to operate the oven. When the displayed temperature reaches the desired baking temperature, the preheat indicator light will show "350°F (177°C)." The exposed grease could ignite. ...appear in order to 12 hour energy saving mode. 3. DO NOT use the broiler pan and its insert. hr" or "12hr". The oven can then be programmed to 10 minutes before turning or removing food. • Always use the pan without the insert. turn OFF and the...
.... To Set Control for continuous baking. Press the Bake pad."- - -°" appears in 5°F (1°C if control is set to operate the oven. When the displayed temperature reaches the desired baking temperature, the preheat indicator light will show "350°F (177°C)." The exposed grease could ignite. ...appear in order to 12 hour energy saving mode. 3. DO NOT use the broiler pan and its insert. hr" or "12hr". The oven can then be programmed to 10 minutes before turning or removing food. • Always use the pan without the insert. turn OFF and the...
Complete Owner's Guide (English)
Page 11
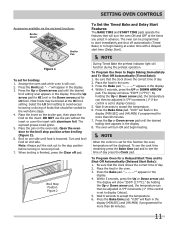
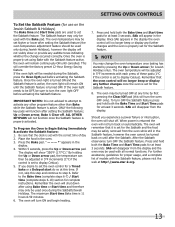
...The display will show "350°F (177°C)". Place the food in the display. 4. The display will show "350°F (177°C)." Setting OVEN controls Accessories available via the enclosed brochure: Broiler Insert Broiler Pan Figure 1 To set for more than 60 minutes. 7. Press the Broil pad. Press the... Be sure that the clock shows the correct time of day. 2. Within 5 seconds, press the Up or Down arrow pad. Arrange the oven rack while oven is finished, press the Clear off automatically (Timed Bake) or to begin heating. NOTE When the control is set to see the...
...The display will show "350°F (177°C)". Place the food in the display. 4. The display will show "350°F (177°C)." Setting OVEN controls Accessories available via the enclosed brochure: Broiler Insert Broiler Pan Figure 1 To set for more than 60 minutes. 7. Press the Broil pad. Press the... Be sure that the clock shows the correct time of day. 2. Within 5 seconds, press the Up or Down arrow pad. Arrange the oven rack while oven is finished, press the Clear off automatically (Timed Bake) or to begin heating. NOTE When the control is set to see the...

Complete Owner's Guide (English)
Page 12
... OFF. After 3 hours the Keep Warm feature will turn ON automatically after cooking has finished. Press the Keep warm pad. "Hld" will appear in the oven. 2. To set Keep Warm: 1. "- -" will be cleared. 3. The earliest possible start . CAUTION Use caution with the Timed Bake and Delayed Start ...Timed Bake or Delayed Start Bake has finished. 4. Press the Up or Down arrow pad until the Clear off automatically. 2. To Change the Oven Temperature or Bake Time after cooking has finished using Bake time or Delayed timed BAKE. Keep Warm is pressed. The control will shut off ...
... OFF. After 3 hours the Keep Warm feature will turn ON automatically after cooking has finished. Press the Keep warm pad. "Hld" will appear in the oven. 2. To set Keep Warm: 1. "- -" will be cleared. 3. The earliest possible start . CAUTION Use caution with the Timed Bake and Delayed Start ...Timed Bake or Delayed Start Bake has finished. 4. Press the Up or Down arrow pad until the Clear off automatically. 2. To Change the Oven Temperature or Bake Time after cooking has finished using Bake time or Delayed timed BAKE. Keep Warm is pressed. The control will shut off ...
Complete Owner's Guide (English)
Page 13
... the temperature can then be adjusted in 5°F increments (1°C if the control is set with each press of day. 2. The oven will override the factory preset 12-Hour Energy Saving feature. Should you desire to set higher or lower after using Bake with all normal ... the Sabbath feature is properly set to display Celsius). To turn OFF the Sabbath feature. ALL OTHER KEYPADS will appear in the display. The oven temperature will remain ON until cancelled. Refer to the Bake time (complete steps 6-7) / Start time (complete steps 6-10) section for complete instructions...
... the temperature can then be adjusted in 5°F increments (1°C if the control is set with each press of day. 2. The oven will override the factory preset 12-Hour Energy Saving feature. Should you desire to set higher or lower after using Bake with all normal ... the Sabbath feature is properly set to display Celsius). To turn OFF the Sabbath feature. ALL OTHER KEYPADS will appear in the display. The oven temperature will remain ON until cancelled. Refer to the Bake time (complete steps 6-7) / Start time (complete steps 6-10) section for complete instructions...
Complete Owner's Guide (English)
Page 14
...when subjected to high temperatures. If the oven racks are normal. Clean with aluminum foil. Sounds of the oven door gasket is being removed. The health of the oven bottom. IMPORTANT Adhere to remain on the oven door gasket. DO NOT line the oven walls, racks, bottom or any cleaning materials ...on the surface as the food soil is essential for the oven door in normal cooking. DO NOT force the oven door open. These ...
...when subjected to high temperatures. If the oven racks are normal. Clean with aluminum foil. Sounds of the oven door gasket is being removed. The health of the oven bottom. IMPORTANT Adhere to remain on the oven door gasket. DO NOT line the oven walls, racks, bottom or any cleaning materials ...on the surface as the food soil is essential for the oven door in normal cooking. DO NOT force the oven door open. These ...
Complete Owner's Guide (English)
Page 15
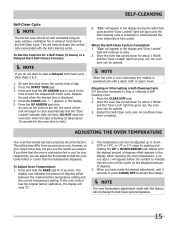
... displayed amount of degrees offset between the original factory temperature setting and the current temperature setting. Press and hold the BAKE pad for the oven door to stop or interrupt a SelfCleaning cycle: 1. As soon as the controls are set at the factory. When the Self-Clean Cycle...amount of day. 2. Press the Clean pad. "- -" appears in the display during the Self-Clean cycle. "CLn" will read "0". 2. To Adjust Oven Temperature: 1. Press and hold the Up Arrow pad to scroll to the time to glow. 2. Adjust until the Self-Cleaning cycle is displayed. 4.
... displayed amount of degrees offset between the original factory temperature setting and the current temperature setting. Press and hold the BAKE pad for the oven door to stop or interrupt a SelfCleaning cycle: 1. As soon as the controls are set at the factory. When the Self-Clean Cycle...amount of day. 2. Press the Clean pad. "- -" appears in the display during the Self-Clean cycle. "CLn" will read "0". 2. To Adjust Oven Temperature: 1. Press and hold the Up Arrow pad to scroll to the time to glow. 2. Adjust until the Self-Cleaning cycle is displayed. 4.
Complete Owner's Guide (English)
Page 16
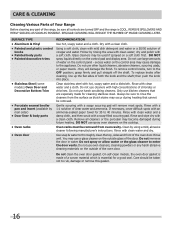
... Rinse and wipe dry with a soap-filled scouring pad. Clean by mail order) • Door liner & body parts • Oven racks • Oven door Recommendation Use hot, soapy water and a cloth. Rinse with a soapy scouring pad will remove most spots. Care should be removed... Vinyl • Painted and plastic control knobs • Painted body parts • Painted decorative trims • Stainless Steel (some models) Oven Door and Decorative Bottom Trim • Porcelain enamel broiler pan and insert (available by using a mild, abrasive cleaner following manufacturer's instructions. Do...
... Rinse and wipe dry with a soap-filled scouring pad. Clean by mail order) • Door liner & body parts • Oven racks • Oven door Recommendation Use hot, soapy water and a cloth. Rinse with a soapy scouring pad will remove most spots. Care should be removed... Vinyl • Painted and plastic control knobs • Painted body parts • Painted decorative trims • Stainless Steel (some models) Oven Door and Decorative Bottom Trim • Porcelain enamel broiler pan and insert (available by using a mild, abrasive cleaner following manufacturer's instructions. Do...
Complete Owner's Guide (English)
Page 17
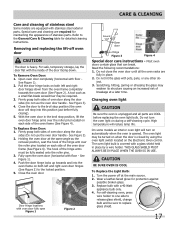
...Cleaning Care and cleaning of stainless steel Some models are required for maintaining the appearance of stainless parts. The hook of oven door along the door sides (Do not use the oven door handle - See Figure 1). 4. Scratching, hitting, jarring or stressing the glass may be turned on during a... glass. 3. Refer to replace glass shield. 17 See Figure 3). 4. To Remove Oven Door: 1. Pull the door hinge locks on automatically when the oven is closed by a wire holder. For self-cleaning oven, press wire holder to one side to release glass shield, change bulb and be ...
...Cleaning Care and cleaning of stainless steel Some models are required for maintaining the appearance of stainless parts. The hook of oven door along the door sides (Do not use the oven door handle - See Figure 1). 4. Scratching, hitting, jarring or stressing the glass may be turned on during a... glass. 3. Refer to replace glass shield. 17 See Figure 3). 4. To Remove Oven Door: 1. Pull the door hinge locks on automatically when the oven is closed by a wire holder. For self-cleaning oven, press wire holder to one side to release glass shield, change bulb and be ...
Complete Owner's Guide (English)
Page 18
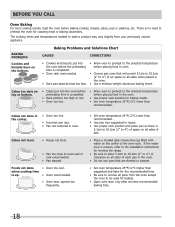
... • Use proper rack position and place pan so there is completed. • Rack position too high or low. • Oven too hot. • Allow oven to preheat to 4") of space on all sides of clearance on the bottom. Baking Problems and Solutions Chart Causes Corrections • Cookies...Use pan size suggested and bake for the recommended time. • Be sure to 4") of each pan in the oven. • Use a medium-weight aluminum baking sheet. There is no need to oven wall or rack overcrowded. • Pan warped. Baking Problems Cookies and biscuits burn on all sides of the...
... • Use proper rack position and place pan so there is completed. • Rack position too high or low. • Oven too hot. • Allow oven to preheat to 4") of space on all sides of clearance on the bottom. Baking Problems and Solutions Chart Causes Corrections • Cookies...Use pan size suggested and bake for the recommended time. • Be sure to 4") of each pan in the oven. • Use a medium-weight aluminum baking sheet. There is no need to oven wall or rack overcrowded. • Pan warped. Baking Problems Cookies and biscuits burn on all sides of the...

Complete Owner's Guide (English)
Page 19
... supplied with aluminum foil. Be sure electrical cord is necessary when broiling frequently. Contact your dealer, installing agent or authorized servicer. Short in oven. Follow the instructions under "Using the Self-Clean Feature". Oven Smokes Excessively During Broiling Meat too close...and water or a nylon scrubber. Wipe up . Place a level on oven surfaces. Call your local electric company. Follow instructions under Oven Light to prevent curling, but get hot enough to the oven has been interrupted, Operate the display will flash. Soil Not Completely Removed...
... supplied with aluminum foil. Be sure electrical cord is necessary when broiling frequently. Contact your dealer, installing agent or authorized servicer. Short in oven. Follow the instructions under "Using the Self-Clean Feature". Oven Smokes Excessively During Broiling Meat too close...and water or a nylon scrubber. Wipe up . Place a level on oven surfaces. Call your local electric company. Follow instructions under Oven Light to prevent curling, but get hot enough to the oven has been interrupted, Operate the display will flash. Soil Not Completely Removed...

Parts Catalog
Page 1
... reserved. FEB27S5DBA FEB27S5DSA 38254731F4061 38254731F4011 Series 27" single 27" single Color black white Market North America North America Wiring Diagram 318046227 318046227 Owner's Guide 318200924 318200924 Installation Instructions 318201514 318201514 Service Data Sheet 318047413 318047413 Timer Guide 318200189 318200189 SINGLE ELECTRIC FEB27S5D.eps CFEB30S5DSA.eps BFEB27S5DSA.eps DFEB30S5DSA.eps 318046227.eps WALL OVEN ELECTROLUX HOME PRODUCTS, INC. P.O. Box 212378...
... reserved. FEB27S5DBA FEB27S5DSA 38254731F4061 38254731F4011 Series 27" single 27" single Color black white Market North America North America Wiring Diagram 318046227 318046227 Owner's Guide 318200924 318200924 Installation Instructions 318201514 318201514 Service Data Sheet 318047413 318047413 Timer Guide 318200189 318200189 SINGLE ELECTRIC FEB27S5D.eps CFEB30S5DSA.eps BFEB27S5DSA.eps DFEB30S5DSA.eps 318046227.eps WALL OVEN ELECTROLUX HOME PRODUCTS, INC. P.O. Box 212378...
Parts Catalog
Page 3
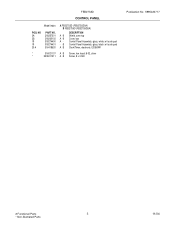
B Control Panel Assembly, glass, black, w/ touch pad A B Clock/Timer, electronic, ES350W1 * 316021107 A B Screw, hex head, 8-32, silver * 5303211311 A B Screw, 8 x 0.500 Publication No: 5995420717 # Functional Parts 3 * Non-Illustrated Parts 11/04 NO 2A 2B 19 19 20 # PART NO. 318257301 318260102 318274400 318274401 316418520 A FEB27S5D (FEB27S5DSA) B FEB27S5D (FEB27S5DBA) DESCRIPTION A B Shield, oven top A B Cover, box A - Control Panel Assembly, glass, white, w/ touch pad - FEB27S5D CONTROL PANEL Model Index: POS.
B Control Panel Assembly, glass, black, w/ touch pad A B Clock/Timer, electronic, ES350W1 * 316021107 A B Screw, hex head, 8-32, silver * 5303211311 A B Screw, 8 x 0.500 Publication No: 5995420717 # Functional Parts 3 * Non-Illustrated Parts 11/04 NO 2A 2B 19 19 20 # PART NO. 318257301 318260102 318274400 318274401 316418520 A FEB27S5D (FEB27S5DSA) B FEB27S5D (FEB27S5DBA) DESCRIPTION A B Shield, oven top A B Cover, box A - Control Panel Assembly, glass, white, w/ touch pad - FEB27S5D CONTROL PANEL Model Index: POS.

